Allegheny48 posted:
Jayhawk500 posted:

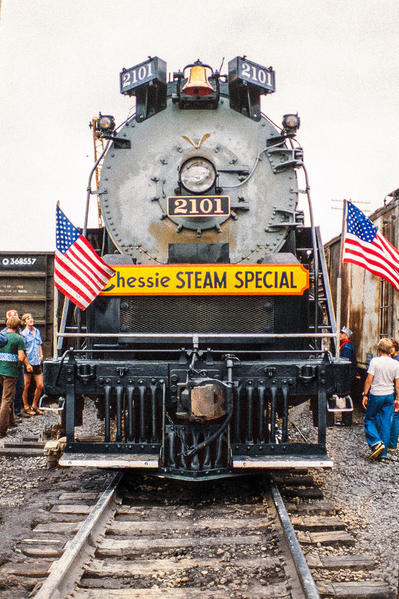
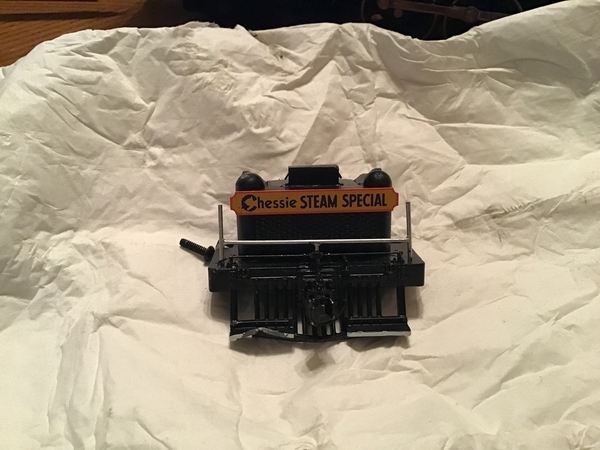
It will be a week tomorrow since I put up a post. I must say I very pleased with the results up to this point in detailing an early 1990's vintage Lionel (LTI) locomotive. I'm not finished by any stretch, I still have to put my engineer and fireman in. I have to reorder the lenses for the class lights. I have green instead of clear and I still need to put the lens on the headlight. I also added the headlight wiring conduit. The other un-noticeable thing I did was paint both boiler handrails black. These were originally stainless steel. I still need to add the numbering to the headlight.

The boiler front was definitely trying my patients. I had broke off the left class light  and it was difficult at best to get it back on, lined up and square. All the while keeping the alignment for the LED hole in the bottom.

I do believe the gold eagle does bring a little of the Freedom Train in, even though I don't have any of that paint scheme on the engine at this time. (We'll see for the future.) I'm slowly finding pictures that the boiler and cab were painted blue. But with 40+ year old photography it's hard to tell between blue and black given the angles and lighting. This too will come in the future.

I still have touching up to do, paint wise. I don't have a hobby shop close by and none of the stores sells the Testors model paint. But as I said in an earlier post I headed to Portland to ride the SP Daylighter #4449 this Sunday, I'll get some then.

DSCN0013

          I think I did good.

26619282061_afb906db45_b

I looked to see if the front coupler on the engine would line up... If it were the correct size....It would.

DSCN0008

I tried taking some pictures under LED bulbs on my kitchen bar, Unfortunately these lights ruined the pictures. I did get two pictures and a video. I forgot to add smoke fluid to the smoke unit and by the time I got done filming the video it was starting to burn and smell up the house. But with my luck the video didn't turn out. I'll try in the morning and use YouTube.

DSCN0010


The next project is to get my layout set up for Christmas and run this beast. I'm sooooooo excited. I have 4 Lionel Steam Special passenger cars to put behind it.


Stay Tuned. More will come!


My Gosh!!! The engine is stunning.  You've done a magnificent job recreating Ross Rowland's 2101.  I also enjoyed the brief videos.  Painting the handrails certainly made the engine appear more realistic.  I have heard that, with early Rail Sounds, the engine's handrails often worked as an antenna.  One quick question regarding the aux. tender.  This may have been discussed earlier but I don't remember.  Was removing its coal load and replacing it with a simulated steel plate ever considered? 

Kudos to you sir.  I wish I had your patience and modeling skills.  Please keep the pictures and videos coming when time permits. 

Thank You for the kind words.

The handrails were not antennas. This was a conventional setup engine. Yes, I did post way earlier about the metal cover for the Aux Tender. That is one of the items that I still need to do. I was going to use ABS, but since I've been working with it for the rear cab bulkhead, I think I'll just grab a piece of scrap aluminum from work and form my own. It'll be pretty straight forward.

Last edited by Jayhawk500
C&O Allie posted:

Chris,

Looks great!!  Are you going to paint the front of the steps on the pilot assembly white as was done on the prototype?


gunrunnerjohn posted:

Lookin' great, that's a far cry from what it started out as!

Gentlemen, Thank you both!

Allan, yes I will be painting the front steps. This is one of the reasons I need to go into the city today. No one here sells model paint anymore.

Allegheny48 posted:

My Gosh!!! The engine is stunning.  You've done a magnificent job recreating Ross Rowland's 2101.  I also enjoyed the brief videos.  Painting the handrails certainly made the engine appear more realistic.  I have heard that, with early Rail Sounds, the engine's handrails often worked as an antenna.  One quick question regarding the aux. tender.  This may have been discussed earlier but I don't remember.  Was removing its coal load and replacing it with a simulated steel plate ever considered? 

Kudos to you sir.  I wish I had your patience and modeling skills.  Please keep the pictures and videos coming when time permits. 

Allegheny,  early RailSounds does not require an antenna.  TMCC and Legacy do require an antenna and some locomotives do use the hand rails. I like to use the handrails if the receiver (R2LC, etc) is in the loco. J

The wife and I drove to Portland on the 3rd and as promised here are the pictures of the SP Daylight X4449. From what I understand, this is one of the last GS4's still running. It is maintain by the dedicated volunteer folks at the Oregon Railroad Heritage Foundation. But...I've been known to be wrong at times. Sorry for the poor quality of the pictures. These were taken right at dusk, just after the 4 PM run.

DSCN0014

DSCN0015DSCN0016DSCN0017DSCN0018DSCN0019DSCN0024DSCN0025DSCN0026DSCN0027DSCN0028DSCN0030


Attachments

Images (12)
  • DSCN0014
  • DSCN0015
  • DSCN0016
  • DSCN0017
  • DSCN0018
  • DSCN0019
  • DSCN0024
  • DSCN0025
  • DSCN0026
  • DSCN0027
  • DSCN0028
  • DSCN0030
Last edited by Jayhawk500
Jayhawk500 posted:

The wife and I drove to Portland on the 3rd and as promised here are the pictures of the SP Daylight X4449. From what I understand, this is one of the last GS4's still running. But...I've been known to be wrong at times. Sorry for the poor quality of the pictures. These were taken right at dusk, just after the 4 PM run.

DSCN0014

DSCN0015DSCN0016DSCN0017DSCN0018DSCN0019DSCN0020DSCN0021DSCN0024DSCN0025DSCN0026DSCN0027DSCN0028DSCN0030


I believe you are correct.  4449 was restored by Doyle McCormick for the Freedom Train back in 1975.  This Christmas train beats CN's hands down!  IF memory serves me correctly Portland was home to the now closed Organ Grinder Restaurant where one could eat surrounded by a 47 rank Wurlitzer pipe organ.   Jonas Nordwall played there for a number of years.  Dennis Hedberg owned the establishment. 

Hello Jawhawk500.  Happy New Year to you and yours.  This morning I ran across an Ebay auction for the 2101's auxiliary tender (former NYC Mohawk) in HO scale.  It clearly shows the top piece fabricated to cover the former coal bunker.  I thought this might be of interest to you.  Looking forward to seeing more progress pictures of your 2010. 

HO Key Imports NYC Mohawk Brass Freedom Train Custom Auxilliary Tender for AFT1 | eBay

Allegheny48 posted:

Hello Jawhawk500.  Happy New Year to you and yours.  This morning I ran across an Ebay auction for the 2101's auxiliary tender (former NYC Mohawk) in HO scale.  It clearly shows the top piece fabricated to cover the former coal bunker.  I thought this might be of interest to you.  Looking forward to seeing more progress pictures of your 2010. 

HO Key Imports NYC Mohawk Brass Freedom Train Custom Auxilliary Tender for AFT1 | eBay

Happy New Year to you too. Thanks for the heads up. I've ran into a road block with the Chessie. I had to send the R4LC back to ERR. My fan quit working and the rear tender light was on constantly. I had to lengthen the draw bar so the tether and plug would clear the engine going around a curve. Pictures will follow when I do the next update.

Thanks for the link.

Last edited by Jayhawk500

It's been a month+ since I last posted an update on my CSS. As with everybody, Christmas and life sometimes gets in the way.

I had a problem with my ERR mods for my CSS engine/tender. At some point during my modifications, I had lost some wires due to cold solder joints. I sent my R4LC to ERR because I suspected it as failing 'cause the smoke unit wouldn't produce any smoke. ( Ken is awesome with customer service.) The fan worked fine, just no smoke. I double checked all my connections and everything now works as it should. The other thing I had to do, was completely erase the programing in the CAB-1 and reprogram it. I had at some point lost the link between the engine and Aux tender. But that is all now been rectified.

The other thing I had to do was, lengthen the draw bar on the engine by 1/2". As it was the plug for the tether was hitting the corner of the engine as it would go around the curve. I'll get a picture of that up shortly.

I did find time yesterday to paint the engines tender. The sides of the tender went from engine black to B & O Blue. Now it matches the aux tender as it should. I found more pictures (albeit) very few of the engine tender. If I can make it work, the rear of the tender will see some improvements.

DSCN0014DSCN0015DSCN0016

Attachments

Images (3)
  • DSCN0014
  • DSCN0015
  • DSCN0016
Last edited by Jayhawk500
ES44AC posted:

Will the locomotive be getting B&O blue? 

I'm still up in the air on that one. Most of me says yes...But the other side is telling me no. Mainly because I can't get the proper 2101 and T-1 for the side of the cab. I would love to modify the top of the boiler, to add the proper steam whistle. The only other thing that would have the "cool" effect is to have a smoking steam whistle. I also need someone to tell me what's printed/painted on the side of the sand dome. I cant read it.

Last edited by Jayhawk500

As promised, Here's the draw bar I had to make. I still need to paint it, but it works great. The tether plug just misses the hand rail on the cab.

DSCN0019

Made this little video this afternoon. As of right now, other than painting the draw bar it's complete up to this point.

I have trouble embedding the thumbnail for videos. If someone could help me that would be awesome.

Attachments

Images (1)
  • DSCN0019
Last edited by Jayhawk500
C&O Allie posted:

Chris,

Nice video.  The letters on the sand dome are "SLCA".  On my MTH version, it is "S.L.C.A".  On the Lionel, it is just "SLCA".  I don't know which is correct.

Thanks Alan. The wife got a little upset....It smokes up the house pretty good. I have to see if I can turn down the intensity some.

Now that I know what it is, I can see it...S.L.C.A.   MTH is correct.


Last edited by Jayhawk500
Jayhawk500 posted:

The wife and I drove to Portland on the 3rd and as promised here are the pictures of the SP Daylight X4449. From what I understand, this is one of the last GS4's still running. .

There is only one GS4 left and by default is the only one running. There is a GS6 on static display at the Museum of Transportation in St. Louis.     J

Observation Car Modification w/ CSS Drum Head


I've been searching for a CSS drum head for some time and I finally found one, through Tomar Industries in Pasco Wa. Here's the link: https://tomarindustries.com/drumheads.htm    The drum head is listed in the "Miscellaneous" section.

My observation car is the Baby Madison style and the rear railing is just the right size for the drumhead. This is a rather simple mod and I forgot to snap a couple of pictures near the end of the process. Tomar provides very straight forward instructions on how to assemble the drum head. The rest of this I just had to figure out on my own.

DSCN0003

Step one was to epoxy the white LED to the inside of the drumhead. There is no need to paint the inside since this is cast metal product and reflects the light well. The LED comes attached to coated copper leads about 8 inches long. Red is positive and blue is negative. Once the epoxy set up I made sure the wires weren't crossed and sealed the hole with another drop of epoxy.

DSCN0010

Next up was the white diffuser lens. Here, a very thin application of epoxy around the perimeter of the drumhead. I aligned the edge of the lens to the bottom, so I wouldn't have to trim the lens and deal with cutting the LED wires. I placed the drumhead face down, then applied a bit of pressure to get a good seal. The CSS lens is to the left in the picture. The process was the same, you just have to make sure the lens is orientated and centered correctly. I had it on backwards, but noticed it right away and changed it. Sorry I don't have a finished pic.

DSCN0015

So as you can see, this is no where near what the original one was. I just clipped off the melted spot on the back of the railing and removed the old Chessie System sign.

DSCN0013

DSCN0012

This is the original Drum Head.

chessie-steam-special-s1-drumhead-randall-c-aldrich-1200x

This is also one of those no picture moments. Once I had the outer lens glued on and trimmed down, I painted the drumhead with Scalecoat II Matte black paint. When I epoxied the drum head to the railing I had to scrape off some paint to get the glue to stick as per the instructions. I placed enough glue on the drum head so it would ooze up and around the railing.The instructions say to use paper to form the trim that goes around the sign, but I opted not to do that and I will at a later time I'll paint an aluminum trim ring around the sign. I then filed a small notch in the floor of the car for the wires, I didn't want to pinch them in the fear for breaking them. I drilled a #50 or .070" hole just behind the screw hole that secures the interior to the car body. I then ran the wires inside and put a drop of epoxy to hold them in place.

DSCN0017

The kit comes with a full wave rectifier and a 2200 ohm 1/8 watt resistor. The red and black wires go to the track power (AC), the resistor goes to the + side of the rectifier. The red LED wire to the resistor and the Blue wire to the negative side of the rectifier.

DSCN0014

You can see where the wires come into the body. I left them full length, cause I didn't want to strip the coating off the wires. Once everything was soldered, I heat-shrinked everything. Epoxied the rectifier to the floor and routed the wires as to not interfere with the interior.

DSCN0018

I reinstalled the interior and re-assembled the observation car.  Below is the finished product. This LED is 3 volt and you can ops check the LED while going through your process by using 2 "AA" batteries. If I would have known the LED was soooo bright, I would have put in a higher resistance resistor to dim it down some. As you can see, the drum head is so bright, you can barely see the Chessie Steam Special. It really does add a sense of realism to the car. 

DSCN0019

Thanks for looking.

Until next Time...


Attachments

Images (10)
  • DSCN0003
  • DSCN0010
  • DSCN0015
  • DSCN0013
  • DSCN0012
  • chessie-steam-special-s1-drumhead-randall-c-aldrich-1200x
  • DSCN0017
  • DSCN0014
  • DSCN0018
  • DSCN0019
Last edited by Jayhawk500
Strummer posted:
Jayhawk500 posted:
Strummer posted:

I only just now discovered this thread and I think this project ranks right up there with the best. Wonderfully done!

Mark in Oregon 

Why Thank You Mark! Where about's are you in Oregon? I'm where Goonies was filmed.

About 2 hours away from where "Animal House" was filmed... 

Mark in Oregon 

I'm sorry. I actually don't know where that movie was filmed. I would venture to guess in Eugene near the college???

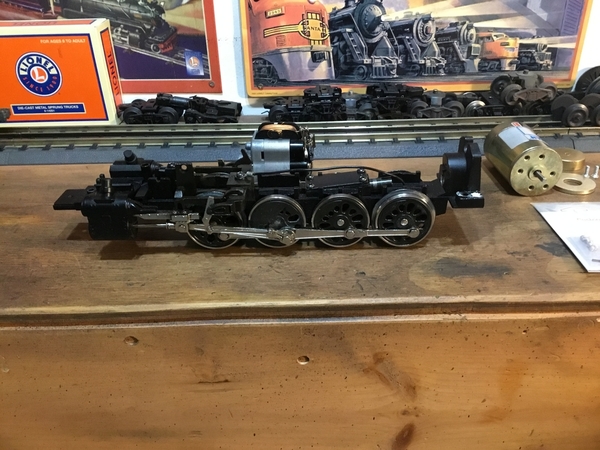
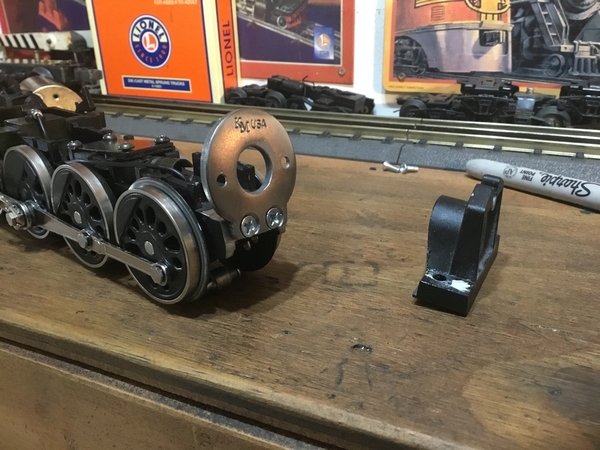
Chris has tasked me to do the Pittman swap on his CSS, the locomotive arrived just the other day....first thing to do is compare this model to the many Lionel 6-18009, & 18064s I’ve done. Although the CSS and the Mohawk share the same chassis, the similarities stop there. Studying the model and having a good plan is key before any cutting. Not going to make a hacked up mess...the boiler shell although close to the Mohawk, will require a slightly different approach to fitting the Pittman up inside it’s tight boundaries. The rear trailing truck pivot points are also slightly different than the Mohawks, so motor mount placement, and angle will critical to ensure an OE outward appearance. Laid out in the pictures are the parts needed to do the swap....the flywheel will have to be turned down to fit, and will be forward mount...After I measure for mounting angle and distance from the back of the chassis to clear the boiler shell.....let the cutting begin!..........Pat0D94DC79-3C17-4139-97E6-FE49B6BE5F77C93334F1-F7C2-475E-8E9D-690AC6F43F9D

Attachments

Images (2)
  • 0D94DC79-3C17-4139-97E6-FE49B6BE5F77
  • C93334F1-F7C2-475E-8E9D-690AC6F43F9D

Not everything in the shop is peaches and cream, Chris’s locomotive came in with this slight shipping damage, I say slight but any damage if enough to make you puke up your shoes......so more collision work to ad to the growing list of wreck repairs...we couldn’t leave my man Chris go up under the bus, so careful heating, careful movement, slowly, repeat, this is the end result, no cracks or breaks...2F31138A-3254-4A62-A0C1-62974964D04B9D5913A7-0AE4-44C0-9F13-760FAEF6AB925A204CCA-15EB-4A60-9EC0-05C0E38C8096

Attachments

Images (3)
  • 2F31138A-3254-4A62-A0C1-62974964D04B
  • 9D5913A7-0AE4-44C0-9F13-760FAEF6AB92
  • 5A204CCA-15EB-4A60-9EC0-05C0E38C8096
harmonyards posted:

Not everything in the shop is peaches and cream, Chris’s locomotive came in with this slight shipping damage, I say slight but any damage if enough to make you puke up your shoes......so more collision work to ad to the growing list of wreck repairs...we couldn’t leave my man Chris go up under the bus, so careful heating, careful movement, slowly, repeat, this is the end result, no cracks or breaks...2F31138A-3254-4A62-A0C1-62974964D04B9D5913A7-0AE4-44C0-9F13-760FAEF6AB925A204CCA-15EB-4A60-9EC0-05C0E38C8096

OH FANTASTIC! Thanks Pat!

Update for today on the CSS .....after figuring where things are going to land, and measuring for what little space I have to work with, here is the final configuration for the motor mount. Wound up in pretty good shape with a 10 degree pitch on the motor, so shaft alignment won’t be an issue, biggest win is I’ll clear all my pivot points for the rear trailing truck OE mounts. The trick on the CSS is to add some material to the washer to slightly raise its center point on the chassis. (Fortunately, I have a nice mig welder) I’ve made a nice clearance valley to get a flywheel forward mount. Next step is to fabricate the rear body mount and set up, and physically set the body back on the chassis and establish OE ride height.........Pat81FA768D-C980-4057-AA9E-A06E0768854D49C00A9D-DC1A-428B-9A1B-06ECD69ABDDFCEA7D5C8-98EC-402D-A5F0-29227F1B1B72EEC3CC5F-1CDF-4E4C-877E-E702240F5ADB

Attachments

Images (4)
  • 81FA768D-C980-4057-AA9E-A06E0768854D
  • 49C00A9D-DC1A-428B-9A1B-06ECD69ABDDF
  • CEA7D5C8-98EC-402D-A5F0-29227F1B1B72
  • EEC3CC5F-1CDF-4E4C-877E-E702240F5ADB

Pat I'm amazed by your conversions.  And I agree 100% this is a MUCH more appropriate motor than what Timko is using.  That little Mabuchi RS-385 is a downgrade IMO.

You seem concerned about matching the angle of the existing worm shaft coming out of the gearbox.  I guess I don't understand the extent of your concern... there's a dogbone shaft that couples the motor to the worm shaft through ball-and-socket type universal joints.  This arrangement will tolerate quite a bit of misalignment without excess noise or loss of torque, if the "pins" on both balls rotate in the same plane.  Some folks try to set them at right angles to each other, but that's not correct and could lead to noise or wobble. 

Other folks here on the Forum connect the motor and worm shafts with #0 Toyota flexible vacuum hose, which would also tolerate some degree of misalignment.

Maybe a bit off-topic but I have the first issue MTH Reading T-1 (20-3130-1, circa 2004.)  As far as I know, this locomotive was all-new tooling and didn't share its chassis or hardware with another model.  Yet, imagine my surprise when I opened it up for the first time, and the motor mounting angle is grossly different from the angle of the shaft coming out of the gearbox!  MTH's factory design has a serious misalignment!!  Like Lionel's, it has a cardan shaft connecting the motor to the worm shaft, so the operation isn't affected much, if any.  But it sure doesn't look pretty!!  I've never seen a later issue T-1 (i.e., 20-3249-1) with the shell off, but I would be surprised if this issue was ever corrected.

So I guess I have two questions: (1) Why do you try so hard to align the motor with the worm shaft when any reasonable alignment would work just fine; and (2) do you or anyone else here know whether the motor-worm shaft alignment was corrected in later releases of MTH's Reading T-1??  Thanks so much for sharing your hard work!

Last edited by Ted S
Ted S posted:

Pat I'm amazed by your conversions.  And I agree 100% this is a MUCH more appropriate motor than what Timko is using.  That little Mabuchi RS-385 is a downgrade IMO.

You seem concerned about matching the angle of the existing worm shaft coming out of the gearbox.  I guess I don't understand the extent of your concern... there's a dogbone shaft that couples the motor to the worm shaft through ball-and-socket type universal joints.  This arrangement will tolerate quite a bit of misalignment without excess noise or loss of torque, if the "pins" on both balls rotate in the same plane.  Some folks try to set them at right angles to each other, but that's not correct and could lead to noise or wobble. 

Other folks here on the Forum connect the motor and worm shafts with #0 Toyota flexible vacuum hose, which would also tolerate some degree of misalignment.

Maybe a bit off-topic but I have the first issue MTH Reading T-1 (20-3130-1, circa 2004.)  As far as I know, this locomotive was all-new tooling and didn't share its chassis or hardware with another model.  Yet, imagine my surprise when I opened it up for the first time, and the motor mounting angle is grossly different from the angle of the shaft coming out of the gearbox!  MTH's factory design has a serious misalignment!!  Like Lionel's, it has a cardan shaft connecting the motor to the worm shaft, so the operation isn't affected much, if any.  But it sure doesn't look pretty!!  I've never seen a later issue T-1 (i.e., 20-3249-1) with the shell off, but I would be surprised if this issue was ever corrected.

So I guess I have two questions: (1) Why do you try so hard to align the motor with the worm shaft when any reasonable alignment would work just fine; and (2) do you or anyone else here know whether the motor-worm shaft alignment was corrected in later releases of MTH's Reading T-1??  Thanks so much for sharing your hard work!

If I can get near perfect alignment, I’m sure gonna try for it. Call it OCD, or whatever, but “that’s close enough” doesn’t register in my rule books....I’m not trying real hard, the rulers and angle finders do the work for me. The angle is slightly off anyways, I’m aware that these can take some angle and be “ok”. Truth is too, I really enjoy the challenge, so making it perfect is just fine by me!....as far as the MTH model goes, I have no idea, I’ve never been inside one those models, new or old.....many, many moons ago, when I started in the automotive field, I had a shop supervisor, who was also my mentor, said “do it right or don’t touch it” those words stuck to me like glue all these years.............Pat

harmonyards posted:
John23 posted:

That Pittman looks larger than the DC motor that Timko uses.  Will you have to remove the backhead?

No, they fit in there pretty good, it’s tight, no room for a rear mount flywheel, but it will clear the back head..........Pat

I had Timko convert one for our club to can motor & TMCC, & was pretty underwhelmed with its performance.  Your conversion looks impressive.  I have my own T-1, still original.  Do you do these on a regular basis for others?

John23 posted:
harmonyards posted:
John23 posted:

That Pittman looks larger than the DC motor that Timko uses.  Will you have to remove the backhead?

No, they fit in there pretty good, it’s tight, no room for a rear mount flywheel, but it will clear the back head..........Pat

I had Timko convert one for our club to can motor & TMCC, & was pretty underwhelmed with its performance.  Your conversion looks impressive.  I have my own T-1, still original.  Do you do these on a regular basis for others?

Yes I can, but be forewarned, it is a very invasive job.....as you can see, I literally lop off the back of Chris’s loco...and the shell will have some hogging too....I do keep outward appearance stock. As long as y’all are aware of that, email is in my profile, and we can go from there as far as pricing and what not............Pat

Add Reply

Post

OGR Publishing, Inc., 1310 Eastside Centre Ct, Suite 6, Mountain Home, AR 72653
800-980-OGRR (6477)
www.ogaugerr.com

×
×
×
×
Link copied to your clipboard.
×
×