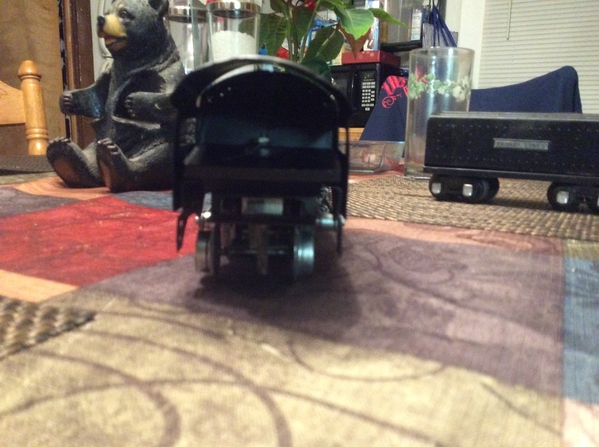
I picked up a 259E with a tender and a couple of other things. I wanted a real test of some methods of repair as well a test of what was realistic vs. my best efforts.

The locomotive was badly bent, the frame was very very out of square, the tin was very rusted and bent. My best guess is it got stepped on. There was damage from a BB gun, several bb sized dents as well as a few holes. The motor was completely seized, the unit was corroded.

i do have a few before pictures, unfortunately all of my during photos were deleted.

F0D84769-F035-4776-912D-B5AA2B10C12AE6448447-4E31-49B3-9CC5-88FB34E56331537F906D-8BFB-4F1E-AA22-08A6038ED35A

I completely disassembled the locomotive, I ran the Tin parts through the dishwasher while my wife was out shopping. I then soaked the in evaporust  for a couple of days.

while they were soaking I took the motor down to just the frame and tested all of the windings. They read fine. Prior to removing the wheels I had used pb blaster over several days to prevent breaking or damaging them.

i did have to remove one side of the motor frame. After I had cleaned the motor and rebuilt the e unit I reassembled and tested. It ran great.

I refinishing the motor housing with several applications of cold blue

I made jigs and forms out of MDF to straighten the bends.  I did not have any true point of reference so much of my work was by eyeball or from what I could see of complete units on the internet.

i test fitted parts several times and to make sure I had the best fit possible. I filled dents and holes with solder and had to solder some of the tin pieces together when the tabs were missing.

Because this entire project was about testing different ways and methods I decided to use a powder coat finish. I did this because the powder coat helps hide flaws and is extremely durable.

I replated all of the nickel parts, hand rails, drive rods etc. I used my home made plating kit and it worked very well.

below are some pictures of the project at its current state. All parts are orginal. I do plane on getting a new smoke stack and playing around with the finish some more.

please give me your honest opinions and any tips or criticism. 7F8CE6D1-39A7-46E0-A5B3-102A0E892768B9521001-8AE5-4650-8534-32454B7DE246D24E9F9C-DEEE-43B2-9D5F-49FE7DDF33C5700D9B0A-A050-45E8-A9F2-5A33B6005D39


Attachments

Images (8)
  • F0D84769-F035-4776-912D-B5AA2B10C12A
  • E6448447-4E31-49B3-9CC5-88FB34E56331
  • 537F906D-8BFB-4F1E-AA22-08A6038ED35A
  • 7F8CE6D1-39A7-46E0-A5B3-102A0E892768
  • C33B5BF7-F3B7-4C8A-B505-24B227B3DCB6
  • B9521001-8AE5-4650-8534-32454B7DE246
  • D24E9F9C-DEEE-43B2-9D5F-49FE7DDF33C5
  • 700D9B0A-A050-45E8-A9F2-5A33B6005D39
Original Post

Replies sorted oldest to newest

beachhead2 posted:

Impressive.  I'd love to see sharper pics of your finished product.  Try taking some pictures of it outside during daylight (but not direct sunlight).  Was this your first train restoration?  I'd love some more details on homemade plating.  

If the sun ever shines here again I will. 

I can plate nickel, copper, brass, zinc . I won’t do chrome because it involves more caustic stuff than I want to use at home.

i have tried gold and silver but had little success.

I use distilled white vinegar, salt and a small dc transformer along with whatever metal I want to plate with. 

The plating metal is the anode and the metal to be plated is the cathode. 

For nickle I use battery welding strips, Copper I use just plain wire, brass I use whatever scrap brass I can find and zinc I use old anode from boat motors. 

This is my first Complete restoration for a train. I have done other repairs and restoration that are similar.

link to better explanation of diy plating

https://www.instructables.com/...safe-Nickel-Plating/

Steamer posted:

you brought a rusted junker back to life, plus it sounds like you had some fun doing it. It doesn't get any better than this. Great job!!

I love doing it. I know it sounds kinda stupid but when I get an old train or other vintage item ( I also collect old tools and restore them, Erector sets as well) I can’t help but think about how excited some kid was to have gotten it so many years ago. I can promise that I was just as happy getting that old 259 as rusted and messed up as it was as the kid who originally got it. 

I have a Marx 989 that is worn out. It had been fixed over and over by the orginal owner. The front truck is help on by bits of old wire and Bobby pins. The wheels are so worn that they have grooves in them. The pick up shoe is almost cut in half from wear.

The shell is in great shape. It’s easy to tell that it was someone’s pride and joy. 

The fact that I am 50 years old and play with old toys is a bonus. I love seeing kids now play with this old stuff. I don’t freak out if they run one off the rails or see how fast it can go before newton proves himself right yet again. I have done the same thing and don’t mind admitting I still do from time to time. The trains themselves have survived worse and nothing in the world is worth as much as seeing a new kid play with a train or erector set the first time.

gene maag posted:

Nice Job, I know how much work go's into restoring the old 259E's I have done 3 myself. and am working on one more.


IMG_3778-001IMG_3784IMG_3788-001IMG_3124IMG_3126IMG_3130

I know those trains. They are the ones I looked at to get an idea of baseline. You were very much a part of my inspiration. Did you make the 259E above the headlight? I did mine,  a bit of plastic from on of those impossible to open packages and a  Brothers label printer.

Does anyone know what font Lionel used on the tinder? Like the one on his red train above.

Popi posted:

WF

great job, looks very nice.

you need a smoke stack. I have 259 in my parts box, if you want a stack let me know 

it's your free and will complement an already great restoration


Popi

Hi Popi... I'm looking for the 3 smoke stacks on the 259E in copper. I also need the bar or plate the rear trucks screw on to. I would like to do business with if you have them.

Thanks Gene

genemaag@yahoo.com

gene maag posted:
Popi posted:

WF

great job, looks very nice.

you need a smoke stack. I have 259 in my parts box, if you want a stack let me know 

it's your free and will complement an already great restoration


Popi

Hi Popi... I'm looking for the 3 smoke stacks on the 259E in copper. I also need the bar or plate the rear trucks screw on to. I would like to do business with if you have them.

Thanks Gene

genemaag@yahoo.com

Hi Gene,

The 259E has two steam domes and one stack.

The rear truck mounts to the motor assembly at the rear on a post and is help in place by a metal clip.image

Attachments

Images (1)
  • image
WF wilson posted:
gene maag posted:

Nice Job, I know how much work go's into restoring the old 259E's I have done 3 myself. and am working on one more.


IMG_3778-001IMG_3784IMG_3788-001IMG_3124IMG_3126IMG_3130

I know those trains. They are the ones I looked at to get an idea of baseline. You were very much a part of my inspiration. Did you make the 259E above the headlight? I did mine,  a bit of plastic from on of those impossible to open packages and a  Brothers label printer.

Does anyone know what font Lionel used on the tinder? Like the one on his red train above.

Hi WF, all the 259Es above the headlight are original,  The Lionel Lines logo are plates and can be purchased, But I'm sure you can match the font up with the fonts on your computer.

gene maag posted:
Popi posted:

WF

great job, looks very nice.

you need a smoke stack. I have 259 in my parts box, if you want a stack let me know 

it's your free and will complement an already great restoration


Popi

Hi Popi... I'm looking for the 3 smoke stacks on the 259E in copper. I also need the bar or plate the rear trucks screw on to. I would like to do business with if you have them.

Thanks Gene

genemaag@yahoo.com

Gene

don't have any of the parts you need out of my parts box, sorry.

try Jeff Kane at www.ttender.com

WF wilson posted:

I picked up a 259E with a tender and a couple of other things. I wanted a real test of some methods of repair as well a test of what was realistic vs. my best efforts.

The locomotive was badly bent, the frame was very very out of square, the tin was very rusted and bent. My best guess is it got stepped on. There was damage from a BB gun, several bb sized dents as well as a few holes. The motor was completely seized, the unit was corroded.

i do have a few before pictures, unfortunately all of my during photos were deleted.


I completely disassembled the locomotive, I ran the Tin parts through the dishwasher while my wife was out shopping. I then soaked the in evaporust  for a couple of days.

while they were soaking I took the motor down to just the frame and tested all of the windings. They read fine. Prior to removing the wheels I had used pb blaster over several days to prevent breaking or damaging them.

i did have to remove one side of the motor frame. After I had cleaned the motor and rebuilt the e unit I reassembled and tested. It ran great.

I refinishing the motor housing with several applications of cold blue

I made jigs and forms out of MDF to straighten the bends.  I did not have any true point of reference so much of my work was by eyeball or from what I could see of complete units on the internet.

i test fitted parts several times and to make sure I had the best fit possible. I filled dents and holes with solder and had to solder some of the tin pieces together when the tabs were missing.

Because this entire project was about testing different ways and methods I decided to use a powder coat finish. I did this because the powder coat helps hide flaws and is extremely durarepla

please give me your honest opinions and any tips or criticism. 7F8CE6D1-39A7-46E0-A5B3-102A0E892768B9521001-8AE5-4650-8534-32454B7DE246D24E9F9C-DEEE-43B2-9D5F-49FE7DDF33C5


Nice work! Please post more photos when you are done.

Last edited by Sean007

Add Reply

Post

OGR Publishing, Inc., 1310 Eastside Centre Ct, Suite 6, Mountain Home, AR 72653
800-980-OGRR (6477)
www.ogaugerr.com

×
×
×
×
Link copied to your clipboard.
×
×