Did your set's observation car have a passenger car frame or did it have a baggage car frame with "baggage car door steps" that lead to nowhere?


1.) If your observation car had the incorrect baggage car frame with those out of place "baggage car door steps" that lead to nowhere, have you left it alone or contacted Lionel's customer service department?


2.) If you contacted Lionel's service department did they send you the correct frame to replace it yourself or tell you to send it either to them or an authorized Lionel repair place to have those baggage car steps cut off, or suggest you cut them off yourself?


3.) Did you cut off those baggage car steps yourself?


I'd like to know whether your response from Lionel Customer Service was the same response I received, "telling me to have the steps cut off (claiming it wasn't really a factory error or shortage of the correct passenger frames), OR did they instead send you a replacement passenger frame for your observation car? 


Thanks for sharing your experience with this situation.

Last edited by ogaugeguy
Original Post

Replies sorted oldest to newest

Originally Posted by Roundhouse Bill:

This has been discussed here over and over again.  I suggest you look through the Polar Express topics posted here over the last month or more to see all that has been written about the Flyer PE set.

I've done exactly that, Roundhouse Bill, and that's the reason for this post
The responses of prior topics weren't definitive but seem to be "all over the place" regarding the frequency of occurrence for this anomaly as well as the suggested fixes from Lionel Customer Service for it.
 
I'm attempting to determine how widespread and prevalent this incorrect observation car frame situation is and whether Lionel's Customer Service department has developed a solution/"fix" for their reps to uniformly offer customers who call to inquire or complain about the observation car's incorrect frame. Or are the "fixes"/solutions offered by the reps "decided upon" by and the discretion of the individual customer service reps as they field customer's inquiries or complaints .
 
Simply put, has Lionel considered this situation worthy of an "official company response and explanation" as they saw fit to create for the FlyerChief wall wart power controversy?
 
Added edited comment: 
(BTW, thank you BanjoFlyer for your comments to Roundhouse Bill that you posted as I was typing this response.)  
 
Last edited by ogaugeguy
Originally Posted by cocker:
"...Lionel O gauge PE have the steps...."

Uncertain which steps you're referring to, cocker. I have all of the O gauge sets semi-scale sets (conventional PE set, two LionChief PE sets, a 10th Anniversary LionChief PE set, the 10th Anniversary PE Diesel Streamliner set), and a scale PE observation car and none of them have the baggage car door steps I'm inquiring about.


As for the big deal -- would cutting it off void the Lionel warranty?


BTW, that's a sweet picture, Jerry.

Last edited by ogaugeguy

I mentioned warranty on a passenger car, RoyBoy and cocker, as I once had a lighted passenger car with a combo riveted truck, coupler, electric pickup roller unit whose coupler stopped working and it cost more than I thought it would for a new truck unit and labor costs for removing and replacing the broken unit with the new one. 

Originally Posted by ogaugeguy:
It's because of a past experience, RoyBoy and cocker, that I mentioned warranty on a passenger car.
I had a lighted passenger car with a combo riveted truck, coupler, electric pickup roller unit whose coupler stopped working. Due to its design the entire truck had to be replaced costing me more than I thought it would for that new truck unit plus labor for removing and replacing the broken unit with a new one. 


Last edited by ogaugeguy
Originally Posted by amflyer336:
Ok, Gregg, that's apparently Lionel's fix for this anomaly as I was also just told by Lionel Customer Service if the steps bothered me I could nip them off. When I mentioned the warranty, it was suggested I take the observation car to an authorized Lionel service station as they'd received info on removing the steps.
BTW, Rusty, not having the car if front of me to see the size of those rivets holding the steps, would those holes that are left when the rivets are removed be large enough to let noticeable light shine thru from beneath on the tracks when running the cars in darkness at night?

I called "L" customer service the other day and they told me to cut the steps off.

And, replacement traction tires will be available in a couple weeks if you didn't get any with your set. 

Jerry caught what it's all about though.

Gregg


Originally Posted by ogaugeguy:
Originally Posted by amflyer336:
Ok, Gregg, that's apparently Lionel's fix for this anomaly as I was also just told by Lionel Customer Service if the steps bothered me I could nip them off. When I mentioned the warranty, it was suggested I take the observation car to an authorized Lionel service station as they'd received info on removing the steps.
BTW, Rusty, not having the car if front of me to see the size of those rivets holding the steps, would those holes that are left when the rivets are removed be large enough to let noticeable light shine thru from beneath on the tracks when running the cars in darkness at night?

I called "L" customer service the other day and they told me to cut the steps off.

And, replacement traction tires will be available in a couple weeks if you didn't get any with your set. 

Jerry caught what it's all about though.

Gregg


The rivets are SMALL!  So I don't know if much light would come through.  Drill them out?  That would have been my fix had I not been able to swap a baggage car frame I had that DIDN'T have side door steps.  But if you have holes, you can always cover them with black electrician's tape.  Or let the light shine through and call it Vanity Lighting like airlines that illuminate the tail logos on their aircraft! 


And guys, thanks for the comments on Sam.  He doesn't seem to mind the small stuff we sometimes complain about.  It runs, smokes and makes noise!  Sometimes I forget what it's all about.  Sam reminds me every time we go into the train room.

Last edited by poniaj
Originally Posted by amflyer336:
 
BTW, Rusty, not having the car if front of me to see the size of those rivets holding the steps, would those holes that are left when the rivets are removed be large enough to let noticeable light shine thru from beneath on the tracks when running the cars in darkness at night?


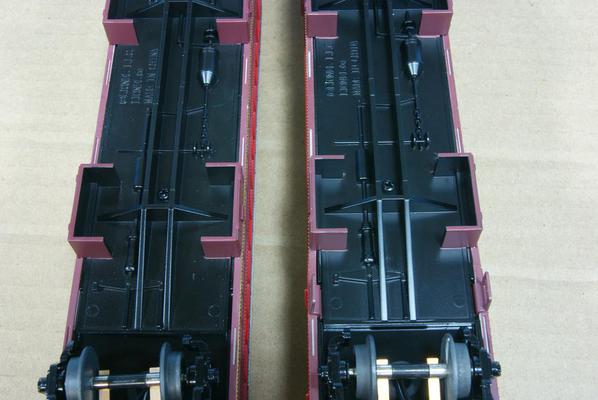
The rivet holes will be covered by the underframe casting.  All of the other cars already have the holes in them (these are Alton cars... same thing) :


rFrame 091215 002

rFrame 091215 001

Rusty

Attachments

Images (2)
  • rFrame 091215 002
  • rFrame 091215 001
Last edited by Rusty Traque
Originally Posted by Rayin"S":
How do I get to the rivets on the steps? What do I need to remove to expose those riveted steps? Also what size drill bit, Rayin"S", did you use in the pin vise to drill then out? 

Those rivets holding the steps on are very soft, maybe aluminum, I drilled them out of the steps with a pin vise. Doing this when you reach the step with the bit the step will pull off easily, the stub of the rivet stays in the chassis and no light comes through.


Ray


ogaugeguy,

If you look at Rusty's pictures above my post you can see on the bottom of the car the cast part of the car that is retained by two screws. the second picture shows the bottom of the car with the screws and the cast piece removed, with that piece off the rivets attaching the steps are visible. The drill size I used was 3/32" and as I stated I used a pinvise, and carefully removed just enough of the rivet so with slight pressure the step will come loose. I set these aside to possibly use on another project.

Ray


Originally Posted by Rayin"S":
Thanks, Ray, will do.

ogaugeguy,

If you look at Rusty's pictures above my post you can see on the bottom of the car the cast part of the car that is retained by two screws. the second picture shows the bottom of the car with the screws and the cast piece removed, with that piece off the rivets attaching the steps are visible. The drill size I used was 3/32" and as I stated I used a pinvise, and carefully removed just enough of the rivet so with slight pressure the step will come loose. I set these aside to possibly use on another project.

Ray


Removed two screws on that bottom plastic cast piece but it won't come off easily as I thought it would. Seems to still be bound somewhere somehow. Is there a trick to removing it? Have I missed something? I'm leery of yanking it hard, fearing I'll break something. Any suggestions, hints, or tips on what to do now to fully remove it and reveal those riveted steps? 

Originally Posted by ogaugeguy:

Removed two screws on that bottom plastic cast piece but it won't come off easily as I thought it would. Seems to still be bound somewhere somehow. Is there a trick to removing it? Have I missed something? I'm leery of yanking it hard, fearing I'll break something. Any suggestions, hints, or tips on what to do now to fully remove it and reveal those riveted steps? 

The cast piece is also held on one end by a tab in a slot in the stamped metal frame.  The slot is on the end with the lettering on the frame.  The other end of the cast piece can be lifted up and then the cast piece can be removed from the slot.

I must apologize, I should have mentioned the tab with the lip on it, this needs to be lifted on one end and than pulled out. I found that if I did not have the screws out they would also hang up in their holes. I also was very cautious with this not wanting to destroy anything.
Ray 
 
Originally Posted by ogaugeguy:

Removed two screws on that bottom plastic cast piece but it won't come off easily as I thought it would. Seems to still be bound somewhere somehow. Is there a trick to removing it? Have I missed something? I'm leery of yanking it hard, fearing I'll break something. Any suggestions, hints, or tips on what to do now to fully remove it and reveal those riveted steps? 


Thanks Jerry, Ray, and Rusty on that tutorial on removing baggage car steps. Drilling out rivet ends and lifting out steps couldn't be any easier, and neater than snipping steps off. Those rivets are so soft, drilling them was like going thru warm butter with a hot knife. Next project is replacing lights in cars with LED light strips and gunrunnerjohn's constant current lighting regulators.

Suggestions welcome on how to remove car body shell from frame so LED light strip can be affixed to car ceiling. If, as the user manual says, you remove the four screws on the frame as though you were going to replace the car's bulb, the body will lift off the frame exposing the car's ceiling. No tabs or anything to keep the body from lifting off the  frame -- correct?

Last edited by ogaugeguy
Originally Posted by ogaugeguy:

If, as the user manual says, you remove the four screws on the frame as though you were going to replace the car's bulb, the body will lift off the frame exposing the car's ceiling. No tabs or anything to keep the body from lifting off the  frame -- correct?

You're welcome!  That's what the forum is for.


And the user's manual is wrong.  There isn't only four screws holding the body to the frame, there's six.  Four are near the corners and two are near the center of the body.  They're hidden by the cast detail piece that hides the bulb socket.  Once the die cast piece is removed, you can see the remaining screws.  To simply change the bulb, you don't need to remove the whole frame, just the die cast piece.  The bulb socket is just like the classic Gilbert ones. 


Replacing the bulb with an LED strip sounds like a great idea.  If I ever try to detail the interiors of these (or similar cars), I'll try it.  But with the lack of interior detail, it doesn't seem all the necessary, especially for a fantasy train.  Now my Pennsy set... ;>


Originally Posted by ogaugeguy:
After the removal of the cast piece you will see the additional two screws holding the shell to the chassis
When you get the six screws removed from the chassis the body will lift right off. I clipped the wire from the trucks to the light close to the light socket and soldered additional lengths of wire to these and added a small plug to the end so the shell can be totally removed once the light strip is installed. I recommend that you attach your wiring to the strip before you install it. I also recommend wiping the inside roof of the car with denatured alcohol before you attach the light strip, I found there to be a small amount of overspray which might interfere with the glue on the back of the LED strip.
Ray

Thanks Jerry, Ray, and Rusty on that tutorial on removing baggage car steps. Drilling out rivet ends and lifting out steps couldn't be any easier, and neater than snipping steps off. Those rivets are so soft, drilling them was like going thru warm butter with a hot knife. Next project is replacing lights in cars with LED light strips and gunrunnerjohn's constant current lighting regulators.

Suggestions welcome on how to remove car body shell from frame so LED light strip can be affixed to car ceiling. If, as the user manual says, you remove the four screws on the frame as though you were going to replace the car's bulb, the body will lift off the frame exposing the car's ceiling. No tabs or anything to keep the body from lifting off the  frame -- correct?


Last edited by Rayin"S"

While running this set in a darkened room, I've noticed a considerable rooftop glow of the observation car from its interior lighting. The baggage car roof also has a considerable glow nearly as bright as that of the observation car. The glow from the roofs of the other cars is much less noticeable.

Before adding  LED light strips I'll either paint the underside roofs of all the cars flat black, or add black paper or electrical tape to the  ceilings to make them less translucent and more opaque.

Last edited by ogaugeguy
An easy fix for the illuminated roof on these cars is to install the LED strip lighting to the roof interior.
Ray
 
Originally Posted by ogaugeguy:

While running this set in a darkened room, I've noticed a considerable rooftop glow of the observation car from its interior lighting. The baggage car roof also has a considerable glow nearly as bright as that of the observation car. The glow from the roofs of the other cars is much less noticeable.

Before adding  LED light strips I'll either paint the underside roofs of all the cars flat black, or add black paper or electrical tape to the  ceilings to make them less translucent and more opaque.


Originally Posted by Rayin"S":
An easy fix for the illuminated roof on these cars is to install the LED strip lighting to the roof interior.
Ray
 
Originally Posted by ogaugeguy:

While running this set in a darkened room, I've noticed a considerable rooftop glow of the observation car from its interior lighting. The baggage car roof also has a considerable glow nearly as bright as that of the observation car. The glow from the roofs of the other cars is much less noticeable.

Before adding  LED light strips I'll either paint the underside roofs of all the cars flat black, or add black paper or electrical tape to the  ceilings to make them less translucent and more opaque.


Okay, Ray, and the rest of you Polar Express fans - what color LEDs would you use prototypically colorwise with those frosted white windows -- warm white, yellow, or amber?
Please chime in with your opinions, folks!
Last edited by ogaugeguy

Add Reply

Post

OGR Publishing, Inc., 1310 Eastside Centre Ct, Suite 6, Mountain Home, AR 72653
800-980-OGRR (6477)
www.ogaugerr.com

×
×
×
×
Link copied to your clipboard.
×
×