
I am going to play with this alot more before it's done. 

I agree that inside bearings would be better.   I will need to get the studs offset by 1/2 pretty quickly since I am looking at a 3 wide inside base.

I am going to further sacrifice the old plastic truck axle sets to see what I can get.   The thicker portion around the metal axle is molded 1/2 and 1/2 to the back of the wheels.  If I can get the wheels off, I can cut that axle covering section off.

I would still rather use metal wheels.   I am a 3 rail guy so a short from one wheel to the other doesn't bother me, and the rolling resistance of metal on metal is much lower than plastic on metal.

O well,  several iterations to go, we will see what happens.
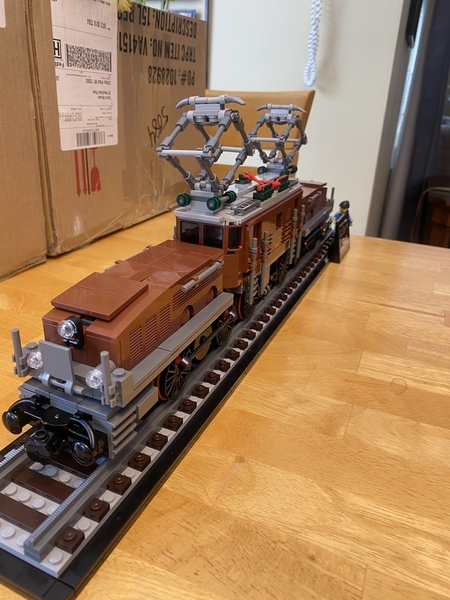
@Sarah posted:

Why don't you modify the lego car bolster and use the unaltered 3-rail truck? I mean it work's for the knuckle couplers - just trying to understand your motivation :-)

Well,  I have already done a little bit of that.

20210108_20563020210108_205615

The objective is simply to build a fully interchangeable (o gauge) car as much out of Lego as possible.

16101575593048799892932840700451

This hopper will be my next adventure.

Brick Model Railroader has made a huge leap by offering coupler assemblies with Kadee couplers.

16101577068341283332706882632689

They did this to improve on the magnetic couplers used on standard lego trains.

But to me it's an invitation to step things up and make a full brick built car,  including the trucks.  This just combines several things I enjoy.

Now that I have a source for the axles/ wheels worked out, I am studying how to modify the 4 wide truck plans into 3 wide, and ordering parts.  I have plenty of lego bricks,  but the cleanest way to do this involves some relatively newer bricks that I don't have. 

Once I get past the truck assemblies I will probably start a new thread for the rest of the build in the 3 rail sub forum.   When complete though,  this car should be able to run on 2 rail or 3 rail tracks.

Attachments

Images (4)
  • 20210108_205630
  • 20210108_205615
  • 16101575593048799892932840700451
  • 16101577068341283332706882632689

Okay I have been playing with parts on hand until my brick link and Kadee orders show up.

The 3 wide truck is okay but not great.  There is about an 1/8" or more gap when the wheels are all the way to on side.  Fortunately I can leave more of that pipe portion on the donor wheels. 

That will work for now but only until I run out of donors.

20210110_16341320210110_16342720210110_163526

The 2x1 offset tiles were just for mockup until my bricklink orders come arrive.  The whole thing is currently too high.  The new parts will allow me to come down 1 plate.  ( For those who don't speak lego, 3 plates =the height of one brick. )

I was able to mock up the lowered arrangement with a 3×4, 4 stud tile that comes with minifigure packages.

20210110_163616

Another height check now shows the top of the couplers lined up.

20210110_16415320210110_164251

This might be good enough.

I can show the height of the coupler box mounted directly to the minifigure tile, and it looks better.

20210110_172736

The Kadee arm can be bent up if needed.  The problem I see is that center of the assembly is now below the top of the wheels.   

I think this is about as far as I can go without the 800 series kadee couplers and the rest of the lego parts. 

I think I will stick with the inside the wheels 3 wide truck assy for now,  but I am not ruling out using outside bearings and more readily available toy train axles for future assemblies.

Attachments

Images (7)
  • 20210110_163413
  • 20210110_163427
  • 20210110_163526
  • 20210110_163616
  • 20210110_164153
  • 20210110_164251
  • 20210110_172736

Still waiting for the rest of my bricklink parts to come in.  In the meantime I found enough parts to make a decent one sided mock up.

20210115_212850

I still need to add some type of detail parts at an angle to emulate something closer to an arch bar design,  but the basic premise works.  The design above uses inverted studs to hold the cross bar with the journal boxes.

The design below forgoes the snot technique (studs not on top) but allows for round tiles at the same height as the top of the rest of the assembly.  The gray technic pieces would not be sticking out, and of course the crossbar will be black.

16107653262675983750320101617446

I like both options,  and will probably try for something more like the lower picture for the final product.


Also I was able to install the Kadee 806 couplers in the lego coupler boxes.  They roll freely and couple well enough to lobster claws.

Attachments

Images (2)
  • 20210115_212850
  • 16107653262675983750320101617446
Last edited by jhz563

Add Reply

Post

OGR Publishing, Inc., 1310 Eastside Centre Ct, Suite 6, Mountain Home, AR 72653
800-980-OGRR (6477)
www.ogaugerr.com

×
×
×
×
Link copied to your clipboard.
×
×