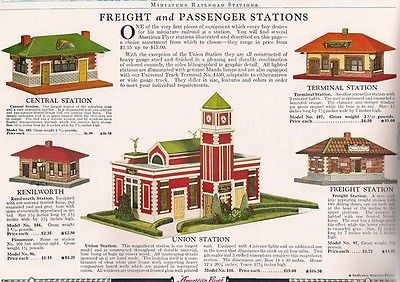
This came home with me today!  It has 93 years of dust and dirt, is missing some shrubbery, has a couple of damaged areas, a warped base that is mounted on a non Flyer frame, and is missing the eagles (I am hopeful that the seller will find them).  Although it looks like one of the side windows is missing, it is still attached by one side of the window and is inside of the building.

However, it is an original!

I am starting this thread to document the repairs, cleaning, and light restoration that this station will undergo.

I will have to take some additional photos, once I take it down to the train room, where there is better lighting. 

NWL

Original Post

Replies sorted oldest to newest

Since one of the major issues with this station is the warped base, which has caused the tower to pull away from the main portion of the building, I realized that I had to remove the building from the base.

I did attempt some light cleaning to the driveway and it seemed to clean ok.

Next up, I am going to work at removing the framework that was added to the base.  It is not original and needs to be removed in order to flatten the base.

NWL

The added framework came off quite easily and now the warpage of the base is clearly exposed.  The base is not sitting on anything, other than the counter, yet the edges of the base do not touch the counter due to the base sagging downward in the middle.

Next up, I am going to remove the nails that previously held the hedges in place and remove all of the original shrubbery, so that I can flatten the base, without damaging any of the shrubbery.

NWL

Removing the shrubbery was interesting, as it was held in place both by nails and by glue.  I used a putty knife to gently go underneath the shrubs and to then pry upward.  Some of the nails stayed with the shrubs and some stayed with the base.

Sadly, the few remaining spots of original hedges will likely not be able to be re-installed.  However, I would only guess that about 15% of the original hedges remained with the piece, so it may not have matched well with replacement hedges.  At least I have some original to match when creating new hedges.

Here is a picture of the base.

I also removed the clock tower from the building, as it was no longer attached to the top of the building and the nails that formerly held it in place at the top of the building were bent.  So I thought that in order to properly reattach it to the top of the building it was best to remove it and straighten the nails.

It will also help to have it removed, when cleaning the building.  Here are some photos of the clocktower and inside of the building.

Now that the building has been removed from the base and the clocktower removed from the building, I can start the cleaning and repair process.

One thing I noted that was different between the original and reproduction (at least the ones I have), is that the clocktower was powered independently from the building on the original.  My reproduction has the clocktower wired in series with the interior lighting.  The original had separate power wires going to the clocktower, from the wires that powered the interior of the building.

The building will need to be re-wired as all of the rubber insulation on the wiring had hardened and much of it was broken away.  I may end up wiring it similar to the reproduction I have, as I see no reason to have separate power to the clocktower, but I will have to think about that, prior to rewiring it.

NWL

Last edited by Nation Wide Lines

Flattening the Curve!

I am taking a big leap of faith here, but I viewed a YouTube video about flattening warped plywood.  The video instructed one to wet the concave side of the board, place that side down on a flat surface, in heat and weight it down.  The video used a concrete driveway in 80 F heat for their example.  Unfortunately it is c. 3 F here right now and the driveway is snow covered.  So I am trying the next best thing, the concrete floor of the train room, with a space heater directed at the board.

First step was to wet the concave side, which would be the top of the base.  I wetted it thoroughly, while doing a preliminary cleaning of the surface.  Used paint brush, soap and hot water, and the spray/rinse option of my kitchen faucet.

Here is the base after the preliminary cleaning.

As you can see, the base is much cleaner.

Then down to the train room.  My first attempt, did not have enough weight.

Second attempt was much better.  Note the use of Trainshelf, seems it is more than just for displaying trains.

Well, I gotta go check on the progress, as that black box on the left is the space heater.  Don't want to start any fires.

NWL

Last edited by Nation Wide Lines

While waiting for the base to dry, I decided to work on cleaning the building.  I had tried soap and water with a qtip the day I brought it home, but it did not seem to clean the white painted areas very well.  A friend indicated I should try either Fantastic or 409 on a qtip.  I had some 409, so I decided to try that.  Here are some results.

It is not going to look like one of the reproductions when cleaned, but it seems to be cleaning up nicer than just the soap and water.

I always like the right and left contrast, so here is one.

Here are a couple of the front of the building, left corner.  I only cleaned the white at the bottom of the building.  Note the white touch-up paint near the door.  At first I thought this had been added by a former owner, but after looking over the entire building, I note that there are several areas of touch up paint, mainly along the edges of the sides and to cover the nails that hold the sides of the building to the frame, that appear to be factory painted areas.  Therefore, I suspect this touch-up paint is from the factory.

This is the before.

Half cleaned

Completed

Overall, it seems to be cleaning up nicely.  However, it is going to take a lot of time to clean it.

Good thing I bought a container of 500 Qtips this morning.  I suspect I will use most of them on this project.

NWL

Last edited by Nation Wide Lines

Looks like a great project and cleaning up well! The round cotton facial cleansing pads work well in some applications. Hope the base flattens out ok, an old timer taught me long ago that when straightening always be prepared to go a bit past the original bend and it'll settle back just like new. May take a couple tries with different weights and wood blocking shims. Can't wait to see how it turns out!

What a great project! I agree with John, and have had more luck bending something past flatness to allow for spring back. That would mean putting a shim in the middle under the convex side- maybe 1/4 the size of the base and 1/4-1/2" thick and then weighting the corners so it is now slightly curved the opposite way it was while it dries. This can also be done clamping the 4 corners to a thick piece of ply the same size with the shim in the middle to bow it.  I also wet both sides. Hot water is best- steam would be ideal to penetrate the wood. Like he said, it may take a few tries. Be prepared for it to look great when you take the weights off, and then gradually warp back.

Hopefully it will come out fine. Worst case scenario, you affix some  screws and little brackets or similar to hold it down without drilling through it on the train table. Then over time it will stay flat.

Update,

The base flattening method that was tried has not worked.  Within the span of a couple of hours after removing the weight, the base slowly went back to its original shape.  Will have to try the suggestion of others to put spacers under the base and over bend it and hope it returns to a flat shape, upon removing the weights.

One other interesting thing I noted was that the hole that was cut in the base to allow access to the interior was not spaced uniformly.  There is 8 inches on one side to the edge and 10 inches on the other side to the edge.  I believe this causes the building to be offset to one side, with a larger lawn area to the left and smaller lawn area to the right.  However, I won't be able to confirm this until everything is ready to go back together.  I thought possibly that one side of the base had been cut off, but when comparing the length of the original base to my reproduction 110, the lengths were approximately the same (I did not measure them, but held the original base in front of the reproduction.

Since these stations would have had hand-cut and hand-painted bases, I can see where every station likely has some variances.

NWL

Last edited by Nation Wide Lines

Update,

The base flattening method that was tried has not worked.  Within the span of a couple of hours after removing the weight, the base slowly went back to its original shape.  Will have to try the suggestion of others to put spacers under the base and over bend it and hope it returns to a flat shape, upon removing the weights.

One other interesting thing I noted was that the hole that was cut in the base to allow access to the interior was not spaced uniformly.  There is 8 inches on one side to the edge and 10 inches on the other side to the edge.  I believe this causes the building to be offset to one side, with a larger lawn area to the left and smaller lawn area to the right.  However, I won't be able to confirm this until everything is ready to go back together.  I thought possibly that one side of the base had been cut off, but when comparing the length of the original base to my reproduction 110, the lengths were approximately the same (I did not measure them, but held the original base in front of the reproduction.

Since these stations would have had hand-cut and hand-painted bases, I can see where every station likely has some variances.

NWL

Yes, in my experience you have to over bend it. Trial and error.

Update!!  Last week I tried a suggested method of wetting the base and then using a steam iron on the base.  I then weighted down the base, similar to how I weighted it on previous attempts to flatten the base.

After it was wetted down, ironed, and weighted, I suspected that I had not gotten the base wet enough and this attempt would not work.  Well I was wrong!  I removed the weight this evening and was surprised that when the weight was removed that the base did not reform its warped shape.

Here it is with the weight off

Much better looking than when I got it, when it was bowed downward in the middle

Now I can work on getting new shrubbery and finish cleaning the building (if work allows time for it).

NWL

Keep weight on it and keep it flat when you are not working on it. In the summer with the humidity, it may want to bend again. This is the arrrgh frustration of wood, a formerly living material that has a sponge like cell structure that loves to absorb water. This is probably masonite, so less so than solid wood, but it's thinness also makes it prone to warp. With a thin panel like that, anything you do to one side puts it out of equilibrium. I have a 1/8" masonite base I am having issues with right now too.

@Will posted:

Keep weight on it and keep it flat when you are not working on it. In the summer with the humidity, it may want to bend again. This is the arrrgh frustration of wood, a formerly living material that has a sponge like cell structure that loves to absorb water. This is probably masonite, so less so than solid wood, but it's thinness also makes it prone to warp. With a thin panel like that, anything you do to one side puts it out of equilibrium. I have a 1/8" masonite base I am having issues with right now too.

Will,

Yes it is masonite or something similar.  It is either a 1/4 or 3/8 inch thick piece (have not actually measured it).  What was suggested to me was to wet it down and iron it with a steam iron (set to steam) or wall paper remover.  The only thing I did differently this time, versus the last time, was to wet the bottom instead of the top.  I simply sponged it down and then ironed it to heat the wetness and get rid of the wetness.  I repeated the process and then weighted it.  My weighting method was to use extruded aluminum train shelving with the back of it to the panel and the front edges immediately under the 5 gallon pails of paint.  I thought using the train shelf was the best way to evenly distribute the weight across the board. 

As I said, I did not think I had wetted it enough and doubted my first attempt would work.  Prior to weighting it, I had noted that the bend/warpage was still in the board.  Therefore, when I removed the weight I was very surprised that it did not start to reform the warpage.  I checked it this morning and it was still flat, so it appears that I have gotten the warpage out of the board.

I run 2 dehumidifiers in my basement to keep the humidity down, so I am hoping that there will be no further issues with the board, but will have to monitor.

NWL

Work has let up a bit, so I am not having to work every weekend (for now), so I thought after the successful flattening of the base, I should do more cleaning.  I started with the front of the building (less clocktower).

I had previously cleaned the left lower corner of the front and the left door.  Here is what the station looked like about an hour ago.

Here it is with the entire left side cleaned

Here it is with the upper portion of the right side cleaned (and a miscellaneous spot above the door, where a drop of 409 landed)

The miscellaneous drop of 409 turned out to be a learning experience.  I learned that the 409 works better if I wet the area down and let it sit for 30 to 60 seconds and then wipe off.  It really loosens the dirt up and it is easier to clean.

So here it is with the entire front of the building cleaned.

I have to go out and buy another pack of Q-tips before I clean more, as I have nearly gone through a pack of 500 Q-tips on this and some other projects.

I also purchased 2 reproduction eagles a couple of weeks ago, as the seller was unable to find the original eagles.

I am a bit of a perfectionist and the reproduction eagles needed some work, so they are presently in the middle of having some body work.  I am filing off any casting marks and filling in some low spots.  One odd thing, which really doesn't bother me, is that whoever reproduced these eagles cut off the loop that the string for the flag would go through.  No problems for me as the loop has no use for the station.

NWL

Some more cleaning yesterday afternoon.  I cleaned both ends of the station.  Before photo below, with some previous cleaning to left side.

After photo

This morning I removed the Eagle holders from the roof and dropped them in a mix of 50% vinegar and 50% water and let them soak for about 5 hours and then used brass polish to clean them.  Note the before picture from yesterday

Here is the after picture

Now I have to find some new brass nails to re-attach these posts.  No reason to clean the old nails, which may or may not have been brass. 

NWL

This afternoon I tackled another issue with the building.  The peaks of the central roof dormer walls had delaminated and looked terrible.  Here is what the typical peak looked like

Note the wall board has separated into multiple layers.  Here is another view of the same end

I decided that these ends needed some attention.  So I took a toothpick and carefully applied glue to each layer of the separated area and pressed them together.  Here is a view of the end that has been fixed.

And view from the end

Looks much better.

NWL

@navy.seal posted:

With your cleaning almost done, do you plan any further "restorations"?

Bob Nelson

The project is going to require a bit more work than just cleaning of the building.

It needs to be re-wired and I decided to replace the light fixtures with modern, but identical fixtures, as I was concerned with the use of 93-year old light fixtures that were heavily oxidized.  I am going to keep the original fixtures in a bag with the station.

I also need to finish cleaning the base and replace the hedges.

NWL

What material will you be using to replace the hedges?

Bob Nelson

The building is fully cleaned, with the exception of the windows.  Yesterday, I set the building on the base to see how it looks.  Here are the views.

Obviously, I still need to do some work to the base, but it looks much better than when I started the project.

The clocktower no longer leans out from the building and the front of the building now sits on the base.

Still waiting for the hedge material to arrive.  Will have to do some touchups on the base due to missing grass/paint.

Need to finish cleaning the windows and find some appropriate tape to re-attach some lose window areas to the building.

I also replace the interior wiring.  I thought about replacing the light fixtures, but realized they were well insulated and ended up cleaning the one in the clock tower (due to heavy dirt and oxidation) and just put new bulbs in the interior fixtures.

NWL

Today I worked on cleaning some spots off of the base.  I used soap and water and a toothbrush to scrub some spots.  Here is a photo from when the base was cleaned, but before it was flattened.

Note the spots at the front left side to the right of the driveway and the spots to the right rear corner of the building.  Those are the areas that I was primarily concerned with, especially, the dark spots near the right rear corner of the building. 

The toothbrush method worked so well, that I went over the driveway and some other areas as well.  Here is the base now.

Note the spot at the right rear of the building is virtually gone and the spots at the front left are significantly lightened. 

Here are some close-ups of the specific areas

NWL

Add Reply

Post

OGR Publishing, Inc., 1310 Eastside Centre Ct, Suite 6, Mountain Home, AR 72653
800-980-OGRR (6477)
www.ogaugerr.com

×
×
×
×
Link copied to your clipboard.
×
×