
Guys,

The New Haven has been one of my favorite road and I may have posted on this thread before, but it's been quite a while.  But being in S gauge limits the offerings available in RTR.  Yeah, there's EP-5s, RS3s and 11's, U-boats, Geep 9's, Alco PA's and FA's, even TrainMasters.  Also available is freight and passenger rolling stock, but sometimes you want something out of the ordinary.  I've always liked the Osgood.Bradley cars, and AC Gilbert made them, but were shortened.  So after picking a few shells at York a few years ago, I started "stretching" them to full length.  Here's one of the six I've been working on:

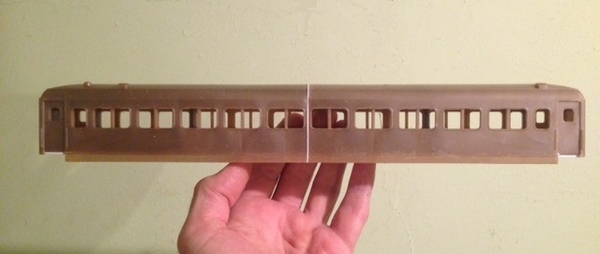
The white line is a piece of styrene inserted to take the place of the saw kerf.  Here's how the primered cars compare with a stock Gilbert car:

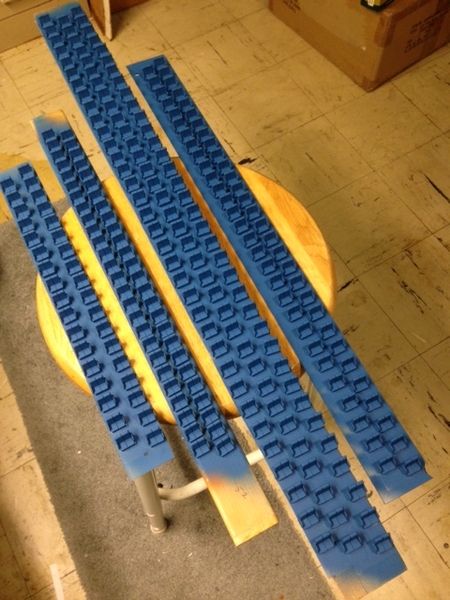
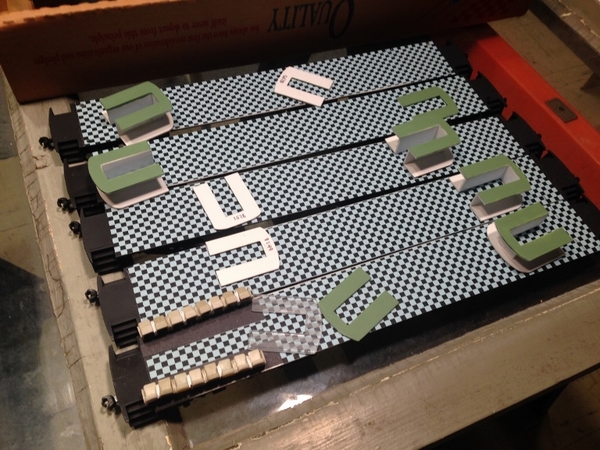
Research told me that the floors were a black and blue square tile arrangement.  So a bit if computer fiddling and printing gave me the floors.  The bulkheads are inserts in the shell, and seats are available (which will be painted a dark blue).  The lower car is the "smoking" car with a different seat arrangement.  The frames are made of sheet styrene using trucks from American Models:

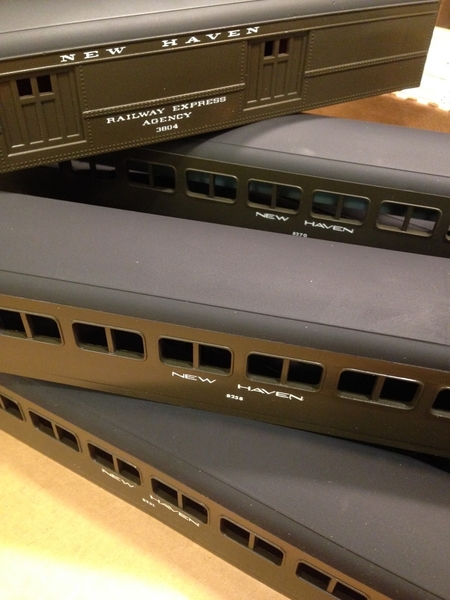
The shells are painted Tru-Color Pullman Green with black roofs.  Dry transfer lettering will be applied when the paint cures, then overcoated with a flat finish:

Motive power?   A couple of years ago a friend gave me an AA set of DL-109 shells from American HiRail (now defunct) to paint.   Being ALco units, power trucks are available as well as frames from American Models, so here's what they look like now:

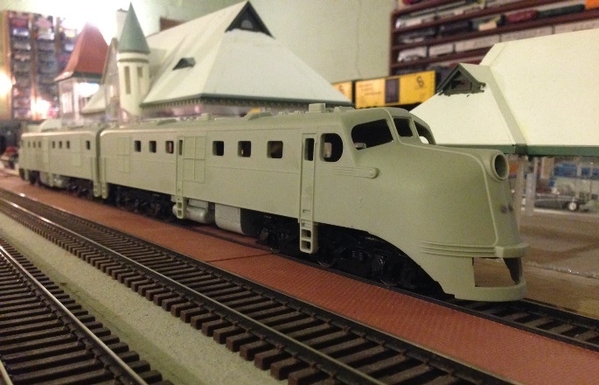
They'll eventually be painted in the "as delivered" Pullman Green/Dulux Gold" scheme.  I have decals, but they're quite different as to application, and I'm wary of using them.  I may do the shells in paint rather than use the decals.  Not sure yet.

I'm not a fast worker on train things since I have a 1920's house, two grandkids, a hot rod in the garage, a part time job and TONS of yard work.  Plus we're thinking of moving within a year.  So progress in incremental, if at all.   The cars will probably be done before the locomotives, and I'll post a photo when that happens.

Will this be a "contest quality" model?  No.  But it will present itself well on any layout.  I just don't have that kind of time to spend any more.   Sometimes you just have to say that close enough is good enough, right?

Great thread, and some great info and ideas, but I'm NOT changing to O gauge....

Jerry Poniatowski                                                                                                                    Wayne, Michigan

Attachments

Images (5)
  • blobid0
  • blobid1
  • blobid2
  • blobid3
  • blobid4

As a PS to my previous post, here's a set on my layout that I ginned up from a new Lionel Flyer EP-5 and repainted junker passenger cars with a head end boxcar.  It represents a set that Gilbert made in the 50's that I couldn't afford then, and still can't.     So I made my own...

Attachments

Images (1)
  • blobid0
Last edited by poniaj
PAUL ROMANO posted:

Outstanding work Jerry! The Osgood Bradley cars are superb.

Thanks, Paul.  I'll post photos of the finished cars if and when they're done....

A fellow S gauger and master model railroader published a great how-to on making these cars a few years ago.  A fun project, but tedious.  I estimate at least 10 hours in each car when finished. 

Jerry -- really nice work.  I hadn't realized how much the Gilbert S-gauge cars had been shortened.  I think my very first AF train was two of these coaches, the companion baggage car and a Pennsy K-5 pacific (nevermind mixing the railroads...).  Turns out there is an even longer prototype version (with 11 of the double windows instead of the ten you are doing).  You no doubt have seen the pictures from here:  http://www.railwayclassics.com/amflyer.htm

The other interesting thing about these cars is that they were referred to as "American Flyer" coaches, referencing Gilbert's models.  Given that the prototypes were first built ca 1937, the "American Flyer" name must have referred to the 3/16 scale, O-gauge versions of these cars (done in sheet metal) that Gilbert made pre-war (ca 1940).

- Rich

Seacoast posted:

A well done layout MELGAR. Does the layout extended across the room from the other side of the truss bridges ? I noticed some trains in the video opposite the bridges.

Thank you. Very observant. I built a completely separate 10'-by-5' layout on the other side of the room. There is no connection between the two layouts. The other layout is modular and was specifically designed to be moved if necessary. You can see a video and photos of the other layout at the link below.

MELGAR

https://ogrforum.ogaugerr.com/...e-caboose-by-atlas-o

MELGAR posted:
Seacoast posted:

A well done layout MELGAR. Does the layout extended across the room from the other side of the truss bridges ? I noticed some trains in the video opposite the bridges.

Thank you. Very observant. I built a completely separate 10'-by-5' layout on the other side of the room. There is no connection between the two layouts. The other layout is modular and was specifically designed to be moved if necessary. You can see a video and photos of the other layout at the link below.

MELGAR

https://ogrforum.ogaugerr.com/...e-caboose-by-atlas-o

A reminder, Mel's excellent craftsmanship and his 10X5 layout was featured in OGR Run 304.

Ron

Well, three weeks later, I finally found time to letter my Osgood/Bradley cars using pressure sensitive lettering from Clover House in S scale.  I told you guys I work s-l-o-w-l-y due to many other things happening this time of year.  Anyway, here's what they look like after a four hour lettering session:

The bottom three (of six) are the "stretched" Gilbert cars and the top one is a Gilbert offering that is very close to the B60B cars that New Haven had.  The roof isn't quite right, but it's a fast project and "close enough" car for me (cheap too since I got the body shell for $5).  I'd like to spray the flat finish on all seven cars this week, but we're hosting a lot of family for Thanksgiving.   When they're back on wheels, I'll post another photo or two.  Then, it's on to the interior details and lighting!  Even if I don't get the DL-109s done, my EP-5 can take up the front end.  And McGinnis rules!  I'd do my DL-109s in McGinnis, but NH only had one in that livery.

And, Rich, thanks for the link to the Railway Classic site.  I've used their photos for a lot of other projects. 

This is a great thread, and I'm having a fun time perusing everyone's NH trains!  At times, I'm glad I'm not in O or HO since I'd go broke buying all that appeals to me!  Not that S is all that bereft of items, though. 

Hope all out there will have a safe and meaningful holiday!

Attachments

Images (1)
  • blobid0

I found time to do more on my Osgood Bradley cars.  Most of you know that they were referred to as "American Flyer" cars due Gilbert making S models of them, even though the Gilbert cars were shortened.  Anyway, I over coated them with Tamaya flat.  I painted 237 seats for the six cars with a custom paint I had left over from a previous project. 

Each seat needs to be mounted on a .125" square piece of styrene to make it the correct height.  It takes TIME!  I was only able to do one car with all the Holiday things going on, but here's one car's floor with seats:

One of the six cars I've ginned up is a "smoking" car with a slightly different seating arrangement.  Photos when I get to it.

Attachments

Images (2)
  • blobid0
  • blobid1
Last edited by poniaj

Jerry -- your inside and outside job on the American Flyer NH coaches is really super - you have a great eye and apparently a very steady hand...  I'm always in awe of folks that can do lettering with press-on letters/digits one at a time and keep the spacing even, the line straight and every thing 'square'!  When I try to do things like this myself, its funny how your eye always finds your mistake(s), even though you know that everyone else won't see it...

My Gilbert versions of these cars (in fair condition given their age -- like their owner ) are the first on my list of passenger cars to install LED lighting when I get the time.  My plan is to simply run the LED strip along the floor and keep the paper diffuser inside the windows.  Are you planning to light your cars with all the interior details?  Presumably that means running something along the top of the shell?

richs09 posted:

Jerry -- your inside and outside job on the American Flyer NH coaches is really super - you have a great eye and apparently a very steady hand...  I'm always in awe of folks that can do lettering with press-on letters/digits one at a time and keep the spacing even, the line straight and every thing 'square'!  When I try to do things like this myself, its funny how your eye always finds your mistake(s), even though you know that everyone else won't see it...

My Gilbert versions of these cars (in fair condition given their age -- like their owner ) are the first on my list of passenger cars to install LED lighting when I get the time.  My plan is to simply run the LED strip along the floor and keep the paper diffuser inside the windows.  Are you planning to light your cars with all the interior details?  Presumably that means running something along the top of the shell?

Rich,

Thanks for the kind words.  The lettering was a fun part, and getting it right is indeed taxing on the patience.   But don't look TOO closely, or you'll find mistakes on mine too. 

I have a number of these Gilbert cars too and my 7 year old grandson loves the 8 car Red New Haven Train, as he calls it.  But for some crazy reason, I wanted some cars  that were closer to scale length.  The very early ones were made of an acetyl plastic which warps over time.   Later ones were a styrene plastic which is much more stable.  Those are the ones I "butchered".  But since the shells were junk box purchases at York a year ago for less than $5 per car, my conscience is clear. 

I left the large blob of plastic on the inside of the roofs from the injection process alone but flattened them out so I can screw a circuit board with LEDs on the inside of the roof.  The wires will run through the washrooms so as not to be seen through the windows.  Those windows will be frosted as on the prototype cars for privacy.   There will be a 2 conductor mini connector between the shell and frame to allow removal of the shell if necessary.  I just need a good constant voltage circuit for the 4 or 5 LEDs I plan on using.  If anybody out there has a suggestion for one, or knows of a ready made board, please let me know. 

Did I plan on making a perfect "scale" set of cars?  Not really since it involves more work than I want to do.  They're not contest quality cars, but more of a "what if Gilbert were still in business today" cars (hint, hint Lionel).  They can even negotiate classic Flyer switches without hitting the lever mechanism.

I've rambled on long enough, so enjoy the Holidays guys!  Keep up the posts!

 Jerry - again, your work is really well done.  I'm curious about how you cut the shells - obviously the cuts need to be square and with minimal ragged edge.  I also see in your earlier post to this thread that you've added a thin piece of styrene to made sure all of the spaces between the windows are uniform.  What glue did you use?  Are the chassis done the same way -- cutting the original Gilbert chassis?

In terms of lighting, as I suspect you know, there are a number of posts about circuits and wiring up LED strips.  One of the more recent is here, which is a reference to GRJ's constant current circuit.  I think his original design was based on working with constant 18VAC track voltage, like you'd use for command/control -- instead of variable AC power like you'd get out of a Gilbert transformer (which is what I use).  I don't know what you use for track power.  If you look at the attached Word file in the link you'll see a suggestion of using 5 VDC LED strips instead of the "normal" 12 VDC, that way the circuit will start to regulate about where the Gilbert transformers cut in voltage-wise.  The circuit board is quite small and I think with some adept building, you might be able to make it thin enough to fit inside one of your end vestibules (since I haven't done that, you can take this suggestion with a grain of salt)...

Add Reply

Post

OGR Publishing, Inc., 1310 Eastside Centre Ct, Suite 6, Mountain Home, AR 72653
800-980-OGRR (6477)
www.ogaugerr.com

×
×
×
×
Link copied to your clipboard.
×
×