I'm working on the Atlas F3A I recently got and things "were" going well, until I pulled out the Microscale decal stripes (48-436).

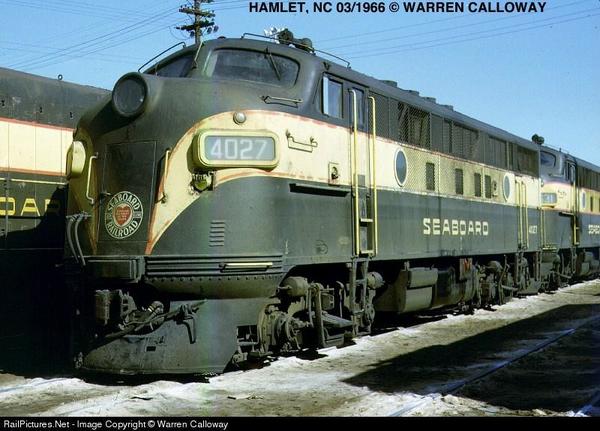
Here's a photo Warren Calloway took, you can see how wide the stripes are:

F3A 4027

Now look at the model with the Microscale stripe sheet laying on top, they're a full 1/4" TOO WIDE:

DSCN0503_330

I've made stripes in the past and can do them again, but it's a lot of making/adjusting til they fit before I print the final decals.

I don't know if I can take these, cut them lengthwise, and put them on, without having a nasty-looking scar or over-lapped edge running down the center, and then I have to do the tapered nose stripes.  Has anybody done this (cut them lengthwise) to a set of stripes?

This may be my last kitbash, I'm getting too old for this mess.

Attachments

Images (2)
  • F3A 4027
  • DSCN0503_330
Original Post

Replies sorted oldest to newest

Bob,

What I have done in the past is cut one stripe the right width and install. Come back with another the opposite way. You cannot see the overlap that way and it makes the yellow a lot deeper and there is not hint of translucence. Solvaset the first layer real good before applying the second. Cut out the nose stripes with out the red and after they are doubled add the stripe. Use Microscale blue label and it will let you curve the red just right.


Malcolm

Bob, I would echo Malcolm's advice if you want to try and overlap decals.. Otherwise the other idea I had was cut the yellow the correct width and find new red stripes for top and bottom.  I've tried to cut decals before where I would leave the red stripe at the top and cut the decal in the yellow to correct width and then try and match the red stripe for the bottom.  Sometimes works, and sometimes doesn't... A lot of time easier to remove the red striping altogether and find your own.      Certainly could mask and paint the stripe as well as Charlie suggests...

Like Malcolm's suggests depending on how happy you are with the color and "opaqueness" of the yellow stripe that really leads down a particular path. 

Almost...done.

I had to paint the stripes on, not as nice or as easy as decals but at least it looks like a SAL F3.

I got some low-profile fans from P&D installed, made new square filters for the sides, installed the 2-rail pilot and right now have the Atlas coupler on the rear, a Kadee on the front (that's too high, I've ordered more Kadees including offset shank), and numbered it for my favorite 4030.  i also added the angled step that runs just below the stripe on the fireman's side between the nose and the ladder (I think I might paint the edge yellow to make it stand out).  I'm missing a lift ring and the ring that goes on the handgrab on top on the fireman's side.  Getting those wire screens and windows off was a PITA, but I did it without having to order any new parts.

Here's some photos, along with my newly acquired GN boxcar and SHPX tankcar from Petersen Supply (also awaiting Kadee couplers):

DSCN0540_367DSCN0534_361DSCN0535_362DSCN0536_363DSCN0537_364DSCN0538_365DSCN0539_366

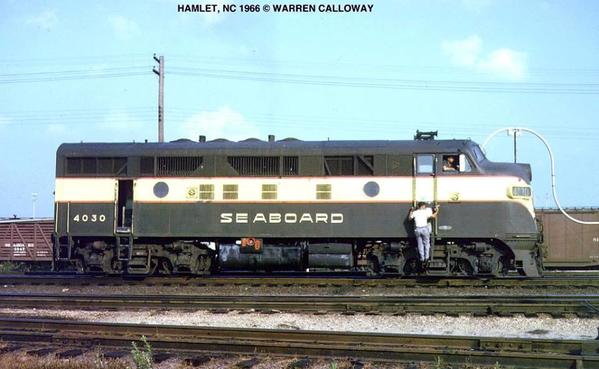
Here's the real 4030, slightly faded and altered (no skirting):

F3A 4030a

Attachments

Images (8)
  • DSCN0540_367
  • DSCN0534_361
  • DSCN0535_362
  • DSCN0536_363
  • DSCN0537_364
  • DSCN0538_365
  • DSCN0539_366
  • F3A 4030a
Last edited by Bob Delbridge

I can't even imagine trying to put decals like that on an engine.  For me to try to use decals,  it would be a complete abortion. 

You accomplish that task, you're a better man than me.  I just finished painting a GN W-1 electric using paint, lightest first (ie yellow), mask the yellow, then painted the orange, again mask off orange and last, the green.  Only time I use decals is for the heralds.

sam

GN W-1 custom brass 19

GN W-1 custom brass 23

Attachments

Images (2)
  • GN W-1 custom brass 19
  • GN W-1 custom brass 23
Last edited by samparfitt

Sam,

I tried it once and it folded over on itself that I felt like I had wrestled a bear by the time I got through, even the skinny stripe was a PITA.

Atlas has yet to offer the F3 in SAL colors, I was hoping they would but I got such a good deal on this engine I had to take it.  Took 4 weeks but what else have I got to do (besides finish all the other projects, RR and non-RR)?

Mike DeBerg posted:

Bob, I would echo Malcolm's advice if you want to try and overlap decals.. Otherwise the other idea I had was cut the yellow the correct width and find new red stripes for top and bottom.  I've tried to cut decals before where I would leave the red stripe at the top and cut the decal in the yellow to correct width and then try and match the red stripe for the bottom.  Sometimes works, and sometimes doesn't... A lot of time easier to remove the red striping altogether and find your own.      Certainly could mask and paint the stripe as well as Charlie suggests...

Like Malcolm's suggests depending on how happy you are with the color and "opaqueness" of the yellow stripe that really leads down a particular path. 

Because there is extra material, when making the second cut, have extra on both and cut thru both so that they will mate perfectly. I would do that on the top stripe but that's just a guess. In reality, somethings work better and some don't.

I was also wondering about applying a red automotive pin stripe tape on top and bottom? Maybe they'd be too thick?

All this after I see it's done!! It looks good from here!

Add Reply

Post

OGR Publishing, Inc., 1310 Eastside Centre Ct, Suite 6, Mountain Home, AR 72653
800-980-OGRR (6477)
www.ogaugerr.com

×
×
×
×
Link copied to your clipboard.
×
×