
I really like how the new Williams 4-6-0 -- as stated on other threads it is a great runner, geared for low speed, etc.

Several people, including me, have commented on thoughts or plans to modify it, updating it to a later period, since it is a rather early locomotive.

Anyway, here is my effort.


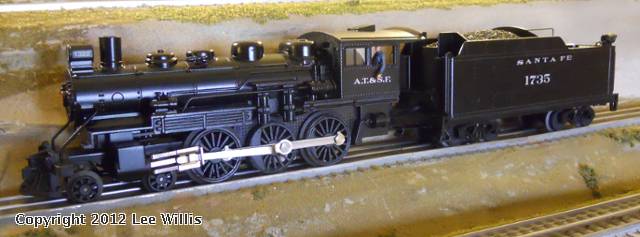
This started out as the gray UP version offered by Williams - the gray one -- after getting it I really did not like the colors. I had no particular prototype in mind - just wanted to end up with something that would look appropriate, if among the older steam locos, on my 1950s layout.

In modifying it I cut down the stack by about 3/16 inch. Cut down the two domes by about 1/4 inch. Cut down the cab by 1/8th inch. Added two other domes. Added a bunch of "locomotive-y equipment things" to it here and there on both sides along with a lot of additional piping, etc., just to add some eye candy/detail. I have no idea what the equipment I added is: just interesting stuff from my parts bin that looked sort of like equipment in several photos of USRA locos around WWI, usually put about where I saw that equipment on photos.
I added handrails, lanterns and a bit of detail here and there to the tender. Glass and window detail to the cab, and two figures. Painted it satin black and had more SF than UP decal sheets, so it ended up ATSF. I have a nice brass bell to put between the stack and the first dome but ran out of epoxy, so will wait and get some tomorrow and attach it then.

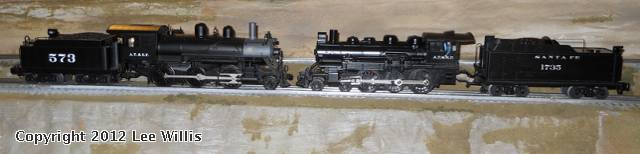
Here is is in company with the new Lionel conventional Mogul, which does not run nearly as slowly, smoothly, but has sound (and cost nearly 3X as much). I like the Williams as much as any loco I have ever bought - might be the best bargain I know of . . . this is a very good runner and quite bashable.
Original Post

Replies sorted oldest to newest

Very nice work!

I really like my Williams ten-wheeler. As stated, it is a great runner.

I plan on filing off the handrails to add wire handrails and stanchions, and converting to a lantern or square-type headlight housing like what's on the Lionel general. Otherwise, I almost think Williams used the same picture to build their model that I'm using.

Again, great job with the mod's.
Lee
Interesting contrast in our objectives. I bought it because of the tall stack and high domes which more closely match up with the 1905ish passenger Ten Wheelers operated on Southern Railway and its subsidiaries. On some branch lines they lasted even up into the early 1950s, however on my hometown A&Y passeger service terminated in 1939.

I immediately cut off the bell and removed[unscrewed]the headlight. Southern's "Shops style" was to mount a headlight on a shelf near front-center of the smokebox door and the bell on top front of the smokebox. Also,I may blacken the rods to help hide their appearance [hopefully].

I have a Cal Scale brass bell and cradle ready to mount but need to order the headlight/shelf from Precision Scale. Not sure what else I will do if anything other than Engineer and Fireman, paint and decorate for the Atlantic & Yakin.

Everyone seems to like these little engines Smile--even without surgery.
"Interesting contrast in our objectives. I bought it because of the tall stack and high domes which more closely match up with the 1905ish passenger Ten Wheelers operated on Southern Railway and its subsidiaries."

What I like about the hobby is all the different approaches/times people model, from 1870s to today. This model, stock, is just about perfect for early 20th century. I model 1950-55 - last of the steam and early diesel era, so I had to "update" it a bit.


Q: "How do you gentlemen add parts onto the diecast shell, epoxy?"

I use epoxy. When I cut down the domes, I used the clay like stuff you roll in your hands (two part blue and white clay that turns gray as you work it), held the top of the dome in place and pressed it up inside the done from underneath, flush underneath with the body. Solid. Generally, for smaller pieces I will attach, I drill a location hole in both the body and the part and use a small metal pin to locate the part/piece and two-part 5 minute epoxy. I fill cracks, etc., with very liguid, just mixed two part 30 minute epoxy worked into the cracks with/from a pencil tip, and finish up with auto-body glazing putty to cover and smooth any scratches and rough marks before final sanding.

Q: "Who has the best price on these engines? I think I will get one too."

Modeltrainstuff.com at $191 but they were out of stock the last time I checked - they may have gotten some more though. I bought my latest from Western Depot for $200.

"An ERR Cruise Commander, sound, electrocoupler - easy stuff, especially with that nice plastic tender - sure needs to show up in one of these bashed locos."

There is even a nice little speaker in there already used now for the bell and horn . . .
Adding Parts:
The brass bells I normally drill a very small hole and insert the bell cradle's post in with CA glue on it[mini Dremel bits needed]. The headlight shelf could be mini-screws or inserts, I haven't received the shelf/light yet but in the past both screws and/or insert posts have applied.

Raw scars or damage: if very shallow I use Dupont auto body primer putty and if deep or rough I use epoxy. Filing, sanding, body putty, priming and fine sanding required.

I ship out for final paint and decoration.
I tried - actually exchanging them but takin no pictures. They look good with them exchanged, but neither will run. The Lionel has an IR coupling between tender and loco, the Williams a tether. Neither loco will run without its tender attached and tethered (the Lionel will run with another Lionel tender with the same type of IR coupler).

I like the cut down look of the Baldwin with a shorter tender enough that I might cut down its tender on the next one I bash.
Post

OGR Publishing, Inc., 1310 Eastside Centre Ct, Suite 6, Mountain Home, AR 72653
800-980-OGRR (6477)
www.ogaugerr.com

×
×
×
×
Link copied to your clipboard.
×
×