Hi Everyone.

I am taking a risk here and am about to sell my soul to the forum and reveal all over the next few months. I thought it would be nice to share this project with the members, so I have started this thread just for this project and nothing else, not being rude but I don't want it to drift off to the rest of the layout I already have a thread for that.

Even though this thread will be about one section of the layout I am sure you will find it interesting as I will include our thoughts and approach to model railroading that we have gathered through many years of layout building and modelling. Again I stress that Bruce and myself are not professionals just  average Model railroaders so don't be put off about this thread thinking it is just another "Endless money and outside help project" it is not, anyone can use our methods and ideas.

Bruce Temperley and myself Neville Rossiter have been developing a layout working together for many years  pooling our finances and time to develop this wonderful layout with very little outside help, we try and do everything ourselves the one luxury we allow ourselves is a fully equipped workshop capable of building just about anything not necessary for this project so don't be put off.

One other thing please don't take offence at my poor attempts at using the English language to write this thread, my education in my younger days was dismal to say the least and I have spent almost all my life trying to overcome this, lucky I have a wife who did have a good education and helps me a lot with my spelling! 

Hopefully you will sign on and join us on this START to FINISH project on the "Redevelopment of Bay Ridge" Thank you Neville. (Roo) and Bruce.


Original Post

Replies sorted oldest to newest

Thank you everyone for your support!

Like every journey that begins with the first step this one begins with a list...........

Confirm concept track plan.

Prepare scale drawings to ensure the position of through board mechanism, such as Tortoise motors do not conflict with supporting timber framework.

Approve final track layout and drawings.

Generate Bill of materials and estimated cost for track, turnouts and tortoise motors.

Agree costs and share expenditure.

Place orders for long lead time items.

Prepare electrical schematic.

Draw detailed electrical wiring diagram.

Design turnout matrix boards.

Design turnout latch relay boards.

Generate bill of materials for electrical components and cabling.

Draw Control Panel display.

Order Control Panel Fascia.

Construct and wire complete self contained control panel assembly.

Construct and test Matrix boards.

Bench test the control panel to ensure it opertates before fitting.

Consider options for phased rewiring such as temporary location of existing control panel while new panel is being fitted.

Remove all obstructions underneath the layout and consider temporary supports.

Consider changes to existing backdrop and scenery before laying any track.

Shut down existing layout only when all equipment is available and the above preparations are satisfactorily completed. 

This above list shows the steps needed to keep the layout fully operational while preparing for the changes it is not a complete rebuild of the layout only one section and we are using the existing bench work it will get more clearer when I post the track plan which is being prepared now.

Thanks for joining us on our journey more soon. It will get more interesting when I can generate some photos that will happen soon. Roo. 

Last edited by Roo
Roo posted:

Thank you everyone for your support!

Like every journey that begins with the first step this one begins with a list...........

Confirm concept track plan.

Prepare scale drawings to ensure the position of through board mechanism, such as Tortoise motors do not conflict with supporting timber framework.

Approve final track layout and drawings.

Generate Bill of materials and estimated cost for track, turnouts and tortoise motors.

Agree costs and share expenditure.

Place orders for long lead time items.

Prepare electrical schematic.

Draw detailed electrical wiring diagram.

Design turnout matrix boards.

Design turnout latch relay boards.

Generate bill of materials for electrical components and cabling.

Draw Control Panel display.

Order Control Panel Fascia.

Construct and wire complete self contained control panel assembly.

Construct and test Matrix boards.

Bench test the control panel to ensure it opertates before fitting.

Consider options for phased rewiring such as temporary location of existing control panel while new panel is being fitted.

Remove all obstructions underneath the layout and consider temporary supports.

Consider changes to existing backdrop and scenery before laying any track.

Shut down existing layout only when all equipment is available and the above preparations are satisfactorily completed. 

This above list shows the steps needed to keep the layout fully operational while preparing for the changes it is not a complete rebuild of the layout only one section and we are using the existing bench work it will get more clearer when I post the track plan which is being prepared now.

Thanks for joining us on our journey more soon. It will get more interesting when I can generate some photos that will happen soon. Roo. 

Neville, you are missing the greasing of palms.  

https://www.youtube.com/watch?v=YlVDGmjz7eM

I have called this yard "Bay Ridge" going right back to when I first started a Rail Marine theme which is long gone now. When I changed to a Steel Mill theme I kept the Bay Ridge name for the yard it was just to hard to change it!

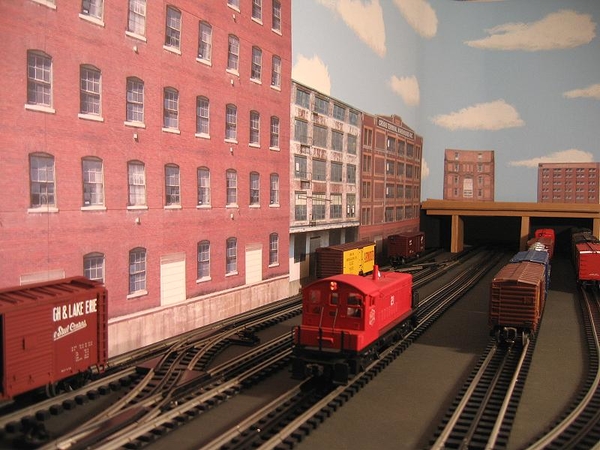
Bruce is working on a track plan and will have it ready soon I have made some changes to the track which is why it's taking so long but I want to get it right. As soon as the track plan is ready I will post it to this thread in the meantime I am fixing up the backdrop working with what I have it might look a bit "cartoonish" to some but you see it when you first walk in the room and the colour looks the part keep in mind everything has to come from America which tends to delay certain jobs like the nearest American Hobby shop for me is 16,000miles away ! I still have to Glue the Walthers backdrops on the wall I will paint some clouds to break up the blue after the final piece is glued to the "sky".Ha Ha.

We have the control panel drawing almost ready I will post it at the same time as the Track plan all going well.

It's not exactly exciting work at the moment but as we go along over the next few weeks it will slowly get more interesting.

Thank you all for following this thread and your kind remarks. Roo.


DSC03772DSC03773DSC03774DSC03775DSC03776


Attachments

Images (5)
  • DSC03772
  • DSC03773
  • DSC03774
  • DSC03775
  • DSC03776

The backdrop is going to be time consuming instead of pasting the Walthers backdrops flat I have decided they look a lot better pasted onto foamcore board first, lucky there is a gap on the already pasted buildings below so they will fit behind (Maybe I had this in mind when I pasted the buildings originally, I forget!)  it just gives everything a feeling of depth not being artistic minded I struggle with little projects like backdrops. I also lightly feather sprayed some clouds on the "blue sky" to break up the monotony of the blue. It's fun isn't it.   Roo.


DSC03778DSC03779

Attachments

Images (2)
  • DSC03778
  • DSC03779

The final photo of the actual backdrop before the the ground cover and other ground scenery. The real thing looks better than the photo as you are further away from it and can't take the whole thing in at once photos can be cruel sometimes.

I'm happy with it and I am the one who has to look at it everyday! No track plan yet but we are working on it. Keep looking in I won't let you down. It's basic Model Railroading but that's what I am, you still might learn something from it. 

  Roo.

DSC03781

Attachments

Images (1)
  • DSC03781

Roo,

Yes, pictures can be cruel, but they can also be very enlightening.  It appears, from your last photo, that the light source for this picture is off to the left and not back near the back-edge of this layout section.  I reached that conclusion by noticing the small shadow lines created near the top of your now 3-D (after adding foamcore) Walther's backdrop building pictures.  Those shadows caught my eye because they are very dark on your blue painted sky.

I know you probably can't safely remove the backdrop pictures from the foamcore, but can you move the lighting to be more directly over the back edge of this table?  That might minimize the "shadow" look.

And, of course, if my analysis is completely wrong because my old eyes have deceived me, please accept my apologies up front.

Chuck

I like what you're doing, there Roo. Urban/industrial is one of my weaknesses: Love it... gonna' find a way to get more of it.

I also like your use of photographic flats. I think the results speak for themselves. (i.e. They produce VERY realistic looking "factory/urban" backdrops.) I use photographic flats, too.

Looking forward to seeing your latest whim take shape!

Andre

Thanks guys the backdrop flats in the front are from Trackside Flats O scale size off the internet and Walthers Instant Buildings HO size at the rear.

Andre. I like industrial areas as well as you may have guessed !

Chuck, the backdrops look OK it's my photography that's the problem.

Tonight I am buildings fences to go in front of the backdrop see photo. I made the jig myself and used the wood you see in the boat building section of the hobby shop not scale wood to expensive for a fence.

Almost forgot have the track plan ready to post along with other drawings will get them up tonight if I'm not to tired. Roo.


DSC03786


Attachments

Images (1)
  • DSC03786
Last edited by Roo

Thanks again Coach Joe.

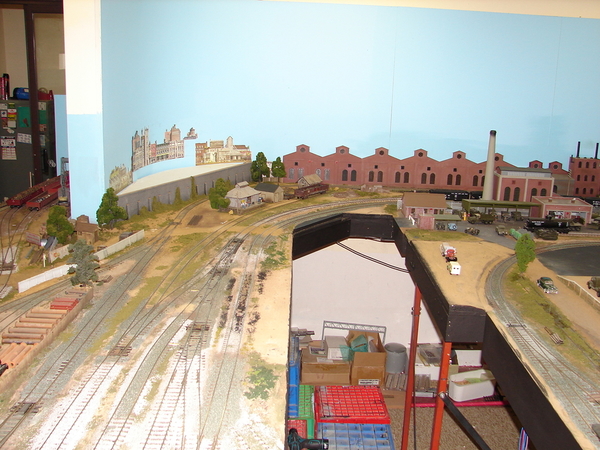
This photo shows the back drop from a distance I think it looks OK I am going to add a few signs when I get time.

At the moment I am about to put some signs on the fencing I stained them yesterday then I will "Plant" the fences today.

I have ordered all the track and the Tortoise motors also the ballast has been ordered along with other items so the next couple of weeks look like being busy.

Jim. I know about those Lenz double slips but I have used English Marcway track for many years and found it to be very reliable to old to change brands! Thanks for the call.  Those plastic things are silverfish deterrents had some attack the backdrop.   Isn't Model Railroad building fun.  Roo.

DSC03794DSC03797

Attachments

Images (2)
  • DSC03794
  • DSC03797

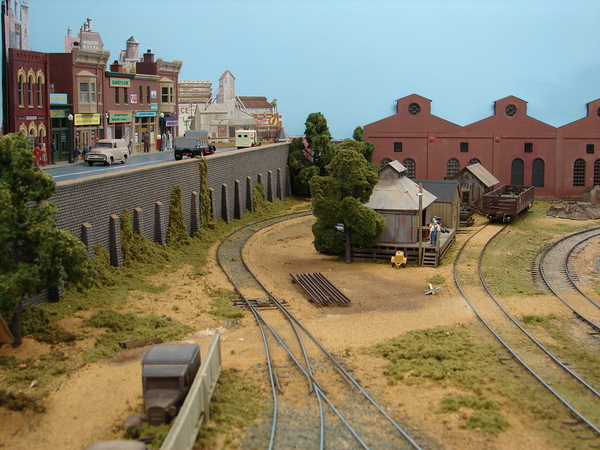
OK the final photos of the backdrop before I move onto other work I added some foliage to break up the "sameness" of the fence line. This is where the redevelopment comes to a temporary halt as far as posting here on the Forum,  but in reality work is still going strong like I have finished all the ordering of what we need and I have removed everything from under the layout including shelves getting in preparation for the electrical work and the fitting of the switch machines. All the items I have ordered are coming from overseas so there will be a delay of between 14-21 days before anything arrives from The USA and England, in the meantime I will work on other projects and keep the layout up and running every Friday till I finally make the decision to shut down the layout for a few weeks I will still post here every few days  and let you know what's happening.

Bruce is working on the matrix modules for the interlocking on the Control Panel and the board has been ordered from the laser sign man I will show you this when it is delivered it's a larger board (A3 size) than we have on other parts of the layout (A4 size) as there are 15 turnouts, 4 Double slips, and 23 isolating sections lots of buttons and switches.    Roo.


DSC03805DSC03806DSC03807

Attachments

Images (3)
  • DSC03805
  • DSC03806
  • DSC03807
Last edited by Roo
Roo posted:

<OK the final photos of the backdrop before I move onto other work I added some foliage to break up the "sameness" of the fence line. This is where the redevelopment comes to a temporary halt as far as posting here on the Forum,  but in reality work is still going strong like I have finished all the ordering of what we need and I have removed everything from under the layout including shelves getting in preparation for the electrical work and the fitting of the switch machines.>    Roo.

 DSC03806

Looking good Neville. Your fence and landscape work add a lot of visual interest. 

LETS not forget this is the staging area for the rest of the layout and for a lot of the time it will be full of cars like this photo taken today shows. This area has never had any kind of scenery up till about 18 months ago when I decided to change the whole area.

Coach Joe. The Steel Mill part of the layout or the rest of the layout could be operated still but without any staging that would make it a bit awkward to use. 

Thanks BobbyD and Coach Joe and anyone else looking in. It will be more interesting when everything finally gets here you have to have patience when your an O scaler in West Australia! Long way from anywhere.   Roo.


DSC03810

Attachments

Images (1)
  • DSC03810
Roo posted:

Hi Everyone.

Even though this thread will be about one section of the layout I am sure you will find it interesting as I will include our thoughts and approach to model railroading that we have gathered through many years of layout building and modelling. Again I stress that Bruce and myself are not professionals just  average Model railroaders so don't be put off about this thread thinking it is just another "Endless money and outside help project" it is not, anyone can use our methods and ideas.

(Roo) and Bruce.


You better believe it! Neville and Bruce have built some killer stuff over the years.

Simon

BobbyD posted:
Roo posted:

Thanks Melgar and Simon if you can make it to the running session this Friday your both invited !  Roo.

Neville,

United has a low fare of only $4,217.00 usd to Melbourne. Is there a Bay Ridge discount code? 

Well I live 2500 miles from Melbourne so there's another Air Fare ! Ha, Ha.

OK, lets get back to WORK or is it fun ? Here is the trackwork laid out for the next stage of Bay Ridge.

Soon I will be ripping up the existing track and replacing it with what you see here. Drop in now and again for updates. Don't forget this thread is not about the whole layout just what it says "The Redevelopment of Bay Ridge". Thanks. Roo.


DSC03916

Attachments

Images (1)
  • DSC03916

Hi Everyone.

Now I have the track laid for the Station which also happens to be the "Mainline" into the Yulan Valley Railroad or the layout.

The short spur leading off that will eventually connect up to the present day yard through a Double Slip switch.

The unballasted track is temporary as well as any wiring you can see. I am doing this in stages so we can keep the Railroad running for our Friday running sessions it doesn't faze me doing it like this I like running trains and don't want to close the Railroad down for weeks. Thanks Roo.


DSC03936

Attachments

Images (1)
  • DSC03936

Hi Bob.

Starting on Bay Ridge was a big step I kept putting it off finding other projects to do, till I finally decided enough is enough, it's time I got onto it and done something. Taking the grandkids for a walk in the bush tomorrow (Tuesday) now that will be really interesting the weather is fine tomorrow so that's one thing taken care of ! You take care mate and I will eventually catch up on my offline emails one day.... Enjoyed your visit to the Wild West. Nev. 

Hi Everyone.

Bay Ridge is slowly making some progress I have started laying the track for the yard without interfering with the operation of the railroad I might start making the framework for the New control panel this week ready for Bruce to wire next week so it's slowly slowly getting there. Those pieces of wood are for spacing the track and the aluminium strips keep it straight I weather afterwards make it look grotty, nice to have it look good to start off with!  Where that hand broom and tins are sitting is the passenger station site.  Thanks. Roo.

DSC03988

Attachments

Images (1)
  • DSC03988
Last edited by Roo

My method of laying track is very simple over 40 years of O scaling I have tried lots of ways including hand laying and while that is a good method for some it's not for me. My method while not perfect as far as looks go (I don't add details to my track) is as follows.

Lay 3mm cork for the roadbed, paint everything matt black, lay flex track with your spacers in place mark where your Tortoise machines are going and drill the holes lay the track, nail down where there is gaps for ties at the track joints fill these in with some glue on the cork and push ties under the rails. Remove all the spacers solder the joins and feeder wires, paint the track (open windows and wear a mask or respirator) I have a fan going as well, clean top of track, when paint dry apply ballast, spray with wet water, spray with a mixture of white glue and wet water to seal everything use an eye dropper around turnouts you don't want everything glued together! Finally clean the tops of the rails and test. Finished. One thing I did not mention was when laying the track have your wiring diagram in front of you for the feeders and the gaps I use insulated rail joiners where possible otherwise it's the Dremel and cut the gaps.

This thread as I mentioned at the start is only to show the members MY method not to debate other ways of doing things if any members want to tell their ways of building a model railroad it is probably best to start a new thread. I like to think anyone with limited skills can use my way and create a nice looking and good performing model Railroad. I have always stated I am an average modeller I cannot scratch build a locomotive or rolling stock I cannot hand lay track and turnouts, I cannot paint a beautiful backdrop, I cannot create beautiful plaster mountains, what I can do is build an operating model railroad and have fun doing it. Years ago I even did all my electrical work including making control panels now I am fortunate to have a good friend who does all the electrical work and even pays for most of the items he uses. Roo.

DSC03991DSC03992DSC03993DSC03996


Attachments

Images (4)
  • DSC03991
  • DSC03992
  • DSC03993
  • DSC03996

So the tracks are down and finished approx two days of calm casual work. The photo shows the ballast two colours.... the light colour is dry, the dark is still wet.

More later, and I will show you how build the frame to mount the control panel notice how every track on the panel has an isolation switch or two something that is necessary when your a DC dinosaur ! Ha Ha.....  Roo.

DSC04002DSC04003

Attachments

Images (2)
  • DSC04002
  • DSC04003

Thank you Bobby and Joe for the kind comments your good blokes.

.......The next morning and everything is dry and uniform it looks good but it's not totally finished this is a yard that has seen plenty of work over the years and I want to portray it as such so I will add some weeds and clutter or details as we call them. I hope to one day build a road bridge at the end against the wall with a stairway going down to the passenger platform which will be where the Black area is. Under the bridge I am going to place a mirror, before all this happens I will just paint the wall blue the same as the backdrop unfortunately the light switch cannot be removed but it will be under the bridge I'm hoping it won't be to obtrusive. Thanks again.  Roo.

DSC04004

Attachments

Images (1)
  • DSC04004

Ha, Ha, a good idea but not for this situation because the light switch is under the bridge or will be ! I'll figure something out is low on the list plenty of other things to do.

I just finished 2-Railing this Die Cast K-Line depressed flatcar one of the hardest cars I've ever done impossible to describe how I did it as I used four trucks from MTH cars that I had in the scrap box the K-Line trucks I could not use I tried anyway the good news is this one is finished the bad news is I have one more to go a K-Line 16 wheeler FLAT TOP not depressed that's me. The chains are in a safe place at the moment till I'm sure it's finished. Roo.

DSC04005

Attachments

Images (1)
  • DSC04005
Last edited by Roo

BOBBYD. I was thinking about getting two of them and using them in the Gym for a workout! 

The progress on changing Bay Ridge yard is moving along slowly Bruce was under the layout today wiring some turnout motors we can still use this section I have laid down some temporary track to link the new finished sections with the present Yard. So one photo today shows the yard staged for this Friday running day.

I have always where possible tried to put everything under the layout on wheels which has paid off numerous times as far as my back goes and the ease of working under the layout here are some examples. The seat I bought from a boat place and put it on wheels.  Thanks again for dropping in Roo.

DSC04016DSC04015DSC04017DSC04018DSC04019DSC04020DSC04021


Attachments

Images (7)
  • DSC04016
  • DSC04015
  • DSC04017
  • DSC04018
  • DSC04019
  • DSC04020
  • DSC04021

Roo,

Here's an idea ("borrowed" from John Allen) to hide the light switch and "expand" the layout.  Cut your bridge in half vertically and remove the piece between middle and wall.  Then attach a mirror across entire bridge, but only up to top of bridge.  Hides light switch while leaving room for hand access and expands length of yard and passenger platform.

Just a thought.

Chuck

"Tracks Ending At The Wall Dilemma"...

Years ago, during an experiment with 3-rail modeling, I faced just such a situation, but in my case it was a bridge also hiding a stage entrance as well as a wall.

I was going to mute the situation by painting the wall under the bridge black. Here's the mock up of the scene:

12thStYd

IMHO:

* Lower the height of your bridge so not so much of the wall is visible. (You can use cardboard for a mock up bridge like I did before you make irreversible changes to your current bridge model.)

* Place a section of black poster board against the wall to simulate a black-painted wall.

* Use some "Tacky-Tack" gum to temporarily hold some flats in place on the wall "past" the bridge.

Look at the results and see what you think.

In my estimation, adding mirrors to the wall (either the entire wall or just under the bridge) will draw visual attention to that area. In my opinion, that's not what you want. You do not want the scene to GRAB attention or compete for visual attention in any way, instead you want it blend-in as best it can and compliment the main scene.

Something to think about.

Andre

Attachments

Images (1)
  • 12thStYd

Roo, above you posted, "I hope to one day build a road bridge at the end against the wall with a stairway going down to the passenger platform which will be where the Black area is. Under the bridge I am going to place a mirror,".  Wow one day has come already and the bridge is there.  Do you still plan on using the mirror under the bridge?  Maybe you can place it between the third and fourth columns where the platform is to hide the wall switch and still allowing space for your hand.  Like PRR1950 suggested, without cutting the bridge in half.  It would even look as if there were two stair cases going down to the platform once you add one.

There are some good suggestions here and I will also add to them in a minute but lets stop for a second and consider the situation. As far as the layout goes I am a one man band except for the electrical and the operation plan, everything else I do myself, everything, which includes locomotives and rolling stock and preparing the layout for running every week. So as much as I would like to add endless detail to the layout I can't, I just don't have the time, but your suggestions are always welcome don't be put off because of what I have said here because who knows I might just use some of them one day indeed I am thinking of cutting a piece of Black foam core and fitting it under the bridge to see what it looks like as Andre suggested.

While thinking about this bridge I thought of two other ways to go about this the first was to make up a much wider bridge which would almost be a tunnel and on top place a small shopping centre. You might remember a few years ago I did this to fill in a corner (See Photos). The second much easier was to make the bridge ONE lane wider and make the extra lane into a "Bus" lane for the commuters this was tempting as it would not interfere with the Backdrop as the lane would finish just before it reached the backdrop therefore the large factory would not be blocked off.

So what it comes down to I have decided due to lack of time to make just a simple two lane bridge with pavements on both sides and some plastic non working street lights and of course the usual motor vehicles and people. If later I decide I don't like that I will think of some alternatives then.

Don't forget I am getting closer to laying the four double slip switches soon that will be an interesting exercise in patience ! 

Thank you all. Roo. 

Filling in a corner 031

Filling ia corner 005

Attachments

Images (2)
  • Filling in a corner 031
  • Filling ia corner 005
Last edited by Roo
Roo posted:


Don't forget I am getting closer to laying the four double slip switches soon that will be an interesting exercise in patience ! 

Thank you all. Roo. 

You are a much, much, much braver man than most of us Roo!  

Have patience and take deep breaths. Maybe some soothing New Age music in the background?? 

Friends. I haven't posted anything for a while on this thread and the Station complex is taking more time than it should (baby sitting duties ) so unfortunately it is still nowhere near finished but just for the record here is a progress report and photo. It looks easy in the photo but it's been a fiddly job especially that stairway.

The above ground platform still needs another canopy and of course seats and people, the bridge is waiting on the rest of the railing as well as street lights and the whole thing is still to be painted including the station platform. We have a running session tomorrow if you are coming try to be here no later than 10-00 AM. Thanks. Roo. 


DSC00137

Attachments

Images (1)
  • DSC00137

The Bay Ridge station is taking shape still a while to go including finishing off the road bridge waiting for parts as usual it's hurry up and wait in West Australia that's what "WA" stands for "Wait Awhile" not West Australia .

We are having a running session today everyone's invited start at 10-00am finish at 5-00pm I provide lunch and coffee and tea still struggling to get operators just about given up I have a shower every morning and keep the house clean must be my attitude hard to change at my age I'm really a nice bloke not the tough guy I think I am. Roo.

DSC00151

Attachments

Images (1)
  • DSC00151
Roo posted:

The Bay Ridge station is taking shape still a while to go including finishing off the road bridge waiting for parts as usual it's hurry up and wait in West Australia that's what "WA" stands for "Wait Awhile" not West Australia .

We are having a running session today everyone's invited start at 10-00am finish at 5-00pm I provide lunch and coffee and tea still struggling to get operators just about given up I have a shower every morning and keep the house clean must be my attitude hard to change at my age I'm really a nice bloke not the tough guy I think I am. Roo.

One day Neville! Maybe we'll charter a flight and surprise you with a bus out front.  Keep up the good work.

Hi Everyone.

Thought I would post an update on Bay Ridge yard. While I have been away in the bush Bruce has been working on the electrical and doing a fine job. The control panel is fitted and looks good if your wondering why there is no names or colour on the panel it's because that's the way I like them they are not there to look nice they are there to use and be functional with no distractions.

So how was the bush ? Not bad, plenty of flies, lots of hills, a few snakes, a couple of really hot days, lost a few kilograms, didn't eat much, drank plenty of water. Apart from all that it was fun. 

Soon have the trains running again more later.... Roo.


DSC04411DSC04413DSC04293DSC04353

Attachments

Images (4)
  • DSC04411
  • DSC04413
  • DSC04293
  • DSC04353

Thanks Mark. Yes my two interests apart from my family are hiking outdoors (we call it Bushwalking in Australia) and the trains. I am not getting any younger and when I can't do the hiking anymore I will have the trains. The doctors are very happy with my walking as I had numerous gunshot wounds in an ambush during the Vietnam war one went right through my leg and broke my femur resulting in that leg being shorter so everyday in the bush is a bonus there are others worse off than myself I have never let it stop me doing what I want to do. I tell that to other vets never give up keep going. To get off this subject here is a photo of the trains ! Roo.

DSC04286

Attachments

Images (1)
  • DSC04286
flanger posted:

Nev...Thought there was a snake under that log you were sitting on...  On closer observation it turned out to be a shadow...

Bob


At this time of the year you see them a lot this one did not want to move so I managed a photo. While working on Bay Ridge yard the rest of the layout is being used for storage there are cars and locos all over the place! I hate seeing the layout like this but sometimes you have to make changes for the better. Looking forward to getting it up and running so is the crew about another week. Roo.

DSC04338DSC04421

Attachments

Images (2)
  • DSC04338
  • DSC04421
Roo posted:

Hi Everyone.

So how was the bush ? Not bad, plenty of flies, lots of hills, a few snakes, a couple of really hot days, lost a few kilograms, didn't eat much, drank plenty of water. Apart from all that it was fun. 

Soon have the trains running again more later.... Roo.

DSC04293DSC04353

Great scenery Neville, you look very relaxed here. I need another "Bushwalking" CD. Drop me an email.

Looking forward to your layout progress updates!!

The four double slips have turned out to be a nightmare of very high proportions trying to get them coordinated has proven to be much harder than Bruce or myself have ever experienced.

That said we have achieved the impossible and have them all working fine along with all the other single turnouts because of the puzzle we are way behind, tomorrow we will be finishing the feeders and by tomorrow night all the track should be powered. I have this Friday coming marked down for a running session that's how confident we are. So maybe some photos on Friday . You all take care. Roo.

BobbyD posted:
Roo posted:


First video ever of the Railroad with the little four wheeler critter running through the slips to test them after a month of torrid frustration trying to get them all to work in sequence it's done !

You are a master Neville, excellent work!

And don't forget the other old bloke Bruce he designed all the wiring diagrams and does most of the electrical a very talented man.

Bruce's Electrical Work 012

Attachments

Images (1)
  • Bruce's Electrical Work 012
Roo posted:
BobbyD posted:
Roo posted:


First video ever of the Railroad with the little four wheeler critter running through the slips to test them after a month of torrid frustration trying to get them all to work in sequence it's done !

You are a master Neville, excellent work!

And don't forget the other old bloke Bruce he designed all the wiring diagrams and does most of the electrical a very talented man.

Neville,

I would never forget the electron genius, I just don't get posts from him  Layouts are always a team effort, even a store bought item has others involved.  

Does Bruce do house calls? 

Last edited by BobbyD

Add Reply

Post

OGR Publishing, Inc., 1310 Eastside Centre Ct, Suite 6, Mountain Home, AR 72653
800-980-OGRR (6477)
www.ogaugerr.com

×
×
×
×
Link copied to your clipboard.
×
×