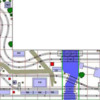
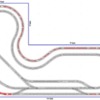
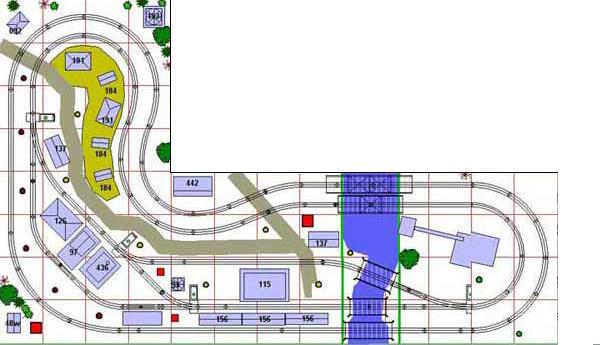
 So I saw this layout picture on this site somewhere and I love the design. I have an 8x12 table already and I know that I will have to somewhat extend my current table size to fit this layout. I think each red box is a square foot, but not sure. I have a bunch of Lionel Fastrak. But I need help because I am absolutely terrible at using SCARM. Can someone configure this using Fastrak for me? I am not sure this was originally designed for Fastrak. I need to know exactly what track sections I need to do this. I assume the inner track is using 0-36 and outer track is I think 0-72 diameter.. I also wanted to also connect the outside track to the inside track somewhere, so that I can switch the trains to either track. Can someone help?
 ![]()
Replies sorted oldest to newest
Assuming that the grid boxes are a foot square, the curves at the ends appear to be about O-27 and O-42.
I agree with @Long Hair that this layout appears to be using something like O27 curves on the inner loop and O42 on the outer loop.
Minimum table width would be about 7' to accommodate O72 curves. This wide of a table usually benefits from having the ability to walk around all sides to be able to reach into the center.
Providing rough drawing of the space with dimensions, including any obstacles, would help the designer(s).
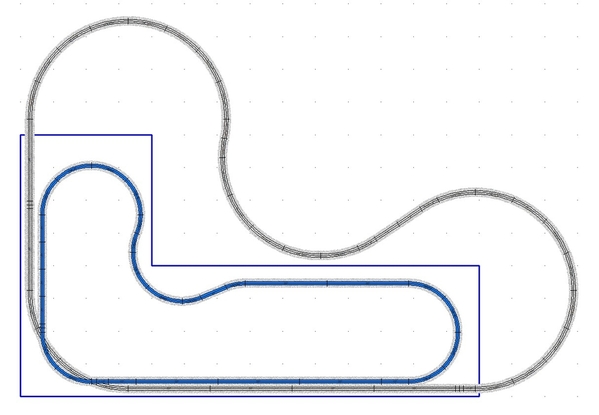
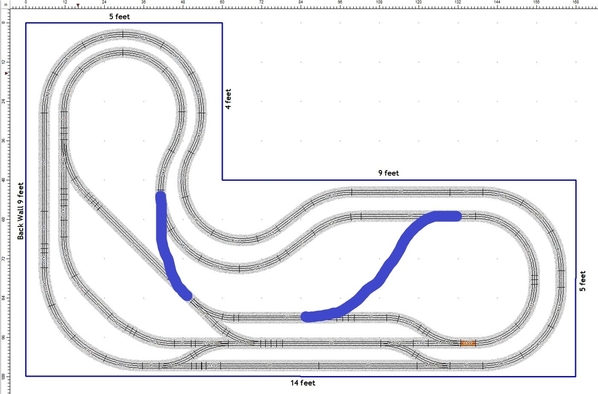
In the sample drawing below, the L-shaped blue table outline is the same 4' x 14' size as the table in the original post (assuming 1 foot square grid) . The blue track is O36 track. The grey is O72 and would require an L-shaped table approximately 12' x 17'.
Attachments
This looks to be designed for tubular track, this is an O22 switch.

Attachments
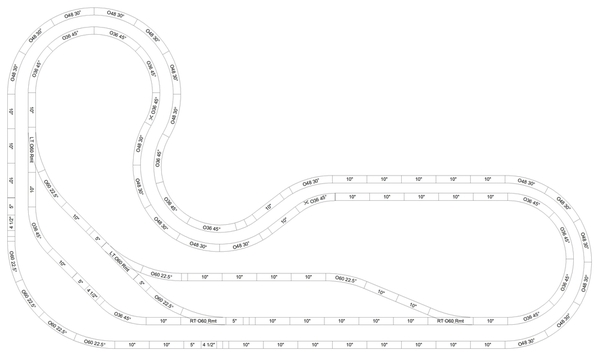
I played around with it in SCARM and have uploaded the files. There few FasTrack pieces that have a tubular counterpart. The resulting plan is slightly larger than the original. The loops are O36 and O48.
Jan
I corrected the typo O46 to be O48. Also note there are two cut curve sections, one each, O36 and O48.
Attachments
There is no O46 in Fastrack.
@D123M....
It looks like your layout diagram was built using RR-Tracks software. It also appears the track symbols represent Lionel tubular track.
To help with what the diagram is showing (and assuming the diagram was built using O gauge track and not 027 track), 6 curved track sections per 1/2 circle (the outer loop) are 042 (42 inch diameter) curve track, 4 curves track sections per 1/2 circle (inner loop) are 031 (31 inch diameter) curve. To further the discussion, 8 curve track sections per 1/2 circle can be either 054 or 072 curve track. As @SteveH and @Long Hair noted, the lines shown on the layout diagram are shown every 12 inches. The table at either narrow end are 4 feet (48 inches) wide. And since the half circles of the outer loop at each narrow end of the table don't reach the edge of the table, that's 042 curve.
I do have the RR-Track software, but I don't recall if I have the FasTrak add-in library. If I have that library, I could redraw this layout for you.
But I would only redo the basic track plan, not the accessories. I make mention of that because the accessory symbols appear to be generic. I have no idea what they represent.
yes thank you all! I will redo the bench work asap and do the layout! Thanks so much to Jan ![]()
But yeah it looks like there is some tubular track and cutting of some tracks.
I have only Fastrak, and with this I will have to purchase more of that.
Is there a way not have the tubular and cutting the tracks?
@D123M posted:yes thank you all! I will redo the bench work asap and do the layout! Thanks so much to Jan
But yeah it looks like there is some tubular track and cutting of some tracks.
I have only Fastrak, and with this I will have to purchase more of that.
Is there a way not have the tubular and cutting the tracks?
We're trying to put the cart before the horse here. Yes, a FasTrack only plan can be designed that would be similar to the original plan you submitted, likely without having to cut any pieces. But there are some unknowns that you could help with to narrow down the possible design choices.
Please answer these questions:
- What are the maximum dimensions your table could be/ you want it to be (list the smaller of these options)?
- Would it be possible to walk all the way around this table?
- Do you already have FasTrack switches you want to use, and if so what types and how many of each?
- Do you have or do you want to run trains that require larger than an O-36 curve? If so, please specify the minimum required curve diameter ( ie. O-54 or O-72)
Your answers to these questions will potentially save you money and save the designer(s) time.
Steve.. Yes true. Thanks..
1. Maximum dimensions would probably be 9x14 table. Right now it is 8x12 and I use the Mth DCS system.
2. My present table I can walk around 3 sides. On my present layout the 8ft side is along the wall but I could def make the layout larger to 9ft along that wall side.
3. I have currently five 0-36 Fastrak (manual) switches, three left hand and two right hand. I would like to use them because they are cheaper than the 0-60 switches. I don't mind buying the cheaper 0-36 switches but my wife gives me a hard time when I say "hey honey, uh .. to do this new layout I need 4 new 0-60 switches at 100 bucks a piece". lol
4. The trains I have run on the 0-36 curves and don't require larger curves.. but larger curves would look nicer and the engines would do better on larger curves. Purchasing new curves or straights is not a problem and that would make it look more realistic.
I'd like to possibly connect the outer and inner track together preferably somewhere along the back 9 foot wall, so I can switch the trains for inner to outer loop etc.
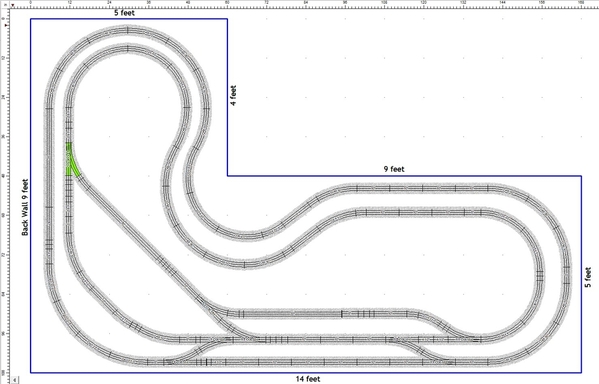
Ok so, here's what a 9' x 14' could look like with O-36 curves and switches and mostly O-48 curves on the outer loop. Note that without cutting pieces, there would be a lot of small fitter pieces.
Most everywhere there is a switch, I've included a 1-3/8" isolation track piece, for two reasons. One is for DCS block wiring of each track section. Two is to allow independent power control to each block with conventional operation.
Since you'll be needing to buy some switches anyway, I'd suggest getting at least one Remote/command control switch to go where the one that is shaded green in the image below. If I've understood the location of the 9' back wall correctly, this switch if manual, may be a difficult reach. Remote/Command would probably be a better option in this location.
Another concern with this plan would be your ability to reach some parts of the layout. Maybe your table is built to be able to climb on. Maybe you'll want to create some hatches for access from underneath. The choice is of course yours.
This SCARM file is attached below.
Attachments
I just realized that I meant to swap out some 10" sections with 30" straight sections to reduce cost and the number of pieces.
That revision with fewer pieces is attached.
Also note that if desired, some of the O-36 switches could be swapped with O-48 (or larger diameter) if desired for smoother transitions to the divergent paths. The plan would of course need to be modified to accommodate these turnout changes.
Attachments
Yeah it looks great so far ![]() .. I do like the idea of a smoother transition but do you mean use 0-48 switches or curved pieces? And do you mean with this plan I would not have to cut any track right? Also, is there a way to print a "parts" list of all pieces needed from the plan?
.. I do like the idea of a smoother transition but do you mean use 0-48 switches or curved pieces? And do you mean with this plan I would not have to cut any track right? Also, is there a way to print a "parts" list of all pieces needed from the plan?
And yes I would get the remote switch for the hard to reach area
Fastrack really isn't ever cut. That was one of the selling points when they invented it.
Also, I think grouping the majority of your switches where you can reach them and using the electrical ones judiciously where you can't is a great way to save hundreds of dollars.
@D123M posted:Yeah it looks great so far
.. I do like the idea of a smoother transition but do you mean use 0-48 switches or curved pieces? And do you mean with this plan I would not have to cut any track right? Also, is there a way to print a "parts" list of all pieces needed from the plan?
And yes I would get the remote switch for the hard to reach area
Thanks. I meant using a combination of O-48 switches in some places as well as O-48 curves adjacent to the switches (turnouts).
This plan doesn't have any cut pieces.
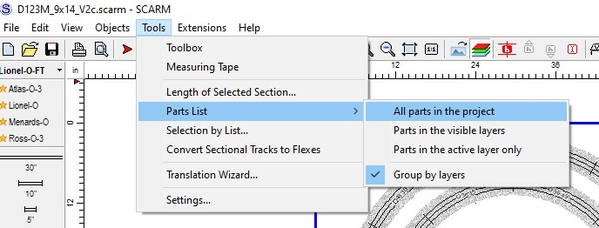
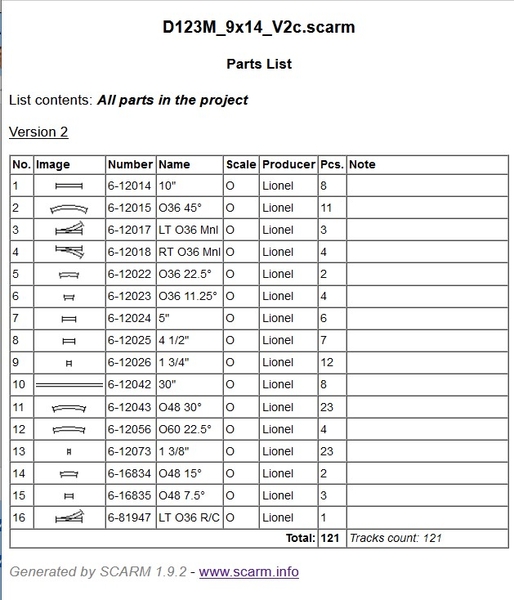
Follow these steps in SCARM to generate a parts list:
From the Tools menu, select Parts List, then All parts in the project.
This will open up a web browser displaying all parts. That can be printed from your web browser's Print dialogue. It should look something like this:
If you could indicate where you'd want O-48 switches, I should be able to make those changes. You could either substitute them approximately in the SCARM file where you want them and re-post it, or use windows Snip & Sketch, Paint or something similar to circle them.
Attachments
@Long Hair posted:Fastrack really isn't ever cut.
FasTrack can be cut successfully:
I found the parts list on scarm.
So I have the Lionel Truss Bridge
Lionel 2130130 - Thru Truss
Sorry a picture was supposed to go up there lol but I am sure you know the bridge. Its about 26 inches long. I love the way it looks.
But I'd like to add it around here to the "outside" track near the wall. Am I going to need multi height bench work, meaning two levels or just use blocks of wood to raise the tracks? because it's probably 5 1/2 inches high.

Attachments
Every length you might need beyond the extremely short is available to the accuracy of one railroad tie or better without cutting simply by combining different lengths of fastrack. Sometimes the combination required gets obnoxious and you are better off making a small adjustment elsewhere to improve your parts list.
I'd suggest either dropping the table height under the bridge or removing the rock piers from underneath the bridge, keeping the bridge at or close to normal track height.
Because of the layout size, creating a 5-1/2" rise up to the bridge would result in an unreasonably steep ~8% grade between the lower left switch and the bridge (the track section shown in bright red).
Attachments
@Long Hair posted:Every length you might need beyond the extremely short is available to the accuracy of one railroad tie or better without cutting simply by combining different lengths of fastrack. Sometimes the combination required gets obnoxious and you are better off making a small adjustment elsewhere to improve your parts list.
I agree that whenever possible, adjustments elsewhere to the overall geometry are often best to avoid using a bunch of smaller fitter pieces, especially considering the cost and voltage drop associated with too many pieces. However, for those among us who are proficient with cutting tools and techniques, as an example, making a custom 9-5/8" piece from a 10" section, may be preferable to using seven 1-3/8" pieces.
I'm also familiar with the Kent Johnson FasTrack Formulas Table. Finding it somewhat lacking in options, I created the attached spreadsheet with more options. Here's a sample of what it looks like:
Attachments
I agree with Steve 100% about keeping the bridge at table height for the reasons he described. Given that technical limitation, I personally wonder if the bridge would like better on the section past the switch highlighted in green, where the track is single and the bridge might make more sense.
I will remove the piers and keep the bridge lower. AND That's the problem I am currently having with my layout. I used Lionels "The Big Climb" layout plan and set it up, the grade is crazy steep on a level table top. The engines, even using full power on DCS can't get any more power up the climb so they even sometimes just stop. The distance is too short to be able to climb up and over the other tracks. I even added more track to make the straight parts longer and lessen the grade over distance (hence my present table size at 8x12). Maybe it would run better with conventional throttles, probably because you can throttle more quick power up the climb. But I want mostly to be able to use the DCS system, I paid enough for it. That's why I went searching for a new plan. And with the one that we are working on, I won't have to worry about a steep grade and be able to finally have fun. So I really do appreciate your help here! ![]()
I think the only place I would want to try the 0-48 switch is actually where you have the highlighted green 0-36 so its just more fluid there. Is that possible while keeping cost down? I know you'd have to make changes elsewhere but I'd like to see it
I think the best practice in that case is to accept that 9 5/8 is basically 9 1/2, which is easy. I personally am never going to cut track or install seven tiny fitter pieces to fix 1/8 of an inch - much less than one railroad tie.
@D123M posted:I think the only place I would want to try the 0-48 switch is actually where you have the highlighted green 0-36 so its just more fluid there. Is that possible while keeping cost down? I know you'd have to make changes elsewhere but I'd like to see it
Here's the modification with an O-48 RC switch and a few other substitutions.
The revised SCARM file is also attached.
Attachments
Thank you so much.
You're welcome. Please post some pictures of your progress on this layout.
I just noticed something I initially overlooked. There is less of a tendency for trains to derail at the switch (coming out of a curve leading into a switch) if a short straight section is inserted between the curve and the switch. In the image below, I relocated the orange 4-1/2" piece so that it's between the curve and switch for a train traveling on the inner loop in a clock-wise direction.
The revised SCARM file is attached.
Attachments
Is there a way to add a loop for the train the other way too?
I'm unsure what you mean. Could you please provide more details?
Sorry yeah I meant add maybe a double reverse loop to it. I'd like the trains to be able to go both ways on the tracks. And actually the size could be longer on the long 14 ft side if needed. I could actually go up to 16 ft long on that 14 ft side. The layout is in my full basement which is partially unfinished at the moment (work in progress) but it's got a pellet stove and AC so I use it all year round.
Also as far as the reverse loop or dogbone (actually not sure what to call it) I'd like to be able to run longer trains, if that helps? Probably doesn't and I am making it more confusing at the same time.? Let me know.. lol
I'm guessing a reversing curve.
Here's a revision with two reversing loops , one for either direction, and the table expanded to 16 feet long. I left a few extra inches of space on the extended end for scenery.
Enjoy! ![]()
Attachments
@Junior Thank you. I do enjoy building things and figuring out how to make things work. I consider it to be one of the many fun aspects of this hobby of ours.
I was scrolling through and was thinking reversing loops could be squeezed into the inner the whole time glad to see it happened. 😊
You can also possibly keep the table width closer to 4’, if desirable, by making compound curves for the outer loop. You can use different radius curves to create an O42-44ish outer loop and keep it on the table..albeit right on the edge. Ken does this in many of his smaller layouts and it can be a nice way to get creative with FT at times when space is limited.


