You mentioned your Louisville LHS...what is that?  I have seen a slough of them come and go in Louisville, from Fischer's once well know shop down off Fourth Street, to his widow's shop that was just around the corner from a present train shop off the east end of the Watterson off Brownsboro Road close to the I-71 exit.  Others into Louisville on Taylorsville Rd. and out toward Fern Creek on Bardstown Rd.,and on a back street in St. Matthews are kaput.


My favorite is Scale Reproductions, Inc. in the McMahan Center at Hike's Point. It's a classic, fully-stocked, broad-based hobby shop. It has a comprehensive RC department. A big railroad department (unfortunately it's about 95% HO) and the best plastic model department that I've seen in a generation. I frequent them as much as possible to keep them going. They plastic model department is so enticing that I'm tempted to start building again. But I can't. I have a railroad to build.

For trains, I go to Roundhouse Trains which is the one you mentioned in the Brownsboro Center at the Watterson/US42 junction. Roundhouse changed owners and tripled in size when they got the space that used to be held by another business. It's a terrific train store that's also a licensed repair center. They're about 70% Lionel, and have lots of used and new stuff. For my train purchases I usually go there. Again... I want to keep both of them in business. The L&N train store that was way down on Frankfort Ave, closed when the owner retired. Roundhouse took up much of the slack created when that happened. When Kevin took ownership, they lengthened their hours so they're now open like a normal retail operation. Before, they were open every other day.

There's a smaller RC specialty shop on Shelbyville just East of Hurstbourne and there's another full-range (although smaller) shop in a shopping center out Shelbyville before you get to the Gene Snyder. There may be others, but I don't know them.

The RR Tie wall is done and drying. When it's cured I'll go back and do some more scenic treatments on it.  There were some undulations in the topo as I neared the right edge which required the construction crew to do some spade work to excavate out a bit of the plaster to create a level footing.

RR Tie Retaining Wall Spade Work

I had to do this under most of the ties on this end. I also used the tooth pick "rebar" to hold two courses plus into the substrate together. There's a small gap between the base plate and the wall which I'll carefully fill with some Scuptamold. In general it looks as I wanted it to. I would suggest using Ross RR ties to do all kinds of construction jobs around the layout. They come in nice 25 tie packages.

RR Tie Retaining Wall Complete

After this I decided to run some trains. After all, that's what this hobby is all about. I finally unboxed my MTH Pennsy, 5-car Madison set. They've been in the box since the moved from Bucks County, PA. There were squeaking a bit so I did a full, all-around oiling. Then this happened.

Madison Car Vs Victorian Station

The nice die cast tail lanterns run into the shed roof on the Victorian Station. This was entirely un-anticipated. All of my engines and rolling stock were clearing the roof. I was having trouble with the loading platform getting smacked by engines with wide pilots or trucks, but not the roof. Not until this. I really don't want to remove the station to grind of an 1/8", so I tried to remove some material from the lantern. That's when I found out that it was a metal casting, not plastic. This wasn't sufficient. So I re-routed the train to the other track that passes on the truck-side of the station. I probably will take the station off the layout to do the repair, but even though it's not glued down, it is a pain since I have to undo the wiring to get it out. 

My MTH U-50c hasn't been run much and was having battery troubles. It's a PS2 loco and wouldn't go into reverse. I charged it for several hours and it worked okay.

Then tonight, I just had to take this picture of the substation under its own lighting.

Substation Night Shot

Tomorrow I'll do some landscaping.

Attachments

Images (4)
  • RR Tie Retaining Wall Spade Work
  • RR Tie Retaining Wall Complete
  • Madison Car Vs  Victorian Station
  • Substation Night Shot

Mark, the Substation looks so real that I'm afraid to ever touch those bus bars for fear that I'll be vaporized. The florescent lights in the room make enough 60 hertz hum that you can imagine it's that main transformer doing it. And thanks Ken. It so exceeded my expectations that it was hard to imagine doing it again.

As far as YT... It's a possibility, but can it be monetized? I know Eric's Trains must be doing pretty good because you'd have to be a millionaire to buy as many locos and he does. He must be getting a cash stream from his activity. 

Today as planned I mixed up some Sculptamold mud and spread it around pretty well to blend the retaining wall into the terrain. I didn't even bother to remove any of the previously applied ground cover. I just slathered over it and used a very wet acid brush to feather the edges. I used W-S Earth Base tint to turn the Sculptamold a disgusting shade of brown, which makes it easier to add the ground cover when it's cured in a couple of days. I find that it takes a long time to thoroughly dry when it's in thicker sections. The plaster of paris cures quickly, but the fiber filler stays damp for a while. I don't like to paint it before it cures since it would seal the surface from being able to dry. There's enough of the stuff on the wall to kick start the weathering process. 

Sculptamold Dirt 2Scultamold Dirt 1

I'm seriously looking at the spray booth thing. Scale Reproductions has one that's similar to the ones sold by MicroMark. I'm researching building the box to enclose the cellar window where I can open the window, but using a one-way dryer vent, keep the cold out when the spray booth is off. To get one big enough to do a 1:350 capital ship will be prohibitively expensive, but I wonder if you paint directly in front with there be enough air flow to draw the overspray and fumes into the booth? Any thoughts out there.

Attachments

Images (2)
  • Sculptamold Dirt 2
  • Scultamold Dirt 1
Trainman2001 posted:

As far as YT... It's a possibility, but can it be monetized? I know Eric's Trains must be doing pretty good because you'd have to be a millionaire to buy as many locos and he does. He must be getting a cash stream from his activity. 

Hi - The YT Story - Short version. Yes you can monetize your videos. Like we all say, it is not about the money, they pay YT creators. It is about meeting fellow model railroaders, world wide. They even have live camera chat rooms for model railroaders seven nights a week. I try to hit about two of these a week.

Yes you can become a millionaire on YT, and over 200 channels have done that. See Google for channel names. Only 17% of YT channels have 1000 subscribers or more. Google will also list the top 500 channels and there are no model railroaders or rail-fanners, in this group.

With this being said, model railroading, does have a good foot print on YT, the same way it is in the real world. Cooking, golf, hunting / fishing & music is a larger group then model railroading.

If you are on a Apple Computer, you can take free classes at your local Apple Store. On, how to use iMovie and share this on YT. You have a large following on this Forum that would watch your YT videos. It will take you about five years to get to a large subscriber rate. On your way, you will meet a lot of model railroaders. If you need help getting started, drop me an e-mail.

YT also has online classes on how to use their editing software and rules.

Good Luck: Gary &

 DETROIT AND MACKINAC RAILWAY Cheers from PASSENGER CAR v6

Attachments

Images (1)
  • DETROIT AND MACKINAC RAILWAY Cheers from PASSENGER CAR v6

Thanks 86TA... I really appreciated the thoughts.

The YT thoughts are intriguing, but how many more railroad modelers do I need to link with. I already have a gaggle of railroad modelers with whom I am in regular contact. I have some concerns about the actual videoing when I'm doing it alone. I'd love to build a series about doing some of the more sophisticated crafting skills that I've developed and taught over the decades. I also would require a much cleaner and orderly shop space. I am dedicated to advancing this hobby and especially attracting new (and younger) blood.

As I predicted, the Scultamold was not fully dry in the thickest sections so I left it alone for the day. We had about 3" of snow today so winter is officially upon us here in the central Ohio Valley. What a great day to be in the shop building models!

And now for something completely different.

I built this model when it was originally produced (in 1956) when I was 11 and building models like a maniac. I built a model a week for several years. My parents were very understanding. Anyway... it's the Revell White Gas Truck. It's actually 1:48 so it's a must-have for a model railroad. There are very few trucks out there that are actually our scale. I found it at Scale Reproductions a couple of weeks ago. Some guy turned it in on a trade and the price was right so I impulsively bought it. It's a re-issue, but produced with the old dies (and it shows it), having lots of flash and some sink holes. My modeling skills are so far advanced from when I was 11 that it will make a nice build.

white-gas

My service station is Sinclair so I'm thinking about painting the truck green and creating my own Sinclair decals. I have some left over decals from the Berkshire Valley gas station build a couple of years ago, but they're too small. I bought Inkjet decal film and haven't had a chance to try it out yet. So I'm going to scan the decals I have and enlarge them to the size that fits the truck's tank. The level of sophistication of today's slide-molded plastic kits is so outstanding and beyond what was produced in 1956 that the kit provides some challenges. For example: the kit has no provisions for window glazing so I'm adding it out of 0.010" clear styrene. 

To do the best job so seam fitting/filling and painting, I'm constructing a lot of the model before doing the color change. This will create a lot of post-airbrush hand painting. 
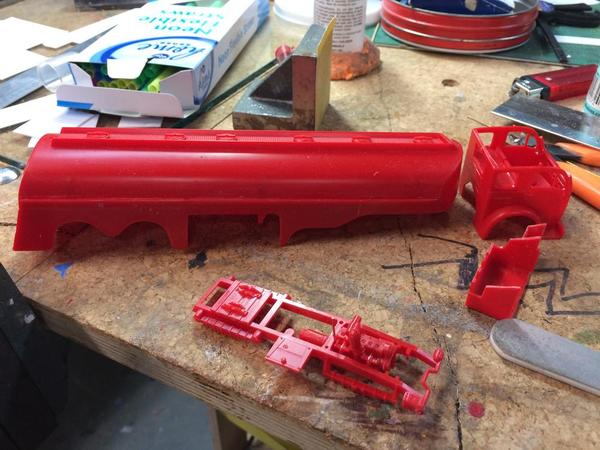
Gas Truck 1

The kit's part count is low by today's standards, but that's okay since I'm really not interested in a serious plastic build. The engine depicts a flat-head six. Wheels and tires are one-piece red plastic, again making for challenging painting since I'm painting the rims Sinclair green. 

To fit the windshield, I glued together all the cab parts except the roof, then taped the roof in place. I can't glue the roof in until the interior is painted. Unlike later car kits where the body and interior are separate and can be painted and detailed before assembly, in this instance, the seats form a structural part of the cab and need to go in to hold the sides of the cab in place. The lower front is separate as is the roof. I first tried tracing the windshield's shape onto white paper, but I was getting an inaccurate result. I then turned to Tamiya masking tape which would hold itself in place while I traced the windshield's shape. This worked well.

Gas Truck 2

I stuck the tape onto the styrene and cut out the shape with a pair of Fisker's scissors. I cut it oversized and then crept up to the actual shape. Here's the resulting glazing waiting until all the paint work is done to go in. I will probably use Hypo-glue to hold it in place. It's a cement that has a fine capillary tube applicator and gives excellent control for glazing. The side and back windows glue to flat surfaces didn't require custom fitting like the front did.
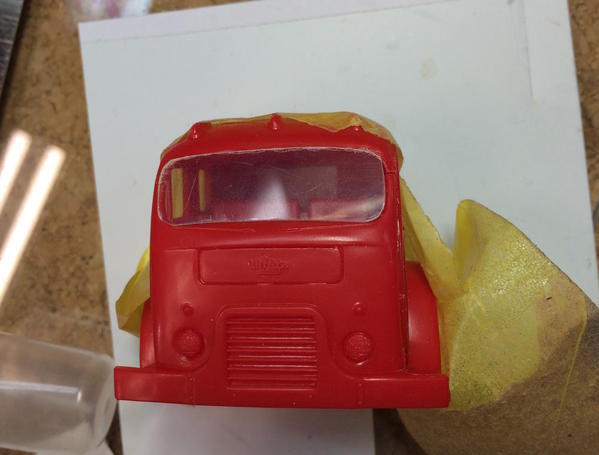
Gas Truck 3

There's a couple of nasty joints at the front pillars that will need attention. I'm going to use Bare Metal Foil for the wipers, head lights and other trim. 

I gave Andre the green light to cut the boiler house. I'll have it in a couple of weeks. In the interim, I'll maybe make some more telephone poles, finish the gas truck, landscape the distillery, and start thinking about other things. Walther's had the Plastruct Chemical Plant kit on sale over the holidays. I really want one of those for the back side of the layout, and will probably spring for it later this year. I also am committed to building the distillery for Heaven Hill's visitor center. Incidentally, they just announced a $15 million expansion for the modern Bernheim distillery here is Southwest Louisville. Bourbon is doing very well indeed. Andre's giving me pricing for all the distillery parts as subassemblies in case any of you folks would like to have it, but not go for the whole shebang at one go.

At some point I'm going to have to bite the bullet and get working on the layout's right end. It's where the tunnel and mine are going and I'm procrastinating about it. I tend to do that when I not sure about the approach I'm taking. Unlike the bridges which were needed to make the railroad function, the tunnel is strictly cosmetic. AND I need to build that 17 foot long facing wall below the high line. That's another thing about which I'm procrastinating. Luckily, I'm my own boss, the trains are running well, it's a lifelong hobby, and I'm retired.

Attachments

Images (4)
  • white-gas
  • Gas Truck 1
  • Gas Truck 2
  • Gas Truck 3

The Sculptamold was dry so I finished landscaping the wall and re-ballasted the track in that area which was showing some signs of deterioration. Like any good MOW provider, good ballast is required for good rail operations. I used Aleen's normal tacky glue thinned with water and a bit of alcohol and applied this directly over the tan-colored plaster. Since the plaster wasn't white, I didn't have to use the latex paint method to adhere the ground cover. I used a mixture of fine green turfs of different shades and some coarse turf of different shades also. I just sprinkled it from a shaker bottle on the wet glue. I then added some weeds, bushes and stuff using W-S products and the left over weeds I made before. Lastly, I went back and dulled down the wood with Dr. Brown's weathering powders (dirty gray and grimy black). The results are passable.

Wall Comp 7Wall Comp 4

Wall Comp 3

While working on this part of the layout, I found an errant traction tire. I figured (correctly) that it was thrown by my MTH UP U50c that was running yesterday. I had noticed that the loco's body was cracked under the radiator assembly before, and thought that I fix it sometime in the future, but when I found it was missing a traction tire—actually 3—I decided to fix the body now. That's when I discovered this.

U50c Troubles 1

The body was completely fractured and there was a crack in front of the engineer's side cab door. To make matters worse, two of the four central studs into which two of the mid-body screws go were also sheared off and were now separate pieces. Luckily, it's all ABS and the Plastruct cement does fuse it. But it was a jigsaw puzzle. I wasn't sure if I could actually get it back together, but I am nothing if not crafty. I actually did replace the 3 missing tires and lubricated the mechanism. I will go back and do some cosmetic work to hide the seams, and may put some addition reinforcement across the inside of all the breaks. Here it is back on the layout and it runs!

U50c Troubles Over 2

So how did this happen? At first glance I thought it had fallen to the concrete below, but there was no external damage that would be evident if the engine smacked into the floor at 1g. I always picked this engine up by the convenient handle on top—the large radiator that spans a 1/3 of the carboy, but this was probably not such a good idea. The engine's heavy and the body is mostly perforations in the midsection, ergo weak. I believe that the body may have cracked at a weak point and then progressed to total failure over many pickups and carries. I'm going to call MTH tomorrow and see if a new body is available for this model #20-2252-1. It is my favorite diesel engine since you can actually hear both prime movers start during the start up sounds.

Attachments

Images (5)
  • Wall Comp 7
  • Wall Comp 4
  • Wall Comp 3
  • U50c Troubles 1
  • U50c Troubles Over 2

Well thanks! I don't consider myself and expert landscaper. Buildings... yes... I do them well, but I tend to cut corners on the diorama aspects of the hobby. There are many others to whom I look to for ideas.

I called MTH Customer Service to see if they have a loco shell for that U50c. Their folks in the parts department had gone for the day due to the snow expected in Maryland. She left an eMail for them. I'm in no rush. I ran the trains for a while today and suspect that the battery in that engine is done. I may get a battery eliminator for it. I've never been able to get the freight yard sounds to work when running in conventional. It's a PS2 engine, but I don't have DCS (yet). 

After playing for a while, I went back to work on the gas truck. I finished gluing up all the things I could do and then filled the few sink marks on the tank trailer. I also cut all the remaining windows for the cab. I'm going to have the driver's window open. Because I'm using solvent cement throughout, it was easier to glue everything up before painting. I will hand paint all the details after the main colors are applied. Since the windows are going in after interior painting, BUT before the roof goes on, I will have to protect the windows with masking tape or liquid mask when airbrushing the finish color on the exterior.

Gas Truck Filler added

It's actually quite enjoyable to build a kit that I didn't have to first design. 

Gas Truck Windows

Weekend coming... that means no shop work. On Monday, I will start painting the truck.

Attachments

Images (2)
  • Gas Truck Filler added
  • Gas Truck Windows

Just to kill time while my wife was engrossed in watching the Australian Open Tennis Tourney, I was reading my entire thread and got up to page 23. It's amazing how much I'd forgotten about what it took to get to this point, and how engaging was reading all the comments from everyone. I'm reflecting on some of the suggestions that were made so I don't lose track of them. 

Today was one of those rare Saturdays where I got to work in the shop a bit. The snow here in L'ville is already melting a bit and the roads around here are all clean and drying. Can't say the same for my family back in Philly. Ugh! I primer painted the gas truck and put the finish color on the tank. I painted it Tamiya Japanese IDF green which approximates the dark green of Sinclair Oil. I'm going to attempt to make my own decals from the leftovers from the Berkshire Valley gas station. The ones I have left are the wrong size. Through some creative computing, I'll make correctly sized ones and print them on the decal film.

Gas Truck Tank Painted

I hand painted the interior seating and will install the windows. Then, after gluing the roof in place, use liquid mask to protect the windows and paint the cab the same color green. For any of you who don't own an airbrush system, what's taking you so long? There are some modeling tools that just up the whole game. Airbrush is one, the RSU is another. While it would be nice to own your own laser cutter, after talking at length with Andre, I quickly realize that it's a tool best left up to professionals. The small amateur machines like MicroMark is currently offering, have neither the size nor cutting capacity to do O'gauge-sized projects. If I was working in HO or smaller, I might have considered it.

The filler effectively closed up the sink holes in the tank's sides. 

For the tires, I first primed the wheels, then airbrushed the wheels Sinclair green. To mask the wheel centers when I paint the tires, I'm cutting circular masks. I measured the wheel diameter with the digital caliper, divided the number in half and used this setting to adjust a special divider I made which has one point sharpened to a chisel edge. And then using this to cut circles of masking tape to cover the wheels. This was my first attempt. I cut it on the cork work surface and it wasn't uniform enough to give a clean cut. For the production run I will cut the tape adhered to one of my cutting pads.

Wheels 2nd Coat

Tire Mask

The fact that there's a small perforation in the center does not matter since underneath is the axle hole.

Next time I will progress with the painting.

Andre has provided me with a pricing breakdown on the distillery. If we offer it as a kit, we'll make the main building, the kitchen annex and the boiler house separate kits so you can buy as much (or little) of the project as you wish.

Attachments

Images (3)
  • Gas Truck Tank Painted
  • Wheels 2nd Coat
  • Tire Mask

While not a shop day, I did get something done. I photographed the large "Sinclair" decal left over from the Berkshire Valley gas station, imported it into Adobe Illustrator (after straightening it in some photo editing software) and then sized it appropriately for the truck side. From the photo of the truck I took yesterday, I was able to sample the color I used and redid the background to match. I then redrew the entire image over the newly sized photo. 

I had to do this because the original decal was creased and damaged a little so I could just shrink it and print out a new one. I had purchased the ink jet decal film from Bare Metal Foil and this was a perfect opportunity to try it out. I bought both the clear film and white film versions. Since the lettering in this case was white, I printed the image out on that film.

Here's the original decal. Besides being too big, the green didn't match the truck color so it would look like a gigantic banner, not lettering that was actually painted directly on the truck body. You can see the damaged area on the left. The background was too green.

Gas Truck Decals

I measured the truck body and estimated that a 4.5" long image would work so I reduced the photo's size in the bottom layer on Illustrator and then locked that layer. I created three additional layers: background, border and shadow, and text. This lets you lock out or hide things you don't want to see or interfere with. The original type face was a custom font (probably) so I drew the characters over the photo image on layer 1. Having command of software like illustrator and SketchUp creates enormous power to do custom things in this hobby.

I made the first go and printed it out on plain paper. I knew that the color density would be different on the decal film since I would be printing it out using photo paper settings and higher res, but I was more concerned about the hue. I cut it out and tried it on the truck for size and color.

IMG_4511

The hue was right, but it needed a bit more black. It was also too big so I copied it and reduced the size somewhat and printed out another trial. This time, the color looked right. Here's the printed decal film. The resolution, color, brightness looks terrific. This decal film is not cheap, but it enables you to do stuff that's impossible any other way. In the past the best I could have done is print stickers and it would look it.

Sinclair New Decals

The next thing you have to do is air brush Microsol Decal Film coating over it in two coats to seal the color and strengthen the film. I'll do that tomorrow in the shop. As I've said a dozen times on this 3 year odyssey, you're never too old to learn new skills, try new stuff, expand the envelop.

I also decided how to handle the window installation and painting. I'm going to pack the interior with wet paper tissue, temporarily put the roof on, paint the body color, remove the roof and install the windows. After that, I'll reattach the roof permanently and touch up any things that need it such as that poor windshield joint. This will permit to leave that driver's window open. If I hadn't gone that route, I could have used liquid mask on the windows after fixing the roof.

Attachments

Images (3)
  • Gas Truck Decals
  • IMG_4511
  • Sinclair New Decals

Ah... Monday... Although I worked out on the apparatus I did get downstairs at about 2:30 p.m. I was able to coat the decal with the first coat of Microsol's decal film coating, and then I got to work on the cab. I filled the interior with wet paper towels (although facial tissue would have been better... more conforming) and sprayed the green exterior with the roof just sitting there. There was some bleed, but touch up with the gray cleared that up. All in all, not bad. I sprayed the chassis glass black.

Gas Truck 1st Painting

I then did trim painting on the trailer. I painted the walkway flat aluminum and then followed up with chrome silver on the hatches. I painted all the controls and piping details and the ladder in back. I slopped it up a bit, retouched with the green and then shot it will Tamiya gloss spray in prep for the decals. I was rushing a bit and got chrome silver on my fingers which I then transfer to the tank. DOH! I don't know if I going to finish it in gloss or flat. It's a commercial truck and probably wouldn't be too shiny. Here's the work completed so far. BTW: Tamiya has a new color available: Tire Black. It's a different shade than Nato black and looks very much like tire rubber. I painted the spare underneath the trailer with it.

Gas Truck 2nd Level Painting

I need to get some Tamiya transparent yellow to paint the marker lights on the tractor and trailer. Their transparent colors last forever since there's no pigment. It's just dye, resin and alcohol. I have transparent red, blue and green, but no yellow. Tomorrow I'll put in the windows, get the roof on, do any filling and apply decals, and finish the wheels and tires. I realized while writing this that I didn't paint the exhaust pipe and muffler rust colored. I'll do that tomorrow too. I think I'll finish it gloss.

Attachments

Images (2)
  • Gas Truck 1st Painting
  • Gas Truck 2nd Level Painting

I have seen that tank truck kit in shows, and thought about repainting it, too, to logos of defuunct regional petroleum companies, but was not sure of the year(s) the prototype  was offered.  You built it originally in 1956, it has a flathead engine, but it could be a model of a postwar prototype, and not have existed prior to WWII.  Yet, the styling might put it into the late 1930's as one of the early cab-overs.

Thanks guys! The kit was reissued in 1995, but with the original dies.

I did some good stuff today and some not-so-good stuff. The good stuff included finishing the truck except for the side mirrors. I used the custom decals and got all the tires painted using the circular masks. I fitted all the windows and placed the roof. The not-so-good: almost destroying said decals by using Walther's Solvaset, having trouble with the front windshield, and breaking the right-hand lug that supports the cab hinge.

I applied the second coat of Microscope Decal Film Liquid. This time I brush painted it with no ill results. I then cut out and applied one of the bigger ones to a piece of plain styrene as a test. It worked well. I then carefully trimmed the correctly sized decals and applied them to the tank. Since the decal's native color is white, you must trim into the color or else a white edge would be visible on the dark tank.

Sinclair Decal applied 1

The decals are a little on the thick side and the edges were curling up away from the truck's curve so I needed to add some decal setting solution. I've been told that Solvaset is a little strong. In this case it was WAY TOO STRONG! After a few minutes the surface started looking like it was suffering from some kind of skin condition.

Sinclair Decal damage from Solvaset

After it all dried I went back and hand painted the damage. I should have grayed-down the white a bit and it would have been almost undetectable after using a spray of Testor's Dull Coat.

Sinclair Decals Dull coat

I mounted the horns on the roof and then attached all the windows. I used Formula 56 Canopy cement. It does stick to plastic and it dries clear and doesn't craze the plastic. I had to trim the back window a bit since it stuck up a tad above the wall. I also had to remove a tab at the back of the roof which also interfered with the window. The front window didn't fit and when attempting to file it, the clear styrene started delaminating and crazing, so I had to make another one. The fit was still not optimal, but I made it work. If this was going to be a shelf model that would receive more scrutiny, I would have been more concerned, but this model will be on the layout and these nitpicking details will go unnoticed.

The tire masking was a breeze and the Tamiya Rubber Black color looks terrific. 

Gas Truck Tires complete

When attempting to "snap" the cab over the lugs on the chassis one lug broke off. I had cut a slot in the cab lug to let the pin on the chassis lug to get into the hole, But the cab lugs were too wide and it took too much pressure to get them together. I glue the lug back on with solvent cement followed up with CA. I then clipped of the plastic pin and drilled through the lug into the frame to accept a piece of 0.032" brass rod. The rod is my go-to means of repairing small stressed plastic parts. I also took some more material off the cab lugs and the whole deal went together as it should.

Here's the finished truck prior to applying and painting the side mirrors. I went with dull coat since making it shiny would have accentuated any defects in the decal. Matte hides a lot of sins.

Gas Truck Comp 2

One of the best things was how close I was able to match the paint color to the background color in the decal. It's almost dead perfect. When I use this decal film again, I'm going to use Microscope's Microset instead of Solvaset since it's a milder solution.

I think I'll clean up shop while waiting for the boiler house to arrive from River Leaf Models.

Attachments

Images (5)
  • Sinclair Decal applied 1
  • Sinclair Decal damage from Solvaset
  • Sinclair Decals Dull coat
  • Gas Truck Tires complete
  • Gas Truck Comp 2
Trainman2001 posted:


I moved the Nighthawks' windows up a foot and a half (scale of course) and am working to create the upper molding for the curved front window. Getting that wonderful curved window to work will be one of the bigger challenges in building the Nighthawks Cafe.


Here's a picture of John Armstrong's Version. 


hopper-1


What's neat about the Allen version is how he also modeled the street scene to be somewhat like the painting. My buildings across the street aren't going to look like that. Notice that the door behind the coffee urns is blocked. You can't get to it. I've put the door in a more logical place to actually provide access to the room.

Not to get off topic, but his illumination of the diner sign is also very cool. Is that etched plexiglass he used?

That sign does look like etched plexi. I wonder if Andre can make a sign like that...?

After finishing the truck by adding some Bare Metal Foil to the sideview mirrors, mounting and painting them, and painting the marker lights Tamiya clear yellow, I bit the bullet and worked to finish the cornveyor system.

I don't know why I spent time putting the foil on the mirrors, but I did and it looks reasonable. There were sink holes in the mirror face center, but I didn't spend the time to fill them. They're not noticeable at normal distance and sizes.

Gas Truck Mirror

I then got back to finishing the cornveyor system. Before painting I needed to build a simulated motor drive. I did this using various kinds of Evergreen shapes including telescoping tubing and flat 0.040" sheet. I made the motor with three diameters of tubing. The belt casing is a laminate of 0.040" sheet. The motor supports are 0.040" which I first drilled with a 1/4" brad-point bit. I then sectioned this around the hole which gave a perfectly shaped circular support which was the same i.d. as the motor's o.d. This was glued to the main conveyor using some H-beam as a base.

Cornveyor Motor 3

I added a laminate of two pieces of 0.040" to raise the connecting portion of the vertical conveyor so it would correctly match the truss height. I noticed this gap when I did the trial fitting. I then mixed up faux galvanized steel using Tamiya flat aluminum, sky gray and flat black. I thin all Tamiya paints with 91% isopropyl alcohol bought in large size bottles at CVS. It's the same solvent as Tamiya uses and is vastly less expensive. Don't use alcohol for other water-based paints such as Vallejo or Model Tech. It causes clumping and plugs the air brush. For those I use Vallejo's air brush thinner.

I have a Badger 150 double-action air brush which earns its keep today because I was able to throttle back on the paint while painting the individual members of all the trusses. I was able to actually put the tip inside the truss and spray the backs of each member before doing the outside. This saved paint and greatly reduced the overspray and kept the basement relatively vapor-free. Imagine painting that structure from a spray can. 

Cornveyor Paint 1

You can't really see the slight metallic sheen this mix gives, but it's there. I then used Vallejo US Gray for the conveyor. I airbrushed the large piece, but had to brush paint the part that attached to the top works.

Cornveyor Paint 2

I then started (but not finished) hand painting all the ladders and rails on the silos. I thought about air brushing, but would have had to mask the silos and was afraid that the tape would lift off the aluminum foil. That was a risk I was unwilling to take. Brush painting this kind of stuff is boring and slow, but it's the only other choice.

Silo Rails Paint 1

Next session I will finish all the painting, which includes picking out some other colors on the motor, and then mount them on the layout. I got the green light today from Heaven Hills Distilleries that the cost of the build is not a problem. So I will be giving Andre the green light shortly, as soon as I get my own boiler house built.


Attachments

Images (5)
  • Gas Truck Mirror
  • Cornveyor Motor 3
  • Cornveyor Paint 1
  • Silo Rails Paint 1
  • Cornveyor Paint 2
Last edited by Trainman2001

Finish the painting (not the weathering) on the Cornveyor including the concrete bases and next session I'll be doing some conservative weathering. In looking at the actual pics, the top surfaces are blackened by the alcohol mold that forms on stuff near distilleries. I think I'll hit everything with a misting vertical shot of weathering black, and some washes, and maybe some strategic rust stains. Then it will be time to permanently place it.

Cornveyor Paint Comp 2Cornveyor Paint Comp 1

While attempting to paint the brass intermediate platform I ran into a strange problem. Not only did the paint not want to adhere to the brass, it immediately started clumping with hard pieces forming. It was a mess. After I got the first coat to dry with the heat gun, I got the second coat to adhere. At first I thought it was a reaction to the flux that still remained on the brass so I washed the whole deal with alcohol and tried again, with no more success than the first time. While normally I would be crestfallen turning in such a terrible paint job, in this case it almost works giving a non-slip finish and already being a little pre-weathered. I would have air brushed this, but was afraid that the masking would pull off the aluminum foil making a bigger mess.

Paint Disaster

The problem continued even when painting the ABS which led me to believe that something happened to the paint. Here's what I think happened. I use styrofoam egg cartons as paint mixing pallets and had used this particular container for the gray Vallejo paint from the day before. It was dry (or so I thought). The alcohol in the Tamiya paint dissolved this Vallejo paint and when Vallejo gets in the presence of isopropyl alcohol it immediately cures into clumps. It's what blocks up air brushes. I should have used a new egg holder. I cleaned out all that paint and remixed a fresh batch and the problem went away.

On another front:

I was having trouble with dead batteries especially on my PS2 MTH engines. I decided to start a replacement program with BCR's. I had put one with a charger into an Atlas TMCC engine which works great. Atlas, like Lionel, don't have rechargeable batteries so either you keep feeding them 9V batteries, live without sounds continuing when the engine is being put in neutral or reverse, or you can install a BCR. BCR's need to be fed a charging current so you have to install their charging circuit. It really works well.

It seems more problematic with the earlier PS2 engines with the 8.4v batteries. I have two, the U50C and the Lima Center-cab. Both engines constantly showed signs of drained batteries and wouldn't go into reverse. After putting in the BCRs, letting them charge for 1 minute at 11 volts, they ran great! I then changed out the 3 volt Ni-Cad that was is my PS2 N-S F-7 A-B-B-A (only us O'gaugers could make sense out of that string...). The 3V engine didn't seem to have as much trouble as the other two, but I changed it out anyway. I then replaced the 9 volt battery in my Baldwin Centipede. It too worked great with the BCR. 

I'm going to start a program to change out every battery on every other engine I have. It's not cheap at about $29.00 per. But I have a lot of engines that don't get used frequently and they always run terrible because of lost battery charge. So 5 down and 11 to go. While the engines were in the foam cradle I did a full lubrication.

For the U50C, while I had it apart again, I decided to put some metal plates across the now-glued fracture lines. I don't think MTH will have another body for this engine and therefore, I thought some additional reinforcement was called for. I used some Gargraves metal junction strips held with J-B Weld 2-part steel-loaded epoxy. It was gratifying to see that the broken lugs were still intact. I don't know of any way to further reinforce them. They also support the spring-loaded contractors that bring power to all the lighting on the body. I think MTH's engineering is the best in the business since you can remove the body without having a gazillion wires still suspended from the body to the chassis.

U50C Reinforcement

I only placed the metal across the bottom breaks, but figured that this is where the maximum stress would be. At Roundhouse Trains, they told me that I should never pick the engine up by the body. They said to tip it and lift it from the bottom. Who knew? I've been playing with trains for a long time and constantly been picking them up wrongly. J-B Weld, for the uninitiated, is very strong, but cures slowly (24 hours). You can fill unintended holes, re-drills and tap them. I've saved some pretty significant blunders with that stuff.

Attachments

Images (4)
  • Cornveyor Paint Comp 2
  • Cornveyor Paint Comp 1
  • Paint Disaster
  • U50C Reinforcement

Today was a real mixed bag. First I did a repair job on my Atlas SD35. The headlight wasn't working, so I pulled the shell off and fixed it by reconnecting the connector into the spring contact block which made better connection. I first checked to make sure that both lamps were actually good by powering them up. I mistakenly thought they were LED, but they're grain of wheat bulbs. They buried in clear silicone so they're hard to remove and change if they were bad. Meanwhile in manhandling this engine over the various times I've had the shell off, five of the handrail stanchions broke away from the frame. During the weekend I tried to glue them to the frame with J-B Weld. After curing for 24 hours, I found that it DIDN'T WORK. Time for some more drastic plan B action.

I drilled the stanchion and frame with a 0.032" drill, inserted 0.032" brass rod. I then riveted a head onto the brass using a narrow nail set punch, added some thin CA and it held. I then mixed up some Brunswick Green (lots of black and some Tamiya Japanese Dark Green) and covered all the mess. Looks kind of gross in this pic.

SD 35 Railing Fix 1

Doesn't look so bad in this one. It's reasonable strong, but not great. By peening the end of the brass may also have had the added good benefit of fattening the brass' diameter in the hole actually making it into a real rivet. The paint match was terrific and I also touched up some other blemishes on the end.

SD 35 Railing Fix 2

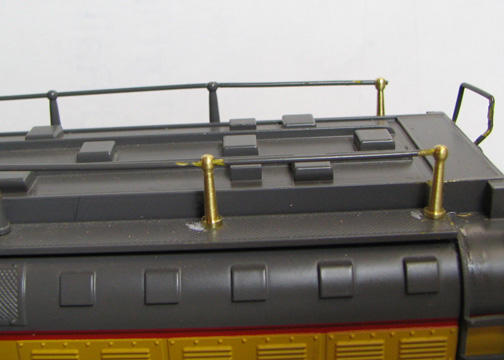
Next I ran trains for about an hour. I'm gradually getting used to my layout and how the switches have to aligned to move trains to all the places. I bought some UP Scale Coat colors years ago after I did the major repair on the coal processing tender in my MTH #81 Coal Turbine. The processor was constructed by UP from a Big Boy tender. This model hit the concrete when the layout was in Pennsylvania. Three rail stanchions on top were destroyed and I had to turn new ones. These bare brass stanchions plus other dings and scratches from the same accident needed paint. Today they got it. The paint matched perfectly and with need some dull coat when it's fully dry which I'd do next time.

Lastly, I started the weathering of the Cornveyor for the distillery. I masked the silos so spray the black alcohol mold that shows up in distilleries and then air brushed Nato Black. After pulling off the tape I used a paper towel to smear the black downward. This really had a good effect to make it look for natural and not so "air-brushed".

Silo Masking

I also air brushed this same black on all vertical surfaces of the truss and conveyor system. This dulled it down quite a bit and looks pretty good to me. BTW: The masking tape DIDN'T pull the aluminum foil off the silo, so I could have masked and air brushed all the railings and ladders. Live and learn.

Cornveyor Weathering

You will notice that the nearside silo no longer has a railing encircling the top. These railings have a mold weakness that in the center of the rails. I already described how one broke a while ago and how I fixed it with a piece of wire. While handling the silo during painting and masking, it broke again, badly. I attempted to glue a new rail all the way around on top of the old using some Evergreen 0.030" X 0.060" stock. It was going well until, apparently weaken by the solvent cement, the new rail fractured in the same place. And then it did it again.

Silo Rail Failure

It was quickly getting out control, and I realized that it was a hopeless cause. I had no more Plastruct railing stock. Plan B is to fabricate a new rail from soldered brass. It's probably what I should have done in the first place. I started this rather late in the day and didn't get too far along, but here's what I did get done.

First I determined that I needed 9 stanchions to keep the size similar to the other silo which still had the Plastruct rail. That was 40 degrees per rail sector. I laid this out on a piece of scrap wood and drilled 1/16" to a fixed depth on the drill press so the holes were square to the surface.

New Railing Fixture

New Rail Stanchion Placement

To drill the stanchions I flattened a small spot on a piece of 1/16" brass rod cut to length with some heavy duty Xuron rail cutters. I measured the rail to rail distance, prick punched the top hole and paced of the distance with a small dividers, and drilled the hole with the drill in the Dremel Flexishaft. Too keep the piece of rod still I filed a groove in a block of wood. Tomorrow I'm going to hold the brass in a pin vise which will give me much more control than holding in my fingers.

New Railing Stanchion Drill

With 0.015" stock on either side of the hole, you have to be very careful to hold the drill dead center in the rod. It's why the center-punching accuracy is so important. I may solder a small ring on the bottom of the stanchions to set their depth. They going to be glued into a wooden piece that forms the silo top. I should be able to finish this up next session and then be ready to put the finishing touches on all of it and get it on the layout. 

Meanwhile, Andre informs me that the boiler house is cut so that will be work for next week.

Attachments

Images (8)
  • SD 35 Railing Fix 2
  • SD 35 Railing Fix 1
  • Silo Masking
  • Cornveyor Weathering
  • Silo Rail Failure
  • New Railing Fixture
  • New Railing Stanchion Drill
  • New Rail Stanchion Placement

While an exercise day, I did get something accomplished. I put a couple spots of dull-coat on the repainted UP Coal Processor tender and put it back in its consist with the MTH Coal Turbine. Just as a refresher for folks that can't remember images that I posted in 2007. The damage was quite extensive and parts didn't seem to be available so the lathe came to the rescue. Here's a refresher...

The damage:

#80-damage-3

The re-made stanchions. If I made them today, I'd do a better job turning the ball tops. I've learned how to do this better in the substation work.

Repairs-Made-1

With that back on the railroad, I continued working on the new circular railing. After preparing 9 stanchions (actually I made 12 and scraped 3), I put them into the fixture and threaded the brass wire all around.

New Railing in Fixture 1

I wasn't sure if this method of feeding the wire would work. As I built it a few times in my mind, I also thought about threading all the stanchions while the wire was straight and then attempting to put the stanchions on the fixture to impart shape and hold it for soldering. But after getting the first wire to cooperate, I figured I'll just put in the second one and get soldering.

New Railing in Fixture 2

With the RSU I made short order of soldering each junction. I like the RSU because you turn on the switch and it's ready to go instantly...no heat up time.

To transfer the hole pattern to the silo, I first found the center of the silo top, drilled a 1/16" hole and drilled the same size hole in the center of the fixture. I also took the fixture back to the drill press and through-drilled all the remaining pattern holes. I had previously drilled them to a specific depth to help in keeping all the stanchions on the same level. I then took a piece of 1/16" brass and poked it all the way through the fixture sticking it out of the bottom by about 3/8". I put this protruding pin into the hole on the silo roof. I then drilled on pattern hole through the fixture into the silo roof. Into this hole I stuck another piece of 1/16" to establish a starting point and keep all the rest of the holes in registration.

Positioning Fixture for Drilling

I was then able to fit the railing into the roof. Even though I was trying to be precise, the railing only lined up perfectly in one orientation. Regardless, it fits nicely, and all that's left is priming and painting. I think I'll remove it, put it back in the fixture and spray it with gray Krylon primer. It does make the finish coat adhere much better.

New Railing installed

My youngest grandson said it looks "much more professional than the Plastruct railing." If I had my druthers, I might make another set for that silo too. Maybe...maybe not. It's far back on the layout and no one will pay much attention to this. I'm not writing an article about the silos so it won't get too much scrutiny. Or maybe I will. Who can tell?

Attachments

Images (6)
  • Repairs-Made-1
  • #80-damage-3
  • New Railing in Fixture 1
  • New Railing in Fixture 2
  • Positioning Fixture for Drilling
  • New Railing installed

Sorry 86, lathe skills take a little longer to master than the RSU. Mine started in Jr. High. I had metal shop in High School, then again when I was training as a shop teacher. I taught Metal shop for 4 years and simultaneously worked as a lathe operator in a manufacturing shop. I got the Taig in the mid-70s, but really started getting use of it only over the last decade. I originally wanted to get a shop together to build live steam, but the Taig is just too small for any practical steam engine building. Plus I still don't have a milling machine. For the kind of model work I'm doing now, there's no call for a $1,000+ expenditure for a mill and all those accessories.

Finished the railing and put all the components back onto the layout. Still didn't fasten anything down since I'm working on adding lighting. I sprayed the railing with the Krylon primer and then air brushed the galvanized steel color. After repainting the silo roof with "Rubber Black" I felt that the silo top mechanism needed a more stable means of attaching to the silo roof. I added some filler styrene into the square box that was the top feed, and then drilled it for 1/16" brass rod to fit a corresponding hole in the center of the silo roof. This really worked nicely and held beautifully without any glue. 

IMG_4552

Here's the new rail painted and ready to go. I already had a center hole drilled in this silo. I found the center of the other and drilled a similar hole in it to receive the upper works.

IMG_4553

Here's everything placed in location. I took the pic with the Canon EOS and did the depth of field thing on it.

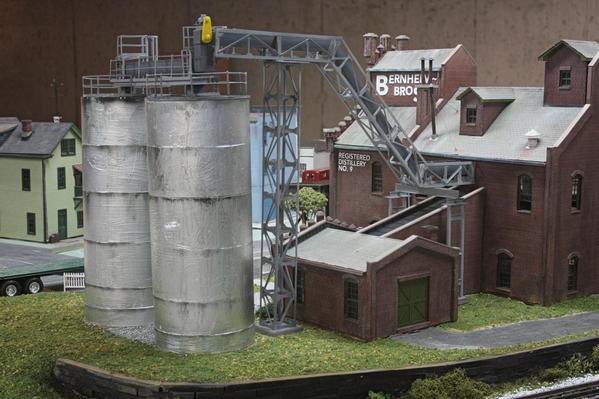
Installed Cornveyor 2Installed Cornveyor 1

I'm satisfied with the results.

I then turned my attention to another maintenance item. The inner loop's front grade crossing was too high on the outside rail. This was causing some problems with some engines with either low pilots, wide pilot trucks or both. I had to remove part of the Bristol Board street laminate, and then grind the foam and plaster to lower the grade slope leading to the rail. I went deep and then "re-paved" the street with India Ink tinted grout compound. This is the same concoction that I used in paving the Distillery drives. Both of these engines were getting their batteries charged. The one on the left is a T-1 Demonstrator and the right is a J1-a, both from Sunset 3rd Rail.

IMG_4556

The closeup shows there's nice clearance between the J1's hardware and the road surface. When this cures I'll give it a thin skin coat of tinted joint compound to smooth it out. I should have made all my streets this way. I still have places where the laminate is delayering all over the place.

IMG_4554

Next I started to make some lighting for the silo area. I using the 2mm Warm White LEDs bent to face downward in a  1/8" brass tube. This is similar to what I did for the substation lighting, but I'm going to make the light fixture out of laminated styrene, not Super Sculpey, and then after making one perfect one, resin cast as many as I need. The positive lead gets shrink tubing to insulate it from the pole. The negative lead is soldered to the top and the other lead soldered to the bottom with the pole acting as the ground conductor. Always hold the long nose pliers near the LED so bending stresses are not imposed on its innards.

IMG_4560

Light test worked. 

 IMG_4559

I'm out of that size tubing and I have to design the housing. I took measurements and will draw up the parts in Illustrator. Tomorrow I'll get the tubing.

Attachments

Images (8)
  • IMG_4552
  • IMG_4553
  • Installed Cornveyor 2
  • Installed Cornveyor 1
  • IMG_4556
  • IMG_4554
  • IMG_4560
  • IMG_4559
Last edited by Trainman2001

After a hobby shop trip to buy more brass I got into the shop kind of late, but kept moving on the lighting fixture. First thing I did was draft out the idea on Adobe Illustrator. Unlike the substation lights, which were literally sculpted from super sculpey one at a time and then heated in a toaster oven, this time I'm making it out of a "styrene sandwich" like one builds a laid up ship model hull.  The space for the LED was measured with the digital caliper. After printing out my first version, the web thickness was too thin and wouldn't stand up to shaping and handling, so I thickened it and printed it out again. I copied and pasted it many times so I had sufficient cross sections to glue together. This would be a great project for a 3D printer!

Street Light Design

I used 3M77 spray glue to adhere the pattern to 0.040" styrene sheet. I used a single-edged razor and thin steel rule to separate the pieces by scribing and snapping.

Light Fixture Cutting

I cut the slots using a fine-toothed razor saw while holding the part in a hemostat. Here're all the pieces ready to have the paper patterns removed by a Goo Gone soak.

Light Fixture Components

I glued them together with solvent glue starting with the fully-slotted pair and the pair with the holes. I then filed their respective openings make them more uniform. My plan is to make one good one and resin cast a whole bunch. 

Here's the assembly clamped while I apply the solvent cement with the Touch-n-Flow. It seeps deeply into the assembly by capillary action (or so it's supposed to).

Light Fixture Clamp

I kept trying on the individual slices to make sure they fit the LED assembly, and then tonight, after unclamping, tried it again.

Light Fixture glue

Light Fixture Trial

After drying overnight, I will start shaping it tomorrow. I have to be careful not to penetrate at the top while getting the curves installed. It should go okay. Since I have the LED facing downward, I didn't need to worry about install a reflector like I did with the substation lights. This LED is designed to project a beam through the lens at the front. It's incredibly bright. I looked straight at it and saw a green spot for a few minutes. DOH! Once I cast it, I might place some shiny-side aluminum foil up into the gap... or not. If they come out decent, I might sell them too. There aren't many decent lights available for us O'gaugers (unlike the tons of stuff HO guys enjoy).


Attachments

Images (6)
  • Street Light Design
  • Light Fixture Cutting
  • Light Fixture Components
  • Light Fixture Clamp
  • Light Fixture glue
  • Light Fixture Trial

Shaped the rough build-up today and then prepared the clay/silicone mold material to make the resin castings.

Lamp Head Master 2Lamp Head Master 1

There are some undercuts inside the fixture, but I hope the silicone can distort enough to pull out successfully. I shaped it using files, sanding sticks and the Dremel tool with various abrasive bits. Here it is tried onto the light pole.

Lamp Shaped Test

It's a very small part so it didn't need a big mold. The lessons I learned in making the distillery vents was the resin feed should be into the bottom thereby pushing the air out of the mold's vent ahead of the flow. So this time I designed the mold box to accommodate this method. Again I used the Lego mold-box method. It's very easy to make boxes of various sizes for small pours.

Lamp Mold Part 1

While it's obvious that the large filler sprue is not actually open to the part master, I will trim the opening in the silicone after the cope half cures.

Young grandson came over after school this afternoon and helped with the mixing of the silicone. He's a terrific worked and follows instructions explicitly. He's also a terrific student and a really nice kid all around. We mixed almost twice as much material as we needed for this half of the mold. It's a really small mold.

Lamp Silicone

I checked the silicone after dinner and it still didn't seem fully cured. It's supposed to cure in 75 minutes, but the basement is a bit cool and it really needs to be room temp or warmer. So I brought it upstairs. That did the trick and it fully cured. I took it back down to the shop after dinner and pulled the Legos apart to get to the clay. The model master comes up with the clay. After repositioning everything, I was ready to mix and pour the second part of the mold which I just completed. I set the time on the iPhone for 1 hour 20 minutes and brought it back upstairs where it's warmer. I could be able to pour a light fixture tonight if I want. Otherwise, it will have to wait until Monday.

IMG_4572

With the ample feed tube, I shouldn't have any dead spots or entrapped air.


Attachments

Images (6)
  • Lamp Head Master 2
  • Lamp Head Master 1
  • Lamp Shaped Test
  • Lamp Mold Part 1
  • Lamp Silicone
  • IMG_4572

Add Reply

Post

OGR Publishing, Inc., 1310 Eastside Centre Ct, Suite 6, Mountain Home, AR 72653
800-980-OGRR (6477)
www.ogaugerr.com

×
×
×
×
Link copied to your clipboard.
×
×