only my thoughts but personally I would sacrifice some signaling and have this mural printed up it looks natural! and will compliment the mountain your building now.

your road and your nickle but after all the effort your putting into the mountain in that area now why skimp? only my 2 cents so do what makes you happy right.

Attachments

Images (1)
  • mceclip0

I think I'll attempt to strike a happy medium. In fact, I'm now leaning away from an integrated signal system and go with something simpler and more cosmetic. I am working with Terry Christopher of Custom Signals, but he's selling the business and it would cost thousands of dollars to realize the design he's developed for me. Instead, I'm looking at Z-Stuff for Trains signals. They look nice, are completely self-contained and can be daisy chained to make them work interactively. They contain the sensors, the relays and look relatively prototypical.

Onto the mountain:

#2 grandson slept overnight since his parents took #1 grandson and a friend to a Cold Play concert at the Yum Center. So... I actually had an agile helper to spend some time on the platform doing some cardboard stripping with the hot glue gun. He, like his older brother, is a smart, good worker, who takes instruction beautifully AND has good problem solving skills. The first thing we did was to modify that errant rock cut. After he carefully took off the strips maintaining their attachment to the center strip, I cut away about 1/2" from the cardboard support piece, and then he re-glued the strips in their new position. We re-tested the Allegheny and clearances were good.

Grandson Help 2

While he was doing that, I was cobbling together a "table" upon which I can put the plaster tray up on the mountain so it will be convenient when I'm hard-shelling the upper reaches. Again, my material of choice is cardboard. I got it glued up relatively level (based on the actual spot on the mountain I placed it). It was sliding down the mountain and I suggested that I would tack hot-glue it to the spot and then move it when needed. He suggested making some form of pin that would engage into the cardboard weaving. GOOD IDEA! I cut some cardboard to do that trick and it worked.

Plaster Tray Table 3 w pin

After putting a pin on the other side, I had my elevated plaster table. (This pic was before the 2nd pin was glued on)

Plaster Tray Table 5

I penciled in the "mountain range" on the wall in prep for the mural painting. I'm printing out the mountain pictures and either using it to mix my own colors or to have it color matched at the paint store. The size of the area to be painted isn't much and probably can be done with the tube paint that I have.

#1 Grandson is 15 now and I will see less and less of him. Younger brother just turned 12 so I still have some more build time with him. He and I were reminiscing about how weird it was that at one time the OSB was just laid out on the floor so we could "see how big it would be." When we started this project he could walk underneath without ducking. Not any more. It's really fun to do this kind of stuff with young people.

Attachments

Images (3)
  • Grandson Help 2
  • Plaster Tray Table 3 w pin
  • Plaster Tray Table 5
Last edited by Trainman2001

Thanks Mark. Plaster table was another "just as I get up in the morning" ideas. I used to use that time to come up with creative solutions at work. Now retired, "work" is building cardboard mountains. Life is good! Grandsons are going with parents to visit other grandparents in California. When they return school will start shortly afterwards. Here in the "South" (L'ville is a half mile from Indiana; the Mighty Ohio) school starts in the middle of August. So... I won't get much more time with them. Older grandson already is in soccer practice. 

You know we're in a different age. All four of my grandkids (son's two girls and daughter's two boys) have all of their grandparents alive and vital. It's makes for an interesting dynamic as we all vie for attention. In my day, I had one living grandparent, and most of my friends were in the same situation.

By the time most (men mostly) were in their 60s, they were old men, and many didn't make it out of their 50s passing through "heart attack alley". If you did have a heart attack, all they could do is give you digitalis and bed rest and hope your heart recovered. Many didn't, and even if you did the threat of another loomed large. Cancer was even worse. Almost anything you got could kill you. And it didn't matter if you had health insurance or money. Get cancer or heart disease and there wasn't much they could do for you.

Today! I have two brother in laws who both had either stents or multiple bypass surgery. They're both in their 80s and both still working. One of the other grandparents had atrial fibrillation corrected with ablative surgery. Another had prostate cancer cured. My wife also had cancer (cured so far). Another had hip and knees replaced and spinal fusion. She would have been confined to a wheel chair without it. One of the same brother in laws had a lens subluction in one eye. It's when the lens falls out of the capsule and literally falls back into your eyeball. Modern ophthalmology removed the lens and replaced it with one that's sewn to the back of the iris opening. 20/20 vision. Then he had a cataract surgery in the other eye that went very wrong since that eye too was prone to the same problem of the first eye. Again, eye surgeons at U of P Shea Eye Institute did a sutured lens. Again 20/20 vision. At any other time in history he would have been a blind man.

This age is the first time in human history that longevity and vitality is the direct result of a person's ability to pay. Even Steve Jobs, if he would have acted sooner, may not have died from pancreatic cancer. Makes you think, doesn't it.

Enough pontificating!

After a stop at the LHS, I bit the bullet and painted a mural. I used the photos to approximate the color tones and was able to mix them using the sky blue latex I painted the walls with as a starting point and then added green, and black for the foreground mountain, and then taking this mix and adding white and gray to create the background hills. Results ain't great, but they're passable. They'll look better (I think) when the "real" mountain is terrain, colored and landscaped.

Mural

Here's a wider angle shot showing the whole mountain. I also finished adding the last strips on the tail end at the left. Instead of moving my work platform, I was actually able to wriggle myself up through the joists so I could stand next to that spot. It took a bit of contorting, but I was able to do it without hurting myself or the layout. It's too back I got that wiring and outlet box right there. It's very important since the wire on the lower left is the one powering the entire layout. It's a switched outlet with the switch on the opposite wall.

Mountain Status 5

I believe I am at the point where I should start laying down hard shell plastering on what I've formed so far. I might be able to cobble a bit more together on the left side, but I think it can wait until this part is finished. I may have missed something, but most folks do not discuss the access problems when building big structures on O'gauge layouts. Without real scaffolding, access can really be a problem.

Grandson had another idea yesterday which I may adopt. He suggested putting some netting underneath the track runs in the mountain to catch major derailments from leaving the layout and hitting the floor. His reasoning was that normally, you can see a derailment before it devolves into a catastrophe, but if something happened in the tunnel we may not catch it in time. Like I said, this is one sharp 12 year-old (like his brother) and I take what they say very seriously.


Attachments

Images (2)
  • Mural
  • Mountain Status 5
Last edited by Trainman2001

I'm with you, both grandfathers passed away before I was born, and I was the oldest grandchild.  One grandmother passed away while I was a child.  I have already outlived one grandfather by 3 years, and if I live to collect full social security, I will have outlived 3 of the 4.

The mural will look much better to you once the sceniced mountain is finished.

Great idea your youngest had, and sound reasoning!  I think you are ready to get messy with the mountain!  :-)


Yup! It's time to get messy. To just add one more example to our discussion. I relayed my comments to my son. He just turned 41 and is an ophthalmologist. His spinal stenosis was so bad in his lumbar region that he was reaching the point where he couldn't stand for more than 20 minutes. He had spinal fusion surgery two years ago and now is able to play golf. He said, "If I was in this shape at 39, imagine my shape in my 50s. I would be in a wheel chair." He also had his 2nd kidney stone. It was a bad one and wouldn't pass. They went in with a laser and disintegrated it. That would have possibly been fatal a generation ago. Again... no money... no treatment without either wealth or insurance. 

I always take the kids advice when they give it, especially when they back it up with sound reasoning.

Today was my 71st birthday so we went to the movies and saw the new Star Trek Flick. Great CGI and special effects, but a formulaic plot with too much (and stupid) hand to hand combat. The fight scenes were overdone and lasted too long. You had to suspend a lot of judgement on the degree of banging around they took and still got up to fight another day. I mean, seriously, crashes of air vehicles into ground and walking away...really? The new cast does a commendable job of carrying on the Star Trek patter. Chris Pine is a very believable young James T. Kirk and Zachery Quinto has got the younger Spock down as well too. I like all of the cast, but I think the plots could be a bit more unique.

Plastering will start on Monday.

They sure are! They're away for the week so I had to put up all these plaster soaked paper towels by myself. I'm using Gypsolite for one reason, it has a very long set time. In fact, it won't be hard until tomorrow or later. Gypsolite has perlite mineral particles in it. This product is used as a base coat for plaster lath walls. The grit gives the top coat more to grab onto. Of my purposes, I could take the grit or leave it, but the working time is a real asset since plaster of paris or hydrocal sets up in minutes rather than hours.

I got one layer (heavily overlapped) placed on all the cardboard areas leaving a bit of cardboard exposed as a jumping off point for the rest of the strips that I'll apply after this phase is completed. I may also put a second layer of plaster/towels depending on the set and how tough it seems. I'm going to add a lot of Scultamold which will also add to strength. The plaster/towels only are a base for the Scultamold.

Mountain Status 6

Remember: all those gaping holes are going to be mountains once all the high reaches are completed.

Plastering Begins 3

It's messy, but all of this went on in one afternoon. 

Plastering Begins 1

I ran out of Gypsolite so I'll have to buy more tomorrow. I did finish everything I wanted to in this first phase. In order to do the last little bit under that outlet box, I wriggled up between the joists. I had the tray of plaster siting on the adjacent joist. I thought I'd clear it. Of course I didn't and it landed upside down on the floor. It was the last plaster I had so I got down on my knees and using cardboard, scraped up as much as I could and saved the day. It was a gross mess! My tray holder did work for the mountain.

Attachments

Images (3)
  • Mountain Status 6
  • Plastering Begins 3
  • Plastering Begins 1

Thanks Gary! It's my pleasure. 

The first coat is dry and some areas were quite week. I also need to do more plastering around the portals to seal them into the land. So started a campaign with the newly purchase Gypsolite I bought at a local sheet rock distributor. A 50# bag is $19 and change. It's a very inexpensive product when bought in bulk bags. Instead of hauling a 50# bag down to the basement, I used my empty 5 gallon pales left over from all the roofing granules I bought and off-loaded the product into said pails. It filled 2.5 of them. I was then able to easily carry it downstairs without hurting myself or making a mess.

In some places where the Gypsolite soaked towels didn't have much plaster in them, they looked like just paper towels. What happens in this instance is the water is evaporating off the towels before the plaster cures. Gypsolite is a slow curing product and if it gets dry before it sets, there's no strength. I started to slather on a stiffer mix of pure Gypsolite onto these areas. I pre-wet those areas with a spray bottle so the towels again wouldn't absorb too much water. 

I then realized that I probably should also complete the edges along that big side fascia board AND work all the areas around the portals. I did this for about an hour. I really have to do the whole mountain this way to strengthen the plaster and destroy the "paper towel" look. I also decided to re-check that critical clearance with the H-8 now that I added more plaster to that rock cut. There's still some space left to add more texture.

Clearance Check

Speaking of texture, I bit the bullet and ordered three rock molds from Bragdon Enterprises to simulate layered strata for these vertical cliffs.

Here's the portal area with the land tucked tightly onto the portals. I used an acid brush and water to wash the excess Gypso of the portals. Plastering the entire mountain with this method is going to take some time, but it should help. It is much less expensive to use Gypso instead of Sculptamold for these large areas. I'll use Sculptamold for more selected areas especially those that I can't use rock castings.

Gypso 2nd Coat 2Gyso 2nd Coat 1

Attachments

Images (3)
  • Clearance Check
  • Gypso 2nd Coat 2
  • Gyso 2nd Coat 1

Just a quick Saturday update. The Gypsolite that I started to apply on Thursday cured solid by this morning and it's very strong. Taking this mountain apart will probably require a jack hammer. I did notice some thin places that didn't cure. You must apply Gypsolite in a thick enough layer so the water doesn't dry by evaporation. So anywhere where I tried feathering it out where the plaster meets the layout base, it's edges didn't cure. I added water with a spray bottle and checked later and some of these spots did actually set up. You need to keep this in mind if you're going to do this method. If I was using Hydrocal or Plaster of Paris, it wouldn't be as much of a problem since it sets quickly before the water leaves by evaporation, but Gypsolite takes 24 hours or longer to set up and thin sections will dry before setting. It's why I got the soft spots with the soaked towels. Anywhere that the solids were too thin, the towels dried before curing and are only as strong as a plain paper towel. I have to think about whether I'm going to plaster over all the surface areas or add a second layer of plaster-soaked towels. When it's cured Gypsolite looks like a good concrete color, when it's not it's white like raw plaster as seen here. It's one of the reasons why you can get it off the floor. A splat is too thin to cure before drying so it's still just raw plaster.

IMG_5213

My Bragdon Enterprises rock molds came today which is perfect timing. I think they're going to work great and save me a lot of carving time with the Sculptamold.

Attachments

Images (1)
  • IMG_5213
Last edited by Trainman2001

Happy Monday! In 2.5 hours I was able to slather an entire layer of pure Gypsolite. It was actually easier to layer this stuff on than to add another layer of plaster soaked paper towels (PSPT). Reason: You can trowel on plaster with one hand while supporting yourself or holding the plaster tub with the other. With PSPT, you need two hands so reaching out too far becomes impossible on the back. I made sure that I have at least an 1/8" or thicker so it will cure, not dry. I also was judicious in applying the water spray. You need to pre-wet the surface since any lightly plastered towels so they don't absorb too much water before the plaster sets.

After using a 1" putty knife to pile the plaster on, I went back with a bristle paint brush to smooth the surface and remove all the trowel marks. This method worked pretty well and left a nice, regular surface to add the next steps to, including rock castings and landscaping. This mountain is going to be very strong and will probably support a hand leaning on it. I can't say that now since some parts of the PSPT were so weak, you could easy puncture it with just a bit of pressure.

Mountain 2nd Coat 3

The Gypsolite's granularity definitely makes for a great surface upon which to add terrain.

Mountain 2nd Coat 1

I added another temporary support to hold up the inboard end of my work platform so I could get closer to the left extremis of the mountain. This removed the need to climb up into the structure to get to that far end. I will also facilitate adding rocks and painting that end which is very visible. I also finished up the area around the rear, left portal.

IMG_5222

I'll give this a good two days to set up. Meanwhile, I'll start evaluating and making rock castings using my existing W-S molds and the new Bragdon products that came on Saturday. I was surprised that this 2nd coat took much less time to apply than I thought. I mixed my plaster in larger quantities. I'm using the plastic container from Cascade Complete that you buy at Costco. There's no chance for the Gypsolite to set up in the container since it takes hours not minutes to cure.

Attachments

Images (3)
  • Mountain 2nd Coat 3
  • Mountain 2nd Coat 1
  • IMG_5222

And I bet you could both outrun me, even backwards, despite age, so smile big and boastfully about being "experienced"

Besides neither of you act your age lol. You've both had me guessing badly at times.

I'd skydive before bungee jumping regardless. If something happens I wouldn't want to tell the story lying in traction  

That's. Looking like an Application mountain now.,.    

Boy this auto correction is killing me.

That's looking like a Blue Ridge fountain now........forget it, I'm giving up.


I think the amount of humidity in the air is the amount of haze we see too. Some days seeing across a valley is hard, others you can see for many miles. Thinking about driving right into the clouds as they hit the mountain sides is what made me remember this. I still have polaroids I took from my third visit where the haze is a wall of mist. The first photo is clear as day, and the cloud is about 20 yards from the road. The last photos are white haze; a fog. The visibility suddenly drops to about 20 feet as we entered a tunnel. The other side you could only see 10' tops. It was as bad as a white out blizzard. We crept to a roadside stop and ate lunch IN the cloud, till the cloud passed AROUND the peak and the sun came out again, then showered in a waterfall I knew would be gushing nearby in about 15 more minutes. That one doesn't really need rain to be more active. Condensing mist boosts it's flow lol.

Thanks! Hydrocal is a casting plaster made for the ornamental plaster industry. It sets quickly and is very hard. Gypsolite is a plaster meant for troweling onto wood lath walls. It's the first coat in a traditional plaster wall construction followed up by a smooth top coat plaster. It has "perlite" in it which is a quartz mineral that is very gritty. The grit provides an excellent surface for the finish coat. It will also provide a good surface to hold my rock castings that are next up on this mountain. Another name for Gypsolite is "Structolite". Same product, different manufacturer. Hydrocal sets very fast (20 minutes or less) while Gypsolite is very slow (at least 24 hours). It's slowness is a good thing when doing hand troweling and plaster soaked paper towels.

As of late this afternoon, the plaster was not fully set so no work was done today.

Nope! I'm experimenting with the Bragdon molds trying to figure out how to get the sedimentary layer onto my mountain cuts.

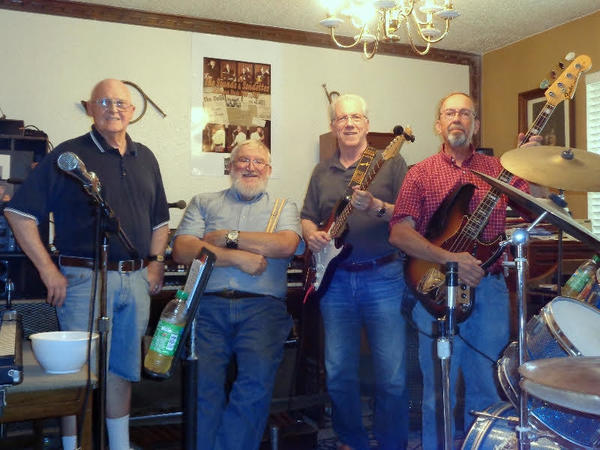
And... I was in OKC this past weekend visiting with the keyboardist and vocalist from my 1960s Michigan State Band, the Sounds, who is fighting lung cancer. He's the first one of us four who's fighting a serious illness. It would be our 49th reunion. The Sounds was #1 on campus from 1965 thru 67 based on two factors. First, while 39 bands did mostly British rock, we chose to do R & B and Motown. Our lead singer had the ability to sound like Ray Charles or James Brown. Considering he was from Oklahoma City that was quite remarkable.

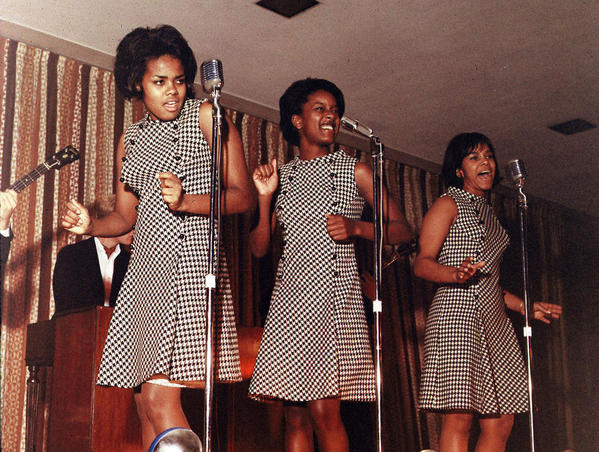
Then there was the Sondettes. We were one of the few non-studio bands in the USA in 1965 that was a band comprised of four white guys and three African American women. They were students too. And they were spectacular. Pat, Kat and Martha. Patty Burnette was one lead vocalist and could sound like Diana Ross or leads from Phil Spector's Rosettes and Crystals. Kathleen Wilson (now Kristy Love), had a more soulful sound and did the rest of the leads and sounded like Mary Wells. Martha Taylor did backup. Patty was the first black women in MSU history (at that time) who was selected as Miss MSU, and Martha was finalist for the Miss Black America contest representing Minnesota in 1970. Kat, however, had the deepest professional career and for 10 years until it was razed a couple of years ago, was the female vocalist in the Platters, Coasters and Drifters Review at the Sahara Hotel in Las Vegas. I had a chance to see her perform in 2008 and she was terrific.

As a result of the draft and Viet Nam the band was unable to stay together after graduation. I was the only member who didn't continue with serious playing, but I did continue to play guitar and have kept my skills up. Roger Edwards, who we went to visit, is a bachelor. His "dining" room has two Hammond A-100 organs and Leslie Speakers cabs, a Fender Rhodes electric piano, and Kurzweil and Yamaha electronic keyboards. He also had two very large PA speakers. He had a set of drums too so Ron, our drummer, only had to bring some drumsticks. Bryant drove from Albuquerque and was able to bring his Fender Bass and amps. Ron and I flew so I brought my Fender Strat on the plane with me. I flew Southwest and was able to get a low seating number for all legs so the guitar was safely in the overhead and suffered no ill treatment. It never left my sight.

Next year is our 50th reunion and if everyone's healthy we're going to do this again. This time we'll try to get the girls to join us. Possibly up at MSU's campus... maybe.

The Band 2

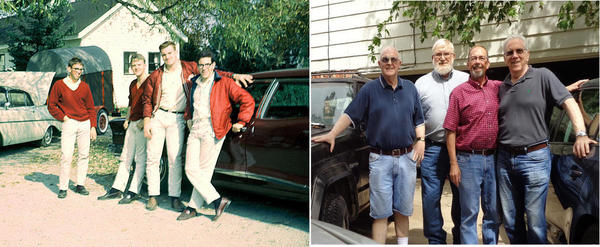
This picture shows the then and now and what 50 years will do to you. The picture on the left (I call it my "Beach Boys Picture") was taken at Bryant's house in early September 1966. We built our own "Altec Lansing Voice of the Theater" system and learned all of the top 40 R & B songs that were playing that summer. It made a big impression when we hit campus the following week. We played our fast numbers very much up-tempo and Ron was the only drummer we knew that could keep up with us for a three-hour gig.

The Sounds then and now

From Left to right Patty Burnette, Martha Taylor and Kathy Wilson. I was able to find four reel-to-reel tapes of the band and get them digitized. I did some sound engineering on them to bring back the fidelity and then made a 4-CD set of all of our songs recorded in four different venues and distributed copies to all members. I'm trying to upload some songs onto Facebook and YouTube, but it's been rejecting my attempts (so far).

The Sondettes 2

I also came back with another cold which makes working with plaster distinctly less fun. My grandson suggested putting the semi-set Bragdon molds up against the rock cuts so it will conform to the contours without fracturing. I'm going to try that the next session (probably tomorrow or Friday).

Attachments

Images (3)
  • The Band 2
  • The Sounds then and now
  • The Sondettes 2

Back to the railroad...

It's been a while since I got sloppy with plaster. Didn't have much time today, but grandson #2 was finishing up his summer project for school and I tried a different approach to get the plaster strata rock onto a non-flat wall. My grandson suggested placing it before the plaster is fully cured and when it's a bit flexible. I tried this today. After letting the hydrocal setup enough to permit handling the very floppy mold, I pressed it up to the wall which I had just coated liberally with medium viscosity Scupltamold. It mostly worked. It wasn't big enough to cover the wall's full height so it would require another piece.

Rock Cut 2

While this was setting up, I adhered some of the really hard rock castings to the wing walls flanking the right outside portal. Again I slathered a liberal quantity of Sculptamold to fill in the undulations and got to stick pretty well.

Rock Cut 1

And then I stuck rocks on the other wing wall. This casting stuck way out at the end and I tried to simply break it off. Big mistake. It broke in all the wrong places. I re-adhered the pieces to the wall and will use a cutter to trim it after it's fully hardened.

Rock Cut 3

I was running out of time and wanted to get the second casting on the long wall, but I rushed it. I didn't give the Hydrocal sufficient time to set up and when I placed it on the Sculptamold bed, it just fractured into a zillion chunks that preceded to end up on the railroad's road bed. I shoveled it all away and will try again next time. Of course all of this will look completely different when painted, tinted, aged and landscaped.

Attachments

Images (3)
  • Rock Cut 2
  • Rock Cut 1
  • Rock Cut 3

Thanks Mike! I checked today and the plaster was not dry. It was setting, but very damp and I decided to give it one more day. Didn't have much time anyway so I didn't want to mix up any batches. I'm running out of Hydrocal, but I'm not sure I want to invest in another 50 pound bag since I'm getting to the back end of the major landscaping/rock forming. I might revert to smaller packages of plaster of paris to make more rock molds. I took a hack saw blade to trim the overhanging rock. A little more sculpting around the portal will be needed to finish it up before painting. The Bragdon Enterprises latex molds, while difficult to fill with plaster without it running out over the low sides, do make convincing rock faces. I can't wait to see what they look like when painted and weathered.

Rock Cut Trimmed

Attachments

Images (1)
  • Rock Cut Trimmed
Last edited by Trainman2001

With my cold finally subsiding, I felt like doing some more plaster work. I again attempted to get the Bragdon strata rock to stick to the upper part of that substantial rock cut. This time I hit it just right, that is, cured enough so it stayed put in the mold, but still weak enough so it would conform to the slight curve of the substrate. After spraying with some "wet water" I liberally applied sculptamold to the substrate and slapped the mold with its plaster onto the wall. It held! I then let it fully set up before peeling the mold from its plaster.

Rock Wall 2nd Layer

The rocks stuck way up over the wall, so I took a bare hack saw blade and cut it off flush. By doing this before the plaster was fully cured the sawing went quite quickly. While there are some gaps between the two rock layers, I think it's a good start and I'll either carve the Sculptamold or add some pieces of strata. I've got lots of pieces of strata as noted by the pile at the base of this wall.

Rock Cut 2nd Layer de-molded

I cracked is some places, but this just makes it look more realistic in my estimation. I then started applying rocks to the area that the coal mine will go. In this instance I used various pieces from my W-S rock molds. Turning them and angling them hides that fact that they're only a couple of different actual styles. Before anyone comments, in real life, you'd probably not find limestone strata and granite blocks side-by-side in the same geological structure, but noting about this railroad is real life. Besides, there was absolutely no way to get those Bragdon rocks to curve into that niche unless I wanted to hand carve them all. While I did that for the ravines, I didn't feel like doing it here.

Rock Layup

Again, liberal layers of Sculptamold helps these flat-backed rocks to a curved and rough Gysolite surface. I then ran out of Hydrocal. I thought I had a half gallon of W-S plaster of Paris, but couldn't find it. I'm reluctant to buy another commercially sized bag of Hydrocal since I'm seeing the end of most of the rock building activities. But, it's the best material for this process AND it's not expensive. It will just mean that I'm have a pail of the stuff lying around for a long while.

Attachments

Images (3)
  • Rock Wall 2nd Layer
  • Rock Cut 2nd Layer de-molded
  • Rock Layup

TRAINMAN 2001, looking good to bad about the cold. I was thinking maybe you were trying to create a chord on the guitar that would add rocks plaster and do all the finishing touches to this massive mountain!

I know we all will be pleased to see the final results but something tells me you will be happy when this is completed.

side note did your rewire of the swing gate work as you wanted so power is turned off so no engines taking a swan dive to the hard floor.

Thanks and yup! You're right. Messing with the plaster is not my favorite part of building a railroad, but it's necessary.  I'm really not looking to cleaning up that floor.

Re: the gate. I couldn't find the glitch, even with all new relays, but I made it simpler. I just interrupted the two main feeds coming into the panel, so instead of just shutting tracks off adjacent to the gap, I shut off power to the entire layout when the gate is open. This is probably how I should have done it the first place. It's also a good safeguard when I go to DCS. If I was running two trains on the same track, I could envision where a train was stopped at the block at the gate, but the rest of the track being energized and the 2nd train running into the back of the standing one. Now that can't happen.

I purchased some large thin Latex molds from another supplier at last year's Big E show in Springfield.... The vendor at the show had a great suggestion which was to fill a shallow container larger than the mold with play sand then set the mold in it.  The sand supports the mold in whatever bias you want, slightly curved and deeper, or very flat and thin...  I didn't have play sand around, so I substituted the absorbent material for soaking up spills in the garage, as I had the remainder of a 40 pound bag of that laying around.   It has worked quite well, and definitely stopped the spillover issues.   I picked up one of those inexpensive large, shallow clear plastic containers at Walmart for less than $5.00, and I just put the lid on it and store it in between molding sessions. 

That's a great idea! I may have to cast some more for the large flat back wall adjacent to the left rear portal. That technique could prove very helpful. On the front rock cut, the thickness of the appliqué must be thin because of the clearance problem with that H-8. Just got back from Pittsburgh where my wife and I got our Global Entry Trusted Traveler clearance. Tomorrow, I should be back in the shop.

Between building plastic models, I did a couple more rocks today and cast some more. I'm preparing the rocks for the back rock cut next to the rear left portal. I also added more where the coal mine is going. When I finish those rocks I'm be ready to paint and ground cover the mountain that's built so far. Then I'll be able to close up that hole in the front and finish up the lower reaches.

More Rocks 3

I'm going to put the mine shaft in the blank area between the rock formations. Again, I'm got igneous and sedimentary rocks existing side-by-side. Any geologists out there, please look the other way.

More Rocks 1

Attachments

Images (2)
  • More Rocks 3
  • More Rocks 1

I got the last of the rocks placed for this first phase of mountain building. It is a mosaic of about 8 pieces of rock castings, held with a lot of Sculptamold. After laying it all up, I went back and filled many of the gaps and then tooled the Sculptamold with the edge of a putty knife and a stiff bristle brush to blend the rocks, continue the strata and get rid of hanging bits. After coloring I think it will work. It was touch and go for a while since I couldn't cast any rocks as big as that wall in on go.

Far Rock Cut

Attachments

Images (1)
  • Far Rock Cut
Trainman2001 posted:

And... I was in OKC this past weekend visiting with the keyboardist and vocalist from my 1960s Michigan State Band, the Sounds, who is fighting lung cancer. He's the first one of us four who's fighting a serious illness. It would be our 49th reunion. The Sounds was #1 on campus from 1965 thru 67 based on two factors. First, while 39 bands did mostly British rock, we chose to do R & B and Motown. Our lead singer had the ability to sound like Ray Charles or James Brown. Considering he was from Oklahoma City that was quite remarkable.

Then there was the Sondettes. We were one of the few non-studio bands in the USA in 1965 that was a band comprised of four white guys and three African American women. They were students too. And they were spectacular. Pat, Kat and Martha. Patty Burnette was one lead vocalist and could sound like Diana Ross or leads from Phil Spector's Rosettes and Crystals. Kathleen Wilson (now Kristy Love), had a more soulful sound and did the rest of the leads and sounded like Mary Wells. Martha Taylor did backup. Patty was the first black women in MSU history (at that time) who was selected as Miss MSU, and Martha was finalist for the Miss Black America contest representing Minnesota in 1970. Kat, however, had the deepest professional career and for 10 years until it was razed a couple of years ago, was the female vocalist in the Platters, Coasters and Drifters Review at the Sahara Hotel in Las Vegas. I had a chance to see her perform in 2008 and she was terrific.

Next year is our 50th reunion and if everyone's healthy we're going to do this again. This time we'll try to get the girls to join us. Possibly up at MSU's campus... maybe.

The Sounds then and now

From Left to right Patty Burnette, Martha Taylor and Kathy Wilson. I was able to find four reel-to-reel tapes of the band and get them digitized. I did some sound engineering on them to bring back the fidelity and then made a 4-CD set of all of our songs recorded in four different venues and distributed copies to all members. I'm trying to upload some songs onto Facebook and YouTube, but it's been rejecting my attempts (so far).

The Sondettes 2

Now that is not only a great story, it is also what "makes" the forum. Members sharing their expertise with any aspects of model railroading and themselves. 

Are the guys young to older 1=3, 2=1, 3=2, 4=4?

I agree. These forums introduce each other as people with interesting lives (including our love for trains and miniature things). 

Let me answer the first note first. No, this person is not older. He's a 50 year-old that watched me build models in my garage at our PA townhouse. He and a bunch of other little guys living on our cul-de-sac used to spend lots of time watching my craft and it stuck for some, this fellow specifically. For his 50th he got a ride in the "Yankee Lady" one of the several extant flying B-17s. He went out and bought the Revell kit, but quickly realized that he'd never get around to build it and decided to get a "Myles Original" He was willing to pay me a commission, but my wife and I thought that wasn't necessary. Since he's in Philly and we're in L'ville, I suggested he return his kit and I'd re-buy it here. I also bought PE and aftermarket engines for it. It will be a good build. I'm blogging it daily, like my railroad, on another couple of forums including this one if you're interested. 

http://cs.finescale.com/fsm/mo...1907123.aspx#1907123

As to the second. All of us "Sounds" are 71 and our birthdays are within months of one another. If the health of Roger Edwards (vocals and keyboards) holds up, we're planning on doing some 50th extravaganza maybe on Michigan States Campus next year. There's a lot of "ifs" in this scenario including getting some additional funding to get all the members, equipment, venue, etc in place. I'm looking at options. It really depends on Rog beating cancer.

If any of you know about Gary Kohs and Fine Art Models, he's officially stopping the manufacture of his world-leading museum-level models. He's been at it for 25 years and producing masterpieces by artisans all over the world. You may know about George Kohs and his staggeringly detailed brass O'scale equipment. George is Gary's brother. Fine Art Models now has a museum dedicated this his craft in at the Mariner Theater and Galleries in Marine City, Michigan. He bought this old theater and completely restored it. The models there are both FAM manufactured and from Gary's personal collection. I'm putting it on my bucket list. I visited Gary's business twice when he was in Birmingham, MI. I first saw his work at a showcase at Detroit's Metro Airport. It was when he first got started. I had to find this guy and on one of my Michigan business trips called him and went for a visit. Of course they didn't manufacture there, but they did inspect, repair and re-ship his products. His office was a modeler's Mecca, but what lay in the next room blew me away. It was a large room filled with amazing models that Gary had been collecting. It wasn't for the public, but it was awesome in the most literal meaning of the word. It did inspire awe in me. There were trains, ships, live steam, engineering models... everything. 

I then visited again some years later and saw their 1:192 rendition of the Battleship Missouri. I was in love. It's price was $8,500 and I put my name on the waiting list. That was until my wife found out about it. My name promptly came off the list. We couldn't afford $8.5k for a 50" museum model. We didn't even have a place to display it. Needless to say, if I took my $30k+ that I've invested in O'gauge trains over the years, I could have owned several FAM models. But that train, as they say, has left the station. I'm not a rich man and can only handle one vice at a time.

Anyway, Gary is closing down because the artisans are dying off or retiring and there are no apprenticeship programs anywhere in the world to replace them. That is very sad! It speaks volumes about what is valued today, and, more importantly, the impact technology is having on the creation of engineering prototypes. In WWII you had to build scale ship models (1:48 masterpieces from Gibbs & Cox) for the process to continue. Today, you can do this digitally, and you can 3D print what you need if you need physical objects. There are still some models made, but the numbers are way down. I entertained going into the architectural model business years ago when I was a shop teacher. Those too have been greatly supplanted by 3D drafting programs and rendering engines that do the job much faster, cheaper with less labor. These skills have disappeared because they're no longer needed widely in industry. They won't come back and it's our responsibility as modelers to keep it alive if that's at all possible.

If you haven't ever looked at what Fine Arts Models has accomplished, check it out here.

http://www.fineartmodels.com/Welcome.html

Even though I can't afford them, I can admire them. I can't afford a Rembrandt, but I can sure admire them.


The flight costs a lot of money, and it's not on my list. That being said the B-17 is famous due to its numbers and impact, but not because it was a particularly great airplane. It was designed in the mid-1930s with 1930s technology. It had one thing going for it... it was rugged. It had an old design very-low-loaded wing (unlike the more modern B-24) that was able to keep flying after taking substantial damage. It was under-powered, non-pressurized, and very slow. Its cruising speed was 187mph which is why they were sitting ducks against the German fighters until the advent of our superior fighter support in the likes of the P-5, P-47 and P-38. But we made a gazillion of them and as fast as they could be shot down we'd build two more. When the B-29 was created it flew outside of the range of Japanese fighters and at a speed that made it much harder to track. It will be a neat model.

Believe it or not, I actually, finally got to do some painting of rocks. I needed a bigger block of time to start the painting process. I got one cliff face done and two others started. I needed to do a little patching where the rock castings met the substrate which prevented me from starting the last face.

I used W-S tinting pigments plus some acrylic tube artist colors. I'm attempting to add some different color strata using an earth brown, slate gray and black. I then sealed it with W-S Scenic Cement spray to seal the first coats (as per their instructions). When it was dry, I did a black wash and then did some highlighting with lighter grays and white tube colors. On the top edge I used earth toned acrylic wall paint and then sprinkled on some ground cover. 

Here's the base coat.

Rock Paint 1

And with the finish coats in place.

Rock Paint 2

The top will get some more vegetation including some draping down over the rocks. Those Bragdon molds are impressive once the finish goes on.

Here's the other two faces with their base coats on.

Rock Paint 4Rock Paint 3

Here's the patched area.

Rock Fix

There won't be any more work for a little over a week. We're taking a vacation to Barcelona and Madrid. I'm attempting to learn some Spanish using Duolinguo. It's a pretty nifty way to learn a new language painlessly. If I can learn anything it will be a small miracle since learning a new language is not recommended if you're 71. You can use it on your PC and your cell phone and it syncs with both so you can pick up where you've left off. When we get back mountain painting will continue and then I'll be able to close up that front face.

So until then, hasta luego.

Attachments

Images (5)
  • Rock Paint 2
  • Rock Paint 1
  • Rock Paint 4
  • Rock Paint 3
  • Rock Fix

Add Reply

Post

OGR Publishing, Inc., 1310 Eastside Centre Ct, Suite 6, Mountain Home, AR 72653
800-980-OGRR (6477)
www.ogaugerr.com

×
×
×
×
Link copied to your clipboard.
×
×