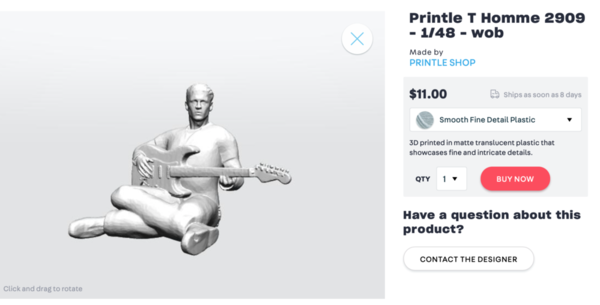
And here he is. Printle on Shapeways already redrew the figure to my specs and uploaded it for printing. With shipping it came to $24 and change which includes shipping. Not cheap, but priceless. Price did not change even with the customization. And yes, he's playing a Strat. I could make him an amp with a long extension cord.

Screen Shot 2020-06-29 at 1.09.19 PM

It's only fitting since I have one too.

ES and Strat 2

Attachments

Images (2)
  • Screen Shot 2020-06-29 at 1.09.19 PM
  • ES and Strat 2

Wow!  I think the stairs leading up from Level 1 to Level 2 are labeled 11d in the Level 1 floor plan.  3D drawing B corresponds to picture D below.  I always thought the open area with the railings was rectangular in the show, but the drawings show it as square.  It is a marvelous building!!

5_20200504092753__2aa8ae49

That is certainly a nice guitar player.

Attachments

Images (1)
  • 5_20200504092753__2aa8ae49

I figured you guys would appreciate this.

Pot pour day. I finally decided to age one of the printed prime movers: the Baldwin VO-1500. I used a combination of AK Interactive Wash and Tamiya Black Panel Accent along with the Molotow Chrome Pen to make the front power takeoff shaft look more metallic. 

I slathered the wash over the entire engine. It's not IPA soluble. It seems to be mineral spirit soluble like the panel accent. After cover it, I washed it with clean low-odor mineral spirits and then further cleaning with Q-tips. I then added the panel accent. The results are a really nicely dirty diesel that looks like it's seen some service.

EH Aged Baldwin 2

I used E-Z Line for the V-belt drive. Finally, the engine looks real (to me).

EH Aged Baldwin Rear

On the forklift, it looks like it's ready for an overhaul. I'm fix'n to print the Alco and FM engines in 1:48 too. I just bought an upgraded build platen for the Mars that has the same treatment as the Elegoo Mars Pro. The treatment apparently holds prints better while still releasing them with less effort. It also has upgraded (enlarged) allen screws to affix the platen ball joint when leveling the print platen. It will arrive tomorrow.

EH Baldwin in Transit

I finished painting the fireplace, put on a mantle made of two Northeastern Strip Wood scale rr ties. I coated it with Dullcoat and tomorrow I'll do the grouting and aging including strategic placement of soot. Since the guy who lives here cuts ties for a living, it was appropriate that his mantle piece would be RR ties.

THC Mantle Piece

I started making the site for the cabin in earnest. The foam piece I cut was really thick and didn't have anything thinner. Instead of attempting to reduce its thickness — and exercise in futility — I built up the topographic layers with some cardboard. As you long-time readers can attest, I am a serious "cardboard engineer". I traced the foam, cut openings in the thick cardboard, which, BTW, was a Canon Pixma Printer box of which the printer has long since been disposed at the Louisville electronic junk facility. I used Liquid Nails to hold the laminate together and it's drying with weights on it as I write this.

THE Site Prep Foam Base

There will be more complexity to this as I work on the materials to contour the landscaping. The pond is on the panel just adjacent to the moving door and I'm going to have a path to it from the cabin.

THC Site Prep Start

The last thing I did was start assembling the piles of complete ties made by the craftsman. Their glued up with Aleen's with 10 ties on each row. I bought a bag of 500 Northeastern O'scale RR Ties. More than enough to make three piles of 60 ties each. These don't get weathered since they're effectively newly cut product. But I will still have some weathered ties lying around that would be rejects. I purposefully made the edges uneven to look like they were stacked by hand. I could have saved lumber by just gluing ends together and leaving the inside hollow, but I have a ton of ties and gluing together full sticks is easier.

THC The Tie Piles WIP

Like I said, it was a mixed bag today.

Attachments

Images (7)
  • EH Aged Baldwin 2
  • EH Aged Baldwin Rear
  • EH Baldwin in Transit
  • THC Mantle Piece
  • THE Site Prep Foam Base
  • THC Site Prep Start
  • THC The Tie Piles WIP

Me too! I've been studying it to see how it conforms to the elevation and come up short. When drawing buildings in SketchUp, the most accurate way to do it is by working directly from an accurate scaled floor plan. You draw the walls in the flat and then pull them up to the ceiling height. You can set the drawing's scale exactly if you know just one dimension. But if the floor plan is not actually the building you're trying to create, you're lost. If you google "key House" you will see these plans in the images and when you open them in their respective pages, it does say it's the structure. It's very possible that the "as built" isn't the "as drawn". Lots of artistic license. The interior scenes don't even have to match the exterior since there's no way to ever know that they don't agree. Movies are the art of illusion.

I hate you guys. I know that song very well (and can play it also… I will have to upload my band's version of it) and know all about the evergreens and hoped nobody noticed. There aren't too many O'scale evergreens around and I wasn't looking to make them. I have some great deciduous tress. Heck if we're going to be "rivet counters", the house he lived in was a "Log cabin made of earth and wood". My cabin is not made out of logs nor does it have any earth. So being that the 1:1 correlation to the song has already been violated, I'm going to let the "evergreen thing" slide. But, maybe I'll look around for some evergreens. I've seen videos on making them by twisting wire in an electric drill with rope fiber captured in the twists.

Meanwhile, I'm going to see if I can find some good tree stumps on SketchUp that I can print. 

I just did a little research on the song. It's rated as the 8th most popular song in history. It was partially autobiographical. But the most interesting is the guitar intro was copied from a song in 1946; "Ain't That Just Like a Woman (They'll Do It Every Time)" is a 1946 song by Louis Jordan and His Tympany Five. So I guess it wasn't so bad that the Beach Boys then copied it for "Fun, Fun, Fun" intro. Imitation is the finest form of flattery, or so they say.

Last edited by Trainman2001

It's your railroad, Myles. Do what makes you happy. If you really want to go crazy you can add to a marquis in a nearby town the words " Johnny B Goode Tonight" . 🙄 Being a tie hackers cabin, you would think it should have a source of lumber nearby. The stumps can represent that. 😏 It already looks great. No need to go crazy. Just having fun with the lyrics to one of my favorite songs.

Funny Ken, I feel the same way.

This is a two-for post since I didn't do it last night.

Got the fireplace finished, finished up the tie piles installed and tested the new platen on the Mars, and started building the mockup for the House by the RR.

I added the panel accent for the stone group, did some final fitting of the rear Sculpey so it nested more closely to the stud wall, used two cut down rr ties for the mantel which I stained Minwax Jacobean Oak, and then added some wash and powders to give it some soot.

THC Fireplace Installed

Three tie piles of 60 each is sufficient to convey the theme of the building. They form a solid block of basswood. I also aged some to put into a pile of rejects that have weathered a bit.

THC Tie Piles

I printed the stumps on the new platen, but not until I committed a very stupid booboo. My first print failed completely because I left the sheet of paper on the LCD that I used when leveling the platen. You put the paper on the LCD to simulate the thickness of the FEP film at the vat's bottom. After you lot the platen, a "normal" person would remove the paper then replace the vat and fill it with resin. I found that it failed yesterday, but didn't want to clean it out until today. I thought that there would be a mess of stuck resin on the vat bottom, but when I slid it off and saw the paper it was a big "DOH".  You can't pass microscopic dots of UV light through a piece of paper. My second print failed too, but because there were errors in the drawing. All the objects were not truly at the same bottom level and some had reversed faces. I fixed all of these and the third time was a charm.

3D Print 1st w New Platen

I printed (graphic, not 3D) all the pieces to be laser cut for the House. The first thing I did was cut out a couple of different window openings to try the 3D printed windows and they were WRONG! When I drew all the window openings I based the dimensions on the SketchUp images that were used to print the windows, but the as drawn and as printed are slightly different. I went back and measured all the windows and glazing and made changes. I sent a revised copy to Rail Scale. 

Then today I started putting it all together and roofs were all wrong too. I made those changes as well and am sending this final, final set to Rail Scale. Luckily, I'm waiting in the queue and it's not costing me $$ or Stephen time.

HBTRR MockUp

I then took this box to the layout to try it in a couple of positions. Unfortunately, none of the sites will facilitate a good front-on view. Take a look and tell me what you think.

This is placement #1. You get an oblique front view, a good side and the entire back.

HBTRR Placement 1 CUHBTRR Placement 1

This is the view from the layout front.

HBTRR Placement 1 Rev View

The other spot is next to the firehouse and across the street from the distillery. The lot here is larger and will give more opportunity for landscaping and more elegant presentation. The bourbon store Rick House was intended for this spot, but the structure is more meaningful. If I choose the front location, I can still build the Rick House.

HBTRR Placement 2

Looking down the distillery street presents a decent front view, but it's not that close to the viewer.

HBTRR Placement 2 CUHBTRR Placement 2 2nd View

Lessons learned: Build the mockup before sending the plans to the laser cutter. I could have found these errors much earlier. 

I have to start messing with Sculpt-a-Mold and plaster next session to get the Hacker's site finished. It's not one of my favorite things in model railroading, but it usually works out pretty well.


Attachments

Images (10)
  • THC Fireplace Installed
  • THC Tie Piles
  • 3D Print 1st w New Platen
  • HBTRR MockUp
  • HBTRR Placement 1 CU
  • HBTRR Placement 1
  • HBTRR Placement 1 Rev View
  • HBTRR Placement 2
  • HBTRR Placement 2 CU
  • HBTRR Placement 2 2nd View

RE Locke and Key:

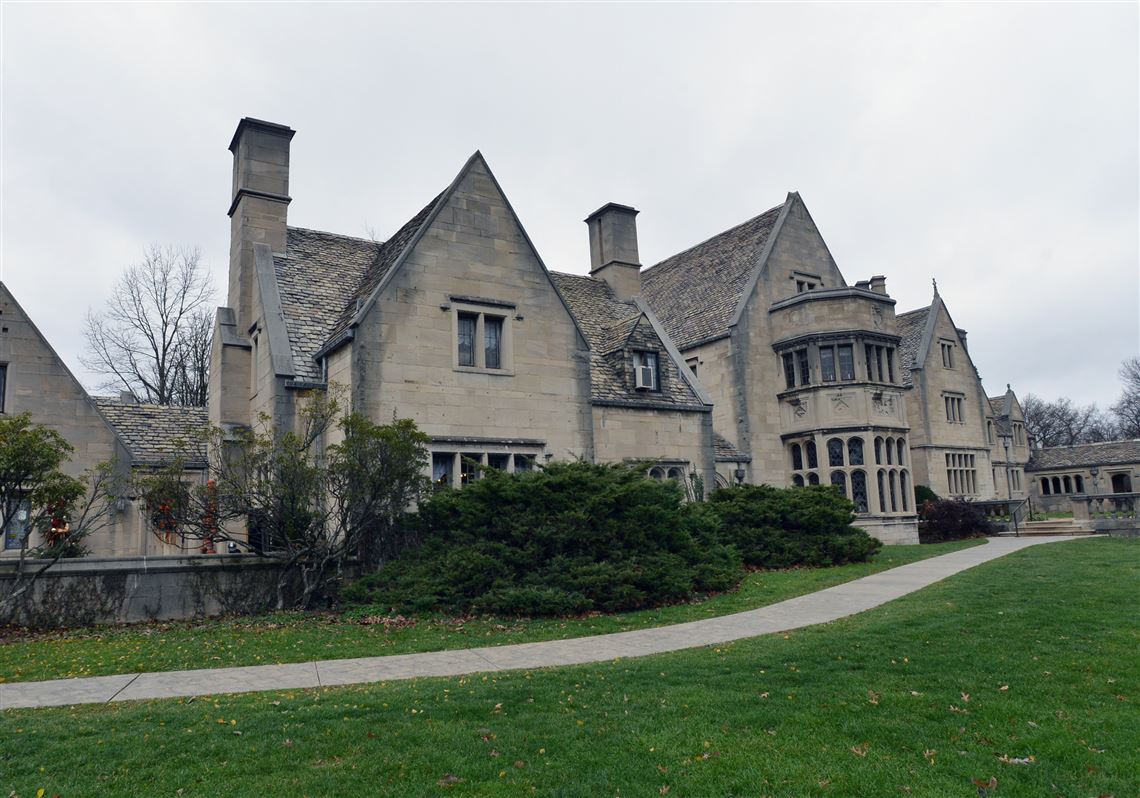
The original pilot for this series was filmed in 2011 near Pittsburgh in Hartwood Acres County Park, which is built around a spectacular old mansion:The mansion at Hartwood Acres will be closed through March 30.

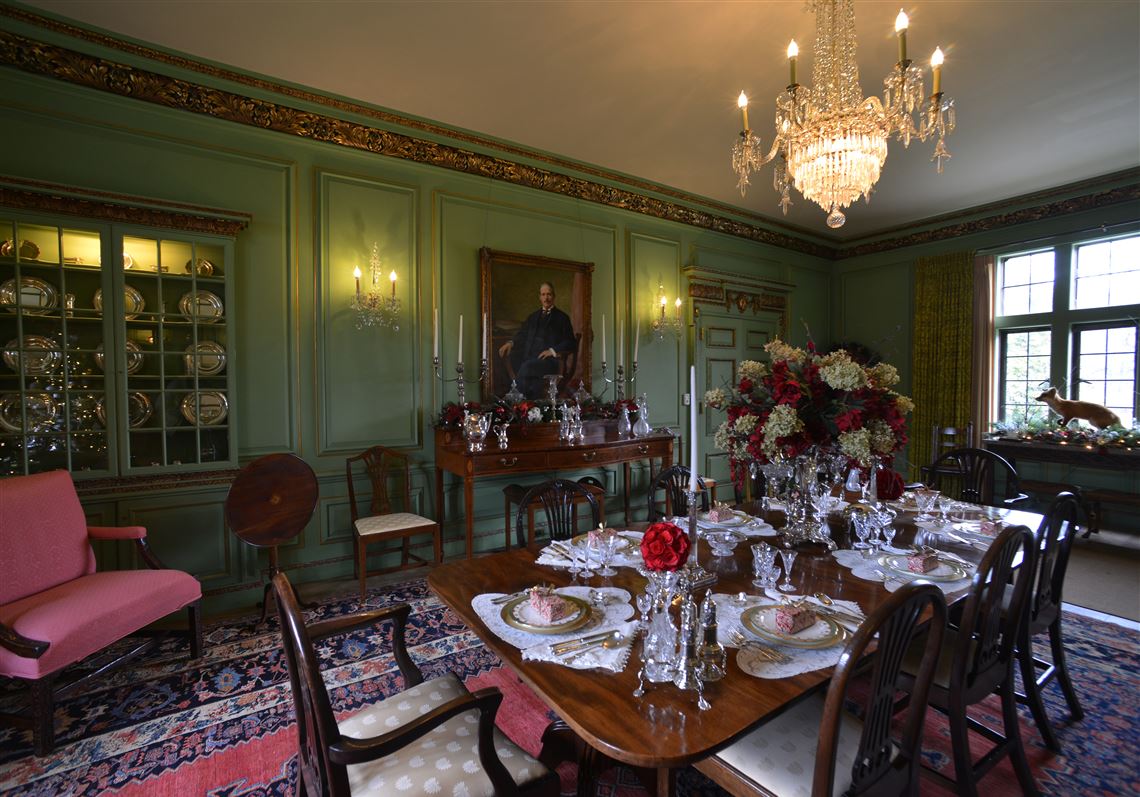
The dining room inside the mansion at Hartwood Acres.

My wife and I hike in the park almost every day, so we saw the whole process, complete with dressing room trailers, catering, blacked out windows for nighttime interior shots, etc, etc.  Quite the process

This production apparently had a rocky start with a cancelation and eventual reprieve. I believe none of the footage from this pilot ever made it on the air, but I guess it did its job. 

In normal times, you can tour the mansion sometimes. It is especially striking during the holidays. It is a favorite wedding venue--pretty photogenic.

Last edited by Avanti

I really like when my musings create some diverging posts.

Did errands today and was suckered into buying something on Costco's "impulse aisle" (which is what I call it). They had these really nice Duracell LED work lights in a set of three for $16 (including 9 AA batteries). That's a tad over $5 per. They're solid, have an adjustable stand and are typically LED bright. I had need for them right now since I just bought an LED ceiling fixture for our laundry room. With the lights off having some convenient work lights will be helpful. I can also use them under the layout when I do some more wiring. I have to install the 10 street lights and will use lighting for that. I also bought a couple more big ground terminal bars to provide power to the lights. 

I kept looking at various LED lights utility whenever I'm anywhere that's displaying them. This time it really got my attention.

LED Work Lights from Costco

I removed the nice print of the tree stumps, cleaned them (no supports) and painted them.

Here's the big stumps in process. I noticed that the artist who drew these did it all with flat surfaces thereby greatly simplifying the drawing process and calculations necessary for SU to complete it.

THC Big Stumps Paint

And here're the little stumps all painted. I will apply some weathering to them before considering them done. I used various mixtures of brown, beige, white, gray and yellow on my Press-n-Seal palette.

THC Small Stumps Painted

I decided to attempt to fasten down the site filler for the Cabin using mechanical means. Underneath all this cardboard is W-S ground cover and plaster which is a terrible gluing surface. Instead of attempting to remove it, (a sloppy job) I used the staple gun for some of it. For other spots I used SPAX screws with dress washers to hold it down. When I slather plaster and Sculpt-a-Mold all over it, the screws with be obscured. I had to add another piece of cardboard on the left side to support the area where the shed will go. I'm positioning the buildings so they will present the best view when the gate is closed. Just as a reminder, the Cabin vignette is going on the layout gate.

THC Fastening the Site bedrock

I needed to find a power source at this extremis of the railroad for the cabin and shed lighting. I wasn't looking forward to running a 12VDC line all the way out there. It is the most remote section of the layout since the power has to come from the gate's hinge side. Luckily, there's already un-modulated power there: the latest switch I installed has a constant 14 VAC feeding it.

THC Power Source

One lead to this terminal and another to an outside rail and bingo, power for the grain of wheat bulbs. Being incandescent I don't have to worry about 20 ma or other LED considerations. I tested it with the cabin and it gave nice light, better than the 12 volts I tested them with. At 12 volts they're a little to red-shifted. This will be an easy wiring job. I double-checked to make sure that the switch machines were tapped into the Z-4000's 14 VAC tap and not the 10 VAC. I'm using the 10 volt tap for some of the older building's incandescent lighting and frankly it's too dim. With a volt meter between this terminal and an outside rail I was getting almost 14 VAC, I will route the wiring around the gate hinge line so they won't be stressed when the gate is frequently opening.

One last random observation.

The new print platen accomplishes its griping power by having the aluminum surface machine with a radial pattern starting at the center. The tool marks are intentional to provide a gripping surface for the resin. Since I formed the tree stumps directly on their bottoms is the same pattern, which you can see in this image. It seems to work.

3D New Platen Pattern

I'm running a much more challenging print now, an O'scale version of the ALCO engine. The first part is an engine block half with all the injector, head and injector cover details included. I'm not doing any pre-coating and seeing how the new plate works. Wish me luck. It will be done tonight around 10:30.

Haven't received any feedback about the House's placement...

I made all the drawing corrections (that I could find) and sent it to Rail Scale Models.

Can't believe tomorrow is Friday already. Seriously, the weeks go by so fast that they feel like 3 or 4 days. I'm blaming it on being very engrossed by the model work I'm doing. I hope it just not speeding up because I'm getting older (turn 75 on July 30) since it portends that the end is near. I was buoyed by the fact that Carl Reiner passed this week at 98 and Hugh Downs just past at 99. Even if time goes fast, that's still almost years in the future and Carl Reiner was vibrant and funny up to the end. I want to live long enough to see Elon Musk get us to Mars and/or get my railroad done whichever comes first.

Attachments

Images (6)
  • LED Work Lights from Costco
  • THC Big Stumps Paint
  • THC Small Stumps Painted
  • THC Fastening the Site bedrock
  • THC Power Source
  • 3D New Platen Pattern

I've always found it interesting that all the model stumps and model cut lumber that I've seen are cut straight as if with a single cut of a large chain or circular saw. I never see the irregular cut  result of a wedge cut in front and a straight cut in back like I see big trees really being cut down. Just an observation. 

I think the house will look good in either location. The uniqueness of the house will draw the viewer's eye to it.

Myles,

Your forklift is an excellent addition to your repair facility. I don't know if I could accomplish what you have with a 3d printer. I don't have your kind of tenacity. With all the issues you've had to work through mine would be in a closet or on Ebay by now. My hat is off to you. Your Hacker cabin is very cool too. I really enjoy scratch building and I've learned a lot of new techniques reading this thread since the beginning. Can't wait to see what your next project is going to be!

Thanks for including us in your journey,

Rand

I agree with you Pat on the way model stumps are often made.  I didn't even notice when I saw Myles' stumps, and I think that is the thing about modeling.  If it is done well, I won't notice something like the cut of the stumps.

I think I would use the first spot for the new house.  It is closer to the other Victorian buildings from what I can see in the photographs, tieing in the whole scene.   Beside the firehouse seems to be a place for a more plain building, also because it is farther from the viewer.

I guess I'm sensitive to that because I'm in the process of replacing those crappy looking plastic logs on my spine cars with real wood logs. Trying to make it look real, I don't like all the flat ends. Not to mention the fact that when the second cut is made, the tree often splinters and breaks before the cut is finished and you get some ripped bark and you get some splintering between the two cuts. But I'm being anal now.🙄

Jeez, what tough crowd! You're all correct of course, but this vignette isn't being built to enter into a show, and the stumps will just be some of the clutter surrounding the joint.

Last night the ALCO print failed. While this looks bad, it's really sort of good. The raft is firmly attached to the new build plate without any pre-coating. Clearly, there were not enough supports to hold onto the big print. When this happens it's usually something you can fix in the drawing and the placement/supports in the slicer.
3D Failed ALCO

When I reviewed the slicing animation of the part, I noticed that there was a huge swatch of unbroken resin that was being pulled off the FEP. Is I first went to the drawing and removed some of the mass. I was able to push the inner walls and taper than some the block had much less material in it. When you do this you need to check the wall thickness in the X-Ray view to ensure that you're not trying to print tissue paper. The walls should be about 1/16" inch to be safe.
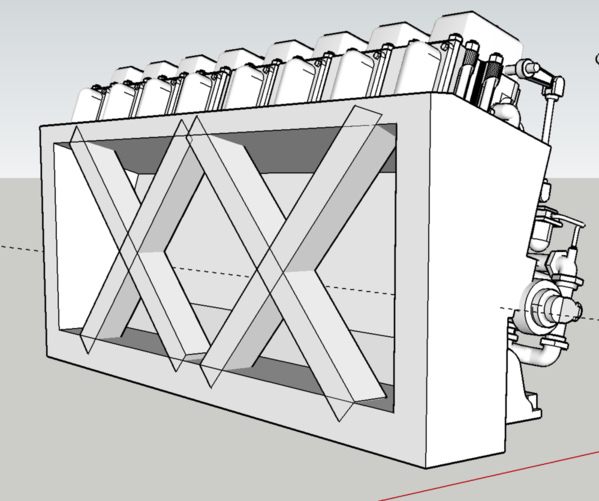
3D ALCO Drawing Edit

I then repositioned it in the slicer so the angles further minimized the amount of material being formed at the same time. Lastly, I ensured that I was using heavy supports and increased their density from 70% to 90%. The result?

A perfectly printed ALCO right half engine block. The only thing I can see that didn't print were the actual injector piping, but these are simply too fine to print under any circumstances. And the new platen is doing its job. If I want to go nuts I can drill and insert 0.010" brass wire to replace the missing injector lines. You can see some of them started forming in this image. I could see in the slicer that the lines would make islands, but the supports would be many times thicker than the part to be produced and wouldn't work. Removing the support would remove the detail too. I'm very happy that the new plate is getting a good grip without the mess of pre-coating.


3D ALCO Block Rt Success

While the printer was humming away I got back to building up the site for the Cabin. I wanted the access road to wrap around the building coming from near the pond. Any other route would have it coming directly from the engine house and I really want these two things to sort of exist in separate locals. You have to use your imagination.

After sketching out the road's path I realized I needed to add back cardboard material to widen the cardboard base. I  had some of the scraps left from the original cutting for one section, but yesterday night was trash night I dumped all the big cardboard trimmings. Of course, the second I did that I would need some of those scraps the next day… Murphy..

For this piece I first traced the edge onto some strathmore, cut it and then traced the pattern onto the thick stuff. I glued it on with Aleen's.
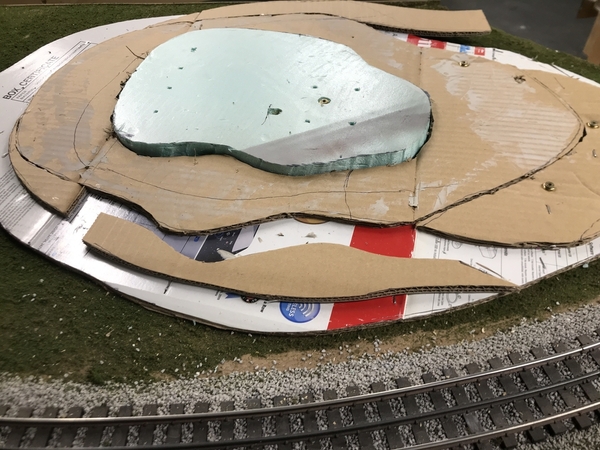
THC SIte Prep Cardboard Stetching

On the front side I had to build up the entire topography so the road would be somewhat level leaving the property. It took four layers of cardboard. BTW: If you're planning on doing a serious terrain work and you don't want to spring for Woodland Scenics stuff or schlepping to Lowe's for insulation foam,  just save the myriad boxes that you have and use that. The really good stuff is from TVs and Printers. You need a good, sharp utility knife blade and you need to take you time taking a series of light cuts to follow the contours. The road cross the layout door hinge line and I had to manage that. It was just a small complication. Some of the parts needed a remake, but the raw material is really cheap. If it ain't right, just do it over until it is. Again, I used screws with dress washed to pull it all down tightly.

THC Site Prep Door Junction

Here is the paper pattern used to cut the extender part on the back side of the oval.

THC Site Prep Paper Pattern

The top two surfaces are glued and I used "gravity clamps" to hold it all tight until dry. I'm letting this sit until Monday. You can see the flush edge at the hinge line.
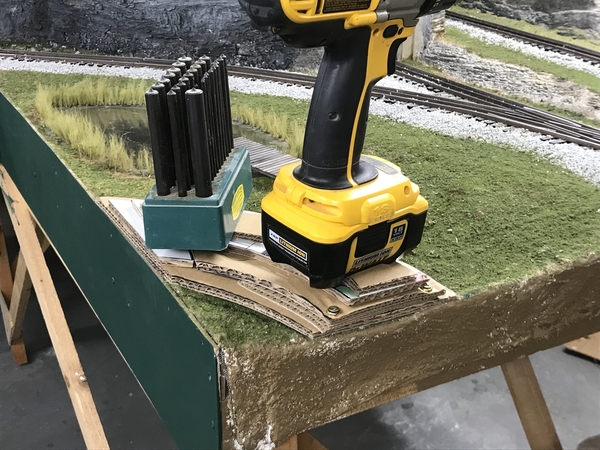
THC Site Prep Gravity Clamps

Here is the entire site aerial view.  Because of the big, wedge-shaped gap between the engine house and the cabin, the two can be view as being apart, probably miles apart.
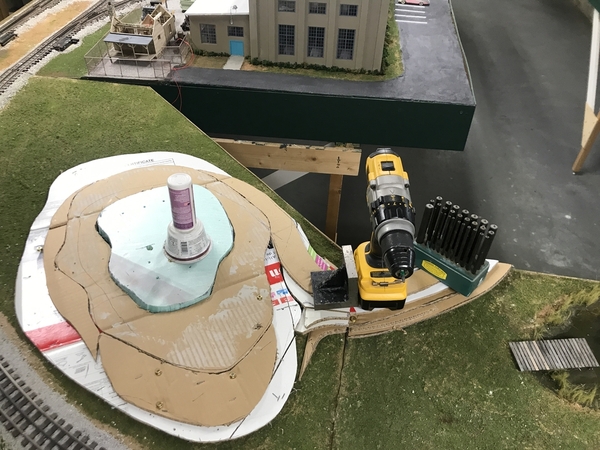
THC SIte Prep Road Surface ext

I took this image just for fun. It's the collection of all the parts I printed for the House. I started counting them, but gave up. Not evident is the number of pieces included in the stair case. If I had to pay to have this all done, it would have been very expensive. When the laser cutting is done I'm going to attempt to photograph ALL the parts just for fun.
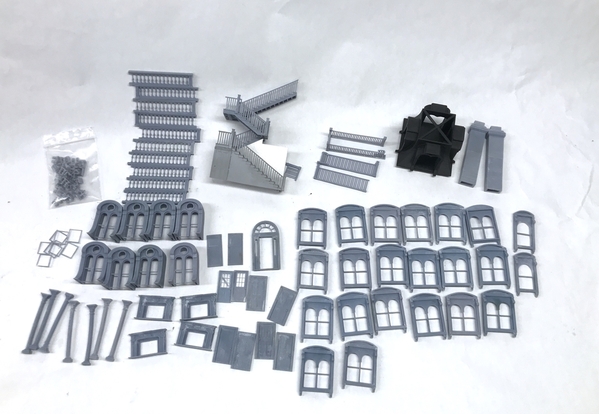
HBTRR All the Printed Parts

On Monday, I will start getting my gloved hands dirty beginning all the plaster work to turn a pile of cardboard into a scene. 

So all y'all have a happy, safe, socially distanced 4th holiday. We're living in strange times, but we will eventually prevail.


Attachments

Images (9)
  • 3D Failed ALCO
  • 3D ALCO Drawing Edit
  • 3D ALCO Block Rt Success
  • THC SIte Prep Cardboard Stetching
  • THC Site Prep Door Junction
  • THC Site Prep Paper Pattern
  • THC Site Prep Gravity Clamps
  • THC SIte Prep Road Surface ext
  • HBTRR All the Printed Parts

Got my hands (gloves) dirty today. I tend to procrastinate plaster work since it's just not fun for me, but it is essential. I used up all my Gypsolite structural plaster on the mountain, so I resorting to hydrocal. It provides a smoother surface since it's missing the granules, and it sets much faster so you have less working time. I mixed up batches that  3/4 filled a large cottage cheese container. It's about 1/3 to 1/2 water and then four 1/3 cups of plaster. Mixes to a whipping cream consistency. To this I added some squirts of W-S earth tone base to make the plaster a tan tone instead do white so if it chips it's not stark white showing through.

THC W-S Tint to Plaster

I use Select-a-Size Bounty Paper Towels since they have good wet strength so they don't just fall apart when soaked with plaster. I used the select-a-size sheets and then cut them in half length-wise. This batch size soaked about 16 to 18 sheets. I used the soaked towels as the first coat to be followed by a filling/texture coat using Sculptamold, which I will also tint, perhaps more darkly.  I rolled/folded the towels so they filled in the stair step of cardboard. While you can still see some of the underlying formers, when the final coats go on, it will all be well disguised.

Before I could get started I had to protect the rest of the area by making a faux "surgical field". I have those very thin poly film drop clothes that I purchased when the "great dishwasher leak" occurred. I cut off what I need and use it all the time. I left a minimum of exposed grassland. I also threw some cardboard on the floor to catch the drips, but still made somewhat of a mess.

THC Surgical Field

It took a little over two hours to do all the towel/plaster work.

The is the door side plastering. You can clearly see the road surface which I kept clear of toweling. I did got back when all done and used some of the thickening plaster to fill the cardboard joints which will make applying the final work much more easy. I may buy some more of that acrylic tile grout that I used for my Macadam roads, only this time I'll tint it like a dirt road. It has a lot of innate texture and makes great roads.

THC Door Side Grading

This is the pond-side of the construction. The road is on a significant berm.

THC Lake Side Grading

The joint between the two roads at the hinge line is very tight and looks good. I was trying out the shed to ensure there is enough space of the tie piles. It will.

THC Road Joint

I noticed on the actual pictures of the cabin in the instructions that the original had more bracing on the front porch and the post underneath. I added these.

THC Added Supports

I also built the small steps that take you up to the porch.

THC Front Steps

The plaster all has to cure overnight before the next coats go on. Meanwhile the printer produced a beautiful ALCo right side block. The left side is printing perfectly too and actually finished up an hour a go. You can even see the ALCo lettering on both sides of the injector covers. It had a perfectly formed governor rod, but i broke it off sometime today. Don't know when, but it wasn't when I was cleaning it. Piping was beautiful.

ALCO O-scale Rt Side Print

Attachments

Images (8)
  • THC W-S Tint to Plaster
  • THC Surgical Field
  • THC Door Side Grading
  • THC Lake Side Grading
  • THC Road Joint
  • THC Added Supports
  • THC Front Steps
  • ALCO O-scale Rt Side Print

The turbo-end of the ALCo printed fairly well, but the flywheel end separated from the build plate early on and was a non-starter. I'm going to check the drawings and do a reprint of both. The left side block was very good and the two halves are now CA'd together. I'll post pics when it's done. Now the piping is on the printer and I'll have to reprint the flywheel end.

They hydrocal was still too damp to work on the second layers. I'll give it some more time. The basement is cool, but the humidity is high so drying isn't fast. The plaster is set, but the paper towels are retaining a lot of moisture and are weakened by it.

The rest of the day was spent doing errands and putting this 2 foot LED light up in our laundry room. There was a four tube florescent there and it was working poorly. Turns out it had two ballasts and at least one of them was going south.

The aluminum fashion pieces are held by two acorn nuts on studs at the fixture's ends. You need to remove these to take off the diffuser. It was the last step in the install. The right hand one dropped when I started threading it, but landed right under the ladder.

New Laundry LED

And of course I dropped the left one, and it landed in the "pit of despair" (to pull a Princess Bride line), right down the crack between the washer and dryer and then scooted under one of them.

The pit of dispair

I got my retrieving tool and started sweeping underneath the two units, not knowing under which one it went. I kept pulling out wads of lint, hair, grunge, but no acorn nut. Finally when there was no more crap to be removed, I heard the retriever hit something that made noise. A couple more sweeps and the nut flew out the front. Phew! Murphy was right there over my shoulder.

All's well that ends well and I got to clean out a lot dirt.

Attachments

Images (2)
  • New Laundry LED
  • The pit of dispair
Last edited by Trainman2001

My theory about Mr. Murphy follows a similar investigation of the tooth fairy and Santa Claus. When my daughter was four or five, she began to question about how the "Tooth fairy knew that her tooth was under the pillow". This will date the answer a bit, "I replied drolly, "It's CB radio. The tooth fairy is in constant, speed-of-light communication with all the places where teeth are residing." When I give scientific sounding answers, I sound very convincing and this bought us just one more year. My daughter is very smart. So now we have to up the ante. Santa and the tooth fairy (and Mr. Murphy) operate in the quantum mechanic realm. They can pop in and out of existence instantly and when not here, they are in 'No Time Zone' meaning they can appear instantly at all places at the same time. So Mark, it is quite plausible that Murphy was pushing my acorn nut as far under the dryer as physically possible and screwing you up at your house at the same time, but in different space. Neils Bohr would be proud. Einstein, on the other hand, might be a bit non-plussed since he really got into this QM stuff.

I redrew the intake cone assembly of the ALCo's turbo. It was a mishmash of various shaped cylinders and odd shapes and there were discontinuities creating voids and some print fail areas. I work up this morning realizing the best way to make the assembly was to draw the entire profile and then use "follow me" tool to lathe it into a cylindrical shape. It worked. It's now a single solid piece and the subsequent part in the slicer worked much better. I'll be starting this print this morning. 

Meanwhile, the piping bundle printed perfectly. It's on the machine waiting for me. That surprised me. I thought it would be a failure since it's so fragile. You never can tell.

Thanks!

Exercise day… 

Got all the ALCo parts finally printed and the engine assembled. It looks pretty good, complex and big.

The end reprint worked mostly okay. The fixes I made the turbo end worked well. There was still a couple of discontinuities and poor print areas, but they were small and Bondic fixed them. The main problem with the turbo was solved. Some of the supports on the piping didn't help.

The piping came out decently. Some of the tiny coolant pipes either failed to print or broke during cleaning. I had to be careful attaching supports to them since it was inevitable that I would break them in getting the supports off. I cured it first and then did all the removal with the Dremel and diamond needle burr. Even being as careful as I could be, just the vibration induced fractured some of the joints. Again, most of the breaks were fixed with Bondic. I did this same part in HO, and the coolant line failures were almost invisible, but the do matter in O.

ALCo Piping Print

I drew the exhaust connections with them attached to their respective spots so when I lifted that part of the drawing to create a separate part and knew that, if printed correctly, it would fit. So when I tried it, it just dropped right in. The coolant pipes drop on the top of the heads, and the exhaust slides down to the sides next to where the intake pipes are molded in.

ALCo Piping Test

I decided to replace the missing two coolant pipes with some 0.032" phos-bronze, so I drilled the head with same sized carbide, bent the wire to conform to the geometry and then snipped to correct length.

ALCo Rebuilt Coolant Lines

I permanently glued the piping in with thick CA.

While the governor linkage was intact after printing, I managed to break off the top part in all the handling, so I decided to rebuild this (sort of). I used, again, the phos-bronze, some folded photo-etched fret brass, drilled and soldered together. I drilled the head and the lug on the governor to restrain the shaft. I then carefully drilled the resin lower end on the injector rack lever and inserted a piece of 0.020" phos-bronze that I bent to interest with a hole in the governor lever arm. It's not pretty, but it will look decent at a distance.

ALCo Rebuild Governor Links

Here is a comparison between the good turbo and bad turbo ends. The new one has a much better formed turbine inlet horn. With it printed as a completely formed solid, there were no gaps that needed filling. The arrows show the glaring failure areas. I also changed the inlet geometry to increase the material thickness and deepen the opening. The exhaust flange also printed much better in the second version. And that is a very visible detail.

ALCo 2 Turbos

So here's the finest product before painting. You can read the ALCO names in raised lettering on the sides of the injector box covers. I am going to try and paint them. It will probably not work.

ALCo Complete 2

BTW: this is the prime mover in the ALCo PA and in the Saturn V crawler carrier. The cylinder studs are actually separate from the heads. The print resolution still amazes me. The pipe complex down on the lower left is the air starter. Notice that the starter pinion actually sits next to the flywheel's ring gear. I had to draw all this crap! Having some good plan drawing with dimensions made some of the more hairy parts (those pesky cylinder heads) possible.

ALCo Complete 1

I immediately started printing the Fairbanks-Morse right-hand block half. It was printing about 1/2 hour and then I remembered, "One of the three previous prints failed and that means there's a chunk of resin stuck on the teflon that's going to ruin this print!" I immediately stopped the printer and when it came up to home position, it looked like this. It had already completely failed. Why?

If you'll notice, the remainder of the raft from the failed job was now part of the raft of the new one (arrow). I didn't realize this at the time. I scraped off the failed raft into the trash, removed the vat, poured the resin through a filter into an empty jar, and went to clean out the stuck part. The FEP was spotless. Where did the scrap raft go?

I retrieved the failed part from the trash and saw that it was picked up by the forming of the new raft and pulled off the teflon. It shows how good the adhesion on the new, revised build plate is being able to vacuum up the remains of the previous print. Even so, this led to the failure since the raft was now working on two layers and this doesn't fly. It's now back in operation and will be done after 10 tonight. Learn something new every day.

3D Previous FEP Debris


Attachments

Images (8)
  • ALCo Piping Print
  • ALCo Piping Test
  • ALCo Rebuilt Coolant Lines
  • ALCo Rebuild Governor Links
  • ALCo 2 Turbos
  • ALCo Complete 2
  • ALCo Complete 1
  • 3D Previous FEP Debris

The plaster was dry enough to get another layer in place. This was using acrylic grout tinted with W-S Earth Base. It took a lot of base to get it to this color. I wanted to add tire tracks, but the stuff was just too soft to do it. I might add a thin second layer just for the texturing. The color is pretty good for a dusty road, but it will need more work. The grout has some much natural texture to start with.

THC Path Paving Start Door Side

Laying down a top coat will also give me some more control of the few tool marks. I cut the foam base with a slope that will lead from the path to the front steps. I placed the shed into the wet grout to set up its location.

THC Path Paving Start Pond Side

The FM engine half came out very nicely. I love how every single hand grab resolved and didn't break during clean up. The other half finished a half hour ago and was also printing very nicely, the last time I looked. I had to reinforce the coolant pipes bracket on the left and the connection on the right. I use the same Woodward Governor drawing for all my diesels. In true life they were ubiquitous, but there were some differences between engine makers.

FM Block Lft Print

And I primed the ALCo and did some detail painting. It looks nice painted. Not weathered yet… need to let it all dry more.

ALCo Painted 2

My attempt at dry-brushing the "ALCO" lettering on the injector covers was so-so. There isn't enough relief to really get good resolution.

ALCo Painted 1

Attachments

Images (5)
  • THC Path Paving Start Door Side
  • THC Path Paving Start Pond Side
  • FM Block Lft Print
  • ALCo Painted 2
  • ALCo Painted 1

Thanks Pat!

I don't know if you guys enjoy my journalistic ramblings or not… but I enjoy it. Most of this afternoon was spent in this.

Crowds at Tax Office

Kentucky has a real estate tax for cars (and boats too) based on 1% of the blue book value as of January 1 of each calendar year. It's a funny tax since it basically dis-incents you from buying a new car since the older the car gets the less tax you pay. With the Covid rules, you had to wait outside the County Clerk's Office until your number was called.  I waited in the high-humidity heat for almost 2 hours. The transaction when I finally got in the door took about five minutes. I'm telling y'all this because it curtailed my shop time, but… there's good news. I still had enough time to get all of the Sculptamold applied for the second plaster layer and got the other Fairbanks Morse block half off the printer and it was better than the first.

First the print. The black smudge is from black acrylic on my gloved hand left over from mixing up a plaster batch in the layout room. The coolant pipe actually printed unattached to the long header which is why it disconnected on the first block. It's a drawing error. I proactively added a Bondic joint there so it wouldn't be stressed during cleaning. I also did the same thing to the bracket at the other end, reinforcing it with Bondic. It worked. The picture was taken before final sanding, but after post curing. It's a great print! It's even better than the first. The first had a little distortion at the far extremity of the base flange. This one has no distortion anywhere. The generator, exhaust stacks and front end are on the printer now, but I have another print set up for the blower and exhausts with an improved exhaust support scheme. We'll see which one comes out best. The base for this engine is a large two-part print that the other engines didn't have.

FM Block Rt Printed

The Hacker's site now has all the plaster it's going to get. It took several batches to cover all of it. My recipe: about 2 cups of water, five seconds of squirts from the W-S Earth Base tint, and then 3.5 to 4 handfuls of Sculptamold. The tint really gives the plaster some color. Even though it will be painted when adding the ground cover, having it tinted earth color means any chipping will not show up bright white. I was liberal in slathering the plaster onto the hydrocal base coat, filling in all the insconsitencies and making the slopes more uniform. I was careful in blending the plaster into the now completely rigid path surface.

To ensure that I can find the openings for the cabin's legs, I inserted basswood splints into the foam and the laid the plaster around them. It took a lot of patience to get the actual part of the site where the house would sit level enough to work.

THC SCM Door Side

I used a combination of putty knives, a wooden paint stirrer and then my gloved wetted finger. On one of the slopes I applied some cast rocks which I was making concurrently with using the Sculptamold. It was tinting the plaster for these rocks where I acquired the black acrylic used to tint the Hydrocal.

THC SCM Pond Side

Putting down the road surface first was the right way to approach this since it gave me a clear demarcation line between road and terrain. I'm still not sure how I'm going to rut the road a bit and show some usage.

Again, I can't believe it's Friday again. Weeks go by way too fast for me. It's almost disturbing. But every day, there's something new in the basement that I created that wasn't there the day before. It's one of the reasons why the hobby we're in is so rewarding. There's always something new that's being created. We're just not marking time.

I was also ruminating on the amount of plaster that my railroad now comprises. Between plaster and ballast, there's a couple hundred pounds of added weight besides the mass of OSB and structural lumber. Whoever dismantles this beast is going to need C4 and a couple of dumpsters to haul it all away. When I built the first iteration in Germany, it was just track, plywood and some structure. Now it's a completely different animal.

Attachments

Images (4)
  • Crowds at Tax Office
  • FM Block Rt Printed
  • THC SCM Door Side
  • THC SCM Pond Side

You certainly had a bad day to have to wait 2 hours in the heat and humidity!!     When we lived in Virginia and then West Virginia, both states had what they called personal property tax.  Essentially the same thing you mentioned in Kentucky.  I viewed it as a good deal for us, since we always had two older vehicles, and it kept the real estate tax on the house low as compared to the high Pennsylvania real estate tax even on modest homes and land.  I would welcome paying 1% of the Blue Book value on my 17-year old Hyundai if it cut our tax on the home by a few hundred dollars.  However, your point is well taken because it could discourage new car buying which isn't good for the overall economy.  I haven't bought a new car since I was single and bought an '80 Datsun 310.  It was totaled in '89 by a kid who just got his driver's licence and slammed into my parked car showing off for a bus load of girls!  Idiot!  Joke was on him!!  We never had to wait in line to pay, the three counties we lived in over the time we were in Virginia and West Virginia always did it by mail.  

Both projects are looking great!  it was a good idea to place the splints in the foam to mark the place for the cabin!  Have a great weekend!!

Add Reply

Post

OGR Publishing, Inc., 1310 Eastside Centre Ct, Suite 6, Mountain Home, AR 72653
800-980-OGRR (6477)
www.ogaugerr.com

×
×
×
×
Link copied to your clipboard.
×
×