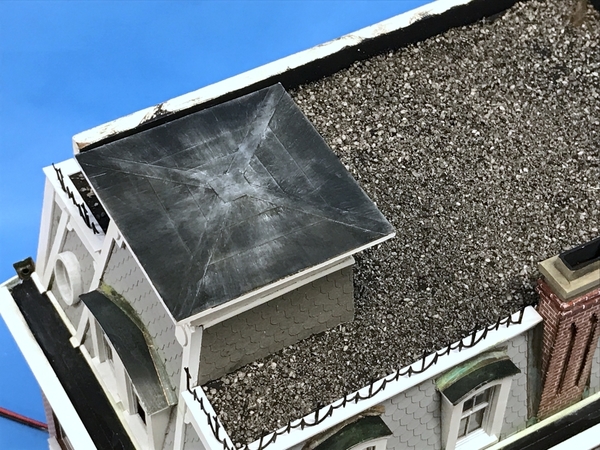
Again, with PT exercises, my shop day was cut short, but not unproductive. I applied the roofing material, but I'm concerned that the grain size of my gravel is just too darn big. While that was drying I built some more water boxes. Each time I do one it's getting easier and they're coming out better. "Practice makes perfect"! I did get the shingles over top of the front flashing. On the side windows, there's not enough shingles to overlap the flashing so I left it alone.

I masked the top facing of the top trim boards so paint wouldn't get on them. The gravel I have looks more like an S-gauge ballast than O'scale roofing granules. It was very light color so I first soaked it with some Tamiya Panel Line Accent Black. I then liberally applied a Mars Black/Neutral Gray mix of Artist Acrylics and sprinkled the stained gravel onto it. I then dripped a liberal amount of W-S Scenic Cement and should have set it aside to dry overnight. Instead of just letting alone, I decided (wrongly) to tip the building over the trash can and let the excess fall away. Why it was a mistake was because I also painted the parapet walls and the gravel then stuck to that making a mess. I cleaned it up, repainted the damaged areas, AND THEN put it aside to dry. The parapet top edge is a mess, BUT will be covered by the parapet cap system which I have to build. You can see the buried flashing in the front if you look hard.

BB Roof Gravel

With the water boxes, the real improvement was a) using the paper templates, and b) perfecting the cutting technique. I stick the pattern with the longest edge flush with the brass edge. I then cut the sides and the long edge of the tapered back panel with the mini-tin snips. Next I use the nibbler on the tapered edges and straight sides of the two ends. I cut as close to the taper as possible, but stop before I get too far since the square nibbler blade can't cut into a acute angle. The little bit left is cut using a jeweler's saw with a very fine blade since the brass is 0.010" thick. I file and straighten all the surfaces including filing the area around the pipe holes. By careful cutting and filing, the folds went better and I got tight corners that were very easy to solder using the RSU. I do the folding with the template still glued on and then soak the workpiece in acetone to dissolve off the adhesive before soldering. After soldering I dip the piece in isopropyl alcohol to remove excess flux (using rosin core solder and TIX liquid flux). I have to make 8 parts with the middle boxes being mirrored for the two sides of the building. Holes exiting out of the sides of the tape are made slightly oval using the Dremel with a cylindrical diamond-coated burr.

BB Water Box Status 1

After they're all made and soldered to their respective downspouts I will age the brass to make it look more like old copper. I will have it done tomorrow or Friday. BTW: that pipe is not soldered. When it is, it will exit straight out to the side, thus requiring the slightly oval hole.

BB Water Boxes Status 2

After the roof is cured tomorrow, I'll re-evaluate whether or not to strip the larger gravel and do something else. 

Attachments

Images (3)
  • BB Roof Gravel
  • BB Water Box Status 1
  • BB Water Boxes Status 2

The gravel dried nicely and I'm going to leave it alone. I'm getting the hang of building the downspout system. I got one full set done, chemically treated and waiting for installation, and got 3/4 done on the second set. They're mirror images of each other and of course I made one part backwards. After this picture was taken I added 0.032" pins to several of the boxes to affix them to the wall and made a loop that I soldered to the midsection of the long downspout to stabilize that long run.

BB Downspout sys 1st set

Here's the downspout for the second set showing that mid-loop. I rediscovered that I had soldering paste in a syringe applicator. This further simplified soldering the boxes since I apply the paste to both inside corners and heat each side with the RSU until the solder flows nicely. I solder the downspout to the box with TIX low temp solder so the other joints don't de-solder too readily.

BB Downspout WIP

Here's what I have done so far. Notice how aging the brass really adds to effect. The top section of the 1st set is over at my workbench since I'm using it as a model to get the dimensions equal. You can see the added mounting pins in this image. Without the pins, gluing those brass boxes to the wall would be very insecure.

BB Gutter Parts

Have a PT appt tomorrow so don't know how much more I'll get done. But it's already Friday again. I don't know what it is, but weeks never flew by so fast when I was working. Maybe it's because I get up around 9:00 and don't get done messing around until after noon. When I worked, I was up at 6:00 and often had a 45 to 60 minutes to commute to work and then back. In the winter both ends were in the dark, so the days just lasted longer. Longer days = longer weeks.

Attachments

Images (3)
  • BB Downspout sys 1st set
  • BB Downspout WIP
  • BB Gutter Parts

Myles, the aged brass looks great!!  I really like the completed downspout on the one side.  Yes, I can see the pins are necessary for gluing them on.  On the prototype there would be hangers attached a various key spots.

Being laid off for the last 4 months after a year of part time, I agree I don't make quality use of all my time.  My insurance approved PT expired yesterday.  I was given a gray tee shirt with the facility's name in white on the front.  It will work for mowing grass and such!  I wish you well on your therapy!!

Dave, Are you ready to move in to the Bronx?  Since you live in New Jersey if I recall correctly, I'm guessing you may have been there.  I've never been to NYC or NJ for that matter.  

Mark Boyce posted:

Myles, the aged brass looks great!!  I really like the completed downspout on the one side.  Yes, I can see the pins are necessary for gluing them on.  On the prototype there would be hangers attached a various key spots.

Being laid off for the last 4 months after a year of part time, I agree I don't make quality use of all my time.  My insurance approved PT expired yesterday.  I was given a gray tee shirt with the facility's name in white on the front.  It will work for mowing grass and such!  I wish you well on your therapy!!

Dave, Are you ready to move in to the Bronx?  Since you live in New Jersey if I recall correctly, I'm guessing you may have been there.  I've never been to NYC or NJ for that matter.  

Well, it would be full circle I suppose sort of, lol. When my grandfather came to the USA was back in the early 1900's, he took up residence in I think the Bronx for a while. Some real funny stories my late uncle used to tell me about his father. My dad really never told me much about him though, but I guess that was because I was 2 when my grandfather passed, and was 18 when my father passed.

I have been to NYC a few times, and a little further up state. I think I would need to pop about a bit more, maybe a vacation. I'd like to see Cooperstown someday, but I'd also love to get out to Pittsburgh for a Steelers home game as well. Sent what the future holds, maybe next year.

Happy Monday… what again! I've been trying to figure out why the days and weeks are going by so fast and have some up with a possible theory (despite that I'm just getting old). When I was a working man, I was up a 6:00 a.m. and on my way to work at 7:00. Now I'm up somewhere around 9:00 and don't actually sit down for breakfast until almost 10. That means I'm unconscious for about 3 more hours per day than before. That's 15 hours a week. No wonder the days felt longer….They were longer. This is a long post so bear with me...

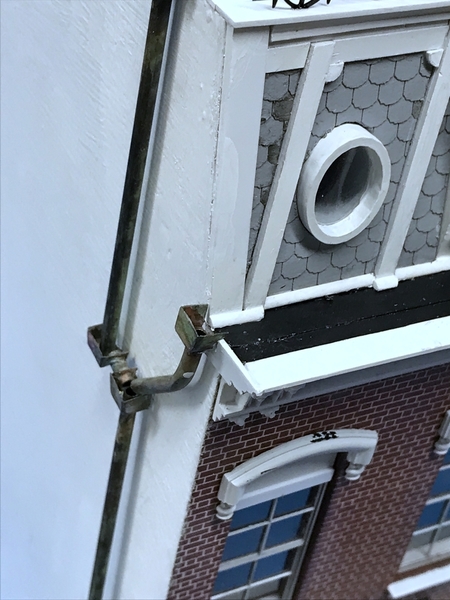
We're getting near the end folks! I got the Widows Walk installed, installed all the those crazy downspouts, put in the plumbing stack, added weathering on the top knot, added some weirs so "water" would end up in the water buckets, and started making a master for the parapet capping system.

Mounting the downspouts should have been a no-brainer, or at least a half-brainer. Instead it had the makings to be a real pain in the butt. Several things contributed to this. First there was breaking four 0.032" carbide drills. Drilling the hole wasn't breaking them; pulling them out of the hole did. They're $1.50 each, so I blew $6.00 making 8 holes. Then there was the breaking of the solder joint when I was putting too much pressure on the brass pins when inserting them in the holes. This was complicated by having the aging treatment affecting solder ability. I ended up filing off the old solder. I also changed from using the TIX, which seems to solder well ONCE, but doesn't seem to have any strength on re-soldering. Instead, I used standard 60/40 rosin core. I was afraid of un-soldering the whole deal so I clamped a hemostat to prevent the long downspout from coming loose.

BB Downspout Fin

To close up any gaps around the water boxes, I added some shaped styrene to act as a weir. I added some styrene up top also for the same reason so the "water" would leave by the scuppers and not run over the edge around the parapet wall.
BB Gutter Weir

The plumbing stack was just a piece of 1/8" brass given some aging.

BB Stack Vent

On Saturday, I went with a friend to an open mic jam session at Mom's Music in Louisville. We didn't play. I was just checking on the competition. I am totally out of shape having not played much at all lately and have no callouses. I did by a neat Wah Wah pedal on sale for $70. I am now officially entering the 1970s musically. Anyway… this person is the retired CEO of a large, commercial roofing company. He said my gravel is okay, and he said there probably would be a roof access hatch in the top knot. So I added one today and then glued the top knot in place.

BB Roof Hatch

I then added all the Widows Walk pieces. I was able to neatly join them and had plenty of extra to use if I broke anything. I did… The pins worked well and I added some thick CA to join separate sections and to tie down any loose ends.
BB Widows Walk 2BB Widows Walk 3

Finally, I started crafting the master for the terra cotta parapet capping. I'm using Super Sculpey to make the master. We just bought a new toaster oven after our 30 year old Black and Decker's toast switch stopped latching. But the oven controls still work fine, so it's now in the shop where I can more conveniently bake my Sculpey stuff. I went on line and found some specs on these.  There was some vintage ones on eBay and they measure 26" long. I found a piece of 1/4" MDF scrap from this building and molded the clay on top so it would be the correct bottom shape. The master doesn't have to be strong… just strong enough to hold its shape when I do any finishing on it and when surround by liquid silicone.

BB Parapet Tile Begin

It's not final shape. I've learned that you shouldn't waste your time trying to get Sculpey perfect before firing (275° for 15 minutes for each 1/4" of thickness). Instead, you make a basic shape, fire it, and then it's stable enough to work more details and get it perfected. Once I get it the way I want it, I will create a silicone mold and cast a bunch of replicas for the total cap. A 1 foot scale wall thickness is not out of line with real world practice.  I may make two of them since it takes about 1/2 hour for each resin cast to cure. That will be many hours of curing time. I may start building the Thunderchief while I'm casting all these multiple parts.

I put some weathering powders on the top know roof so it wasn't so pristine.
BB Top Knot Weather

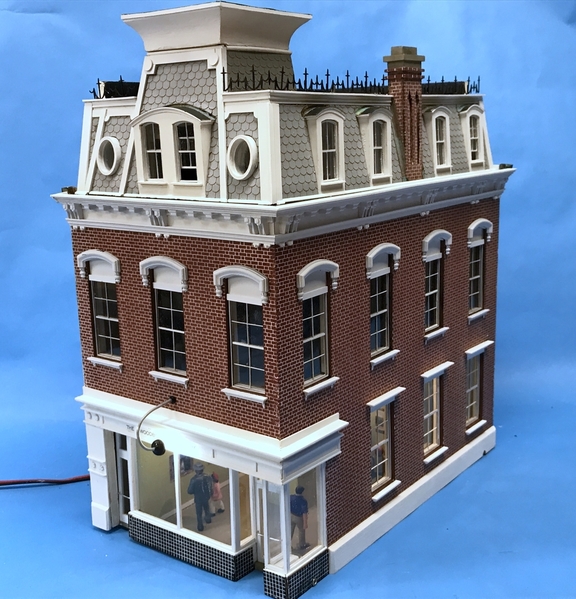
With the parapets finished the building WILL BE DONE. What's left is creating the base plate and siting it on the layout. I'm still debating (in my mind) how to fit it at the corner I want and what to do next door to its left. This building is 2" wider than Saulena's and that 2" will need to come out of the Sinclair Station. 

Here's where Saulena's and Sinclair Station will go. Sinclair is 17" deep, and the space near the tracks on the front is 15". I can get the 2" off the back of Sinclair's base plate and it will simply flip from one side of the street to the other.
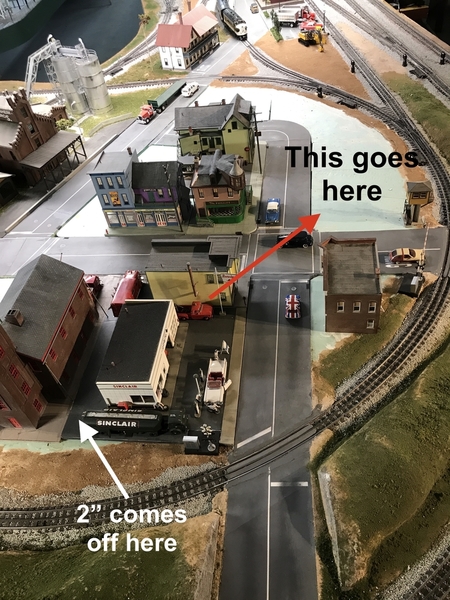
BB Site Planning 3

Then Bronx and the Appliance store will move into the vacated spot. Bronx is a foot long so fits perfectly in length. It's 2" wider and that will come out of the parking lot. The appliance store will be rotated 90 degrees to the right some the display windows face the parking lot. Should be enough for about 8 to 10 parking spots.

BB SIte Planning 2

Lastly, I still need to find stuff for the vacant lot on the other side of town. Ideas are welcome.

BB Site Planning 1

On another topic: I bought Phillips replacement LED tubes for a florescent fixture in out master closet. These are not plastic tubes like occasionally goes on sale in Costco, but are glass enclosures and very substantial. They're not cheap ($16/tube) but their light is terrific. You can get them in about four color temps. I chose 3500k, which is a neutral white. I was buying complete fixtures to replace all the florescent fixtures in the basement since I had tried the Costco tubes and one caught fire. I now know that you have to be very specific about what types of ballast is in the existing fixture to get the most compatible LED. The Phillips lights are correct. Now I'm re-thinking actually replacing the rest of the fixtures, since it's not so easy restringing lights over an existing layout. Replacing the tubes is much less hassle since I don't have to disturb the power connections. It's within a couple of bucks of buying new fixtures. Then I had the problem of not only disposing of the florescent tubes, but also the now obsolete fixtures. So from now on, I'll be replacing the tubes one fixture at a time. All the lights over the town are now LED. The rest of the layout is Florescent. You can see the level of light intensity is much higher with the LEDs.

Attachments

Images (11)
  • BB Downspout Fin
  • BB Gutter Weir
  • BB Stack Vent
  • BB Roof Hatch
  • BB Widows Walk  2
  • BB Widows Walk 3
  • BB Parapet Tile Begin
  • BB Top Knot Weather
  • BB Site Planning 3
  • BB SIte Planning 2
  • BB Site Planning 1

You come up with a lot of little details like the terra cotta covers and the wier to direct water flow.  Now I see one use of the top knot.  I wouldn't mind an access door to my roof and especially my dad's house and shop.  I don't know if I will be able to go back up on Dad's roof again to point the chimney and fix a tiny leak in the roof vent joints that broke loose 6 months after I had it fixed, temporarily.  

Yes I do see more light intensity over the town.  I was glad to see the photographs of the existing town and your plans on moving buildings.  I forgot what the town looked like overall.  You had some photographs when placing the Night Hawks. but this shows much more.  

  I came across a "forgotten" detail you might be interested in using on one of the really old buildings; gutter valve handles.

 Before city plumbing, you likely had a cistern well for water storage below grade (basement) and gutter valves to divert rain water into it until full. Fancy systems would have a float to move the valve back to yard discharge once full. Others might have a few valves outside to be turned manually once full.  If you come across an odd basement "bunker" with a doorway later cut into it, that may have been a cistern at one time.  I've seen a few, but never knew what they were for or why a fat crock pipe was high up in the basement wall aimed up at  the house corners vs down and towards the sewage lines.  One of those times years of "useless" info bits suddenly clicks into place as a likely explaination to many of the little mysteries encountered.

 This thread has been one of the best ever for watching an evolution of a big design imo. Not Big Boy big, but "normal big" and a different type of focus all together so far.

I'm in no hurry to see you finish either... leaving me just that much more bored.  It's been a while since I said a thank you for that too, so thanks

 We all knew it would be, but it is really beginning LOOK like something very special now fyi. So hurry up not finishing it too fast so I can enjoy the completed view 😵...

Butch, your second comment is right in line with my thinking.  Certainly a different focus from Elliot and others.   I appreciate the work documenting everything, Myles!! 

I wonder if that is how they got water in the cisterns at my Dad's house, the one I grew up in, and am now maintaining until our older daughter and her husband can get their low budget fixer-upper into a state they can sell it.  There were two cisterns outside the basement door at the lowest corner of the house.  Dad and I, and with some help of my brother when he was visiting, pumped the one out that was caving in and filled it up with broken concrete, bricks, stones, anything.  The other cistern is still there as is.  I kept the pump, etc we used when we had someone in buying salvage, because our son-in-law may need it some day.  Dad had never cleaned out all the junk grandpa had accumulated.  No it wasn't of any value to American Pickers.   The house was built in 1888, still has a brick outhouse standing, and is in an area that was very rural until developers started buying up farms for houses.  The house isn't far from 2 highways that weren't even built until I was driving, that is why the area is changing.

I kinda know what you mean, though "modern" (57) this house used to have tractors cutting through the neigborhood all day when I was a kid, farmers stands everywhere and there was no police force at all until the early 70's.  It was as rural as a suburb can be.

  You could see for a couple miles once you cleared the sub. Today, you can't really see a clear quarter mile anywhere and the city has always been in the top ten for our states population beginning by the late 70s. All the nice farm houses are pretty much gone now... a few moved to a park. There are lots of small 30s-40s houses kinda spread around too, though they aren't really pretty any more.

Keep the pump. That's worth more than gold should it ever be needed again. There are still three old ones in our family.... just incase.  (and a working one at the cottage. Likely over 100 years old and holds prime even if unused for the summer.. good thing as it has a 50yard & 15ft drop to work a draw through. It's got one of the longest pump handles I've ever seen too. 

Nice comments guys! I don't think I'm going to add anything more other than the vegetation growing up the blank walls and maybe another TV antenna like the one on Nighthawks. Unlike you guys, I'm generally happy to see a project done once I'm into the multi-month duration. Besides, I have that massive F-105G Thunderchief to build on commission and then it's on to the Engine House. I'm finalizing its plans and working right now with Stephen Milley of Rail Scale Models to get an estimate of cutting both the windows and the main building. It's good to have choices re: custom laser cutting. Additionally, there may be a way to cut it myself at the U of L Additive Manufacturing Lab. Choices, choices.

I did get some new stuff the other day. My new True Sander and Duplicutter II arrived from Northwest Short Line. I simply wore the other two out. They were at least 10 years old. I dropped them more times than I'd like to admit and it damaged them eventually to failure. Clear to see old vs. new. The new Duplicutter is below the old True Sander. These tools are indispensable scratch-building items. And I've produced a lot of work with them.

New NWSL stuff

Didn't get into the shop today, but will work tomorrow. I'm going to start moving out the Sinclair and Saulena's and make the changes to the Sinclair base to fit in its new space. I just went downstairs to bring a new supply of surface mount LEDs that arrived to the shop and was handling the clay parapet tile and broke most of it. It was too thin. I'll make another tomorrow with a little more cross-section. I may also add a bit of wire in the friable edges which could use some reinforcement. 

Attachments

Images (1)
  • New NWSL stuff

Thank you!

Yes… I live less than 2 miles from Roundhouse. I buy as much from them as I can, and when I'm not buying, I'm drooling. If you're in the area, give me private eMail and we can arrange a layout visit.

Well… I pretty much got the parapet cap master done… possibly a little bit more cleanup, but it's really done. Now I have to cast a couple of them and see how they key together. This was the third attempt. I made a fixture that provided the correct thickness of the cap's body and formed the body flush with this styrene gauge. I then fired that part. I trimmed it up a bit and then put it back on the fixture and added the thick portion with half on the previously fired body and the other half on the fixture which would provide the indentation so they would nest together. I then fired it again and cleaned it up some more with a sanding block and files so it would be a slip fit onto the wall. I won't know how they fit together until I make the castings.

BB Parapet Cap master 1BB Parapet Cap master 2

It takes 15 minutes at 275°F to cure Sculpey. While it was curing both times I started doing other stuff. I measured and cut out a baseplate template that I will trace onto 1/8" Masonite and 1/8" foam core. 1/2" thick baseplates work best with my street height to make reasonable curbs. The base is 13" deep and 9" wide. The pavement area is 8 scale feet wide. Is that too wide? I think my other buildings are not set back that far. I can easily change it since it's just sitting on some Bristol Board. That's why I'm making a template.

BB Base Plate Template

I crawled under the layout and disconnected the power to the Sinclair Station and Saulena's and then moved them out. Saulena's is sitting in its final spot, but I'm still experimenting with the Gas Station. I didn't like it next to Saulena's since you couldn't see any of it from almost every vantage point. So I moved it up to the right corner and will trim the mounting board so it will fit into the RR curve. This picture shows that orientation, but not the fitting. The Sinclair Station uses an actual mini-florescent tube and needs DC. Saulena's is lit with grain of wheat bulbs and uses AC. Only my very earliest structures have incandescent lamps in them. Anything built over the last 5 years is LED and therefore DC.

BB Saulenas Moved

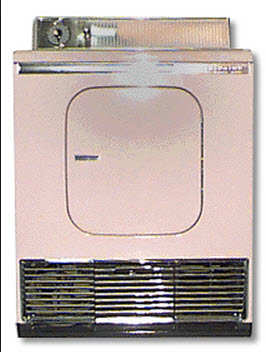
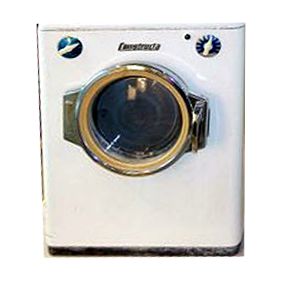
Having the Appliance store facing front now gives me more motivation to do a nice job on its interior. As I noted a while back, I was exploring having a bunch of O'scale appliances 3D printed, but the bill would have been $350. Sorry, I'm not going to make some miniature plastic appliances for the same price as I can buy a 1:1 dishwasher. Most appliances are 30" wide so a piece of 5/8" square wood stick would slice off to some "appliance-sized" block to which I'll stick images of mid-century appliance images. So block could be 3/4" for 36" appliances like fridges.

Here's the kind of images I'm collecting.

TV 2Washing Machine 2Washing Machine 3Fridge 3Range 4

They'll need some photoshopping to separate any backsplash control panels so they can be added on top. And the tops will have to be guesstimated since I don't have any top views of them. Viewing from 3 feet away pasted on images should work nicely.

While I was crawling around the layout, I was able to refit the guttering on this side of the fire house. I was going to make a single base plate for Bronx and the Appliance store, but had second thoughts that this is limiting. I'm going to make separated bases.


Attachments

Images (9)
  • BB Parapet Cap master 1
  • BB Parapet Cap master 2
  • BB Base Plate Template
  • BB Saulenas Moved
  • TV 2
  • Washing Machine 2
  • Washing Machine 3
  • Fridge 3
  • Range 4

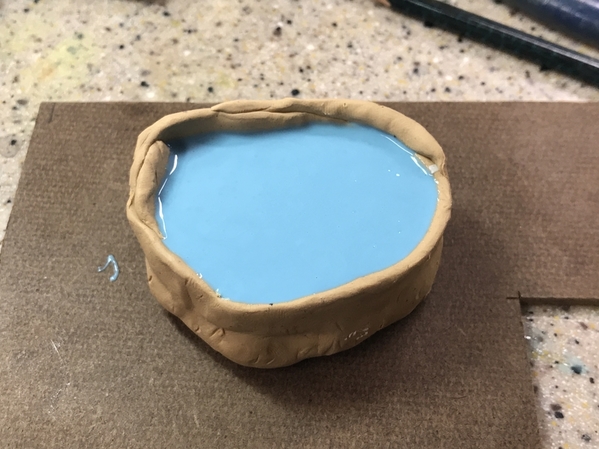
Started the mold making process. The part is so small that the mold process is very crude not needing a lot of sophistication. For silicone mold making you must use a tin-free clay that available from art houses. I simply built the clay base on my Corian work surface and made the dam out of the same clay. For larger pours I've used Lego bricks to build a mold box. The master was imbedded halfway in the clay and I use extra plastic kit sprue material; it's round and already has curves and joints that make for good flow. After all, that's the purpose they play in the plastic kit manufacture.

BB Para Cap Ready for Pour

The Smooth-On M0025 2-part silicone is mixed 1:1 by volume. I just opened some brand new stuff. It has a shelf life and one of the two components starts to set by atmospheric moisture. You have to use it up (which I won't). I use disposable plastic cups and since I'm using such as small amount, I make the cups with the same level on both. You pour Part A and B into separate cups with the equal amounts, then pour this into a 3rd cup which is mixed a lot until it is completely homogenized. Pour from one end and let the material slowing work its way up the mold so the entrained air is pushed out ahead to the silicone.

BB Para Cap 1st Mold Pour\

Looks like a kiddie pool… I head the mold plate with the pour on top of my air brush compressor to help vibrate the pour and encourage air bubbles to exit. This is a very basic silicone and doesn't need vacuum degassing.

It takes about 6 hours to cure at room temperature. I brought it upstairs since it's a bit warmer than the shop. I went to my model club meeting tonight and when I got back it was cured some pulled off the clay to expose the mold half.

BB Para Cap half Mold done

Next session I'll wrap a dam around this portion, spray it with Easy 200 mold release agent and pour the top half with additional silicone. The lumps are alignment tabs that will insure the two halves register properly. Then I'll be pouring resin over the next week or so while I start working on the Thunderchief.

After the pour I got back to the base plate construction. I took the template I made yesterday and placed it in the spot. My corner was exactly square being slightly open, so I adjusted the template and then transferred this to the 1/8" Masonite. I cut the Masonite with the saber saw clamping the stock to my back shop work table. I then finished up the edges on the belt sander and my edge sanding fixture. Using 3M99 high-strength spray adhesive, I glued on a piece of 1/8" foam core to the bottom, cut it flush with the Masonite and tried it on the layout. The curb height was just a tad low, so again I used the spray adhesive and added a layer of Bristol Board on the back which gave me the correct curb.

I marked the location of the storm drain on the street and cut the notch using a razor saw and scroll saw. Into this I glued the Westport Model Works resin cast curb inlet. The last things I did was locate and drill the hole to pass through the power leads and then measure and scribe pavement expansion strips and some strategic cracking. A corresponding hole was drilled through the layout by tracing the location of the base plate hole so the leads will be able to be terminated.

BB Unpainted Base

I split the difference on the setback at 1.5" (6 scale feet). There was a little filler piece that occupied the space between Saulena's and the Fire House that needed cutting down. I first had to get it off the layout. I had used styrofoam structural adhesive and had to use a putty knife to break it loose. I measured and cut it in the chop saw and just cleaned up the edge. The base plate and the filler fit like a glove. That filler was the black top area where the rescue fire truck sat.

Next session I will paint and weather the base and attach the building to it. I will also fabricate a TV antenna and install the power utility stuff like I did with Nighthawks. And I need to do something about the ivy. I probably have to do the parking lot and Appliance Store next since it's going to look funny if not done. I will make another chain link fence, only this one will be cinch at only a foot or less, compared to the monster that surrounded the refinery. Getting there… Can't forget modifying the gas station either...

Attachments

Images (4)
  • BB Para Cap Ready for Pour
  • BB Para Cap 1st Mold Pour
  • BB Para Cap half Mold done
  • BB Unpainted Base

Happy Friday! Today I was definitely multi-tasking. I mixed up more silicone and poured the upper half of the parapet cap mold. I then glued on some .250 X 0.020" styrene strip on the curb edge of Bronx's base plate to finish up the curb appearance. I then primed it with Tamiya light gray primer. I then went back and filled some of the gaps between the styrene and the base so it would look like a single surface. While this was drying I wired up Saulena's in its new location and also moved the elevated guard shanty to the other side of the street and then wired its lighting back up.

I went back and sanded the now-dry filler and then air brushed my concrete color blend. While this was drying I fit the Sinclair Station to its new location. This required reshaping the back edge of its base and then creating a template and cutting a filler piece from on of the remaining chunks of very high quality foam core left over from my work in Germany. I glued that in place, and while drying, went back to the Bronx base, masked and painted the black asphalt side and back edges. 

BB Base Curb Finishing

Here's the base with the painting completed. Next session I will seal this flat paint and then highlight all the expansion strips and cracks, repaint the storm water inlet, weather the entire base and glue the building in place. This will have the secondary effect of being able to move and carry the building without the fear of damage. I already knocked off the far right end of the widows walk and had to replace part of it. It's delicate and brittle.

BB Base Painting WIP

I'm going to glue only the first floor plate and not the building's edge which will still permit me to remove the building from its interior. Speaking about lifting from the base, I find that Saulena's is aging… badly. The building is separating from the base and I don't know exactly how to fix it. It's due to it being all wood and possibly being exposed to that moisture from the dishwasher leak that destroyed the streets. I suppose I could simply overlay another piece of strip material to hide the gap and leave it alone. Rather than drill another hole in the sub-base, I just fed the wires through the watchman's shanty hole. I'll cover the wire with some scenic work.

Saulena's Aging

Sinclair needed a lot of changes to make it fit the wedge-shaped new space. I had to do all this while crawling on the layout. The sub-base under the town is not support really well enough to handle full body weight, but the rail sub-roadbed is, so I'm careful to have my knees on that strong part and just lean on my hands in the weaker areas. This involved a lot of bending, climbing and trial-and-error to get a reasonable fit. I made a Bristol Board pattern, transferred this to the foam core and then re-fit… twice… before cutting anything. I have a very limited supply of the thick German foam core and I don't want to waste it. The rectangular cut out was necessitated by fitting the Z-Stuff Crossing Signal and now I had to refill it.

Sinclair Filler Pattern

After a reasonable fit, I glued the new piece on with some Henkel Polyurethane glue which is pretty benign and won't damage the foam. I held the glued piece with tape.

Sinclair Filler Gluing

Here's the station fitted in final position while waiting for the glue to dry. Note that there's a bit of a gap on the existing base towards the left, but I think I'm adding another curb cut there which could easily fill that space so I'm not worried.

Sinclair Filler Final Fit

There's one other area of concern. There's a large gap at the back edge near the right of way. Part of the problem is a slight elevation due to the Sculptamold that was used to edge the town's sub-base. I really don't relish breaking that out, so I'm thinking of building a low retaining wall to keep cars from rolling on the tracks. As I look at the station, that far back edge is no longer wide enough for a vehicle to pass. This clearly wasn't the best place for a gas station, but real estate is tight in the Village of Woodbourne. It's on a convex curve so the large overhang engines shouldn't collide. Long cars could bind on their flanks so I'll have to check that out. I can always cut more of the base away.


Sinclair Rear Challenge

The mold was fully cured after dinner so I split it and cleaned up the sprue access points. Next session we'll make the first pour and see how it works. Then production will begin. Once you get the hang of it, resin casting is fun. Not cheap… but fun!

BB Para Cap Mold Complete

I wonder if it's too late to engineer and install an access hatch in the center of the town. It's really getting hard to get reach and I've got a lot more detailing that needs to be done (street lights, power poles, signage, more buildings, repairs, parking meters, etc.). I'm going to seriously think about this. I'm not getting any younger and can no longer count on the grandsons to do it for me. The oldest is 6 months from starting college, and the younger is a sophomore in HS and will be driving before I know it.


Attachments

Images (8)
  • BB Base Curb Finishing
  • BB Base Painting WIP
  • Saulena's Aging
  • Sinclair Filler Pattern
  • Sinclair Filler Gluing
  • Sinclair Filler Final Fit
  • Sinclair Rear Challenge
  • BB Para Cap Mold Complete
Last edited by Trainman2001

Add Reply

Post

OGR Publishing, Inc., 1310 Eastside Centre Ct, Suite 6, Mountain Home, AR 72653
800-980-OGRR (6477)
www.ogaugerr.com

×
×
×
×
Link copied to your clipboard.
×
×