
Well, (yes, that's a deep subject).

We are the creators of our (model) domain! thus, the thread title.

Eons and eons ago, came forth out of the great, dark expanse of the universe, a galaxy known as The Milky Way! Within this galaxy, is a little speck of dirt and rock, known as Earth...oh, wait a minute here. I'm going way too far back, for the 'beginnings' of my trees!! :-)

As I was building the modules for The Horace and William Creek R.R., I was in need of many pines.

There are a couple of really good model tree makers out there, but as with so many commercially made products for our hobby, only a few can be afforded. didn't work for my budget. But. I do seem to be guilty of 'digress' here.

Onward and upward! (pun intended)

This is one without the bark added, against the real deal in the great outdoors.

C__Data_Users_DefApps_AppData_INTERNETEXPLORER_Temp_Saved Images_206-250614061322

Here is just a trunk, wrapped in bark.

C__Data_Users_DefApps_AppData_INTERNETEXPLORER_Temp_Saved Images_206-250614061603

Here is the same trunk, finished on a diorama...outdoors.

C__Data_Users_DefApps_AppData_INTERNETEXPLORER_Temp_Saved Images_206-250614084427-29221303

Do I have your attention yet?

Dave

Seattle

p.s. These trees can be built for any scale or gauge. I just happen to put the thread here, because my modules were "o" scale.

Attachments

Images (4)
  • C__Data_Users_DefApps_AppData_INTERNETEXPLORER_Temp_Saved Images_206-250614061322
  • C__Data_Users_DefApps_AppData_INTERNETEXPLORER_Temp_Saved Images_206-250614062728-29012145
  • C__Data_Users_DefApps_AppData_INTERNETEXPLORER_Temp_Saved Images_206-250614061603
  • C__Data_Users_DefApps_AppData_INTERNETEXPLORER_Temp_Saved Images_206-250614084427-29221303
Last edited by Dacs
Original Post

Replies sorted oldest to newest

These are trees I built with my own ideas.

I started building these years ago!

I dont even know who that is or how long they have been around.

I have not taken anything from anyone, nor taken credit for someone else's work!

If there is someone here, who does this, then we think the same.

I have done this sbs in other forums. I could have just put up links sending folks out of this forum to another. I dont do that either.

Perhaps he got the idea from me and from my postings in other forums. I share everything!

As an added note here, I have never did this as a commercial enterprise and have not even considered doing so.

If someone has, then from my point, I have not intentionally stepped on them.

if they have, then this thread is finished right here.

DAVE

SEATTLE

Last edited by Dacs

Dave,

Please do not get hung up on techniques that others may or not use as it doesn't matter.  What matters is your willingness to share your techniques that you've perfected over the years. 

EVEN if it were originally form someone else years ago, your modifications make it your own version.  

I'd like to see just how you use sagebrush to create your conifers!

     Dave sir I did not intend to upset you or make it seem like you took someone else's idea. I just asked if the branch structures were from (that co.) or if you came up with the branch structures yourself. I did not intend to discredit your work or put you down in any way it is just that your trees look similar to the ones from (that co.). If you took it that way I am very sorry and I did not mean to disrespect you in any way. Choo Choo Kenny

After I posted my response, I realized you meant no harm.

I have been accused of taking others ideas and claiming them as mine. On more than one occasion. Getting a little raw about it, I guess. No foul, no harm.

I have been model railroading for 60 years.

I should have checked his site before, not after.

Perhaps I should say, you said nothing that you should have felt it necessary to respond as you felt you should.   Many years ago, I was sued by someone who accused me of copyright infringement.  When the dust all settled, and there was a lot of dust, I was exonerated.  They had taken one of my uncopyrighted ideas and made it theirs.  I was able to prove that I had come up with it several years before they had.   

I apologize to you sir!

Signed:

The way too thin skinned on this subject.

Dave

Last edited by Dacs

C__Data_Users_DefApps_AppData_INTERNETEXPLORER_Temp_Saved Images_206-250614062330The first thing to do, is gather up materials.

Super 77 adhesive (auto paint supplies)

Cheap hair spray

White glue

Sisal rope (local hardware)

Green, finely ground foam (Scenic Express)

Adirondack ground cover (Scenic Express)

Square pieces of 36" length of balsa.  1/2"...3/4"... however big around you want your tree to be.

*note: I prefer balsa over other, more hard wood. I carves easily. It is very fragile, so care must be exercised when caving and drilling on it.

*note: Sift the ground cover. All that is wanted are the various shades of flocking and, a bonus! The itty bitty pieces of brown foam. once they are on the branches, looks like pine cones!

American Sagebrush and bark:  Here are some pics. These are three different pieces.

4547

4548

4549

This stuff is amazing in its detail.  It is a little on the stiff side and some of it needs to be soaked for a bit in water to soften it just a bit.  This is the last of my supply you see.  So most of it is of the short lengths.

It is time for me to make another trip to the other side of the mountains to get more.  The only problem is, there were bad fires in the area I collect this from, and it's all gone.  So, I have to travel a bit further for a new supply.  This stuff goes in thickness from a sheet of paper to a piece of cardstock.  Most is very flexible, but some, very stiff.  It has a natural curl and comes mostly in pieces of very good length.

*Sorry, This is not something that is readily available to everyone.  But there are alternatives, that work ok.  But, the sagebrush cannot be beat!

Hobby knife with number 11 style blade.

Razor saw

Tweezers of various type.

Various sizes of drill bits for making holes for branches, or use whatever is convenient. Dont go crazy though.

Small screwdriver or 1/8" drill bit.

 In the above pic, I have cut a short 9" piece of balsa. For demonstration purpose. In O scale that is only 45'. In HO, 72'.

I start by carving a rough taper. Dont try to be perfect with this. It isn't necessary.

C__Data_Users_DefApps_AppData_INTERNETEXPLORER_Temp_Saved Images_206-250614062506-28762204

As this tree will not be wrapped in bark, because of the reason stated in the materials list,  the Next step is to use the side of the hobby knife with the #11 blade, drawing it down the trunk, all around it from top to bottom. Get creative!

Do not despair though, I will be adding an addendum to the thread, showing how to wrap the tree with the bark.  I will also list alternatives.

Again, do not try to be perfect. Support the trunk on a flat surface while doing this step.

If you do happen to break it, glue the broken pieces back together. Dont cut them flat though. Just leave the break and glue.

C__Data_Users_DefApps_AppData_INTERNETEXPLORER_Temp_Saved Images_206-250614062506-28971244

C__Data_Users_DefApps_AppData_INTERNETEXPLORER_Temp_Saved Images_206-250614062506-28982199

Once you are satisfied with your artistic talent, you are ready to scribe the trunk with the razor saw.

Here, I have run out of time again.

Will pick this up later today.

Dave

Attachments

Images (7)
  • C__Data_Users_DefApps_AppData_INTERNETEXPLORER_Temp_Saved Images_206-250614062330
  • C__Data_Users_DefApps_AppData_INTERNETEXPLORER_Temp_Saved Images_206-250614062506-28762204
  • C__Data_Users_DefApps_AppData_INTERNETEXPLORER_Temp_Saved Images_206-250614062506-28971244
  • C__Data_Users_DefApps_AppData_INTERNETEXPLORER_Temp_Saved Images_206-250614062506-28982199
  • 4547
  • 4548
  • 4549
Last edited by Dacs

Here we begin using the razor saw.  You can go straight up and down or go a little squervy.  I recommend short and squervy strokes with the razor saw.

Do not worry about any fuzz, just leave it.

5

Next, place the down into the bottom of you work of art.  Just use a jewelers screw driver to make the hole.

6

In this pic, you can see that I added a little root structure at the bottom of the trunk.  I used a jewellers file for this.  Not totally necessary in background, but it does add a nice touch.   Escpecially if the tree is more toward the front of the layout.

7

Color the trunk of your tree with your favorite shade of ink and alcohol mix. I use a brown and a black mix. Sometimes one or the other.  In this pic, you will notice that it is not the same trunk as above.  No root structure.  It is also cut for a hillside plant.

Once this has dried. This next step is a matter of preference. Personally, I really like the effect.
Spray only one side of the trunk with super adhesive. Let it set for about 20 sec., then sprinkle the yellow, green ground foam up and down the trunk. Set aside and let dry.

Do not worry about the brightness of the simulated moss.  That can be toned down with I/A mix.  Again, you are the master of your own domain.

At this point, it has taken me 15 mins. to make the one trunk. Not too bad.

This is western sagebrush.  I will gather bunches of the stuff when I make my sojourns to the East side of the Cascades.  I use this to make the primary branching on my conifers. 

I will break off twigs of various sizes and and configurations.  Anything you do here, I guarantee you will find it in nature.  Go for forked, curved, straight, bent, long, short.  For these, we want larger at the bottom and work our way up, getting smaller and smaller.  Then, sometimes not...
As in nature, do in your modelling.  If I have found out anything, it's this. You will always find the same look in nature.

Using your small screw driver or drill bit. Begin making the mounting holes for your branches. Do this all the way to the top of your tree. Stagger them and try not to be perfect. Mix them up as far as their shape and direction of curve. Do not glue them in yet.

Once you are satisfied with how it is going to look. Begin removing them from the bottom up. I usually do 4 or 5 at a time. Do this in your own comfort zone.

Now we will begin to do the secondary branching.
For this, I use sisal rope fibers. I will cut 1/4, 1/2, 3/4 inch lengths into a container.

Next step is to make what I call, "rollers." This is taking a clump of the sisal fibers in one hand, then roll is back and forth between both hands. The fibres will realign.
Once I have this, I will then pull them apart in the middle. It just makes them easier to work with.

Holding your branch in tweezers, or if you prefer clothes pins, spray them with the super adhesive. Don't spray all the way to the base. Leave some branch that will still show through the tree when it is finished.
Let sit for about 20 seconds, then taking the half roller, and begin just touching it to the adhesive. All up and down the branch and both sides. Don't let it clump too much. But, you can always thin it out later.
Once you are satisfied, set aside and do the next one.

By the time you get to number four, you can go back and spray the branches again with super adhesive.  I can't seem to find the pic of doing this.
Then gather up some of your flocking mix and sprinkle it over and under the branches. When they are covered to your satisfaction, shake off the excess and affix with the hair spray. Set aside and let them dry.

I will actually place them into a piece of foam core board with holes punched to hold them at the end where there are no rope fibres or flocking.   You really do not want to just lay the branches down

Now, once you have gotten all your branches for a tree finished, you can begin placing the branches where they belong.  Start from the bottom and work upward.  It's a lot easier this way.

Sorry about the fuzziness of the pic.

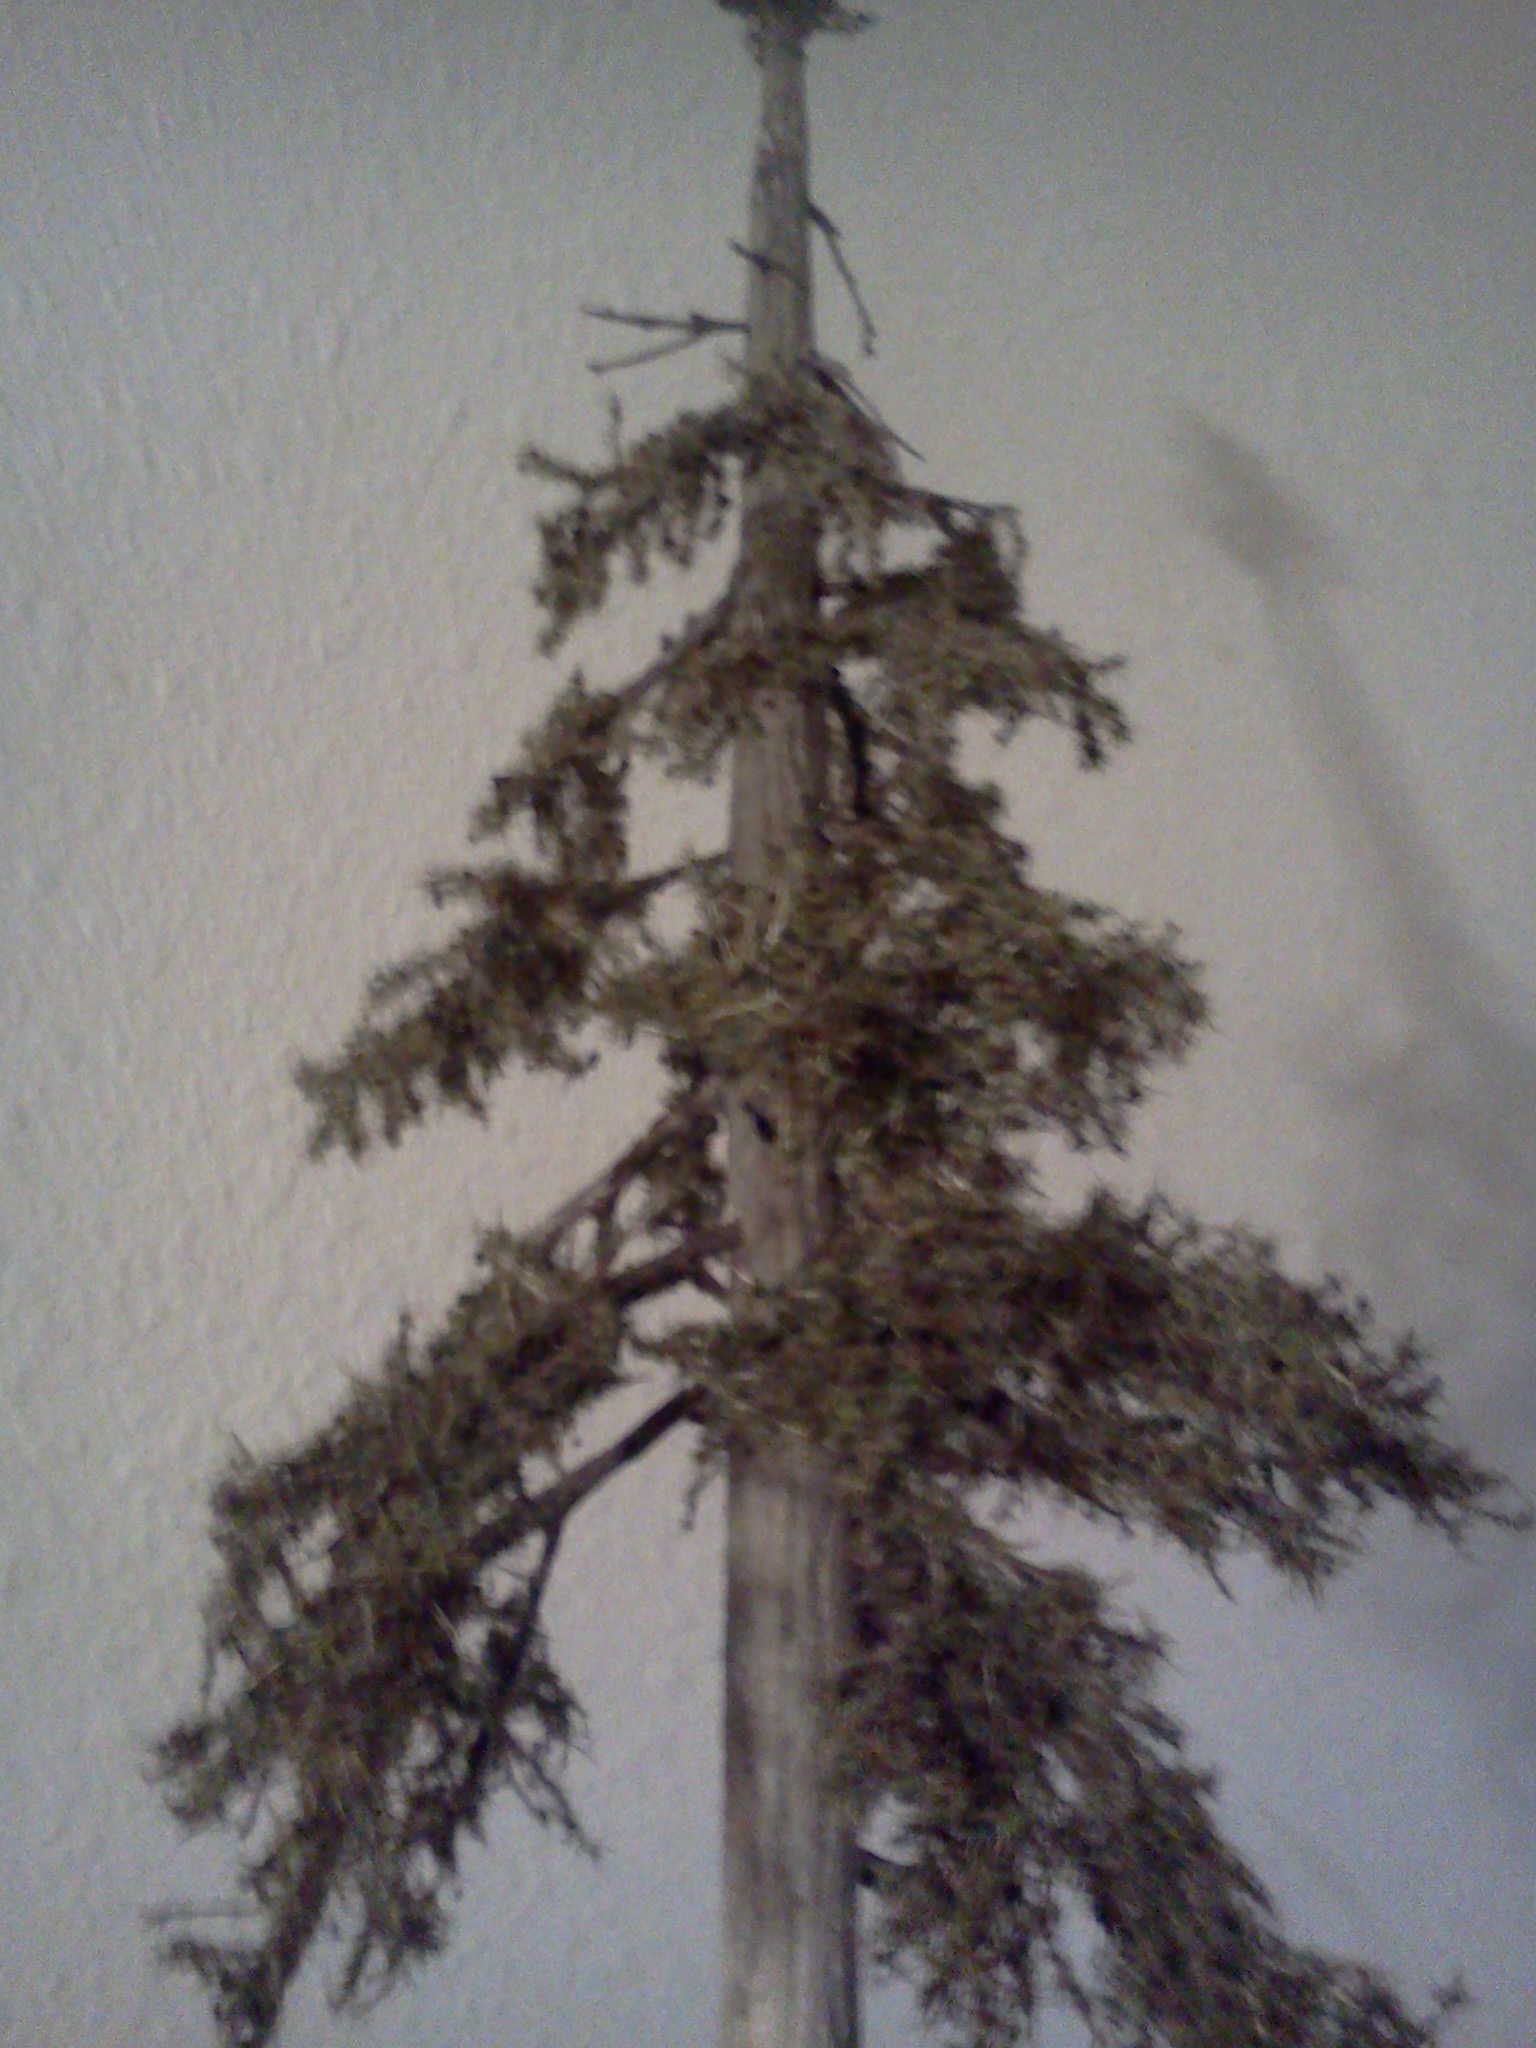
This is just a quick tree.  You can place as many or as few branches as you desire.  When you get to the top of the tree,  I generally will only place a twig that has been made for the topper, straight up.

Experiment, get creative!  You can see or find all sorts of configurations in nature.  Do not be concerned with perfection.  There is perfection in imperfection.  In nature though, what we see as imperfection is actually, perfection.

These trees, are very delicate and do not take to a lot of moving around.  Try to plant the once.  You can have all your scenic materials in place before planting the tree.  Then all you have to do is a little touch up around the base.

I have been told I should market them.  They are just too delicate and would never be a shippable item. 

Next, I will show how to wrap a trunk, before the branching of course, in sagebrush bark.

Right now, I think I will go do a little trout fishing in the town of William Creek!

A pic of my favorite spot.

PIC_0837

Dave

Attachments

Images (5)
  • 5
  • 6
  • 7
  • 4950
  • PIC_0837
Last edited by Dacs

I sat down this morn, to show how to bark a tree.  I cannot seem to find the files in my computer that contains the pic folder of barking a tree.  So, I am going to sit here today and do a fallen trunk section.  I don't have enough material to do a complete tree.  I will have to make a trip over the mountains and into the deserts of Washington for material.  Also, so many fires have consumed a lot of where I used to go, so I have to go further.  It's at the very least, 200 miles round trip.   Not today.  

It is however, the same technique as a whole tree.   As you will want fallen trees on your layout, this is how to do it with this method.  Before I go any further with this, I do want to say, you can use juniper bark also.  It has a tendency to layer and peel on the bush on it's lower extremities.  Never use fresh green bark, it doesn't work.  Only use the stuff the plant is giving up naturally.   The only difference I have found is, that the juniper does not carry the same amount of detail as sagebrush bark,  But, it is a good alternative.

So bear with me...same channel...today!

Dave

Here it is! 

4562

4563

4564

4567

Believe it or not, this is a piece of balsa, carved down, stained, then covered with sagebrush bark.  The two limbs left on this piece of deadwood are sagebrush twigs.  It is not just a piece of broken limb I found laying in the yard.  The moss is the same foam as I used above.  It was made, using the techneques listed below.

If at first you do not succeed, don't worry about it.  Practice makes perfect!  Or imperfect!

Barking the tree or the fallen trunk.  As I am very short on materials for this, I am going to do a short piece of 3/4" balsa.  About a 3" piece.  Representing of course, the remains of a fallen tree.

4551

Carve it to a semblance of a round trunk.  Because we are doing the bark detail, you do not have to carve and cut on the trunk itself.  Leave this step out.  If you want some broken branches on it, go ahead and poke the holes for this.

4552

4555

Then using your specialty tool, (jewellers screwdriver)  Just tear up the ends.  Hollow it out, mess with it.  However, don't worry about perfection.  I hate to keep mentioning this, but you can overdo or underdo the very effect you are looking for.

Once you are happy with your results, drop it into your A/I mixture.   I use a mix of one ounce of Alcohol, (don't use your favorite single malt here), with six drops of Black India Ink mixed in.  Different colors of India Ink can be had at your local art supply store, or, if you don't have one of those, online.  I use two colors, sienna and black.   Set the piece to the side and let it dry thouroughly.

4558

4559

Now you are ready to start barking the the tree, stump, fallen trunk...etc.

I will normally use yellow carpenters glue for this.  It is stickier than white glue and sets faster.  I recommend using some sort of rubber/vinyl gloves.  You will be getting glue on your fingers!  There is no neat way of doing this step.  But I seem to be out of yellow glue, so I am going to use C/A.  Not the best choice, but it will work!  It has a tendency to leave shiny spots.  These can be covered later with a flat matte spray.  Here we go: Do not use any more glue than is necessary.

Well crud...Sorry, just got called in to work.  Just a couple hours though.  I will post more on this today.

Dave

Attachments

Images (11)
  • 4562
  • 4563
  • 4564
  • 4567
  • 4551
  • 4552
  • 4555
  • 4557
  • 4558
  • 4559
  • 4561

Okay, got that chore done.  Now back to the important stuff.

Lets bark up this trunk!

Normally, I would much larger pieces.  Pretty much the same length of the trunk I am barking.  But, again I am very low on this material.  But, hopefully, it does a decent job.

I try to get pieces that match up edge to edge as much as possible.  But, as this is a downed tree, missing bark is not an issue.

I will let the pics do most of the talking from here on.  There may be a couple of places I will text an explanation.

4572

4573

4574

4779

4780

4783

Now, I choose which side I want moss on.  The most pleasing side is the one you would want up.  Then spray on some of this goo.  Go easy though, a little of this stuff, goes a long way.

4786

Then let it set for a few seconds, then sprinkle on your choice of green foam for moss.  What I am using is pretty darn close from here in the Northwest.   If it is too bright, it can be toned down with another dip in the A/I mix.

4787

Knock off any loose there might be.   And Voila!4790

There ya go!  Do not let your dog near this!  He will try to mark it as his territory!

Enjoy!

Dave

Seattle

Attachments

Images (12)
  • 4572
  • 4573
  • 4574
  • 4778
  • 4779
  • 4780
  • 4783
  • 4785
  • 4786
  • 4787
  • 4788
  • 4790

Kazar, John, Nick, Gary, also anyone I could have missed. Thank for all your kind comments.

Transporting across country is not impossible, but it has to be treated for any bacteria. Each state has rules and regs about it.

For personal collection and use, nothing is said or much done. Commercially, its another issue.

Dave

Last edited by Dacs

Add Reply

Post

OGR Publishing, Inc., 1310 Eastside Centre Ct, Suite 6, Mountain Home, AR 72653
800-980-OGRR (6477)
www.ogaugerr.com

×
×
×
×
Link copied to your clipboard.
×
×