I've received several requests to start a thread on my curved arch bridge project, so here goes.


First, as many of you know I was originally planning on building a wooden trestle.  But I wasn't happy with the appearance of a double-track trestle and I thought it was more western looking and older than I was looking for.  After a lengthy search of real railroad bridges, I came across the Minneapolis stone arch bridge.


The real bridge was built in 1883 by James J. Hill for his Great Northern RR.  It was to connect the new Minneapolis Union Station with the rest of the railroad across the Mississippi River.  The Great Northern Empire Builder ran over it and it has 21 arches.  It also has a curved section which not many railroad bridges do and it is a Midwestern bridge. 


bridge

stone-arch-bridge-minneapolis-3

wide angle bridge

My goal is to make mine as realistic as my abilities will permit, but I am not trying to be a perfectionist about it.  It will be a centerpiece of my layout that visitors will see as soon as they entre the layout room.


On my next post I will show pictures of the current construction.


Art

Attachments

Images (3)
  • bridge
  • stone-arch-bridge-minneapolis-3
  • wide angle bridge
Last edited by Chugman
Original Post

Replies sorted oldest to newest

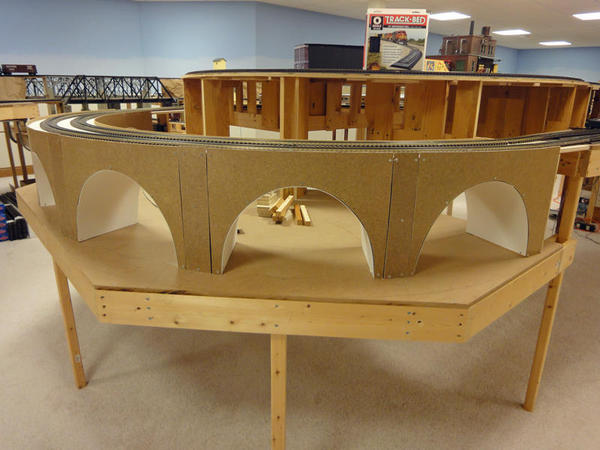
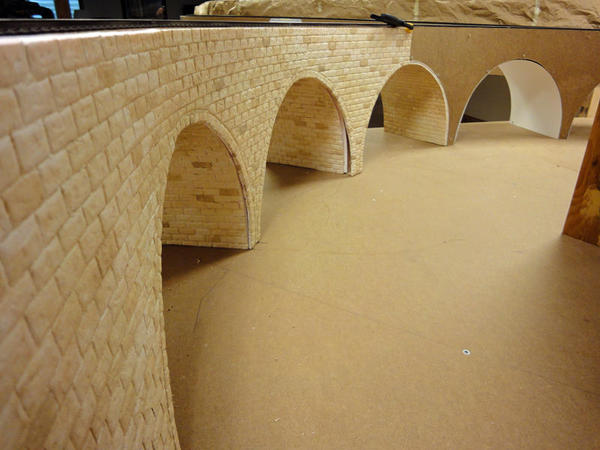
I began by building a wooden framework out of Masonite.  I had a fair amount of trouble getting the arches the way I wanted.  I drew them out in PowerPoint on my computer until I was happy with their basic shape.  After that I had to decide if I wanted to vary the shape of each arch or change the width of the legs to accommodate the curvature of the bridge.  I decided to vary the legs and keep the arch shape uniform across the bridge.  I cut the outside walls first and that was a mistake as I misjudged the correct width differences in the legs.  I then cut the inside walls with leg widths of 2" and the outside legs had to be 5" wide.


open-framework

outside

The next issue was how to surface the under arches.  After trying different materials, I decided on Strathmore construction board that I got at Hobby Lobby.  It was flexible enough but still strong enough for my base.  I screwed small one inch pieces of wood in 5 places under the arches as a support for the Strathmore board.


  strathmore-under-arch

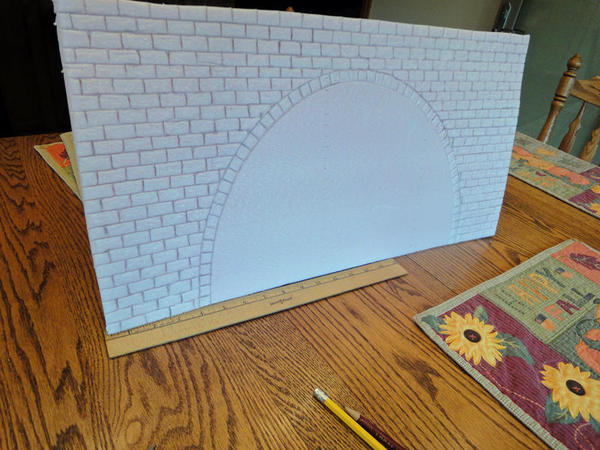
For the finish surface I was hoping to use real stone.  I had looked at all the local building supply stores and wasn't happy with any of them.  So I decided to try to find a flexible, thin Styrofoam that I could carve my stones in and then paint them to look like a limestone bridge.  I found a 1/4" thick foam that is used for insulation under metal siding.


I will post pictures of that portion of the journey on my next post.


Art


Attachments

Images (4)
  • open-framework
  • outside
  • outside3
  • strathmore-under-arch

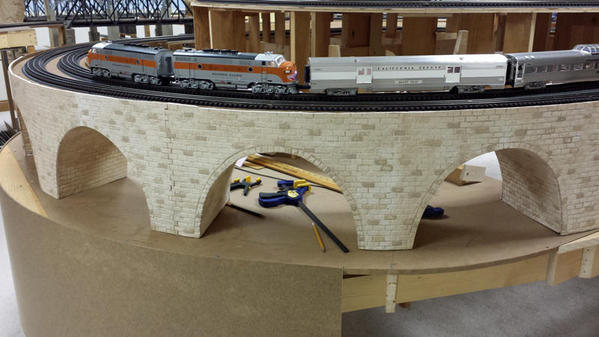
While I was building the bridge I had my double-track mainline out of service for some time.  When I got the framework completed, I had to stop and play a little. 


under-arches-completed


lineup4


lineup5


The structure passed all the critics and was approved for the stone carving to start.  We will start with the best stone mason we could find on the next post.  Actually it was the only stone mason we could find that would work for free.


Art

Attachments

Images (3)
  • lineup4
  • lineup5
  • under-arches-completed

As someone from the Minneapolis area, it's one of my favorite spots in the city and I recommend any visitors to make their way down there.  From the bridge you view the Mississippi as it spills over a hydroelectric dam, watch boats go through locks, have a good view of the University of Minnesota campus, view ruins of the old flour mills that dominated this area, view the famous Guthrie theater, and have a breathtaking view of the downtown skyline.  On a summer evening, there is really no better view in the city.


Great choice and I agree that it will be the centerpiece to your layout.  Can't wait to see how it progresses.


Really nice start with the bridge, Art!  I like the use of the construction board.  When I built my straight stone arch bridge from 2" thick sheets of styrofoam sandwiched together, none of the arches I cut matched perfectly, so I used drywall compound to smooth them out underneath and spray painted them black to hide the imperfections.


For brickwork, maybe you can try using a straight edge and a Dremel tool to cut the bricks into the masonite.  It'll be tedious and take a little time but it'll look good.  I used a straight edge and a Hotwire foam knife to make mine.


DSC_0030

DSC_0035

DSC_0037

DSC_0042

DSC_0022

DSC_0025

IMG_2729

Attachments

Images (7)
  • DSC_0030
  • DSC_0035
  • DSC_0037
  • DSC_0042
  • DSC_0022
  • DSC_0025
  • IMG_2729

Very interesting thread.  I too built a curved stone arch bridge which I finished in 2000 and is the most difficult modeling project I ever attempted.  I built it over the course of a year.  Its the geometry that makes it tough.  It was cast in place, and required 153 pounds of hydrocal plaster.


Port_Royal_9-24-08 004

Attachments

Images (1)
  • Port_Royal_9-24-08 004
Last edited by PRRMiddleDivision
Originally Posted by Traindiesel:

Really nice start with the bridge, Art!  I like the use of the construction board.  When I built my straight stone arch bridge from 2" thick sheets of styrofoam sandwiched together, none of the arches I cut matched perfectly, so I used drywall compound to smooth them out underneath and spray painted them black to hide the imperfections.


For brickwork, maybe you can try using a straight edge and a Dremel tool to cut the bricks into the masonite.  It'll be tedious and take a little time but it'll look good.  I used a straight edge and a Hotwire foam knife to make mine.


Brian,

Very impressive job!  Thank you for the how to photos.

Originally Posted by John Devlin:

Art, this is a great project!  You commented you were going to face the masonite with 1/4in insulation used under siding.  This is normally styrofoam and hard to form stone or blocks.

Lowes carries extruded polystyrene in .52 and .25 widths.  This is the thinner version of what our club used to make our arch bridge.

Art,

To couple on what John wrote, I was just at Lowes yesterday buying dome wood for a shelf in my wife's laundry room.  I went past the foam insulation and took notice it looked different from what I have seen.  Dummy me, I should have taken a photo, because I knew you were planning to use 1/4 inch.  I saw two types, both grayish green.  One was 2 inch thick, the other was folded sheets of the 1/4 inch.  Instead of having a smooth surface as I am used to, both had lots of random depressions like the foam doesn't fill completely in when it is being formed.  For normal base or scenery work this would be fine, but the depressions are a bit deep for carving stone or block.


Like I said, I should have taken a photo; big dummy.  Now I can't remember the name of it.  It seemed that was all Lowes was selling except for the white bead stuff that isn't as useful around the layout.  Has anyone seen this?

I tried carving the stones in the foam and was pleased with the results so far.  The good news is that it is easy to work with common tools.  The bad news is that it is very time consuming and tedious work.  The first under arch took 3 hours and the first side wall took 5 hours.  With 7 arches that comes to about 90 hours of carving!


foam-outside

foam-under-arch

I used a blunt regular lead pencil to make the mortar lines and a metal dental tool to shape the stones.  My hand got a little sore as it was not used to doing this and for such long periods of time.


Art

Attachments

Images (2)
  • foam-outside
  • foam-under-arch


There was an interesting stone chimney application for a doll house kit that I did for one of the Granddaughters.  There was a sticky-back stencil paper applied, then a white glue paste mix applied.  Before the paste mix dried, the stencil was removed. The chimney was painted brown for the mortar lines before the application.

Red brick was the same application.

Last edited by Mike CT

As I started painting the foam I must have done everything wrong.  I went to Home Depot with a close-up picture of the stone work on the real bridge.  A very nice young lady tried to help me.  I even went back to the kitchen remodeling area and brought a sample of real tile that looked like limestone for her to look at.  She said she could not use the tile in her color matching machine but she knew what I wanted.  After spending an hour, we picked a color and I headed home with a quart.  I showed it to my wife and she said it was too yellow.


The next day she went with me and we spent another hour looking at every paint sample in HD.  We finally picked out a light base color and two accent colors.  Got home, painted it on the foam and she said it wasn't right yet.


So my son-in-law is a contractor, carpenter, and master faux painter.  I asked him if he could stop over on the way home and help me.  He looked at all my colors and started painting and blending colors and it started looking like limestone to me.


Armed with my new confidence I forged ahead and tried his technics.


 Art


painting

painting3

painting4

Attachments

Images (3)
  • painting
  • painting3
  • painting4

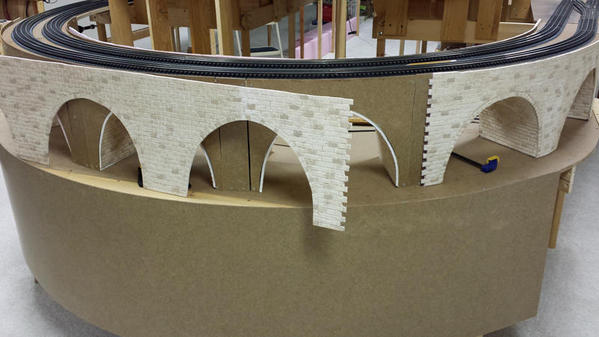
At this point I was dying to see what it would look like on the framework.  So after I painted the new wall section that I did yesterday and finished 3 under arches, I went down and placed the panels.


test-fit

test-fit2

test-fit3

The sections have to be glued in place to close the gaps, but I started getting excited that this might work.  My next step is to determine the right glue.  I can't use a contact type cement as I don't trust my being able to place it in exactly the right place the first and every time.  I don't dare use anything that will attack the foam.  Any suggestions are very much appreciated.


Art


Attachments

Images (3)
  • test-fit
  • test-fit2
  • test-fit3

Art, I have had the best luck using Latex Acrylic Caulk to bond the foam together.  Liquid Nails makes an adhesive explicitly for foam insulation board also.  


The caulk take some time to fully cure, but it remains just flexible enough that it wont' break loose.   I have used plain old wood glue out of the bottle as well.   One nice feature of the caulk is what squeezes out of the joints can be smoothed over to hide any seams.   While I am waiting for caulk to cure/dry,  I have set it under weights with plywood to even the load, or on verticals and odd shapes I have used large rubber bans, bungee cords bought at the discount stores to hold everything in place.  Hope that helps. 

I too have been to see this bridge and Art, you have done a great job so far and can't wait to see the results.


One question, it seems that in one of the pictures above, it seems like the bridge is lit from under the arch, have you given any thought to lighting this centerpiece before you get too far along in the construction? If so, can I assume LED's? Not sure how I would light this, but it does deserve some kind of attention...just a thought.


Charlie

Last edited by Charlie

That is an interesting suggestion, Charlie.  I plan to add spotlights in the ceiling on a dimmer, but haven't thought of lights on the structure.  There maybe lights on the real bridge now, but I don't think that there were any when it was a railroad bridge.  If anyone knows more about it, please join the discussion.


Art

WOW,  Very nice work and the amount of time to carve each block.  1 question, how thick is the foam you carved the blocks into and where did you get the foam, from Hobby Lobby as with the curved undersides.  Thanks for showing the how-to's on this project.  It will be the first thing people will comment on when they see your layout, like a big trophy in a cabinet or deer head on the wall.  Nick

Originally Posted by Mark Boyce:
Art,

To couple on what John wrote, I was just at Lowes yesterday buying dome wood for a shelf in my wife's laundry room.  I went past the foam insulation and took notice it looked different from what I have seen.  Dummy me, I should have taken a photo, because I knew you were planning to use 1/4 inch.  I saw two types, both grayish green.  One was 2 inch thick, the other was folded sheets of the 1/4 inch.  Instead of having a smooth surface as I am used to, both had lots of random depressions like the foam doesn't fill completely in when it is being formed.  For normal base or scenery work this would be fine, but the depressions are a bit deep for carving stone or block.


Like I said, I should have taken a photo; big dummy.  Now I can't remember the name of it.  It seemed that was all Lowes was selling except for the white bead stuff that isn't as useful around the layout.  Has anyone seen this?

Think Lowes has some that is made to pass air thru. It is not a smooth surface like the standard pink and blue foam sheets.

Art....this is one of the most beautiful model bridges I have ever seen....it sure puts my bridge project to shame!!  You are doing everything just right and when completed this will be a masterpiece...heck it already is.  I am enjoying this build and look forward to more progress...thanks so much for inspiring others here on the forum!


Alan

You have a wonderful project in progress, Art.  Just a caution.  I was working some foam board for one the Fort Pitt Highrailer modules, and did some model paint touch-up of the back side of some foam pieces. The foam and paint didn't do well together, the paint ate the foam.   Different adhesives also have foam problems, which I think has been mentioned.   Mike

Last edited by Mike CT
Originally Posted by Zett:

Wow great work. Isn't it funny how once the cold weather hits things start getting done on the layout. 

I see that you have been getting a lot done too.  I have an additional reason as I'm having the gang over Sunday.  Which reminds me that I haven't heard back you so I'm wondering if you got my message?


Art

Last edited by Chugman

Alan - Thank you, a complement from a master like you is very much appreciated.  I just saw your new bridge installed and it is magnificent.  When is the staff going to venture west and visit us Midwesterners?  Will you be at TrainFest this year?  I will get the red carpet ready to roll out.


Art 

Here is a picture of the foam that I am using. 


foam

I have used water based latex paints and I hope that they will not attack the foam. 


The glue decision is still up in the air.  I tried a little of the construction adhesive specially made for foam and felt it was hard to work with.  I have a sample glued with plain old Elmer's white glue to see how it works.  It was much easier to work with.  And I am considering the latex caulk suggestion too.


Art

Attachments

Images (1)
  • foam
Originally Posted by Chugman:
Originally Posted by Zett:

Wow great work. Isn't it funny how once the cold weather hits things start getting done on the layout. 

I see that you have been getting a lot done too.  I have an additional reason as I'm having the gang over Sunday.  Which reminds me that I haven't heard back you so I'm wondering if you got my message?


Art

Didn't get a message, shoot me a message on Facebook or you can get me at zett@actfclan.com

Originally Posted by Chugman:

As I started painting the foam I must have done everything wrong.  I went to Home Depot with a close-up picture of the stone work on the real bridge.  A very nice young lady tried to help me.  I even went back to the kitchen remodeling area and brought a sample of real tile that looked like limestone for her to look at.  She said she could not use the tile in her color matching machine but she knew what I wanted.  After spending an hour, we picked a color and I headed home with a quart.  I showed it to my wife and she said it was too yellow.


The next day she went with me and we spent another hour looking at every paint sample in HD.  We finally picked out a light base color and two accent colors.  Got home, painted it on the foam and she said it wasn't right yet.


So my son-in-law is a contractor, carpenter, and master faux painter.  I asked him if he could stop over on the way home and help me.  He looked at all my colors and started painting and blending colors and it started looking like limestone to me.


Armed with my new confidence I forged ahead and tried his technics.


 Art


 Be very careful selecting paint colors in stores.  The color you see is the color as it appears under their type of lighting.  If you have incandescent spotlights and they have fluorescent lamps; the colors won't match. Even fluorescent lamps are differnt colors that will affect the appearance of your layout.

Last edited by RichO
Originally Posted by Lima:
Originally Posted by Mark Boyce:
Art,

To couple on what John wrote, I was just at Lowes yesterday buying dome wood for a shelf in my wife's laundry room.  I went past the foam insulation and took notice it looked different from what I have seen.  Dummy me, I should have taken a photo, because I knew you were planning to use 1/4 inch.  I saw two types, both grayish green.  One was 2 inch thick, the other was folded sheets of the 1/4 inch.  Instead of having a smooth surface as I am used to, both had lots of random depressions like the foam doesn't fill completely in when it is being formed.  For normal base or scenery work this would be fine, but the depressions are a bit deep for carving stone or block.


Like I said, I should have taken a photo; big dummy.  Now I can't remember the name of it.  It seemed that was all Lowes was selling except for the white bead stuff that isn't as useful around the layout.  Has anyone seen this?

Think Lowes has some that is made to pass air thru. It is not a smooth surface like the standard pink and blue foam sheets.

Yes Lima!  That must be the stuff.  Thank you!!

Originally Posted by Chugman:

Here is a picture of the foam that I am using. 


I have used water based latex paints and I hope that they will not attack the foam. 


The glue decision is still up in the air.  I tried a little of the construction adhesive specially made for foam and felt it was hard to work with.  I have a sample glued with plain old Elmer's white glue to see how it works.  It was much easier to work with.  And I am considering the latex caulk suggestion too.


Art

Art,

Thanks for the photo.  Your bridge is great!

Beautiful work! I was reminded of a project my son and I worked on for school when he was in 7th grade. We made a O gauge section of the Rockville bridge in Harrisburg PA. I let him do the stone carving with a pencil point soldering iron. It turned out really nice, and is kept in the workshop as part of the staging yard fro our suspended layout.

Don

Decided it was time for an update.  Actually it's past time, but anyway...


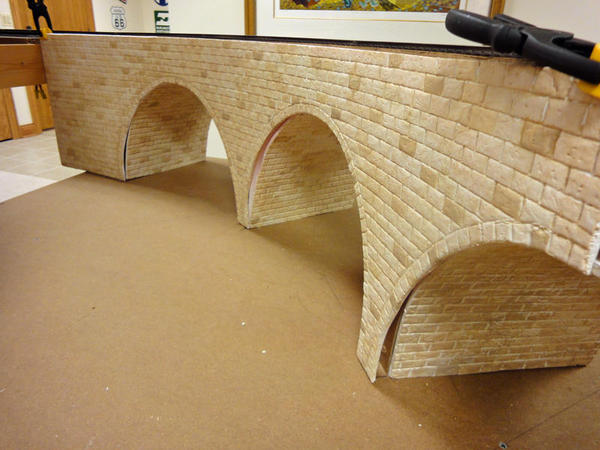
I have finished the under arches and have just completed the second section across the front.  Here are a few pictures of fitting, gluing, and clamping the second front section.


21315A

21315B

21315C

21315D


After letting it dry overnight, this is what it looks like so far.


21415A

21415B

21415C

21415D

21415E

21415F


I think one more panel will finish the front and then to the backside where I have had a few problems.  But I think I can salvage most of a panel.  Time will tell.


Art

Attachments

Images (10)
  • 21315A
  • 21315B
  • 21315C
  • 21315D
  • 21415A
  • 21415B
  • 21415C
  • 21415D
  • 21415E
  • 21415F

Man oh man, that is B-E-A-U-T-I-F-U-L. Some real talent out on this forum. Boy do I wish it was contagious!

Is is contagious.  Most of the stuff I have done I would have never thought to try on my own.  But after I read these forum posts, I give them a try.  My talents are not nearly as good as some of these folks... but you get better every time you try it.


Ron


Originally Posted by Ron045:

Man oh man, that is B-E-A-U-T-I-F-U-L. Some real talent out on this forum. Boy do I wish it was contagious!

Is is contagious.  Most of the stuff I have done I would have never thought to try on my own.  But after I read these forum posts, I give them a try.  My talents are not nearly as good as some of these folks... but you get better every time you try it.


Ron


Very nice bridge, and a great way to highlight the curve on the layout. This forum does a lot to inspire others to try new projects and techniques. We never know what we're capable of until we try. 

Don

Here is an example of a bridge I built over ten years ago at Len's Train Shop in Irwin, PA.  It was my first attempt at a curved double line bridge.  Difficult part was the math necessary to make the inside arches which are very different from the outside arch arcs.  I used Scenic Express Pennsy Stone Walls cut very thin on a Band Saw then glued to masonite.

Layout len's 8

Attachments

Images (2)
  • Layout len's 8
  • Layout len's 8

Thanks guys. 


One of the first decisions you have to make with a curved arch bridge is the shape of the arches.  If you make the arch the same on both sides, you have to make the legs wider on the outside.  That's what I chose to do rather than keep the legs the same width and vary the shape of the arches.


OGRE your bridge looks very good, thanks for sharing.


Art

Originally Posted by Matt Makens:

Art, what are you using to make the stone foam front? are you hand carving the foam or pressing it into some sort of form?

Matt - I am using 1/8" thin pink foam that is used under metal siding. Then I am hand carving it with a pencil and a carving tool.  I draw the pencil lines to outline each stone, then I shape all four sides of each stone.  Then I distress each stone with a blunt object and a scriber.  Next is a base coat of paint followed by a shading coat that is partially wiped off and then I hand paint random individual stones.  It is rather time consuming, but after having started I don't want to change.


Art

Last edited by Chugman

Mark Boyce, Yes Len's is a large Train shop and still has the 10 X 20 five level layout  that I built for him.  Max of 13 trians running at the same time.  Mostly all O-Gauge.  If you use GPS, go to the second address in the list, there are 2 Lauffer lanes in Irwin, PA...his shop is located between Herminie and Sutersville, PA.  Worth the trip.

Originally Posted by pennsynut:

I just finished reading all your posts Art.  Really fantastic work.  It is a monumental project.  What paint colors did you settle on for the stone?  Its fantastic.

I don't remember without going down and looking.  I made two trips to Home Depot and tried different colors each time.  It just wasn't looking correct.  Then my son-in-law, who has a great talent and eye for colors, agreed to try to help me.  He just took 3 of the colors that I had and started mixing and blending them.  He would paint a little, wipe some of it off, and then blend some more, and before I knew if it looked like limestone to me.  So I tried it and it looked good to me.  After I watched him do it, it seemed easy to me, but it wasn't before he showed me the way.


Thanks for the kind words.


Art

Originally Posted by OGRE Modeling,LLC:

Mark Boyce, Yes Len's is a large Train shop and still has the 10 X 20 five level layout  that I built for him.  Max of 13 trians running at the same time.  Mostly all O-Gauge.  If you use GPS, go to the second address in the list, there are 2 Lauffer lanes in Irwin, PA...his shop is located between Herminie and Sutersville, PA.  Worth the trip.

Thank you for the information!  I will defiantly make it a point to pay Len a visit some day.  Irwin is only one more exit past Monroeville?  Thank you!

Chugman ,
I want to thank you for posting this. It has helped me with a very large problem I have with having so much elevated sections on my layout. I thought that I was going to need to spend a small fortune on some type of flex wall system to cover them up. I went out to Home Depot this past weekend and bought the foam board. Today I was able to get one section done and I could not be happier with the results! Again, thanks to you and all the forum members who post what their up to, it really helps!


some photos of what I was able to do:


image

image

image

image

Attachments

Images (4)
  • image
  • image
  • image
  • image

Add Reply

Post

OGR Publishing, Inc., 1310 Eastside Centre Ct, Suite 6, Mountain Home, AR 72653
800-980-OGRR (6477)
www.ogaugerr.com

×
×
×
×
Link copied to your clipboard.
×
×