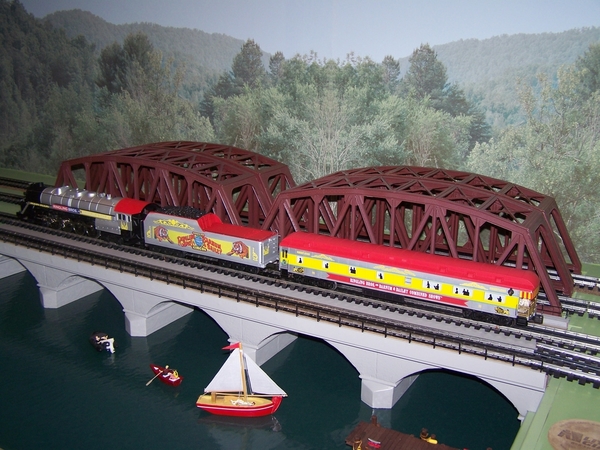
Hey members, just wanted to show you what I did in my spare time, lots of thought, lots of hours. I know that it's not prototypical but just thought that I needed a fantasy Locomotive that matches the K-Line heavyweights so I stripped a Chessie T1 and dug in. What if RB&BB would have been allowed to use their own engine and have been given the right-of way on tracks across America. Thoughts and comments???  Gene M101_5046101_5049101_5053101_5054101_5057


Attachments

Images (5)
  • 101_5046
  • 101_5049
  • 101_5053
  • 101_5054
  • 101_5057
Original Post

Replies sorted oldest to newest

Gene, that looks great, even if non proto-typical. 

Could you imagine the Engineer and Fireman dressed as clowns or trapeze artists? Advertising and railfanning would have been fun if they had.

I know the museum in Baraboo, WI had a bunch of the trains around the area during the 90's and early 2000's when I was driving through.

Thank you Carl, countless hours it seems. I wish that I would have taken step-by-step progressive pictures but unfortunately I did not and I apologize for that. For the locomotive, I used Weaver S23 Scalecoat 1 silver which after testing a few aluminum and silver colors, I thought matched the K-Line cars the best. I used Testor's red to match the K-Line red. On the boiler front, I hand filed away the side number plates on the headlight assembly (just my preference for a different look) and for the RB&BB front display board, I soldered 2 brass tabs onto the the back of it which insert into the 2 slots that the Chessie board tabs previously occupied on the pilot. The locomotive decals along the walkway on the locomotive are set # RB200 AD Car circus decals from  CircusCityDecals.com. They are HO size that would normally be used for an HO passenger ad car. The yellow graphic scroll set #YS301 also comes from CircusCityDecals.com. The decal on the display board is an 'N' scale decal that was purchased on Ebay from member thorn14141. I actually only used this one decal from a whole sheet! I drilled the holes in the boiler front for the green LED's that came from Daniel Maher. He can be reached at (danmaher1978@hotmail.com). Upon careful inspection, I had to be extremely careful in determining the exact position of the drilled holes for the LED's, as there is minimum clearance between the inner walls of the boiler and the OD of the inner ring on the inside of the boiler front. The LED's must be inboard of that inner ring of the boiler front or it will not clear the ID of the boiler. The 3mm LED's come with an adhesive strip for the resistors which I attached to the flat side of the smoke unit (RH side looking at the front of the locomotive), then soldered the wires to the positive and negative contacts on the mother board. At the bottom of the boiler at that particular area, I had to file a groove just a bit wider than the resistor projection so that the boiler clears it when mounting it to the chassis, this was trial and error. The decal on the tender was made from taking a picture of a K-Line trailer with my high resolution camera, downloading it into my computer, reducing the size to my liking and then printing it onto white decal paper. I wish that the yellow would have come out as brightly as the K-Line yellow but it is a bit darker than I would have liked. The rest of the time was spent masking and painting with quite a bit of time in between of applying the different colors. The original black was left wherever possible and then everything was clear coated with Testor's flat coat, which makes the red and silver blend and match very nicely with those colors on the K-Line cars.  

Gene M 

Gene, I have taken the liberty to copy and edit your latest post to insert paragraph breaks for my convenience.   You provided an excellent write-up.   I intend no offense in reformatting your words.

From Gene M's original post:

For the locomotive, I used Weaver S23 Scalecoat 1 silver which after testing a few aluminum and silver colors, I thought matched the K-Line cars the best.  I used Testor's red to match the K-Line red.

On the boiler front, I hand filed away the side number plates on the headlight assembly (just my preference for a different look) and for the RB&BB front display board, I soldered 2 brass tabs onto the the back of it which insert into the 2 slots that the Chessie board tabs previously occupied on the pilot.

The locomotive decals along the walkway on the locomotive are set # RB200 AD Car circus decals from  CircusCityDecals.com. They are HO size that would normally be used for an HO passenger ad car. The yellow graphic scroll set #YS301 also comes from CircusCityDecals.com. The decal on the display board is an 'N' scale decal that was purchased on Ebay from member thorn14141. I actually only used this one decal from a whole sheet! 

I drilled the holes in the boiler front for the green LED's that came from Daniel Maher. He can be reached at (danmaher1978@hotmail.com). Upon careful inspection, I had to be extremely careful in determining the exact position of the drilled holes for the LED's, as there is minimum clearance between the inner walls of the boiler and the OD of the inner ring on the inside of the boiler front. The LED's must be inboard of that inner ring of the boiler front or it will not clear the ID of the boiler.

The 3mm LED's come with an adhesive strip for the resistors which I attached to the flat side of the smoke unit (RH side looking at the front of the locomotive), then soldered the wires to the positive and negative contacts on the mother board. At the bottom of the boiler at that particular area, I had to file a groove just a bit wider than the resistor projection so that the boiler clears it when mounting it to the chassis, this was trial and error.

The decal on the tender was made from taking a picture of a K-Line trailer with my high resolution camera, downloading it into my computer, reducing the size to my liking and then printing it onto white decal paper. I wish that the yellow would have come out as brightly as the K-Line yellow but it is a bit darker than I would have liked.

The rest of the time was spent masking and painting with quite a bit of time in between of applying the different colors. The original black was left wherever possible and then everything was clear coated with Testor's flat coat, which makes the red and silver blend and match very nicely with those colors on the K-Line cars.  

Gene M 

THANK YOU, GENE M for the detailed description of this terrific project.

Last edited by Pingman

Thank you Ron, for the decals I used Inkjet waterslide white decal paper that I purchased on Ebay through Digital Design Depot. Their paperwork included their website www.world-paper.com. Their phone number is 561.200.7616.

I used an HP inkjet printer 6310. It is old but does a reasonably good job. As I mentioned in my write-up. I tried to get better accurate coloring but the result was the best that I could achieve. 


Gene M

Gene, very nice looking locomotive, I like what you did.  I remember the Circus train, one came to El Paso and my dad took me down to the yards to watch them unload, he worked for the SP at the time as a signal maintainer and tooled around on a speeder.  The train didn't have the regular locomotive at the head-end, it was pulled by an A-B-B-A set of Black Widow F-3's if I remember correctly.  Somewhere, I have the negatives of all the action that my dad took that day, I'll see if I can find them, unfortunately, I don't have any prints from those negatives, I think my dad sold them to the circus.

Thanks for sharing.

Add Reply

Post

OGR Publishing, Inc., 1310 Eastside Centre Ct, Suite 6, Mountain Home, AR 72653
800-980-OGRR (6477)
www.ogaugerr.com

×
×
×
×
Link copied to your clipboard.
×
×