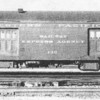
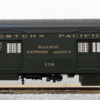
Another car I'm working on at the moment... got it as a custom RI, but in the process of making it into a WP for my Expo. Car has been stripped and is ready for detail work. Need to add a few grabs and steps, and remove most of the roof ceiling. Already got dry transfers from Clover House. The trucks feel loose and wobbly, so I'll have to see how to make them more rigid.

I have a good pic of 136 from my Expo Bulletin, but more pics of these cars would be appreciated!


IMG_4185IMG_4186IMG_4187

Primed truck sides

IMG_4188

Painted wheels look much better

IMG_4189

bye bye sloppy paint job

IMG_4190

IMG_4191

Attachments

Images (7)
  • IMG_4185
  • IMG_4186
  • IMG_4187
  • IMG_4188
  • IMG_4189
  • IMG_4190
  • IMG_4191
Original Post

Replies sorted oldest to newest

Erik C Lindgren posted:

I might pull out my consist of expo cars and photo them all. The mods I did on my 10/1/2, and 8/5 are extensive. Black sashes are sweet, Dr Allen is a big help. I will see if I have the G.O.D’s for these cars from Sam Tech and email them. They are confidential 

If you could I'd appreciate that, of course I'd keep them confidential. Your expo consists belong in a museum, Erik. And those E5's are the ultimate Expo power for sure!

Awesome

Some notes:

Ive found the most authentic look for the diaphragm on this particular PSC installation is a rubber cloth cut and inserted since the originals were not a cast diaphragm. Bill McClung was very successful in creating imho the best diaphragm assembly yet with these all of these heavy weight models  

Example: 

IMG_0312

Sorry about the low resolution I’m not at home on my computer for the original. 

On the chains may I suggest double insulated wheels. 


Attachments

Images (1)
  • IMG_0312
Last edited by Erik C Lindgren
SANTIAGOP23 posted:

Can you guys tell me what this part is called? Is it a card holder? I mean that rectangle divided into three. Want to add it but don't think PSC makes it...

image

It is a mail car destination card holder used when mail / express cars were sealed and carried to a specific location. Not used when cars were worked en route as the information would have not been accurate.

I worked for the PRR / Penn Central on mail and express cars and we used them. For cars that were worked en route they were not used. Just for solid mail to a specific point. Baggage cars, express reefers, and express box cars had them.

As I recall from the 1960's most cars just had the outer assembly - not the inner pieces but my memory could have faded.

Last edited by rheil
rheil posted:
SANTIAGOP23 posted:

Can you guys tell me what this part is called? Is it a card holder? I mean that rectangle divided into three. Want to add it but don't think PSC makes it...

image

It is a mail car destination card holder used when mail / express cars were sealed and carried to a specific location. Not used when cars were worked en route as the information would have not been accurate.

I worked for the PRR / Penn Central on mail and express cars and we used them. For cars that were worked en route they were not used. Just for solid mail to a specific point. Baggage cars, express reefers, and express box cars had them.

As I recall from the 1960's most cars just had the outer assembly - not the inner pieces but my memory could have faded.

thank you, rheil. I'll see if I can come up with a couple somehow...

Thanks, Max. Some progress...

My trucks are not equialized, they were falling apart so I soldered the parts together. It's ok, a car this light really doesn't need equalization. Since I don't need springs, I upgraded the look of the springs by making them with thicker wire and making new loops. The springs will be painted pullman green along with the trucks.

IMG_4516IMG_4517

Attachments

Images (2)
  • IMG_4516
  • IMG_4517

hope you don't mind me being a pest, always want to learn.....do you mechanically scratch the brass with sand paper or scotchbrite before priming? or do you use an etching primer that chemically bites the brass? I see beautiful detail even with the primer coat on. I'm always worried about flattening out details like rivet heads and what not.....yours are perfect ......im impressed

 I like to follow your work and admire your attention to detail. Sometimes when I'm building, I think of cutting corners as it's easier and saying good enough. I've even said that's all the major players do. Other times it's because it's the limit of my talent.

 So once again I find myself needing to add,...... your work is very inspiring! and Thanks for sharing.

Sorry for interrupting!

Santiago,

Considering your focus on excellence, wouldn't it make some sense to ship the body to a recommended professional painter? I'm sure Eric and some others could make a recommendation. It would also permit you to work on something else.

 I completely understand the desire to shoot it yourself. I have to wait until winter here in Texas for a dry low humid day. I've got a bunch of cars I'm waiting to shoot this winter. It can sure be frustrating. Best of luck.

Ron H 

Ron, thanks but I'm confident I can do this. Really the problem was the primer, I won't be using vallejo anymore. I also love the challenge. Hell, what was that MFA good for if I can't even paint a scale model The undercarriage came out perfect. Also, this project has been approved for an article, so I better put my game face on. I do have the utmost respect for pro painters. The finest of crafts! 

This learning curve is more than necessary for me if I'm to paint that protocraft XM-32 car.


SANTIAGOP23 posted:

Ron, thanks but I'm confident I can do this. Really the problem was the primer, I won't be using vallejo anymore. I also love the challenge. Hell, what was that MFA good for if I can't even paint a scale model The undercarriage came out perfect. Also, this project has been approved for an article, so I better put my game face on. I do have the utmost respect for pro painters. The finest of crafts! 

This learning curve is more than necessary for me if I'm to paint that protocraft XM-32 car.


Understood ! It'll be fantastic.

Ron H

IMG_5108IMG_5110New primer coat. I used Revell basic primer, does not leave a perfect surface, but it is incredibly tough and with a good sanding you can really achieve a smooth flat surface. This primer is so tough, I can't scratch it with my fingernails, I love that because I know it will stay no matter what. Vallejo on the other hand is ridiculously delicate, can't sand and will scratch with anything. Once sanded this revell primer feels like ivory, and I know it takes paint well since I used it for my Q F3's passenger pilot. 


Attachments

Images (2)
  • IMG_5108
  • IMG_5110

Thanks for sharing Santiago. and good to see others using rarely mentioned Clover House lettering.  When available, I generally use dry transfers.  With dry transfers there is no messing with decal sets solution,  and  they can be applied to both gloss and mat finishes.  Santiago probably knows this trick, but others new to dry transfers might benefit from this tip.  I use light tack removable  clear Scotch tape to hold the lettering strip in position during the transfer process.  The tape is applied extending over one edge of the dry transfer so that it can function as a hinge.  In that way you can lift the transfer sheet and see if the letters completely transferred.   Clover House's catalog is worth checking out.  For PRR locomotives they have steam  sets covering pre and postwar lettering standards.  

Last edited by Keystoned Ed
MaxSouthOz posted:
SANTIAGOP23 posted:

Dry transfers are a superior product!

IMG_5352

That looks very good. 

Are they very popular?

Max, I think they are, but ther is a learning curve in using them. Once you start applying them there is moving them around like decals. And the catalog is not as wide ether. But the results are spectacular! I hope they continue to expand their offerings. 

Add Reply

Post

OGR Publishing, Inc., 1310 Eastside Centre Ct, Suite 6, Mountain Home, AR 72653
800-980-OGRR (6477)
www.ogaugerr.com

×
×
×
×
Link copied to your clipboard.
×
×