
Hello everyone! Great forum and I’m thrilled to be here! Figured I’d make a thread with the progress of my layout remodel project.

Since 2008 I’ve had an 8x8 L shaped layout set up in a spare bedroom. Has sentimental value since it was the last thing my late father and I worked on together before his passing from cancer.  I’ve been into trains ever since I could crawl, all starting with Thomas The Tank Engine little diecast toys (which are stashed in the attic) but every Christmas Dad’s Lionel 2035 would get taken out of the closet and set up on a simple 4x8 plywood platform underneath the Christmas tree. But in 2007 the train was handed down to me as a little side graduation present, yet it’s sentimental value to me is beyond measurable. The next year the train bug bit me considering we built the layout. It consisted of 3 separate lines, 1 of which was elevated for the snow scene on the mountain. Buildings were mainly Dept. 56 buildings, and landscape was just paint, several trees, and some white ballast (I still have no idea why I chose white). Lots of streetlights but a few went out. I also use matchbox vehicles considering I already had a bunch and with the limited space, I can get more scenery and stuff happening IMO. It’s far from any phenomenal layouts like I’ve seen, but it’s what fits together with my limited space and my layout desires.

Now onto the fun part….

Reasons for demolition/remodel:

-I’ve wanted to redo my scenery for quite some time now but just haven’t pulled the trigger on the project. Learning so many tricks and money friendly innovative ideas. I’m entering the world of foam and chicken grit!

-I’m also learning that we constructed the benchwork too low for my liking at 24” so I’m raising it to 36” (any higher and I’m blocking a window I’d prefer not to).

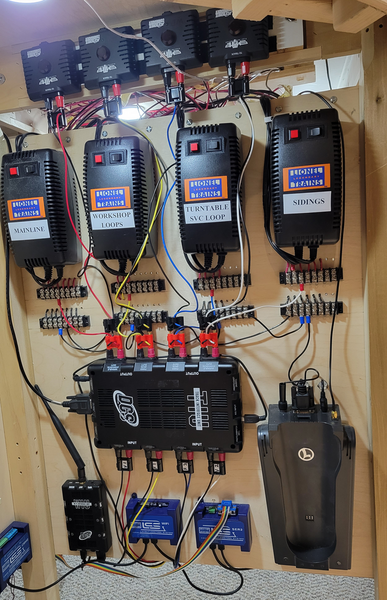
-With a few streetlights out, there’s no better time then now to upgrade my lights to LED. Plus my wiring job was horrendous so it’s being completely redone straight from the outlet. I’ll be adding dimmer switches, using terminal blocks, making separate power sections, all new wire, etc. FUN FUN FUN!


I’m sticking with the same benchwork layout except I’m separating the one 4’x4’ section about 5 inches to make a dropped down river. I am though highly considering removing a closet door and extending the layout into the closet as a yard or possibly a coal industry. It’s a closet filled with clothes I haven’t used in nearly 8 years so instead of losing the space in front of the closet door, I’ll just use it all for the layout! hahaha.

Lots of things still under consideration. Figured I’d make a thread that I’ll keep updated if anyone would like to follow. I know a few others are currently redoing their layouts or building one for their first time so sharing methods is ideal. Advice is always appreciated!

Attachments

Images (6)
  • 5312DAF6-4400-4DE1-9A49-D76FE27050B8
  • 8F5A040B-0D88-4363-AECB-B81627121B6A
  • 50CB7C2E-F083-42F1-A277-65EE0B59285A
  • F7B569E2-BF31-4CAF-A5A8-C470094B313D
  • 4B328E86-C821-4157-B798-69319D67ABCF
  • 7E2BF13A-247A-4479-B1B8-CEE331420CC8
Last edited by Richizzle07
Original Post

Replies sorted oldest to newest

Nothing wrong with white ballast:  some RRs had access to nearly pure white limestone, at least in some regions, and their rights of way looked very white.  Back when such things mattered to them, they made sure the edges were crisp and straight and very eye-pleasing.  We don't see that kind of thing today, really, but many roads took great pride in their mainlines near cities, especially, once upon a time.

@RSJB18 posted:

Hi Rich- welcome to the forum. Looks like you are off to a roaring start.

Please keep us posted as you progress.

What's the new plan going to look like? Are you staying post-war theme or going with more modern stuff? Lot's of fun toys out there now

Bob

Thanks Bob! I’m probably sticking with the same track layout, just adding on where I decided the closest would be more useful this way (there’s another closet on the other corner of the room but let’s just justify one at a time 😂). Most likely sticking with postwar but who knows, things may always change. Need to stick with o31 curves though. As for scenery era, that’s still also debatable. Going to paint a couple plasticville switch towers in PRR colors. My matchbox vehicles on the old layout were a wide range in years so that’s not helping narrow it down. I am trying to stick with all warm led lighting though.

Updates will definitely be provided for everyone throughout this journey and as always, any advice will be greatly appreciated!

MOVING ON UP!

Day 2 Update #2

I didn’t get as far as planned but had a great day. Temperature was 54 here in NEPA so I decided to take a little ride to the local train shop. Didn’t leave with any goodie’s this time.

I did get the rest of the ballast removed and cleaned up, moved all the sections around the room and cleaned the floor, tipped over 2 of the sections and removed the old 24” legs and added the new 36” legs. Ran out of wood for the third section. I did have enough supplies but my neighbor had a roof leak so I lent him two 2x4’s to help with holding his tarp down.5EBC6BDA-48FD-4C5D-B138-0933D9DCB8B1

The height difference sure seems higher than  a foot but it’s perfect! I’m glad I decided to raise the benchwork and my back is even more thrilled! (Photo shows the new height compared to the old) Not to mention getting underneath is much easier now also. I’ll be adding some new cross support bracing too.

off for more supplies tomorrow

Attachments

Images (1)
  • 5EBC6BDA-48FD-4C5D-B138-0933D9DCB8B1
Last edited by Richizzle07

Update #3

Spent a portion of Saturday getting supplies and of course had to venture out to the Anthracite Hi-Railers display. Gathered some more scenery idea’s and talked with a member about landscaping tips and buildings.

Finally got back to the layout on Sunday. Finished raising the benchwork, secured the sections together, split 2 of the sections apart 4 1/4” for my waterway to run below the tracks. Pulled out the outer loop of track, temporarily secured it down and pulled out locomotive 2035 for some test trials. Everything went great! Only running off 1 lock on for now, but will be adding more once the foam roadbed I ordered last night is delivered.

Hitting pause for the moment as I’m starting to debate different track plans. I was trying to incorporate my previous mountain in but now I’m considering adding some more track action to the layout. Being a very undecisive person doesn’t help in these situations.

Attachments

Images (3)
  • 955E4C0A-4423-47FF-952B-5DD1B1C3376E
  • 5B620556-9826-4FD0-9CC3-ED735D4F7CD4
  • 80B944A9-1739-4BC5-A9AD-33162DC9CF25
Videos (1)
trim.384FA684-CEBF-49A6-BF29-85E195A085E4
Last edited by Richizzle07

Update #4

Didn’t really accomplish much today. Still undecided on track plans so I’ll probably just pull out a pile of track tomorrow and just see where it takes me. I did notice a slight wobble in the table when I bumped it with some force. I may have gone overboard adding all the leg braces but it’s not budging now! I kept the short leg braces from the old height and just added a few longer ones. I’d rather some overkill for extra peace of mind.

Attachments

Images (2)
  • E0200097-1C31-47ED-B25B-BCCF62A76DFE
  • F659CB35-F74B-45B0-8874-074EA1CAC4FB

Update #5

Well after a few days of both using SCARM and just throwing together some junk track pieces and trying to find a track design I liked, I believe I found one. I’m losing some space for buildings but it’s a good trade up for adding more track action and a second engine house.  I’ve also decided to add some height to the inside line. I think this will look great with a mixture of rock cuts and retaining walls between the 2 lines. Another upgrade is that the former mountain was 7 1/2” high, I raised it to 12” this time.

I’ve taken some photos of the trash track on the foam(please note it’s not connected and I’m missing pieces and also misusing curves for straights just for reference). I’ve also taken a photo of the SCARM design. Ran out of free track on SCARM so it’s not complete on the sidings. The green line is tubular track with the black ties (train will go clockwise). The blue line is tubular track with brown ties(train will go counter clockwise). It doesn’t line up completely on the program, but does for me on the layout. I’m utilizing the inside of the mountain for a small yard for the blue line. A third line will go on top of the mountain eventually. The side line made of a darker green and red will be added in the near future once more of the main layout is completed.

The SCARM design has O42 curves and 031 switches (green line) compared to the o31 curves and o22 switches in the photos. I’m split on which to go with.

What’s everyone’s thoughts? Suggestion’s?

Attachments

Images (5)
  • 3904DD56-F2C8-4D2F-A33B-15DC1F119907
  • 38AD7781-0FE0-4EF8-B8D5-1149CB61B80D
  • B7968981-F491-4087-82D7-25C443C68DC1
  • 2754B3A7-31F0-477C-AFD3-53C4C2B4A676
  • 2FF62EF2-607F-497A-B4A7-D7E06383C33C
Last edited by Richizzle07

I put together a SCARM this morning with the o31 curves and o22 switches for comparison (once again it doesn’t line up on the program, but I make it work).

My question is, do the o42 curves really have many advantages over the o31 curves? I’ll be running mostly smaller engines and cars. The o31 curves provides more space for buildings on the inside of the layout which is really important since town real estate is disappearing fast to all the railroad rights!

Attachments

Images (1)
  • 46707EE2-0328-4915-8595-F41377E554E3

Update #6

I haven’t updated in a month for two reasons: 1 is I wasn’t completely certain on a few aspects of what I wanted and 2 is the shipping delays.

With that said, I have made some good progress and finally had to make some of those uncertain decisions. First off, I went out and picked up 2 sheets of homasote to place on top of the plywood to help with the sound deadening. I decided to screw it down so it’s able to be removed if needed.

8636682E-CCBF-4CEC-811F-96F43637D27A

Next up I have ordered, received, and glued down the foam roadbed I purchased off eBay from Sparks00033. This item was highly recommended in a few other posts on the forum so I did the free sample first. I was sold! I’m very satisfied with the product and the price. Used the purple Elmer’s glue that resulted in me eating a PB&J sandwich afterwards lol.

EE190752-52F9-482A-9765-BB2DA655B1A178800AAB-C496-4EED-9CBE-DF5EB48DEB61C4F442E0-2B3C-4382-B657-260CC5049C1247D39B94-92D0-45B1-A169-1E95FA1A73EA
E8AC2127-A8B9-46C1-B454-FC54B479F7CF

I’ve also made a decision on my curve radius and decided to step it up to the 042 rather then the 031 I previously had. After seeing the prices for track from Menards, I had to grab a case of 042 curves plus a case of straights (not needing them yet). This will help out “down the track” when I start with the side yard and industries I’ll be adding on.

EEA56318-B289-410F-BFC8-2C9851B106C2

Instead of using the Lionel lock ons, I’ve decided to separate the underside of the rails and inserted spade connectors for the feeder wires. This is another trick I picked up off this forum. Just received the Wago electrical connectors yesterday for connecting the 7 feeders to the buss wire I’ll be running under the outside loop.

F7B6679D-5635-4BBF-957E-3FC1F99C2C2CE2403136-4C5B-4E69-B055-5236296CE64B

That’s all the progress for now.

Attachments

Images (10)
  • 8636682E-CCBF-4CEC-811F-96F43637D27A
  • 0BF02238-9988-453E-84FD-CAB8EF8AEE5E
  • EE190752-52F9-482A-9765-BB2DA655B1A1
  • 78800AAB-C496-4EED-9CBE-DF5EB48DEB61
  • C4F442E0-2B3C-4382-B657-260CC5049C12
  • 47D39B94-92D0-45B1-A169-1E95FA1A73EA
  • EEA56318-B289-410F-BFC8-2C9851B106C2
  • E8AC2127-A8B9-46C1-B454-FC54B479F7CF
  • F7B6679D-5635-4BBF-957E-3FC1F99C2C2C
  • E2403136-4C5B-4E69-B055-5236296CE64B
Last edited by Richizzle07

GAD!  It took me a lot longer to get where I am, you're doing in days what it took me months!

I’m determined to get the trains running again at least on one of the 3 lines. Once I hit that mark, I’ll slow down especially on the scenery. The nice weather will also have the train project slowing for a few months. Then again, all these train shows might keep me in overdrive. Attended my first show last Sunday and had a blast! Didn’t take any money as I wanted to just get a feel of it. Sure regret that logic…

Well, that's what stopped me as well.   I can run trains, but I'd like to start improving the look as well.


Wow John that’s an impressive layout you have! I don’t blame you for running trains and holding off on the scenery, not to mention all those choices in trains too. Your yard is practically the size of my layout! You probably have some great ideas brewing up while running those trains.

@Richizzle07.

I put up my 50s/60s Lionel stuff in the mid 80s when my kids were little.  I custom built platforms for that and put it in my garage and it had about 96 square feet.  That only lasted 5-6 years and its been packed away since then.  After being retired for 3 years, out of sheer boredom I brought them out in November, and like you installed it in a spare bedroom, but on a carpeted floor.  It didn't matter that the carpet got dirty since we're replacing it in a month.  I'm about to tear it down for the carpet install, and will be putting together a table layout after it's done.  My new layout will be perhaps a little bigger than yours, and I have enough 2x4s that I used for the mid 80s layout.  I live north of Houston, there are no basements and I need to keep my garage space open for the cars in case of a hail storm (couple times a year).

So some questions and comments;

  1. I looked at your pics, and couldn't find where the transformers and perhaps manual controls were located.  Are they just on a side table that wasn't in the pics?  Are you going to do anything like make a sliding platform under the table and have that kind of stuff on it?
  2. Based on what you said, I'm guessing you didn't look into any custom benchwork, right?  If you did, perhaps you could send me an email (address in OGR profile) and I'd like to ask you some more questions.
  3. The O31 vs O42 is a persistent issue with me as well. For my current floor layout I went with O31.  I was in the market for a new diesel and was limited beyond my comfort level for locos that worked with O31.  I bought one and I'm happy with what I bought, but I think I'll go to O42 for the platform layout in order to give me some flexibility for my next diesel purchase.
  4. I went with fastrack instead of tubular.  The 145C and 153C connections drive me nuts.  I know you can use insulated track sections but that is yet another thing to do.  I'm a firm believer in the adage 'buy, don't build', at least to a point.
  5. That being said, tubular will have a place on my layout for my #60 trolley, #50 gang car, tie ejector, and fire car.  The motorized units seem to interest my grandkid more than the trains, so I will be putting a run for them.

Good luck, and keep us posted.

Looking good Rich!  yea one of the first things I did after getting the trackplan figured out on my layout was get a loop on there to have something going around while working on something else. its motivational to be able to at least have some fun running while building at the same time.  it will also allow you to take your time and make it nice and not rush to run trains. good stuff......

@Richizzle07 posted:

Wow John that’s an impressive layout you have! I don’t blame you for running trains and holding off on the scenery, not to mention all those choices in trains too. Your yard is practically the size of my layout! You probably have some great ideas brewing up while running those trains.

It's translating those "great ideas" into action that's my downfall!

We have a walk-out basement, that's where my layout is.  So maybe it should be called a "half" basement.   The door to the outside is on the right, and there's a window next to the end of the layout.

Here's my original plan when we moved in, this is when I was figuring out where everything went.  I pretty much adhered to the plan.  Obviously, the big open space is where the layout is.

Basement Plan

This is a shot from the workshop end (left in the layout above), you can see the window and the door to the outside.  The two blue posts in the layout are the columns you see in the foreground.

Layout View From Workshop

Attachments

Images (2)
  • Basement Plan
  • Layout View From Workshop

I was in Houston for a week on business many years ago in August.  The weather was stinkin' hot with humidity about 110%.  It's also the only place I've been up close and personal with a real tornado!  I was north of Houston and stopped to look when I saw the tornado off the road about half a mile.  It went close by a house and destroyed an adjacent shed, then I realized it was coming right at us on the road!  We jumped back in the car and left a warp speed, not an experience I care to repeat!

No way I get my wife to leave the area, so we're here for the duration.

Last edited by gunrunnerjohn

I know from experience, it’s tough resisting running the trains, especially when you have an awesome running railroad, like John’s. Once I got the track down & trains running, that’s all I wanted to do. I threw down some buildings and just dreamed about what’s next. The most important thing is getting the railroad running flawlessly. Everything else are just details.

John, I promise, it’s coming. I hope to get the final kinks out of your background this weekend. I know from experience, it’s tough resisting running the trains, especially when you have an awesome running railroad.6C4E2F7D-66E2-44B2-AF26-435AF675EF4A

Attachments

Images (1)
  • 6C4E2F7D-66E2-44B2-AF26-435AF675EF4A

@texgeekboy going from a floor to a table layout will be a big difference! I’m already thrilled with raising mine up a foot. My transformers and switches were all placed under the backside of the previous setup. I’m thinking of putting them off to the right side this time. A slide out shelf is a really great idea! I’m already squeezing every inch out of the room so this would really help. As for my benchwork, it’s 3 separate pieces of 4x4 plywood with 2x4 legs and 1 1/2x1 1/2 bracing added that my late father built with me many years ago. We didn’t use any blueprints or anything when building it. I recently loaded it up with more leg braces after raising the height so it may have some overkill but it’s not moving now. Haha   With that said, there’s benchwork methods out there that would use much less wood. Choosing the 042 for future purchase flexibility is smart too. Even if you could pull off the 054 I’d suggest it. My limited space is preventing me from doing that. A trolley though might be something I’m going to consider further in the future.

@Richizzle07 posted:

A trolley though might be something I’m going to consider further in the future.

Funny thing, Tom and I are working on a small subway addition that will be under my 10-track freight yard.  The subway platform will be in the center on the straight stretch, the loops of track will be under the yard.  I'll be running the MTH subway with automatic station stops programmed to stop in the station each time through.

Attachments

Images (1)
  • mceclip0
Last edited by gunrunnerjohn

Add Reply

Post

OGR Publishing, Inc., 1310 Eastside Centre Ct, Suite 6, Mountain Home, AR 72653
800-980-OGRR (6477)
www.ogaugerr.com

×
×
×
×
Link copied to your clipboard.
×
×