


Last year I expanded my intermodal collection to include some O Scale MTH and Atlas twin stacks. I could not find all the containers I wanted. There were no 53 foot O Scale containers either. I decided to try making some containers by printing on card stock. We can always use some extras to stack on the layout. Here are some of my containers, 53 foot on top and 45 or 48 foot on bottom:


Atlas cars with some of my various 20, 40, and 45 foot containers.

More 53 and 48s.

The HO, N, and S scale folks have been making their own cardboard intermodal/shipping containers. They are even paying for printable images! Here is valuable link: http://www.modeltrainforum.com/showthread.php?t=7674
There is a Dutch site that has free 20, 40, 45, & 48 foot printable container images. NOT O Scale. Click on one of the flags to see in English:
http://home.online.nl/schatborn/
The main drawback is that cardboard containers alone are just too light and fragile, especially if made in O scale size. Printing on paper and gluing on wood blocks is difficult to get the required precision. Most of the HO images are poor resolution after increased to O scale. I have solved the fragility problem and am still on the look out for better quality images. I only intended to make the 20 and 40 footers for the twin stack bottom wells but they have turned out good enough to use in the larger sizes. Briefly, here are the main points:
- Most printers should be able to handle 110 pound card stock paper but you will be limited to 20 foot containers if your printer cannot handle the 11x17 size ledger paper. Lighter 65 pound card stock may also work. (Copy paper is 20 to 24 pound) I am using a $230 Brother MFC-J6920DW inkjet. It has a convenient manual feed slot for a straight through feed without doubling around the rollers or hanging up in the tray. A laserjet should provide some nice bright waxy images whereas the inkjet provides more muted images for a lightly weathered look.
For 20 foot containers use 8 1/2 x 11 (Image Plus 250 sheets 110#@ Sam's $8.00)
For 40 to 53 foot containers use 11 x 17 (Springhill 250 sheets 110#@ $25)
2. Use a software program like Microsoft Photo Editor to edit, scale, and print the files. Scale is 1" equals 4' ,but make containers 1/8" short to ensure they fit both Atlas and MTH. (Top well for 48' container on Atlas twin stack is only 11 7/8".) The image needs to be positioned on one side of the page so you can use the blank part of the page for the bottom of the container. Windows Paint will also allow you to position the images using the page setup. These are 48 foot containers on 11 x 17 sheets. You can see that the door tabs are short and will have to be extended after being cut out.

3. You will need good quality scissors, an 18 inch steel ruler to fold creases, Scotch Magic tape to seal the edges, razor blades, silver & gold metallic markers to color edges and add highlights. Optional white glue to add gloss and durability. Promag ceramic magnets are coin sized, very powerful, and also add 1/4 oz per magnet.
4. After printing, sketch in the edge line for the bottom of the container. Cut out and fold the container. You will have to add tab extensions for the doors on the larger containers. The 53 foot containers will not fit on one sheet so one of the doors will have to be printed out on a separate sheet and taped on with Magic tape.
Some 40 or 45 foot containers that were printed on 11 x 17 and cut out:

Here are some 20 foot containers that have been printed on 8 1/2 x 11 and cut out.

A 53 foot container cut out and tabs and end taped on:

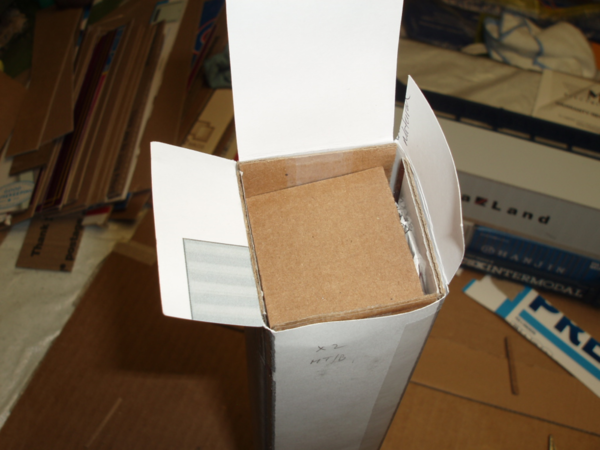
5. Reinforcing the containers adds several ounces. They will withstand anything short of being stepped on. Use a razor blade to cut a batch of straight cardboard strips in widths from 1 3/4 to 2 1/8 inches ( 1/16 inch increments.) Packing boxes, lighter priority mail, and even boxes from MTH and Atlas sets are all good. Use 4 strips to build a reinforced box inside the container. You want a good fit but not too tight. Add magnets to the upper and/or lower cardboard strip(s) if you intend to use the container on a husky stack or the new Atlas Maxi-stacks. They are also a great help if you intend to stack them around your layout. Cut the ends of the cardboard. Stuff with small wads of newspaper until they start to come out the other side. Then compress and add one or two more wads. Don't stuff too tight or the sides will bulge and you will lose the square edge. Add a small square cardboard cutout to each end before closing container.


6. Touch up the container door flap edges with dollar store marker pens. A high quality silver leaf marker can provide shiny metallic trim if desired. For a duller trim you can use the dollar store metallic silver or gold markers. If you want brighter colors and glossy finish coat container surfaces with some white glue. Unfortunately it will cause some wrinkling of the sides and roof. Don't use it on the container roofs or weathered containers. The white glue is best for 20 and 40 foot containers for durability if used in bottom well of twin stack.
7. Sealing the containers, and aligning. Glue could be used but best solution was to use the Scotch Magic Tape. It is barely visible on the lighter colors and if carefully applied looks like part of container seam. Unlike glue, it is removable if you need to work on the container later.
8. Start with the easy 20 foot containers and stick to lighter colors first. Any defects will be hidden in the bottom well of twin stacks. You will get much better at it. It is hard to get the contrast for the side ribs on dark colors (blue, green, red) and they use lots of ink.
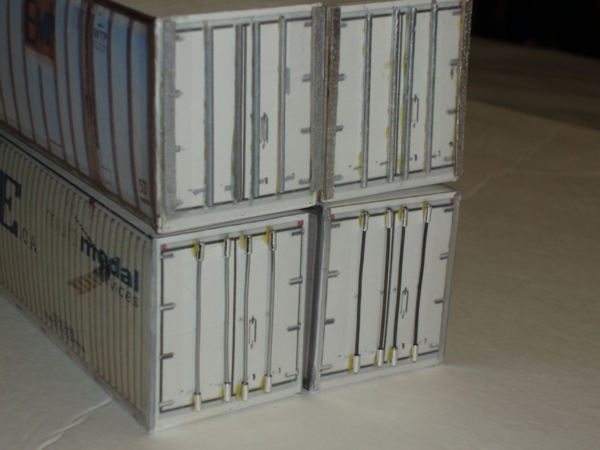
9. I felt that my containers were really missing something until I came up with several options for the four locking rods on the back of the containers. One option is to use 1/16 inch diameter wooden mini-dowels and paint them with a marker after glued on. These are about the diameter of a tooth pick and look OK, but are too thick. The other preferred option is to use 18 or 19 gauge metal wire. Cut thin strips of aluminum tape and roll these on at the top and bottom of the wire strips. The wire comes in rolls so it is not possible to get them perfectly straight. Not exactly scale but they do provide the desired effect. The dowels are on the top containers and the wire is on the bottom containers:

I pre-ordered some sets of the new Atlas Maxi IV Gunderson and should be able to double stack my 53 foot containers with the magnets. For now, I am double stacking my 53 foot containers on the husky stack cars. My 48s or 45s will fit on the bottom in MTH husky stack cars. I didn't try to duplicate the Lionel 45 or 48 foot containers, which are shorter. For Lionel husky stacks I put one of my 45s on the bottom.
I added 30 of my O scale files you can print for 20 foot containers. (Most of these use photos of the container sides, so they are of better quality than scaled up images from the Dutch site.) You will have to use your page setup to position the image on 8 1/2 x 11. After printing you will have to sketch in the cut lines for the bottom and door tabs. Also measure the top and sketch the fold line for the bottom so the container will be same width at top and bottom. DO NOT ADD THE LOCKING RODS ON THE DOOR IF YOU ARE GOING TO PUT THEM IN THE ATLAS or MTH TWIN STACKS. I scaled the containers without the locking rods and they will not fit.


