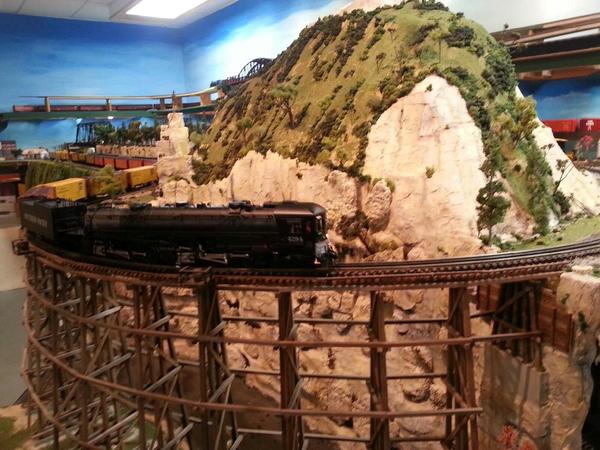
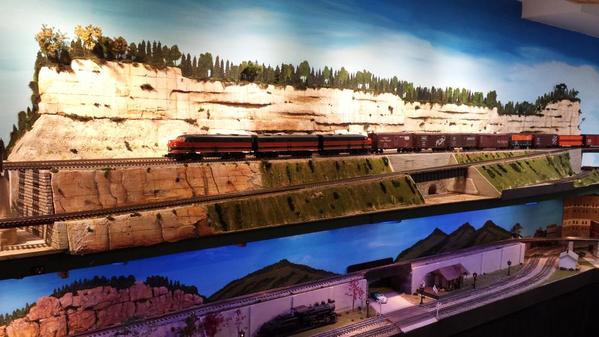
Rather than edit the original post I added new night time photos and descriptions in new post below Saturday 8/5/2017    

So if a picture is worth a thousand words, hopefully a short video or two will be much more informative.    I have been making mountains and hills for my layout using Low Loft Batting a technique I found on YouTube.   

I improvised and started applying spray foam insulation under the batting to shape the landforms... I am building a large coal mine scene off the table and needed a 3 foot tall mountain with a lift out access hole in it as its 5 feet into the layout up against the back wall. 

Anyway there are some photos below of the results after landscaping, and I just finished foaming the large 3 foot high, 3 foot wide and 2 foot deep section with the lift out section.   

Hope the videos encourage someone to try this technique,  I am pretty sure I am not going back to plaster mountains other than for cast rock outcroppings.    this method is light, not messy, and after the latex paint and landscaping is applied it's still slightly flexible so it doesn't chip or get damaged moving it from the bench to the layout. 

The 2 videos can be viewed with the links below as well as the link to the original video I found on this method. 

https://www.youtube.com/watch?v=02urEgugzew

https://www.youtube.com/watch?v=l3TL0AyNPGg

this 3rd video is what got me hooked on this method initially:  

https://www.youtube.com/watch?v=9C6aHEoUWYg&t=21s

6/21/2017:  Some new photos added of the upper mountain above and to the left of tipples/loaders.   All the batting is painted, and for the most part the landscaping is complete except for adding Super Trees... Need to get the tree farm working again.  Making decent progress on the scratch timber mine entrance and timber retaining walls, hopefully they'll get done tonight and stained tomorrow.  

DSCN3537DSCN3536DSCN3535DSCN3533built 


Chris DSCN3506DSCN3508DSCN3514DSCN3518DSCN3516

Attachments

Images (11)
  • DSCN3506
  • DSCN3508
  • DSCN3514
  • DSCN3518
  • DSCN3516
  • DSCN3537
  • DSCN3536
  • DSCN3535
  • DSCN3533
  • DSCN3528
  • DSCN3520
Last edited by chris a
Original Post

Replies sorted oldest to newest

Thanks,  What I am really excited about is I got the whole mountain built in about 10 hours total  work time,    and it only weighs about 10 pounds total.  Total investment so far is about $35.00 in spray foam,  scenery materials, flat latex paint, and it really doesn't eat up the grasses, clump foliage, shrubs and ground foams.... I don't even want to think how much plaster, plaster cloth and hours I would have spent mixing enough plaster to cover an area 3' x 8' long x 2' deep.   

Thanks Don,   Great photo... The aging and weathering on the mine buildings is really well done.  My (3)  On30 side dump mine cars showed up Friday, so I have to go buy a 3 foot section of HO flex track and complete that, the mine entrance and the conveyor from the mine track to the tipple/loading building...   After spending a whole day and a half making trees I wish I was modeling the desert...  Finished staining the rock castings in the mountain and mounting all the trees.... This had to be done before I can slide the Coal Mine scene in behind it.  

DSCN3541DSCN3540DSCN3545 

Attachments

Images (3)
  • DSCN3541
  • DSCN3540
  • DSCN3545

This is a very interesting technique.  One thought I had while watching the original video is wow, sure eats up the paint. Seems like using a plastic tub and dyeing the batting in RIT first may be an easier solution, the if wanted paint could be added after words either brush or spray but much more sparingly as your're not trying to cover up all the white.

Also does the batting come in different thicknesses?  Would be good for other projects if you could get a thinner type.  It certainly adds a lot of texture and depth.

Thanks for your comments....    I actually thought I would be using more paint than I have used.... So far I have built the module shown above, plus a large corner module (3 ft. x 4 ft.) which I will post a picture of below, and I haven't gone through a full gallon of flat latex paint yet.  I am probably around 3 to 3.25 quarts consumed...  Plus one other benefit is the large quantity of paint also serves as the adhesive for the grasses, earth that you apply....  So I am really not using much in the way of adhesives...  I glue down the larger clump foliage with diluted white glue,  and the mountain module above I shot the whole thing with Scenic Cement as most of the surfaces are near vertical and I wanted to make I didn't have tree leaves dropping down on the tracks below.

  I went to HD and bought a gallon of their mid-range Behr flat latex for around $23.00 maybe....   

Regarding the "loft" of the batting, you want to use "Low Loft" which is the thinnest......   I am not sure dying it would work as it's synthetic fibers....  but you could probably hit it with some of the 99 cent flat black spray paint.....  I think using the expanding foam under the batting is cutting down on the paint consumption as it bonds to the back of the batting and it's seems easier to cover than the first time i did it over pink foam....  Hope that helps...   All in all, I still figure it's way more cost effective than getting out the plaster and sculptamold and plaster cloth...  and I have done it that way,  Problem is I have had to move twice in the past 10 years and the plaster based scenery doesn't do well moving it around, way too brittle.   DSCN3460DSCN3444

Attachments

Images (2)
  • DSCN3460
  • DSCN3444

Thanks to everyone who has shared comments and positive feedback...  

Mark,  I am normally not the tutorial type, but after trying this technique I really wanted to do what I could to get someone else to try it.  I am really thankful I found Kevin's video from Scale Model Trains & Colorado's Joint Line.    It really isn't difficult to achieve the same results, no expert level skill required.....    Hopefully my video skills will get better next time...  I am actually contemplating on the next section, letting the whole thing dry and set up and then cutting in rock castings after the fact for any rock out croppings.   

Dave C:   I really appreciate your comment about the elevations and grading.  When I first did this scene, and put a post up on the forum, I noted that my goal,  was for first time,  to build a scene with a building and roadway on grades, not simply sitting on a flat surface...  

If I didn't mention it somewhere in this or one of the other posts I am totally sold on Gorilla Glue for gluing  Pink, Blue or Green rigid insulation to itself or to wood....  Found this searching You tube also....  It expands when it sets up, dries hard in less than 3 hours, and produces much stronger bonds than any of the latex caulks, or foam adhesives I have used.   While the foam project adhesive worked, I found that the pieces tended to shift overnight while I was waiting for it to set up ??  Maybe I am the only one that happens to.... Doesn't happen with the Gorilla Glue

 Not sure what Chris used for the tree tops. You can get by modeling only a couple of rows of  actual trees. As long as what's behind them rises up steeply. You can use a product called Poly Fiber. Woodland Scenic's carries it. Basically you tear it apart and stretch it out to an odd shape. You want it thin  and be able to sort of see through it. The one bag at first. May not seem like much. But it should go a ways. Hit it with a cheap aerosol can of glue. No need to by the expensive 3m stuff.  Get a decent sized sealed plastic container and fill it about 1/3 up with some ground foam. Drop in the Poly Fiber piece you sprayed with glue. Put the lid on and shake it around. Pull the piece out. Shake it a bit and set it aside. Do some more and then change up the color from say a light green to a dark. You do want to settle on one dominant color. You then can place these on your mountainside stacked accordingly and secure themwith some craft glue. Your basically creating an illusion. Your creating trees beyond the modeled ones. The fact that the mountain rises steeply aids in the illusion that you don't need a trunk or branch structure. For the forrest floor. In the fall you can gather up real leaves and grind them in a blender. Scenic Express. I think sells it. You want to stay away from anything that looks like a lawn under the first  few  rows of trees.

Sorry HRSPLA I didn't see your question.....  They are commonly referred to as "puff ball" trees.  I have made some with Woodland Scenics "Poly Fiber"  in Green Item # FP178...  However you don't get much Poly fiber for $3.25 per bag....  

I am getting the best results using something called Poly-Fill, it's 100% Polyester Fiberfill used for making pillows and stuffed animals....  It's white, pretty sure I bought this stuff at Walmart, or one of the craft stores like Micheals, or AC Moore..   I pull it out, kind of tease it and stretch it so I get rough straggly edges then spray it flat black with the cheap 99 cent paint from Home Depot....  Then I spray it with 3m 77 spray adhesive and add a variety of scenic grass, Leaf material available from Scenic Express and or Woodland Scenics..   I will shoot a couple of  close up photos.... and post them tomorrow....  

These newer larger puff ball trees that I am describing are above, and to the right of the large mountain, in the photos above.... If you right click on the photo you can open it in a separate window and enlarge it to zoom in and look around.  I grab them with a large pair of hobby tweezers to hold them when I spray the adhesive and dust them with the various scenic textures... Let they completely dry for 1 or 2 days, then I now attach them to the vertical backdrop with Hot Glue.  

Hear are some photos of the Puff Ball trees sprouting leaves..... Also a photo of the material I would highly recommend as it's cheaper easier to work with and can make larger trees with more unique shapes.   

Also added some photos from today as the details keep getting done... Finished the timber coal mine entrance a & wooden retaining walls and stained/weathered them ... Kitbashed an older Plasticville Coaling tower and added it to the tipple building in the foreground ...  Finished and weathered the walkway between the coal hoppers where the loaders operate the chutes... Getting closer !

DSCN3556DSCN3555DSCN3554

Attachments

Images (6)
  • DSCN3547
  • DSCN3549
  • DSCN3548
  • DSCN3556
  • DSCN3555
  • DSCN3554

Chris, you got me back in the train room and working. Nice, nice, nice. Can't wait to see your mine area all done. I love old buildings and mines. I'm finally seeing the light at the end of the tunnel or should say canyon on my mining short line. Have about six more feet to go. Then string overhead wire for the small electrics.  One of the mines will be partly burnt down. Believe it or not I built a mine building from a craftman kit board by board and now have to somehow burn about half of it down. Don't ask, it goes with the story of the canyon. As you can see the town isn't doing very well. Don


DSC_0275rock wall


Attachments

Images (2)
  • DSC_0275
  • rock wall
Last edited by scale rail

Hello Don,  thanks.   The rock work in the canyon is really impressive.   Are you casting those rocks and piecing them together ?

 If you're carving or creating those with something other than molds,  then you are a really gifted stone worker !   Buildings look incredibly realistic as well... Love the guy with the 35 MM on the porch.... 

Your canyon photos remind me of being in Yosemite Valley so you're doing a great job modeling the Cascades.    Chris

Chris-

I like your technique. Looks great. The spray foam does stick to EVERYTHING... even you hands and clothes!

I use stacked extruded foam and then glue plaster casting on it...

20170627_231320

I created this mountain with cardboard webbing, stacked foam, and some expandable foam as well...

20150131_204906

Other construction methods include just stacked extruded foam with plaster cloth draped over it... then carved.

20150809_23043220150819_21440420151006_215957_Richtone[HDR) - Copy - Copy20160807_223802

Attachments

Images (6)
  • 20170627_231320
  • 20150131_204906
  • 20150809_230432
  • 20150819_214404
  • 20151006_215957_Richtone(HDR) - Copy - Copy
  • 20160807_223802

Chris, most of these are made from molds. I made a few of the molds when we lived on the mainland but most I bought from a guy that makes hundreds of different kinds in California. Some are two and half  to three feet long. I use everything and anything for the mountains. Even real rocks that I have to paint because everything here is red. I dry brush the "stone" after painting the entire rock wall flat black. DonPhoto #2

Attachments

Images (1)
  • Photo #2
scale rail posted:

Chris, most of these are made from molds. I made a few of the molds when we lived on the mainland but most I bought from a guy that makes hundreds of different kinds in California. Some are two and half  to three feet long. I use everything and anything for the mountains. Even real rocks that I have to paint because everything here is red. I dry brush the "stone" after painting the entire rock wall flat black. DonPhoto #2

Is he still selling the molds and do you  have contact info if he does?  Thanks Don!

Adding some new photos, getting pretty close to putting this module in place up against the backdrop... Of course I have said that the last 3 days in a row !!  Got the grade between the mainline and coal loading sidings done today, the road is almost done,.  Made the tall concrete retaining wall at the end of the spur tracks, which I will cut to length when I slide it in behind the mountain on the layout.  The decking between the tipples is weathered and has it's railing on, and I built a circular poured concrete foundation for the tank in the foreground......

DSCN3575DSCN3574DSCN3573DSCN3572DSCN3571

Attachments

Images (5)
  • DSCN3575
  • DSCN3574
  • DSCN3573
  • DSCN3572
  • DSCN3571

Doug,  thanks very much....  it's a blessing and a curse being a perfectionist...  It's taking way longer to complete this than I thought, but I am not willing to give into "that's good enough"...   Not sure I can build the entire layout at this level of detail, but it's been a fun challenge to find out what I am capable of accomplishing...  

I have seen a ton of really exceptional modeling done on the OGR forum and have wondered what it takes to achieve those kind of results...   Of course I have to thank Google, cause I have searched a ton of google images for coal mining, coal tipples etc. etc... What a great resource for finding prototype photos and articles.  

Paul,  Thanks.   The only form that I have the plan in is RR track, I don't have the current release but I designed in v4.0... If you are using their software I could email you the file...    

Last September there was a thread on "show us your layout"...  I posted some overhead photos looking down from a stepladder and also shot a short walking tour of the layout the link to the YouTube video is in the OGR thread ,  the link is:  

https://ogrforum.ogaugerr.com/...64#64358525797652364

Moving forward, I am limiting my use of plaster or hydrocal to "cast rocks" and then plant them in this Low Loft batting scenery ....     I was thinking when I was working on this module, that it's like creating your own custom textured scenery mat that conforms to whatever shape you create underneath...  

Luvindemtrains,  I used some black O scale roadbed foam.  Put the angled side upside down against the center rail, then put a 1/8 spacer inside the outer rail to hold it in place while the wood glue dried....    You could also use black foam core or some other material....  I like using the closed cell foam as its flexible....  I plan to go back and apply a thin coat of dirt or fine coal dust to the top.   thanks for asking.  One suggestion,  next time I am going to leave the spacers in place during the ballasting as it's not the easiest place to get rocks out of, particularly with the Ross track nail spikes down there...

Add Reply

Post

OGR Publishing, Inc., 1310 Eastside Centre Ct, Suite 6, Mountain Home, AR 72653
800-980-OGRR (6477)
www.ogaugerr.com

×
×
×
×
Link copied to your clipboard.
×
×