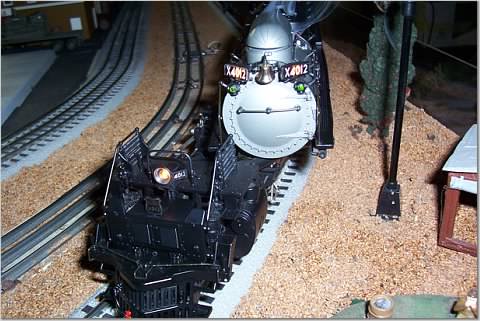
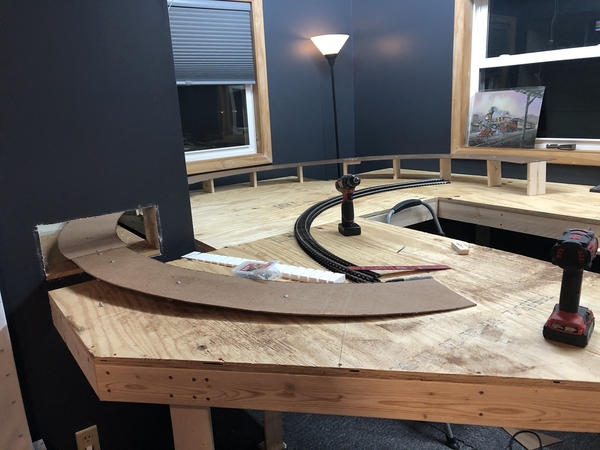
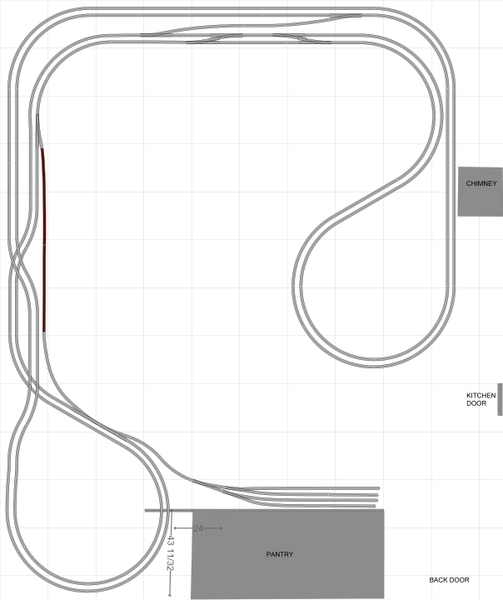
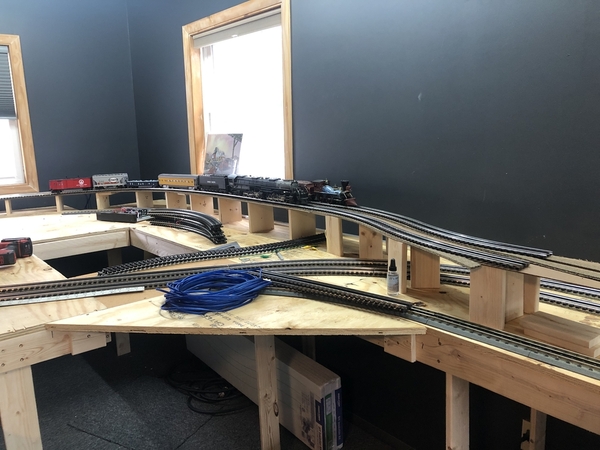
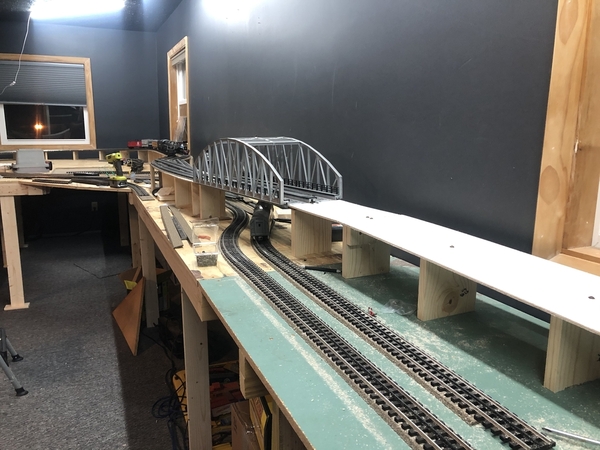
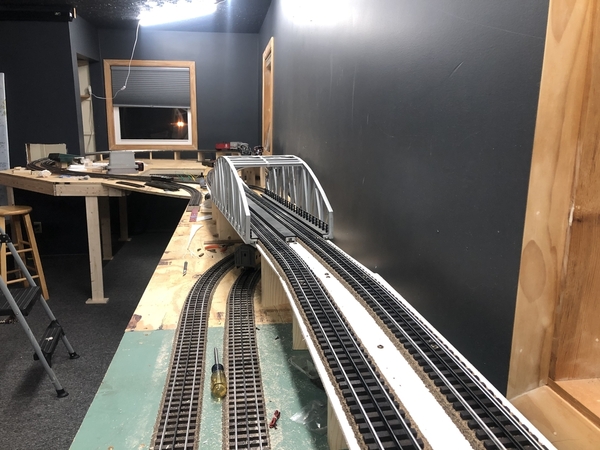
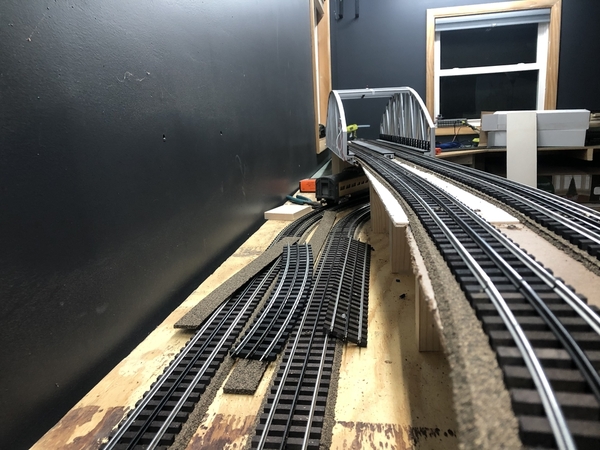
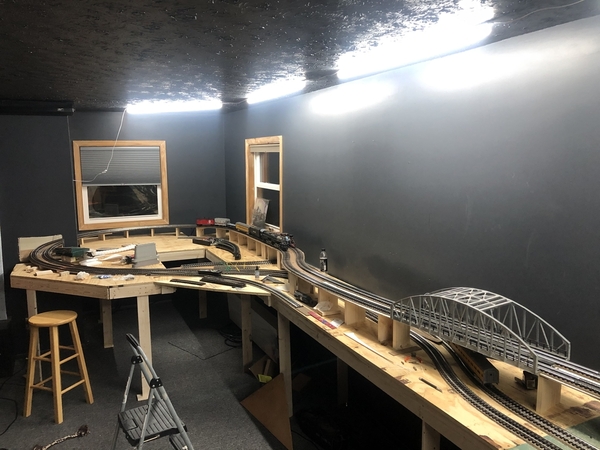
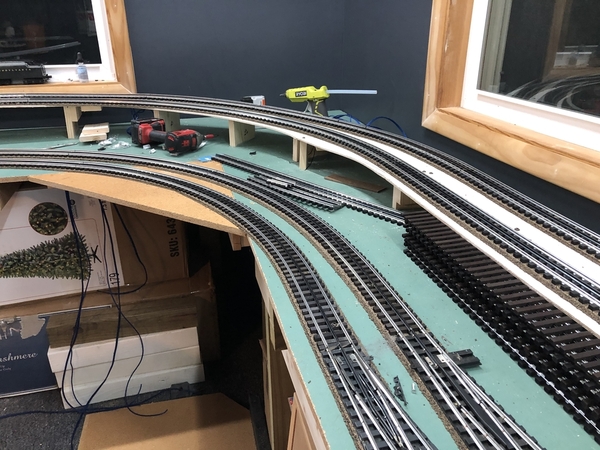
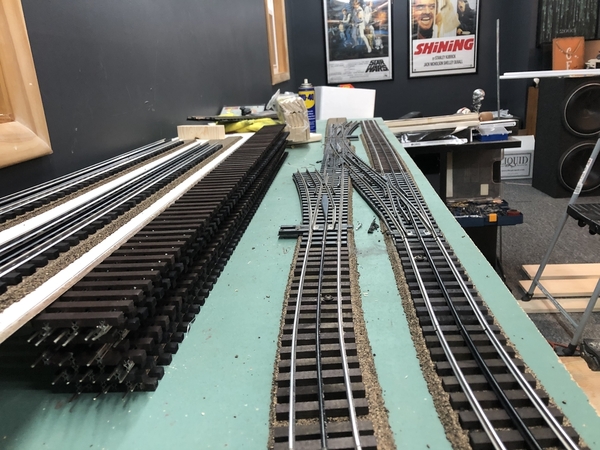
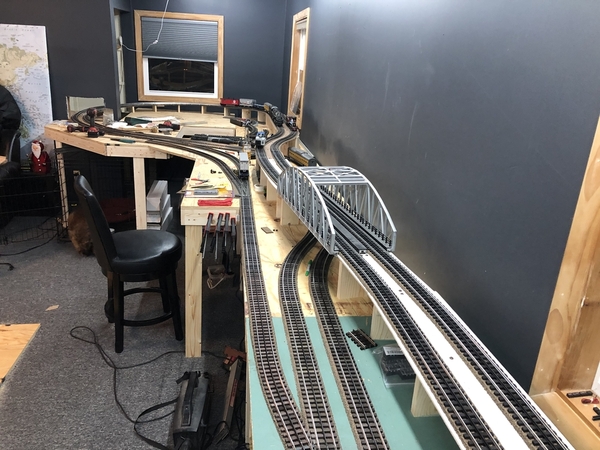
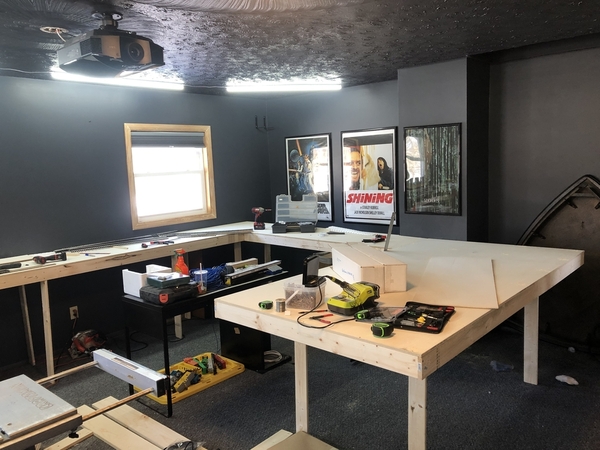
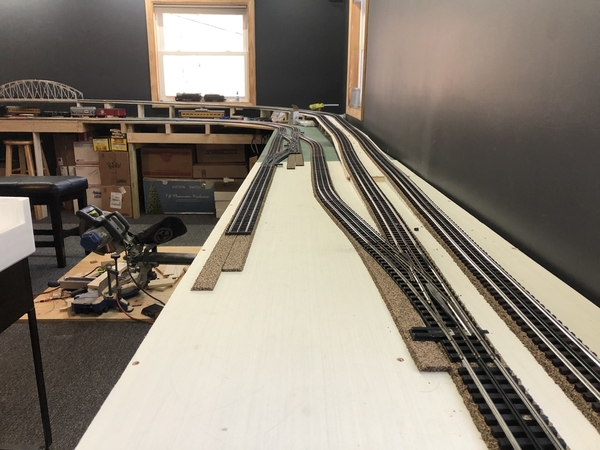
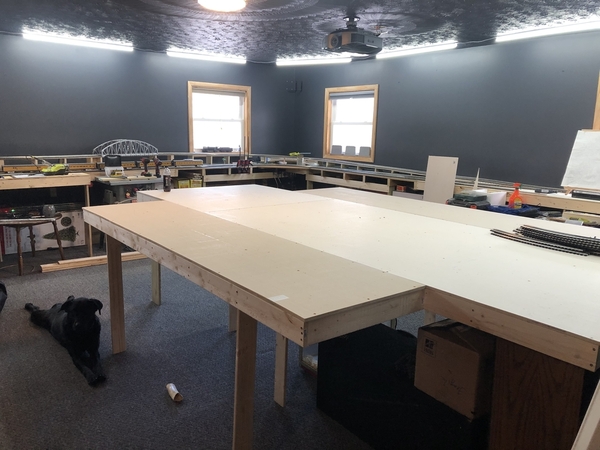
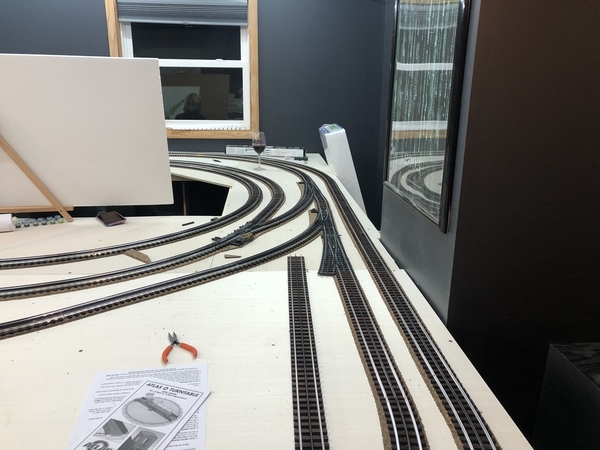
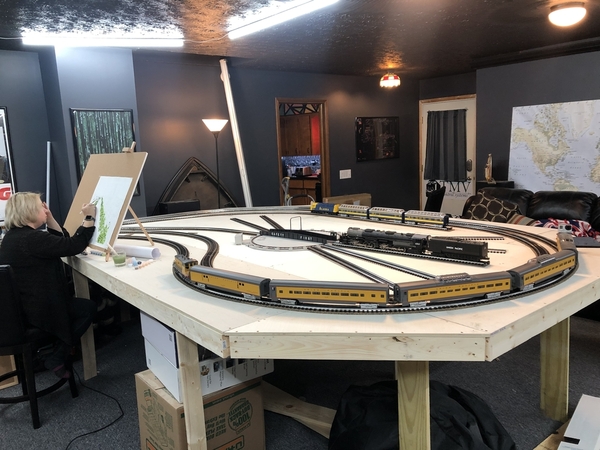
Well, after an amazingly warm welcome, I've decided to start a build thread. If you missed my intro, i'm a career railroader and model train collector. The locos and cars have set on shelves and static displays for too long and it's time to build a layout to run them. We have a dedicated home theater that has run it's course and is being gutted and sold off. This leaves me with a 21x21 area to create. I'll be running, among other locos, a MTH premier Big Boy and DD40X so I know I will need minimum O-72 curves.

I've purchased a new TIU (rev L) and remote so I should be good on DCS control. I'll be using MTH Realtrax as I already have a small assortment and it just seems easy to work with.

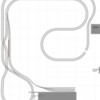
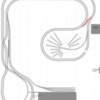
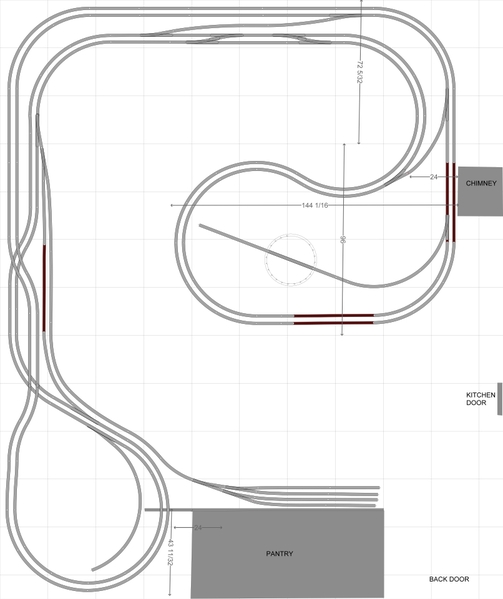
I'm using Anyrail software and have come up with a basic "flow" I want to build. Go easy on me, as this is just a design flow and by no means the final build. I would like a double main in most areas but do not want two tracks to just follow each other around the entire time. Inspiration is coming slower than I would like, but I have the desire, and some space, so it's a start. The general plan is to build along the walls and not make the room seem "crowded" or filled to capacity. I also have no desire to plan and build for 6 months before a train ever hits the track. I'd like to get a base layout running soon and while ugly, have it operational. Then inspiration can lead me to scenery and extras.

I'm going to attempt to attach what I've come up with so far as far as a "flow" desire goes.

Thanks in advance, and I am completely open to suggestions...

Attachments

Original Post

Replies sorted oldest to newest

David, I commend you with the plan to replace the home theater with a layout.  It's looks like you have a good basic start for a plan.  Having come from HO myself, always bear in mind everything takes a lot more space than you are used to.  It has been over 8 years, but I am still surprised at times how much space O gauge takes.  It is still worth it to me.

Sounds like you are having fun, which is the important thing.  Just remember you'll be potentially buying future track and control items on the second hand market, as MTH has announced that it is going out of business in six months or so.   That's not necessarily a problem, but you should be aware of the possibility if you are not, as a newbie.

Last edited by Landsteiner

Just for S&G’s ...see what it looks like, with 081 minimus if space permits, .....my outside main is O81 & O90 and all those big split frames like your Big Boy look right at home on those curves, ....even on O72, they can start to look silly, especially in spots where the curves double back on themselves, .....just giving some food for thought, ...looks like you’re off to a good start, ....hope you don’t mind the suggestions, but if you’re just in the planning stages, now is good time to see just how far the space permits the largest, and most gentle realistic looking curves you can, .....heck, go 100 if it allows!!...21X21 ain’t no slouch of a space,.....and if you can blow out to 81 or 90, that might leave inner room for a second main of O72, ....now your diesels will look at home and be really happy,...

Pat

@harmonyards posted:

Just for S&G’s ...see what it looks like, with 081 minimus if space permits, .....my outside main is O81 & O90 and all those big split frames like your Big Boy look right at home on those curves, ....even on O72, they can start to look silly, especially in spots where the curves double back on themselves, .....just giving some food for thought, ...looks like you’re off to a good start, ....hope you don’t mind the suggestions, but if you’re just in the planning stages, now is good time to see just how far the space permits the largest, and most gentle realistic looking curves you can, .....heck, go 100 if it allows!!...21X21 ain’t no slouch of a space,.....and if you can blow out to 81 or 90, that might leave inner room for a second main of O72, ....now your diesels will look at home and be really happy,...

Pat

This is actually what I was thinking last night but glad to hear someone say it as well. I drew everything with O-72 but quickly figured out it will not follow itself through a curve so I’ll probably just start the drawing over with O-81 and see where I end up.

in anyrail, I have most of it somewhat figured out except connecting it all at the end. Meaning I drew the entire loop in about a half hour and then spent the next hour trying to get the two ends to join. I was moving things everywhere and adding and removing different size pieces. In the end, I never did get it perfect. Is there some trick to joining the open ends or is it just an acquired skill?

@Landsteiner posted:

Sounds like you are having fun, which is the important thing.  Just remember you'll be potentially buying future track and control items on the second hand market, as MTH has announced that it is going out of business in six months or so.   That's not necessarily a problem, but you should be aware of the possibility if you are not, as a newbie.

I’m aware they are finished but hoping someone somehow keeps it going. Had read once there was a plan in place to have the employees take over but who knows. I know I had one heck of a time finding a new TIU and remote.

@harmonyards posted:

Just for S&G’s ...see what it looks like, with 081 minimus if space permits, .....my outside main is O81 & O90 and all those big split frames like your Big Boy look right at home on those curves, ....even on O72, they can start to look silly, especially in spots where the curves double back on themselves, .....just giving some food for thought, ...looks like you’re off to a good start, ....hope you don’t mind the suggestions, but if you’re just in the planning stages, now is good time to see just how far the space permits the largest, and most gentle realistic looking curves you can, .....heck, go 100 if it allows!!...21X21 ain’t no slouch of a space,.....and if you can blow out to 81 or 90, that might leave inner room for a second main of O72, ....now your diesels will look at home and be really happy,...

Pat

David I agree with Pat I have the MTH Premier Class A and see the difference between 072 and the wider curves 080, 089 on my layout go wider where ever you can. It will be worth it.  Looks good so far. Will be fun to watch the progress.

I have to agree with the wider curves, I also have a lot of "big iron" including the VL-BB, several Challengers, and other scale articulated locomotives.  I have a smaller space than you do, and while I have some O72 curves, most of my curves I tried to to larger, up to around 99" diameter. Mine is a folded dogbone on two levels.

Since you have AnyRail, I attached the plan so you can take a look.

John's Layout 2020-12-27.any

The 3D image of the layout.

A couple of shots of the current progress.  Most of the main level track is down and up the grade on the right.  The second level will be over the first level loops in the foreground, I have to get all the wiring completed for the main level before putting that back on.

What the second level will be when I put it back together, hopefully in a couple of weeks.  It's fabricated, just had to remove it to finish track work on the main level.

Attachments

Images (3)
  • mceclip0
  • mceclip1
  • mceclip2
Files (1)

Use the widest curves possible.  Can you fit in 0120?  60" radius?  When you talk Big Boy you are looking at something that will clear off anything even near the right of way outside of the curves.

I have 0120 and 0144 curves but the best looking articulateds I have are the Lionel 2-6-6-2 steamers shorties.

Well my eyes won't let me do anymore tonight (long story involving optic neuritis) but I'm learning at a geometric rate (great movie reference).

I got the overall flow more dialed in but I still need to figure out how to add inclines. I also currently have no switches or any type of a yard.

Got the theater dismantled today and inventoried so my son can start selling it all off. I honestly can't believe how much wire was used for both power and speakers (was dolby 7.1 with 3 18" subs powered from pro audio amps).

Built the first section today just for nostalgia. The rear seats of the theater sat on top of an old 4x8 ho table from years and years ago. Cut it straight down the middle and put it in the upper left corner so i now have 2x8 on one wall and 2x10 on the other. Completely useless at this point but it kind of made this "official". The dogs didn't quite know what to think of me using a circular saw in the house while wearing pajamas.

Anyways, here's where I'm at. Feel free to comment whether positive or negative. I'm happily open to suggestions. Near the chimney a hill will start for the outer 2 tracks and continue along the entire upper wall and along the left before dropping down in the lower loop. All outside curves are 82 and all inside are 72.

Attachments

Images (1)
  • Theater train 2
Files (1)

Sorry, Mark, but I've got to disagree with you.  Setting something up as a "first try" without careful planning will result in much tearing out and re-laying later on when other items wanted or needed require adjustments.  Better to develop a concept for the layout (e.g. do you just want to watch trains run in circles no matter how big or convoluted those circles are, or do you want to "operate" a model railroad with freight and/or passenger movements?) and then "plan" how you are going to fit that concept into your available space.  Another concept to consider is whether or not you plan to model a particular prototype or will you just run what you like?  This process is called "givens and druthers," and if you search this concept you will find lists of other things you need to consider in planning.

Dave, before doing anything more, please look at books and magazine for track planning info.  I would highly recommend Track Planning for Realistic Operation as good reading, and then I would recommend looking at track plans (and related stories) developed by John Armstrong, John Allen, Byron Henderson and Frank Ellison.  The NMRA also sponsors a Layout Design SIG which might have useful info if you choose to sign up.

Good luck and happy building!

Chuck

I have to agree with Chuck here.  I'd do some more thinking on what you want to do with your RR.  Ripping up track after laying it is super annoying, I'd avoid that if you can.

Specifically, what kind of operations do you envision?  Do you want multiple trains running at the same time?  How about yard space?  Industries and/or operating accessories?  What scenery do you plan on in the long run.

I confess I don't have the optimum layout, I'm hardly a seasoned large layout builder, but I think I'm going to end up with something I'll be happy operating on.

Appreciate the feedback. I’m not entirely sure I can accurately answer these questions but I’ll try even if it’s just to get myself thinking more. Maybe I’m crazy and this is blasphemy but I don’t really care about prototypical operation or switching. Maybe because my career is in railroading and I see that every day? Who knows. I do want some storage and places to store specific trains, like let’s say my Alaska F40 with 8 coach cars.

I want to be able to run multiple trains at once but I’m more interested in having a “certain” train on the layout than I am building it in a yard. I also have no interest in “servicing” any industries. Maybe that will get boring quick and I’ll hate myself but it’s what I see in my mind when I envision this.

It's your railroad, so not wanting switching, prototypical operations or servicing industries is your call.

One thing I would suggest is putting in as many sidings as you think is reasonable to store engines and rolling stock on, because taking trains on and off the track can get tedious very quickly.

You might also want to consider a small turntable, roundhouse or engine shed.

@Mark Boyce posted:

I like what you have put down so far!  What are your plans for sidings, crossovers, a yard, or engine facility??  You have room for a lot, but you may want to just tackle the basics and add on later.

The best I can say I’ve come up with is to have a few switches at either end that go nowhere for now. That way I can add if needed without destroying anything. Also plan a crossover up at the top.

I'll stick by my comment because it seems to me you aren't sure what you would like in a layout.  What you just replied is what I meant by tackling the basics and add later.  However, if it was me, I would end up deciding to put the sidings or yard somewhere different and have to change the track I had already laid anyway.  I just did that very thing this summer and fall, if you want to look at the last few pages of my Blackwater Canyon Line topic.  I decided to squeeze a wye in off my mainline, where I had originally planned to just have a siding or two.  I also put in a tiny yard, where I was going to have a siding.  I pulled out the track screws, lifted the track, and rearranged things.   Since you and nearly everyone else has more room than I do, you may be able to plan things out better.  I couldn't imagine the use of the small space until I had it in 3 dimensions and others commented on it.

By all means, the more you think you want up front, all the better.  These other guys can be more of a help on a larger layout.  My 11x11 room is the largest space I have ever had to work with.

A bit more on the "siding" discussion.

OK- so running trains sounds like what you are about. I like your basic concept so far. Double main lines are nice. I would recommend adding a pair of long passing sidings (one on each main). This instantly doubles the number of trains you can have on the layout without the complications and switching work that yards require.

Just my two cents..... I think I've invested about ten cents so far......

Bob

On an O72 curve, the VL-BB will take out anything within 3" of the centerline on the curve.  The MTH scale BB has an even bigger reach, probably at least 3.25" from the centerline.  We got my VL-BB running on the club layout, and then I brought the MTH BB, it promptly rammed a tunnel entrance and stopped!

I’ve seen a MTH Big Boy make it’s own tunnel entrance, .....very indiscriminately.....it’s also quite the scene sweeper on O72.....amazing how it just doesn’t care what’s in the way,...☺️

Pat

@RSJB18 posted:

A bit more on the "siding" discussion.

OK- so running trains sounds like what you are about. I like your basic concept so far. Double main lines are nice. I would recommend adding a pair of long passing sidings (one on each main). This instantly doubles the number of trains you can have on the layout without the complications and switching work that yards require.

Just my two cents..... I think I've invested about ten cents so far......

Bob

I like the passing siding idea. I had been thinking about a yard along the pantry but a passing siding sounds great. Thanks.

Start off with all of the "big stuff" (mains, passing sidings, yards, reversing loops, etc.)  planned and detail out the "little things" later.  That's what I'm doing.  Also, it's easier when flatland railroading is the theme, as there are no hills and ridges to complicate changes later - just open space that may or may not be landscaped, in the near term.  My folded-dogbone plan has a 2-track main with reversing loop, passing/parking sidings, and a large yard with arrival/departure tracks, in 24x14/19.  The first, smallest, simplest benchwork module was completed today.  The first O-112/104 two-track main corner module is next, then another where the main drops down to pass under the main surface in the "fold".  Lots of sawdust, so far!

Frustrated a little bit tonight. Any change I make in anyrail results in an hour of finding the absolute correct pieces to put in way down the line to make what I want work. Tried to add a crossover at the “top” (per the picture) and it’s nearly impossible. It throws the connections off by a half inch or better. I know from just playing around the house and putting trains under the tree that there is more tolerance than the program is giving me. Gave up and started adding passing sidings but then the battery on the laptop died.

Might head to Lowe’s tomorrow and just start building a base. I have 16 pieces of O-72 curve track being delivered Wednesday and actually seeing the curves and the locos on it should help me quite a bit. I’m a very “physically visual” person. I look at the room, and then look at the laptop screen, and think I need to see some things in place to further inspire me. PS2 conversion for the DD40 should be here soon as well so that’s a whole other project on the list.

I had a lot of help designing my layout in SCARM mostly by DoubleDAZ Dave.  I would leave track sections close to touching, but not totally connecting knowing there was a little wiggle room.  It didn't work out exactly as his plan showed anyway with the type of problems you cite.  I don't know anything about Anyrail.  Starting to build a base table even a smaller version and putting some track down will help you just see a train run.  Then move on with a more complex plan.

Dave,

I'm in the middle of setting up our layout right now. I know the frustration of the software not lining pieces up, but I'm not sure how big of an issue it will really be for you.

We meticulously planned every section of track for our layout before we started putting track down, but there were sections in the software that didn't join up. One particular spot was almost two inches off side to side.

But gargraves track and Lionel tubular track have a lot of wiggle room, and in reality we were able to connect that siding with no issues whatsoever and you can't even tell that it wouldn't have lined up in the software.

I don't know the difference in FasTrack or the your tolerance for cutting custom lengths, but I probably wouldn't sweat a half inch in the software as long as you've got a length of track before and after to "cheat" a bit. It's harder to cheat tight curves and switches and areas around crossovers though.

Here's an image of what it looked like in the software, and then an image of what it looks like actually installed:

Screenshot_20201228-235908_WhatsApp

Screenshot_20201229-000513_Gallery

Attachments

Images (2)
  • Screenshot_20201228-235908_WhatsApp
  • Screenshot_20201229-000513_Gallery

On an O72 curve, the VL-BB will take out anything within 3" of the centerline on the curve.  The MTH scale BB has an even bigger reach, probably at least 3.25" from the centerline.  We got my VL-BB running on the club layout, and then I brought the MTH BB, it promptly rammed a tunnel entrance and stopped!

This may help reinforce John's point - here's a visual of the Big Boy overhang on O72:

Big Boy overhang 1Big Boy overhang 2

-Greg

Attachments

Images (2)
  • Big Boy overhang 1
  • Big Boy overhang 2

Good evening David and good luck to you on your adventure!

No one else has brought this up but how dead set are you on using Realtrax? You said you had "some". Before you acquire all you will need, please give this some thought. You can easily resell it. Your choice of track is very important as it will be a sizable investment in $$, time, and effort. Once started, you are committed and it's not easy or recommended to change horses in mid stream. . There are several good choices out there, each with advantages and disadvantages. The MTH track does not look very realistic with it's wide spacing of the ties - Fastrack would be the better choice if you want plastic ballast in place. Primarily because there are so many more sizes and pieces available and it's still in production. If you like the larger scale locomotives and equipment perhaps you should consider Gargraves and Ross track systems as they are the most popular and again, come in many sizes and offer flex track. The other good choice is Atlas for scale realism and ease of construction. Perhaps pick up a few pieces of each and handle them awhile to help make a sound decision?

Last edited by c.sam

I fully agree with Sam.  Be sure and check out Ross Custom Switches.  A phone call with personal introduction and your layout plans would work too.  I helped several friends in Florida years ago and not one of them had so much as one complaint about Ross.  In the rare event a problem should arise, Ross will make it good!  100% good!

Note: Ross Custom Switches is a Charter O Gauge Railroading Forum Sponser, and what's best, all products are Made in the U.S.A.

A Healthy and Happy New Year everyone.

Joe

Last edited by Trinity River Bottoms Boomer

After using tubular track for years, then moving on to Fastrack, my current "forever" layout is being built with Gargraves track and Ross switches.  I can't imagine going back to the noisy plastic base Fastrack or MTH RealTrax now.  We use Atlas track at our club, but the prices made it difficult to choose for my home layout.  I do think Atlas is great track, just too expensive nowadays, and I'm not a fan of the switches.  If you consider Atlas, I'd go with Ross switches.

After using tubular track for years, then moving on to Fastrack, my current "forever" layout is being built with Gargraves track and Ross switches.  I can't imagine going back to the noisy plastic base Fastrack or MTH RealTrax now.  We use Atlas track at our club, but the prices made it difficult to choose for my home layout.  I do think Atlas is great track, just too expensive nowadays, and I'm not a fan of the switches.  If you consider Atlas, I'd go with Ross switches.

Really liking gargraves. Think I’ll order a few pieces and see how it goes.


(edit) Have 4 pieces on the way. Will experiment and see how I like working with it and will probably just return the MTH curves I bought. Do you guys have a preferred vendor you order gargraves through? I went with legacy station just based off of google but I’m finding more and more lately that a lot of online sellers are just middlemen.

Last edited by David K. Simpson

Back in 2000, I bought the Lionel UP JLC Challenger, and reworked my outer loop for O 72 curves to accommodate it. ( It had been O 42 and O 54.)  I wish I had gone with even larger curves. Here it is coming out of a turn. It makes it just fine, but doesn't look right to me.

Good luck with everything you're doing, BTW.

Attachments

Images (1)
  • 4
Last edited by jay jay

Got the O72 MTH track today and couldn’t resist building one curve to see the overhang. The pictures posted above definitely don’t do it justice. It’s comically bad and I’ll be trying to go bigger wherever I can.

Question on the Gargraves track. Is it preferred to lay your own curves or buy their pre curved pieces? If laying my own I would probably just make a sodden template at whatever radius I want I would think.

Having just gone through a lot of flex track, waiting on the second case of track to arrive, I can say... it depends.  I went with the flex track as I didn't want to try to chisel in granite the exact design for every piece, and if you don't, you're likely to have a lot of dimensional track left over.  Flex track allowed me to shape the curves to make things work.  I can cut to size and "tune" stuff to fit.

With that being said, it's considerably more difficult than dimensional track to lay flex track, you're bending, cutting, trimming and cleaning up the ends, installing pins, etc.  If you have a plan that lends itself to transferring from the paper (or computer) to the benchwork, dimensional track is probably the answer.

Like I said, it depends.

FWIW, my first concept was for all dimensional track, but once I saw that was going to be difficult to exactly spec for my concept, I decided to go with flex.  I'd probably be done by now with dimensional track, still laying track using the flex.

John is right about both points.  I used a minimum at flex on this layout after butchering several pieces trying to get around a jog in the room where I built my Ceiling Central Railroad.  I do have curved sections left over, mainly because we originally designed the layout for 042 on plans A, B, and C, then changed to 054 on Plan D.  I also bought some very nice used 064 from someone thinking they were 054.  I don't know if it was my mistake or the long forgotten other guy's mistake, but I have a lot to inventory and offer for sale.  If I had used flex throughout, I would be able to use the left over for another 11-foot long display shelf instead of having to buy more straight for the shelf. 

Once you bend some, it gets easier.  Obviously, the tight curves that Tom was talking about in a different thread are a whole different deal, those must be fun to bend!  The tightest curve I'm bending is around O80 and up, not too bad with new track that the ties slide well on.  I'll probably have some Ross O72 left over, I bought 75 pieces when I was planning on mostly O72 curves.  When I decided to go bigger, I just used a lot of flex track for the larger curves.

We used all dimensional tubular and Gargraves track in our new layout on about 95 percent. Some of those pieces were bought off of forum members who chimed in elsewhere in this thread. Glad they switched to flex...I got a good deal on sectional because of it!

The other 5 percent we used flex. I think we used 4 pieces of flex in all.

Something to consider, if you truly want your track "straight", buy straight track. Although the flex starts out as straight, the moment you bend it at all is the moment you might as well forget about it ever being truly "straight" again. You can do it, but not very easy.

But the flex pieces were handy when having to do little "jogs" in odd dimensions. I didn't make any into true radius pieces though.

Amen to that.  In fact, I think it is next to impossible to get them straight again. 

David, I'd reconsider used track.  Since I only had minimal exposure to Gargraves Flex before this layout, I bought some pieces early on just to see how flex would be to work with, and get some practice.  Old track ties get brittle and hard to slide, making it more difficult to easily form proper curves.  That also have a tendency to kink or twist much easier than new track.  It's workable, but since the track isn't that expensive for factory fresh, I recommend going that way.  The new track is much easier to slide the ties and make smooth curves.

@Mark Boyce posted:

Amen to that.  In fact, I think it is next to impossible to get them straight again. 

I agree, but you can come pretty close.  I have a 3-track yard hidden behind my grade, I'm thinking of using the older track that I practiced on for those tracks.  I managed to bend them pretty straight, certainly more than sufficient for a yard.  I'll see how my track supply is running as I get nearer the end, if I'm running short, I may use them for those yard tracks.

Last edited by gunrunnerjohn

Just wanted to say that I like your track plan. The folded dog-bone as they call it is my favorite type of track plan. I like that you can pretend the train goes somewhere (leaves a scene) and then comes back from the direction in which it left. I understand if you don't want to do any switching (hey it's your railroad) but I highly agree with the suggestion to add some passing sidings. For me a circle, even a giant circle of track will get boring after a while. If it hasn't been already suggested you could add staging tracks for full trains so you can easily switch trains. There is no right or wrong way to do this hobby. All opinion. Good luck and have fun.

David,

If you are dead set on using older GG track, whether it is used or NOS, buy a big can of WD-40. Spray the wood/metal contact points, and let the sections sit a bit. I let mine sit overnight b/c I had other things to do. The stiff joints really soften to a point where the ties will easily move. Be sure to wipe the rails down before moving on. It works.

Chris

LVHR

Still pretty undecided on the right side (per pic) of the layout but the left side is pretty solid. Sold the two arcade machines this morning so that made it easy to go buy some wood with the “free” money from them. Built some bench work and quickly realized how different it is to see this in person as opposed to a screen. Amazed at how much real estate even an O-72 curve takes up. Let alone that that will be my minimum. Also amazed at how hard it is and how much time it takes to find somewhat straight wood at the big box stores. What was straight when we bought it was twisted up when we got home. Not a huge deal but took longer during building to make things straight. You also quickly learn how not straight and square your house is!

I built it all in modules so it can easily be taken apart if I change my mind before anything is made permanent. I’m more of a visual person I guess so I had to build something to see the vision as I was  getting frustrated with paper and screens. Biggest decision now is do I shorten the left side as it’s shown in the pic or go the full 25 or so feet which means hole in the lower wall as the space is only 6 feet wide. Hate to give up that space when all it means is possibly drywall repair for the kids when I’m dead.

my very supportive wife used the parts I wasn’t currently working on to set up and do some paint by numbers. Was a pretty good day overall.

Attachments

Images (3)
  • 2183D0CB-F7EA-48FF-AE97-CC8311DAE255
  • FA97C215-5171-4911-935D-BADC9E84C359
  • FA18797F-ACD1-4AAF-B810-D448E38C3A82
Videos (1)
8C9CA087-7568-4BC0-9121-DE77B54134A7

Was originally planning on 2% grade max. Is 3% that much worse? I only ask because the supplier I’ve chosen doesn’t offer the 2% kit. Only 3. I can get the 2 from someone else but they are the same people who sold me the O-72 curves and it took them forever to ship. The chosen supplier shipped my Gargraves track the same day and also answered the phone and were quite helpful. Those are important points to me.

I'm at 2.5% grades, and I don't anticipate any issues.  We have a long 2.5% grade on the club layout, and I had two Legacy U-Boats pulling 115 cars around that layout and they managed the 2.5% grade, so my little 23 x 12 layout shouldn't have any problems.

I chuckled at the wood comments.  I took the shortcut around the crooked wood by using the Mianne benchwork for the underpinnings of the layout.  For the top, I used Baltic Birch 1/2" sheets, they're 11 ply and as flat as a pancake.  They resist warping much better than big box store plywood as well.  I had to go to a real lumber yard about 30 miles away to get my birch.  That's topped with 1/2" Homasote for some sound deadening, and the track is laid on 1/4" foam roadbed.

There was one important feature i wanted that the 2% grade would not allow, and that was a reversing switch. Thankfully a 3% grade allows me that as well as the option to not cut a hole in the lower wall if I do not want to. I can only currently fit one reversing switch in which means you have to go all the way around to reverse again but it was a very important feature to me. Now to work on either passing sidings which I love the idea of or a yard somewhere.

Attachments

Images (1)
  • Theater train 4

I'm not sure why a grade is necessary for a reversing switch.  I have all the reversing on my plan on the main level with no grades.  How does the grade percentage enter into reversing?

The two double-slip switches and #201 and #100 allow crossing between sides of the loop as well as access to the yard and the inner O72 loop.

On another section, these switches allow movement between inner loops and change direction on the main loop.

Attachments

Images (2)
  • mceclip0
  • mceclip1

Well I just served myself a pretty major blow. All along I had myself mistakingly thinking O72 to O80 would have 8 inches between centers. Obviously as you all know I was horribly wrong. I had radius stuck in my head when in reality of course radius is half of diameter.

This means basically the entire layout as drawn is scrapped as the two locos I most want to run can never be on the track with anything else. Unless I went with O72 inside and something like O90 on the outside which I’m not sure I want to do.

The only other option I see right now is to only run either of them on a “special” train all by themselves. But then there’s the issue of most of my rolling stock being long passenger cars.

Time to walk away from it for a few hours. Glad I figured it out before buying and laying track.

You probably don't want to know how many plans I discarded over the years, but it's a bunch!  I think it's great that you found out the issues before laying track, I found some of them after the track was purchased and I was trying to make the plan work this time!   No matter how many times you do a layout, the "next" one will always be better.   I already know some compromises I made on my current build, but none are truly fatal, so I'm bulling ahead.  If something pops it's ugly head in the future, there's a reason for reconstruction.

@c.sam posted:

Good evening David and good luck to you on your adventure!

No one else has brought this up but how dead set are you on using Realtrax? You said you had "some". Before you acquire all you will need, please give this some thought. You can easily resell it. Your choice of track is very important as it will be a sizable investment in $$, time, and effort. Once started, you are committed and it's not easy or recommended to change horses in mid stream. . There are several good choices out there, each with advantages and disadvantages. The MTH track does not look very realistic with it's wide spacing of the ties - Fastrack would be the better choice if you want plastic ballast in place. Primarily because there are so many more sizes and pieces available and it's still in production. If you like the larger scale locomotives and equipment perhaps you should consider Gargraves and Ross track systems as they are the most popular and again, come in many sizes and offer flex track. The other good choice is Atlas for scale realism and ease of construction. Perhaps pick up a few pieces of each and handle them awhile to help make a sound decision?

I’d like to thank you for opening my eyes in this particular situation. I set up a 50 foot “test” track tonight with all MTH realtrax, and I’m not happy with it at all. Especially the curves (which are brand new). Many don’t line up very well and I could see it taking a lot of bending and modifying it to work smooth. Especially the big boy which is quite noisy through this curve. I have no doubt that joints that are pinned will be better.

When I first got into O gauge after years in HO and N scales, I bought an MTH set with MTH track.  I did not like it as well as Fastrak, which I only use for Christmas setups.  Who knows if MTH track and switches will be available in the quantities needed for a good sized layout that will probably be modified over time.  Sure it will be on the used market, but will the exact piece someone needs can be found.

After buying some Ross track to go with my Ross switches and GarGraves track, I will have to say I like Ross track better.  I think it looks better with the spikes holding the rail in, and I found the rails seem a bit more secure, but that could just be me.

Mark, since you mentioned that, I thought I’d give Ross a try. Unfortunately, trying to convert an O-36/O-45 design proved fruitless. I refuse to resort to O-31 and O-42 is too large to fit the O-36 space. Since I’d have to resort to O-32 with GarGraves, Atlas appears to be my only option. I don’t even like having to use O-36, but it’s a compromise I’m willing to make. Christmas is almost put away, so I’ll get my part of the craft room back and should be able to finally start building the display layout for Bedford Falls.

I plan a little and build a little. As I mentioned before, I’m a physical visual person so I have to see it in real life to “see” it. Built some more today and got the southern loop structure done. Went back and forth about going through the wall but very glad I did. Helped me figure out inside and outside spacing from the walls and the hole. Also, the little aisle wasn’t originally planned but makes great sense now. At least for the moment.

Attachments

Images (2)
  • A0CA9420-F7BF-4443-84C4-C9E11E0684DE
  • 05F2E328-2D6E-4403-A39F-707032F5171B

Consider this more of a proof of concept update.

Finally found a local retailer who carry’s and can get gargraves track so I bought a box of 72 and 80 curves. Quite surprised at how much variance there is due to the ends not butting up tight to each other and how you can visibly see how “untrue” the curves are. A simple template should help solve that. Anyways, I’ve been dreading using the foam risers and been trying to think of a decent way to get around them. Well, some 5mm hardboard, a jigsaw, and some math is apparently all it takes. Mocked up this 3% hill tonight. Basically 3/8” rise per foot to a final height of 6 inches. The “riser” will be done better and will be full width (7”) but for proof of concept I just cut up a 1X4. Wasn’t sure what to expect when I started but I’m actually impressed. Plenty sturdy and if I ever had a feeling of doubt it would be quite easy to stiffen further if needed before scenery was added. B9925394-ED56-4F93-9831-87008AA16887725F23FB-6CBD-4E7B-BB9F-480B0473FE9C29B2AA31-0EB2-4079-8E6A-70E8D45974B9

Attachments

Images (3)
  • B9925394-ED56-4F93-9831-87008AA16887
  • 725F23FB-6CBD-4E7B-BB9F-480B0473FE9C
  • 29B2AA31-0EB2-4079-8E6A-70E8D45974B9
Last edited by David K. Simpson

I thought it was just me that the GarGraves curves weren’t exact.  I used 054, and it all worked out.  Your mocked up grade looks good.  My two grades are roughly 4%.  Make sure you allow for a vertical easement at top and bottom of the grades.  With 4% I didn’t allow enough vertical easement, The pilot on one of my steamers hit the track at the bottom of the grade.  I had to rework them making for a longer transition.

@Mark Boyce posted:

I thought it was just me that the GarGraves curves weren’t exact.  I used 054, and it all worked out.  Your mocked up grade looks good.  My two grades are roughly 4%.  Make sure you allow for a vertical easement at top and bottom of the grades.  With 4% I didn’t allow enough vertical easement, The pilot on one of my steamers hit the track at the bottom of the grade.  I had to rework them making for a longer transition.

Good advice. I shallowed out the bottom approach and the big boy does just fine on it.

Anyrail was worth every penny. Especially when you figure out that you do not have to be absolutely precise. My anyrail project is more of a rough draft that shows me what i can do. Then I build and tweak as I go. Really liking it.

I've listened closely to every single suggestion mentioned here, so thank you all and even if I do not directly reply to all of them, they are all considered and appreciated. The lower double main loop is finished, tested, and runs smooth as silk. So so so glad I ditched the MTH track.

Got back to the laptop and was able to add a passing siding, a reversing loop which is now extended and could be another siding when not in use, a dual crossover, and a dead end line at each end for future expansion. These are all of course subject to change as I use it as a guide and build more visually instead of following the exact plan. It currently looks to me as though I'm set up for future operations instead of just going in circles as before. The inner loop is pretty standard but the outer loop has much more possible activity.Theater train updated

Attachments

Images (1)
  • Theater train updated

As it turns out, even though I thought my AnyRail layout plan was going to be the "end all" and dead accurate, it didn't work out that way.  I did end up with something very close to the plan, but then the variations creep in and it's not to the plan.  I actually went back a number of times and updated the plan to reflect what I ended up with.  That was useful in that I would then have something close to where I was, and when I moved ahead, I could better visualize what I was ending up with.

As it turns out, even though I thought my AnyRail layout plan was going to be the "end all" and dead accurate, it didn't work out that way.  I did end up with something very close to the plan, but then the variations creep in and it's not to the plan.  I actually went back a number of times and updated the plan to reflect what I ended up with.  That was useful in that I would then have something close to where I was, and when I moved ahead, I could better visualize what I was ending up with.

That’s pretty much where I’m at. I went in tonight and changed it to what I actually built and then added the new features I want. Then I save the exported pic and can look at it throughout the day and see what I like and don’t. Pretty happy with the overall process

Learning and having fun...

Bent and cut my first pieces of flex tonight. Both easier and harder than expected. The cordless dremel came in quite handy and worked well. For a dedicated loop I prefer the pre formed curves as gunrunner mentioned earlier. They aren’t perfect but I have a ruler with 4” taped off that I use to keep the spacing consistent. With that said, O72 is readily available but O80 is 6 weeks out. The local shop (E&S) has some Ross track in O90 something that would work well in the upper left corner (since it will have 4 curves and doubling up O72 and O80 might get weird) so I may go buy it this weekend which should let me continue north (per layout pic) and around the corner to the east.

So since I’m stuck waiting on track I started wiring. Planning on the inner main and outer main each being on a dedicated output from the TIU. Dropped a feeder in the far south curve, and then another halfway up the west wall. Tied them together below on a terminal board (“borrowed” from a real loco) and then ran that to the TIU in 14awg stranded wire. The Big Boy runs perfect but my 4-4-0 general struggles so I think I’m going to join the outside rails with jumper wires (per gunrunner again in another thread I read). I’m assuming the two main lines should be completely isolated from each other and insulating joints should be used in the crossover and reversing loop. Per my plan, each main will be fed from a separate channel of the TIU with its own brick on each input.

Heading to Dansville New York tomorrow to inspect a locomotive we are having rebuilt so I’ll have some hotel time to ponder all of this.

Got this for Christmas and it has been amazingly useful for moving around easily and soldering things without worrying about dragging a cord around. Heats up quick and uses minimal battery capacity. I have many soldering irons, but this is my new favorite. D5350A21-13D9-4036-8B67-DEA1F0566C2D

Attachments

Images (1)
  • D5350A21-13D9-4036-8B67-DEA1F0566C2D

I'm sure my building style drives many of you nuts, but I'm a visual person and this is what's working for me. I build a few feet and then look at it for a few days and see what's working and not working for me. Again, anyrail has been a blessing and I can't recommend it enough.

The southwest incline and hole in the wall are complete and wired. Have ran trains up and down it and it is as smooth as I could want it. Couldn't be happier with the progress. The biggest issue is pacing myself but I'm doing good and tackling it in sections. I do not even look at another area until the one i'm working on is "complete". Did a few more feet today and then back to the laptop. My original vision for the northeast corner kept getting blocked by the chimney and to tuck in that corner, go around it, and then loop back in brought it all too far south and would disrupt the doorway to the kitchen. Can't believe I missed it all this time but the answer was to not tuck into the corner and just head straight south. This let me get the 3 wall effect I originally wanted, stay clear of the door, and leave an access cubby in the northeast corner the same as I accidentally ended up with in the southwest. Have 1 passing siding, a crossover, reversing loop, and provisions for a yard. I'm sure it will change again before it's complete but that's half the fun of it. Local hobby shop is loving the business as well.

Anyways, here's the latest...Theater train updated

Attachments

Images (1)
  • Theater train updated

Mine is the 24" Atlas, the DD40 is 24" long, so I think it would probably swing it.  As long as the wheelbase is 24" or less, you can actually have an overhang of about an inch plus on the ends.  There's about 1.75" to the motor drive house from the end of the bridge track, so actually, you can swing about a 27" overall length diesel.

Attachments

Images (1)
  • mceclip0

Mine is the 24" Atlas, the DD40 is 24" long, so I think it would probably swing it.  As long as the wheelbase is 24" or less, you can actually have an overhang of about an inch plus on the ends.  There's about 1.75" to the motor drive house from the end of the bridge track, so actually, you can swing about a 27" overall length diesel.

Did you get the newer updated one with better rollers and motor or one of the originals?

I have the first generation, but if it gives me trouble, it would be easy to pick this one up and drop the newer one in, it's exactly the same size.  I did take the table off, the rollers seem like they're up to the job.  I lubed everything while I was in there.

Every time something new comes out the internet loves to say how bad the old one was. Doubt it’s as bad as people claim. Interested in hearing your review or findings.

Laid my first switch tonight. Now I know I basically committed a mortal sin by not using Ross switches, but I bought 12 O-100 current Gargraves switches for $85.00 and didn’t think I could pass that up.

Have to fly to Louisiana tomorrow to do an end of lease inspection on 4 GP9s so it will sit untouched until the weekend. Couldn’t help myself though and had to install at least one switch tonight.

As I’m finding out more and more, things don’t always line up the way they supposedly do in easyrail so the back to back switches wouldn’t work here as the foreground one (which didn’t get installed) would have been on the start of the slope. So the yard lead will actually now end up up near the northern end of this passing siding. Not the end of the world as the only limitation will be you can’t access the yard if something is parked on the siding. The only other concern is the yard is single ended so you will have to back the train into it. I really have no way around this so hopefully if I keep all the joints smooth backing in will not be a problem. It’s how we do it at work everyday so I’m hoping for the best.

FA453E2D-E790-4348-AE05-75BBE82DE910

Attachments

Images (1)
  • FA453E2D-E790-4348-AE05-75BBE82DE910

Laid my first switch tonight. Now I know I basically committed a mortal sin by not using Ross switches, but I bought 12 O-100 current Gargraves switches for $85.00 and didn’t think I could pass that up.

Have to fly to Louisiana tomorrow to do an end of lease inspection on 4 GP9s so it will sit untouched until the weekend. Couldn’t help myself though and had to install at least one switch tonight.

As I’m finding out more and more, things don’t always line up the way they supposedly do in easyrail so the back to back switches wouldn’t work here as the foreground one (which didn’t get installed) would have been on the start of the slope. So the yard lead will actually now end up up near the northern end of this passing siding. Not the end of the world as the only limitation will be you can’t access the yard if something is parked on the siding. The only other concern is the yard is single ended so you will have to back the train into it. I really have no way around this so hopefully if I keep all the joints smooth backing in will not be a problem. It’s how we do it at work everyday so I’m hoping for the best.

FA453E2D-E790-4348-AE05-75BBE82DE910

It takes a brave soul to keep a Big Boy on the layout during construction.

You are making good progress so far David.

Bob

@RSJB18 posted:

It takes a brave soul to keep a Big Boy on the layout during construction.

You are making good progress so far David.

Bob, I used my Vision Line Big Boy for a clearance test around my entire mainline and a couple of the secondary loops.  I needed to make sure I left plenty of clearance on curves and the elevated section supports, but no sweat there.  I don't have power wired yet, but I "sky-wired" it for the test.  All went well and the BB is safely back on the shelf until completion.

I have to agree, I don't leave expensive on the layout when I'm working on construction, I'm not that brave.  I do have my cheap battery powered LC+ Camelback sitting on the layout as I work, it is my go-to quickie track check machine.   Before any running, it'll also drag my magnet debris pickup car around to collect any little track cuttings, screws, nails, etc. that have fallen into the tracks.  First time I powered up track, the breaker on the brick promptly tripped, there was a 1/2" piece of cut track wedged into the rails.

As I’m finding out more and more, things don’t always line up the way they supposedly do in easyrail so the back to back switches wouldn’t work here as the foreground one (which didn’t get installed) would have been on the start of the slope............The only other concern is the yard is single ended so you will have to back the train into it. I really have no way around this so hopefully if I keep all the joints smooth backing in will not be a problem.

Being a software guy, I’m a bit confused by the first comment. You said easyrail, but I assume that was an autocorrect error and you meant AnyRail. Anyway, did the program not show where the grade would start? Or did it have the wrong dimensions for the switches? I get that GarGraves sectional tracks don’t seem to be as exacting as perhaps they should be, but something seems to have been way off if you’re having to make that big of a change to the plan.

Re the second comment, if you come out of the yard, you’re going counterclockwise and will end up having to back into the yard, unless you go through the revering loop. Since you only have a single reversing loop, you’ll then be going clockwise with no way to reverse back other than backing through the loop. If you don’t reverse back, you’ll have to pull into the yard with no way to get the engine out unless you have enough space to add an escape crossover to the end of yard tracks. Unfortunately, you’d then still have to back the engine through the reversing loop to turn it. Of course, adding an escape crossover reduces the maximum length of trains somewhat.

@DoubleDAZ posted:

Being a software guy, I’m a bit confused by the first comment. You said easyrail, but I assume that was an autocorrect error and you meant AnyRail. Anyway, did the program not show where the grade would start? Or did it have the wrong dimensions for the switches? I get that GarGraves sectional tracks don’t seem to be as exacting as perhaps they should be, but something seems to have been way off if you’re having to make that big of a change to the plan.

Re the second comment, if you come out of the yard, you’re going counterclockwise and will end up having to back into the yard, unless you go through the revering loop. Since you only have a single reversing loop, you’ll then be going clockwise with no way to reverse back other than backing through the loop. If you don’t reverse back, you’ll have to pull into the yard with no way to get the engine out unless you have enough space to add an escape crossover to the end of yard tracks. Unfortunately, you’d then still have to back the engine through the reversing loop to turn it. Of course, adding an escape crossover reduces the maximum length of trains somewhat.

I indeed meant AnyRail. The only real change is I originally wanted two switches back to back. Yes, AnyRail showed the grade starting halfway through the one switch but being inexperienced I thought it would be fine. Looking at it actually in place I didn’t like it so changed the plan accordingly. The “crossover” also isn’t precisely where AnyRail shows because as you mentioned, the curves aren’t as precise in real life. The good thing is, nothing is permanent yet and it’s just a few screws to move things if needed.

Last edited by David K. Simpson

For whatever reason, the Gargraves sectional track doesn't always some in exactly on size like most other sectional track does.  I've heard from more than one source that the Gargraves sectional curves aren't always "exactly" the same length, which would certainly explain the issue.  I know that the Ross O72 sectional curves I have, Atlas sectional track, and any Fastrack track I've used in Anyrail come in spot-on to the plan.

Of course, unless you go to considerable lengths to make the flex track EXACTLY as you represent in Anyrail (or any other track layout package), that won't match up exactly as well.  Personally, I can't see how anyone lays flex to be EXACTLY like what you represent in in a layout package, but I'll bet it's a PITA to do if it's possible!  I just try to get it close and leave it at that.

@RSJB18 posted:

It takes a brave soul to keep a Big Boy on the layout during construction.

You are making good progress so far David.

Bob

Thats the way I feel about running trains on any elevated track.... yeah, EVEN the little Marx 400... the train I named TIMEX "Takes a licking, keeps on ticking.....".

Beautiful, Simply beautiful!! (someday.........) Looks soooo smoooooth, and NEW!  lol

----(wait, What!!!?? No Carpet?)----> haha

Had to stay in Louisiana an extra day due to an emergency breakdown on a SW1 in Columbus Mississippi on Tuesday which pushed end of lease inspections back one day. Anyways, home at last and put a few hours in on the layout today.

Before I left I ordered a MTH double track bridge that I fell in love with and spent most of the trip deciding where to put it. I had a few ideas but needed to see it all in person to really decide. On to the funny part of the story...

Now I’ve never met this man, nor heard his voice, but somewhat like a ghost or knowledgeable entity, I kept faintly hearing Gunrunnerjohns voice saying “big boy”, and “mine put a hole in a tunnel”, and from another forum topic “it will remodel a coach car at will”. So I proceed to “kind of” listen and put the bridge where I think it looks good and cut a small section of a O86 Ross curve to lead into the 4 inches of straight before the bridge. Looks great and looks like plenty of clearance. I look over my shoulder as I swear I can hear him laughing from the kitchen. Instead of my typical power up test run for clearance, I decide to slowly push the big boy into position. Again he snickers as I can’t quite figure out how this monster of a locomotive has absolutely zero chance of making it on the bridge. However, being determined I’m good, I push it closer only to find out it will make it just fine as long as I take a sawzall and cut the entire top off of the bridge! Well that’s not going to happen so I tear it all back apart and start over.

This is where the beauty of flex track comes in because I made a much shallower approach with a curve of enormous radius and not only does it look better, but the big boy is nearly completely straightened out before it gets to the bridge. Used my longest passenger car down below and after probably an hour of tweaking and adjusting, I’m pretty happy with how it lays. I did not at all want the bridge just on a straight section and squared off to the room. Not sure why, but that was important to me visually. Currently none of it is hard wired or permanently fastened (as usual with my style of building) but you get the idea of how it will be. Was going to try 2% grade on the north side but won’t have room for the reversing switch if I do so I stuck with 3%.

P.S. if it’s preferred not to insert images full size please let me know.


8843C24E-F52E-4F14-9E64-62FB21970F6373A6148D-8FBE-4BAE-ABDA-786FD620663F2A09DA08-FF62-43D2-B654-87D59AC421B50FF3CB88-0299-48E8-9E21-FE5667312B6093AF660D-D229-4286-BCC6-A3F6523904A42D72E5CE-79F7-4533-B9B5-01BA10CE54843E8FEF50-D2F9-4847-8E91-EE3F519E47FF1BCF5CB4-823C-414A-AD34-F663737F97CA0AAF6E3F-AE4A-4C9D-988E-FF3B4EB74C7119B177FE-7288-4E8D-B848-F14F94AE38F8700871E4-074D-4123-8A3C-FBF3F656EC8860C780FA-000E-42F8-9548-03F2CF957B97A8F86A33-9F0F-44A2-AB40-37C83DD2024EAD84A407-AEFC-49A9-84D0-E4B509D706A5

Attachments

Images (14)
  • 8843C24E-F52E-4F14-9E64-62FB21970F63
  • 73A6148D-8FBE-4BAE-ABDA-786FD620663F
  • 2A09DA08-FF62-43D2-B654-87D59AC421B5
  • 0FF3CB88-0299-48E8-9E21-FE5667312B60
  • 93AF660D-D229-4286-BCC6-A3F6523904A4
  • 2D72E5CE-79F7-4533-B9B5-01BA10CE5484
  • 3E8FEF50-D2F9-4847-8E91-EE3F519E47FF
  • 1BCF5CB4-823C-414A-AD34-F663737F97CA
  • 0AAF6E3F-AE4A-4C9D-988E-FF3B4EB74C71
  • 19B177FE-7288-4E8D-B848-F14F94AE38F8
  • 700871E4-074D-4123-8A3C-FBF3F656EC88
  • 60C780FA-000E-42F8-9548-03F2CF957B97
  • A8F86A33-9F0F-44A2-AB40-37C83DD2024E
  • AD84A407-AEFC-49A9-84D0-E4B509D706A5
Last edited by David K. Simpson

Not sure if I should be proud or ashamed of the fact that I worked an honest 14 hours on this thing today. Probably won’t be able to walk tomorrow.

Building the crossover was interesting. Trying to align 6 pins at once with two hands and one eye was fun. Bought some nifty terminal blocks off of Amazon that worked surprisingly well. Still have more wire management to do though.

Took a small break this afternoon and built a dedicated camera car as well.

Quick question. the two loops will be isolated and on their own channel but should the neutral from each loop share a common connection? I’ve read numerous articles and can’t come up with a correct answer. If so, should they be common at each terminal block or just at the TIU? I have drops and terminal blocks every 10 or so feet and all wires are soldered to the rail. The 14awg surround sound speaker wire from the old theater came in quite handy and I have plenty of it.

C51B962E-21EC-4D31-A28B-4FC62FC1CB591CCC237C-3A99-4265-81CA-7F8E9FEEC058B7E82CEC-33A3-4EEB-B3A2-C994224A9A5F
This corner will be redone. 1E501B98-A05F-4955-BA99-846F4524353F7BED40D3-4560-43A0-8359-71EA7ED8E85446BAC8E2-ACA3-45F6-A24F-8839C0AE21CE08AB4E5B-9175-42F7-891C-6AD24774D3EDE0760CB6-1846-4113-9671-7C9C4E988271A73CB75C-A07A-4FD3-A34F-ECF7D339F693543EF8B5-B95F-4C5B-8CAF-C308EEED2E115936E635-BA76-492B-94A7-256EC70CBE9CDF5B46C5-2001-4D74-9233-2C923328E38A

Attachments

Images (12)
  • C51B962E-21EC-4D31-A28B-4FC62FC1CB59
  • B7E82CEC-33A3-4EEB-B3A2-C994224A9A5F
  • 1E501B98-A05F-4955-BA99-846F4524353F
  • 7BED40D3-4560-43A0-8359-71EA7ED8E854
  • 1CCC237C-3A99-4265-81CA-7F8E9FEEC058
  • 46BAC8E2-ACA3-45F6-A24F-8839C0AE21CE
  • 08AB4E5B-9175-42F7-891C-6AD24774D3ED
  • E0760CB6-1846-4113-9671-7C9C4E988271
  • A73CB75C-A07A-4FD3-A34F-ECF7D339F693
  • 5936E635-BA76-492B-94A7-256EC70CBE9C
  • 543EF8B5-B95F-4C5B-8CAF-C308EEED2E11
  • DF5B46C5-2001-4D74-9233-2C923328E38A

I'm running all the neutral lines back to a common set of terminal blocks where my forest of transformers, TIU, and several SC2 controllers will be mounted.  For DCS, IMO, the best way is to have a separate neutral from the tracks and join them at the common junction.  The 3.27mhz DCS signal treats the wiring & track as an RF transmission line, and keeping the two sides of the signal path a similar length should be the optimal method.  That's not to say that tons of people that have just made all the neutral lines common all over don't run DCS just fine, I know a number of people that have wired that way.   I'm just being extra careful as I only want to wire this sucker once!

To be clear, all the neutrals should join at some point, my opinion is it's best at the output of the TIU at a common connection point.  In order to run TMCC/Legacy, it's mandatory that all the neutrals be common at some point.

So the Western and Southern portions are physically built and wired (except for the yard, but the lead is in). Starting along the northern wall and starting to think...

Originally I wanted this only around the walls and to leave the center open as to not crowd the room. The room has no other purpose though so I'm not sure why that was important at the time. Maybe to make this seem less evasive or permanent? I'm not sure. Anyways, I lay in bed at night and follow the track in my mind and the basic L got boring fairly quick so I added the eastern downturn. I still like that quite a bit as there can be trains on 3 sides of you but tonight I started thinking about this. I like the concept, but not sure how crazy I am about the gigantic 8x10 or whatever island in the middle of the room. Would be a great place for a turntable or shop, but there would be 4 foot reach to the center from either side and a hole in the middle would negate any advantage having this island or peninsula gives.

Would love to hear insight, thoughts, or suggestions.Theater train updated 2

Attachments

Images (1)
  • Theater train updated 2

David, FWIW, I had the same thoughts, and suddenly to my wondering eyes did appear...

In case you're wondering, I think it's a great idea.   This gives me more places to park motive power, and adds interest to the operations.  Since there was a service loop around the area, I added two lead tracks so I can drive out going in either direction just by picking which lead track I exit on.

One comment, your lead track has a problem, a curve that close to the TT will be trouble.  Note that my lead tracks have at least 20 inches of straight track onto the TT, and the TT is only a 24" model.  You probably need at least 18-20" of straight track leading onto the TT in order for the locomotive to be lined up well enough not to hit the bridge/railings.  With a 24" bridge on the TT, I made my longest whisker tracks 30", I figure I can swing about a 27" overall length locomotive(24" wheelbase), so having more track in the whisker seemed pointless.  A larger TT would have been cool, but this will satisfy my TT itch.

Attachments

Images (2)
  • mceclip0
  • mceclip1
@DoubleDAZ posted:

Since you only have a single reversing loop, you’ll then be going clockwise with no way to reverse back other than backing through the loop.

I read this part of the comment but at the time (what was that? 3 years ago it seems, lol) I didn’t give it as much thought as it deserves. This is on the verge of a critical oversight on my part. I have no issue backing into the yard but with only one reversing loop things will suck pretty quickly. I really need to search for somewhere to add another.

thank you very much.

David, FWIW, I had the same thoughts, and suddenly to my wondering eyes did appear...

In case you're wondering, I think it's a great idea.   This gives me more places to park motive power, and adds interest to the operations.  Since there was a service loop around the area, I added two lead tracks so I can drive out going in either direction just by picking which lead track I exit on.

One comment, your lead track has a problem, a curve that close to the TT will be trouble.  Note that my lead tracks have at least 20 inches of straight track onto the TT, and the TT is only a 24" model.  You probably need at least 18-20" of straight track leading onto the TT in order for the locomotive to be lined up well enough not to hit the bridge/railings.  With a 24" bridge on the TT, I made my longest whisker tracks 30", I figure I can swing about a 27" overall length locomotive(24" wheelbase), so having more track in the whisker seemed pointless.  A larger TT would have been cool, but this will satisfy my TT itch.

I agree completely and honestly just threw it in there for concept purposes. Will for sure find a way to straighten the approach lead if I go this route. Thanks.

I think if you go for the TT, you'll be glad you did.  It's a cool accessory, and it also gives you a ton of parking for locomotives.   Besides, people just expect a TT on a train layout, right?

I think it’s a must have. I was on the fence until I saw yours.

bought a MP15AC that was delivered today and actually had fun switching a few cars around on the “completed” section. Wired in a programming track (switch to switch in the passing siding) so as to not have to remove any other locos to get it going. I love the “chess” aspect of it all, as in having to think numerous moves ahead to get something where you want it. After all, we can’t just pick the locos up in the real world when we want them somewhere else.

This has been a very fulfilling adventure so far and I thank all of you for the support.

5231810E-E005-46E5-8286-2735BED03536B40F7DF4-FDC0-44C5-BC11-46F4EDD866C9

Attachments

Images (2)
  • 5231810E-E005-46E5-8286-2735BED03536
  • B40F7DF4-FDC0-44C5-BC11-46F4EDD866C9
@DoubleDAZ posted:

Dave’s, if you pursue the peninsula for a turntable or just antra run time, you might add another crossover to give you that 2nd reversing loop.

FE0EA4AA-A3BE-4DDF-9D8A-CE32FB635923

Yea, that area is about the only one that makes sense. Although I'm somewhat back and forth on it now as having just one would just require more strategy in operation. Final decision will be made when I get to that section probably.

David, you have really accomplished a lot on the layout!  I noticed how you laid the cork roadbed for switches and like it!  I learned how to do it from old Kalmbach books back in the late '60s and have done that method ever since, including the roadbed and track I just finished this past fall.  They had you run the edge of the cork along the diverging route, then slice it at angles at the switch frog.  I always found it awkward and as I get older, I find it more awkward.  Mike looks bad until I cover it with ballast.  Are you going to slice away the extra cork to keep it parallel to the tie ends on the diverging rail?  That would be much easier than the method I have always used.

@Mark Boyce posted:

David, you have really accomplished a lot on the layout!  I noticed how you laid the cork roadbed for switches and like it!  I learned how to do it from old Kalmbach books back in the late '60s and have done that method ever since, including the roadbed and track I just finished this past fall.  They had you run the edge of the cork along the diverging route, then slice it at angles at the switch frog.  I always found it awkward and as I get older, I find it more awkward.  Mike looks bad until I cover it with ballast.  Are you going to slice away the extra cork to keep it parallel to the tie ends on the diverging rail?  That would be much easier than the method I have always used.

I’m not entirely sure what I’ll do in the end with the switches. I knew I wanted cork down for sound but I haven’t decided the final roadbed setup.

Having a little trouble with the second reversing loop and have a question. How bad is it for the normal flow of traffic to be through a switch? The second loop becomes quite a bit easier if I can put a switch in a curve and let normal traffic flow through the switch when thrown instead of through the straight section. (As a railroader you would think I would know these terms). If it’s not advised then I will probably go without the second reversing loop.

Having a little trouble with the second reversing loop and have a question. How bad is it for the normal flow of traffic to be through a switch? The second loop becomes quite a bit easier if I can put a switch in a curve and let normal traffic flow through the switch when thrown instead of through the straight section. (As a railroader you would think I would know these terms). If it’s not advised then I will probably go without the second reversing loop.

When you think about it, if you have any capability of ever getting the train off the mainline onto a branch line or siding, it has to go through a switch, right?   I have several curved switches on my mainline in the normal flow of traffic.  AAMOF, I have two double-slip switches, several curves, and three straight sections on my normal mainline.  As long as the switches aren't causing an issue, it's pretty normal to have at least several of them on your mainline.

When you think about it, if you have any capability of ever getting the train off the mainline onto a branch line or siding, it has to go through a switch, right?   I have several curved switches on my mainline in the normal flow of traffic.  AAMOF, I have two double-slip switches, several curves, and three straight sections on my normal mainline.  As long as the switches aren't causing an issue, it's pretty normal to have at least several of them on your mainline.

Good to hear. This is basically where I'm at with it. Benchwork is built and just need 1 more switch and a bunch more track to make it happen. Track is quite hard to come by right now though. Spent the week in Houston and couldn't even find any there. May have to hand bend the rest of the curves. The long extension off of the turntable is to park the Big Boy. I know I can never spin it, but it will at least have a place to park. Let me know if you see any huge mistakes. Thanks.


Theater train updated 2

Attachments

Images (1)
  • Theater train updated 2

Cool that you could fit the long track in for the the larger engine.  I have two turntable leads, but the opposite whisker track didn't have enough length for anything huge, I was hoping to be able to park a couple of large engines as well.  I'm going to go a different way and create some parking for large steam on the other end of my layout off one of the inner tracks by adding a switch or two.

Cool that you could fit the long track in for the the larger engine.  I have two turntable leads, but the opposite whisker track didn't have enough length for anything huge, I was hoping to be able to park a couple of large engines as well.  I'm going to go a different way and create some parking for large steam on the other end of my layout off one of the inner tracks by adding a switch or two.

I like that idea as well but something about having all the motive power at “home” appeals to me. Next I’ll want a shop and and and, well, I guess the living room isn’t used much anymore and the only thing separating it is drywall!

can’t figure out how to draw the table in anyrail.

It's a bit of a PITA to draw odd shaped tables in AnyRail, I haven't figured that out yet.  I draw the surface with a bunch of tiny segments, looks fairly sloppy, but I couldn't get it to work any other way.

For example, here's the corner of my layout under construction with the curve I was trying to put into Anyrail.

The arrows at the bottom left show what I did with the surface tool, pretty sloppy, but I couldn't come up with a better way to create that kind of surface.  I also have curves on the upper right that I tried to represent, didn't do much better there.

Click on graphic to expand.

Test Layout

Attachments

Images (2)
  • mceclip0
  • Test Layout

It's a bit of a PITA to draw odd shaped tables in AnyRail, I haven't figured that out yet.  I draw the surface with a bunch of tiny segments, looks fairly sloppy, but I couldn't get it to work any other way.

For example, here's the corner of my layout under construction with the curve I was trying to put into Anyrail.

The arrows at the bottom left show what I did with the surface tool, pretty sloppy, but I couldn't come up with a better way to create that kind of surface.  I also have curves on the upper right that I tried to represent, didn't do much better there.

Click on graphic to expand.

Test Layout

Glad I’m not alone.

I wasn’t going to post this as I made it just for me and for fun but they seem quite popular so whatever. Here’s a half layout LPV video I made to test the camera car last week.

https://youtu.be/4kKk9lNsnWs

if there’s a better way to embed a video let me know.

@DoubleDAZ posted:

Dave, I’ve only heard that running through the turnout on the mainline is not prototypical, so a lot of modelers don’t do it, but I think that’s just being picky, especially if there’s really no other way to do something. This will add a lot of play value for taking a minor liberty.

In the real world, show me a prototypical "mainline" that doesn't have any switches?

Glad I’m not alone.
I wasn’t going to post this as I made it just for me and for fun but they seem quite popular so whatever. Here’s a half layout LPV video I made to test the camera car last week.
https://youtu.be/4kKk9lNsnWs

if there’s a better way to embed a video let me know.

If you simply take that URL and click on the  Insert media icon in the toolbar, you can insert the video link.

Here's a demo of what you get if you do that.

Last edited by gunrunnerjohn

John, sorry, but I don’t see it that way. Looking at the photo you posted earlier, I only see interchanges and crossovers, all of which are prototypical. That’s true of the trains here running between Tucson, Phoenix and Flagstaff that make the interchange in Phoenix north to Flagstaff or west to LA. In Dave’s case, he’s got the one switch on the left side of the crossover that’s part of the mainline run for the inner loop. A train running that circuit goes through the turnout part of the switch with each pass. And he can always consider that as an interchange. Non-prototypical would be a dead-end spur or group of spurs that go off the main through the straight part of the turnout. I’d be surprised if there weren’t such a configuration somewhere, but it’s certainly not the norm. It really doesn’t matter though unless someone is a purist.

In that case, who knows.   Here's the path of my mainline at the table level and the elevated section.  Lots of switches as there are a number of interchanges if you will, and  of course there's my maintenance siding on the right and my lead to the future yard in the lower left.  As to what we call all of that, I call it a model railroad.

John's Mainline at table level

Mainline Only [Table Level)

John's Mainline elevated level

Mainline Only [Elevated)

Attachments

Images (2)
  • Mainline Only (Table Level)
  • Mainline Only (Elevated)
@DoubleDAZ posted:

But none of those have a train consistently traversing through the curved part of the switch. What you have is totally prototypical. I was talking about the Blue interchange where you have the curved O96/O72L switch between the 2 ovals.

Actually, both of these are the curved path through the switch.

Attachments

Images (1)
  • mceclip0
Last edited by gunrunnerjohn

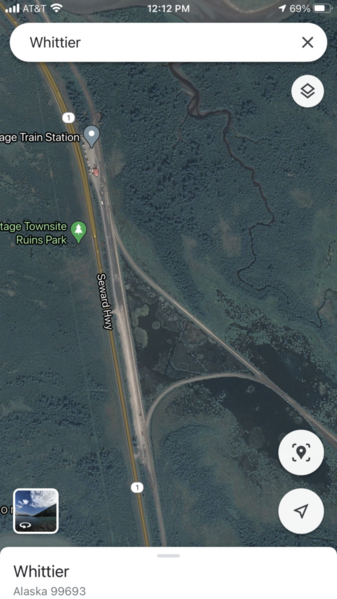
On transit we make regular moves through a switch in the reverse position. The LA Crenshaw Line will use regular moves through switches in the reverse position. Same with Miami Metrorail. When I was testing PTC for Alaska RR every move onto the Whittier Line was through a switch in the reverse position. See Google Maps screen capture of the Y to Whittier.
The limiting factor is you have to travel at a reduced speed through the reverse position. A No.10 switch for example is limited to 35MPH. In the real world an O72 switch equivalent would be limited to 5MPH. With that said I am for doing whatever you want to get your model railroad the way you want it  

0E0BEA1B-7177-4D35-A414-28F254B504C3

Attachments

Images (1)
  • 0E0BEA1B-7177-4D35-A414-28F254B504C3
@Ryan Mc posted:

On transit we make regular moves through a switch in the reverse position. The LA Crenshaw Line will use regular moves through switches in the reverse position. Same with Miami Metrorail. When I was testing PTC for Alaska RR every move onto the Whittier Line was through a switch in the reverse position. See Google Maps screen capture of the Y to Whittier.
The limiting factor is you have to travel at a reduced speed through the reverse position. A No.10 switch for example is limited to 35MPH. In the real world an O72 switch equivalent would be limited to 5MPH. With that said I am for doing whatever you want to get your model railroad the way you want it  

0E0BEA1B-7177-4D35-A414-28F254B504C3

The speed was my main concern. I don’t want to have to slow down every time I come through this section.

Looked at the matching roundhouse tonight (atlas 6904) and loved it until I saw the dimensions. That thing is massive! I think I’ll copy the base of it on cardboard and see how it sits before buying one. It would definitely eat up a ton of real estate.

Kind of comical how this thing has progressed. Started with the thinking that I had tons of room and would have plenty leftover and is now at the point of becoming crowded if I’m not careful.

B404CCC6-B36D-4812-B49E-AA1FCF88F12744EFF5CA-C8AB-4363-ABBB-24ED88498BA61246FFAD-6F0E-4541-BD68-9279CC6A487620CB9C49-C19E-413D-AAB6-8BD97FF77D79F10BC79E-A974-4864-BF0D-BAD9483F66F4Second reversing switch didn’t come out exactly as planned but I’m happy with it. Bought my first Ross switch for it and have to admit, it’s quite beautiful. Only real change was the centerline spacing at that section had to widen which is fine with me.

Got the turntable installed and unfortunately had the cheat a little. Couldn’t drive the big boy there so went against my rule and picked it up and moved it there. Plenty of clearance approaching and leaving. The rest of the turntable tracks are just sitting there for now until I decide final placement. Open to suggestions.

Somehow I have power on the outer loop which shouldn’t be but I’m guessing one of the switches in the crossover is wired through. Found this out while roll testing parts of it and had lights in the coach cars. Of course I couldn’t resist driving the MP over and grabbing them and doing a few loops. I’ll post a video later.

Very happy with the state it’s in. Again, many thanks to all of you for your help and support.

Attachments

Images (5)
  • B404CCC6-B36D-4812-B49E-AA1FCF88F127
  • 44EFF5CA-C8AB-4363-ABBB-24ED88498BA6
  • 1246FFAD-6F0E-4541-BD68-9279CC6A4876
  • 20CB9C49-C19E-413D-AAB6-8BD97FF77D79
  • F10BC79E-A974-4864-BF0D-BAD9483F66F4

Forgot to mention that o80 is basically unobtainable at the moment so all of the “outside” curves, as well as the turntable lead and parking track in the peninsula were hand bent. Wasn’t as bad as I thought it would be. Basically bolted 3 pieces of MTH realtrax o72 to a piece of plywood and used the inside as a jig. The outcome was less than perfect but better than expected.

I found that the Gargraves pins carried power way better than I had expected, when I initially applied power to one end of my layout, the whole thing was live except for the lift bridge, and that had to be separately connected for obvious reasons.    Nice videos, it's really gratifying when you actually see trains run for a decent stretch for the first time.

As for the turntable, I'd put as many tracks as you can around it, you'll love all the extra parking.

What switch machine are you using, the DZ-1000 or the DZ-2500?  The DZ-1000 is not a command controlled switch machine, so you need to wire it back to a control box.  The DZ-2500 is a command controlled switch machine, but it requires 12-14 VAC, higher voltages may cause issues.  Also, you have to wire the serial data back to the command base for the it to function in command mode.

I found that the Gargraves pins carried power way better than I had expected, when I initially applied power to one end of my layout, the whole thing was live except for the lift bridge, and that had to be separately connected for obvious reasons.    Nice videos, it's really gratifying when you actually see trains run for a decent stretch for the first time.

As for the turntable, I'd put as many tracks as you can around it, you'll love all the extra parking.

The same thing happened to me.  It showed me where I had forgotten to put in a gap where I wanted to be able to shut off the power to a siding.

As for the turntable, I'd put as many tracks as you can around it, you'll love all the extra parking.

how are you powering yours? I’m using a 12v wall wart and thing it turns way too fast. I have trouble “catching” the index sections. Part of that is the horrible switch they provided. I’ll be swapping it out for a DPDT momentary on switch that springs back to neutral. Have a box of wall warts so I think I’ll try different voltages to see if I can slow it down. Or maybe I’ll use an old HO power pack.

Add Reply

Post
The Track Planning and Layout Design Forum is sponsored by

AN OGR FORUM CHARTER SPONSOR

OGR Publishing, Inc., 1310 Eastside Centre Ct, Suite 6, Mountain Home, AR 72653
800-980-OGRR (6477)
www.ogaugerr.com

×
×
×
×
Link copied to your clipboard.
×
×