"HONGZ" stands for HO scale, N scale, G scale, and Z scale.

Post your non-O scale stuff here!

I'd call that a good operating session.

First railroader showed up at 5 PM and last left at 12:30 AM and there was only 3 cars on my work bench that had derailed.  Ran lots of trains and DCC sure makes life simpler for me: no more blocks to 'throw'!  

Plus great camaraderie; lots of war stories, of course!

Two railroaders spent half the time getting my new laptop to interface with the DCC command station, etc.  Along with all the junk food and beverages, I had a couple large pizza's delivered (no one ever complains about having pizza!).

I'm encouraging others to bring their DCC engines over and there were several.

I was partial to the nice SF F-3 A-B-B-A set.

PC interface work:

GNRR440

Jor and Joe did a lot of work on the laptop: 

ps: this is what happens when eating pizza and then touching your camera lens!


GNRR441

Cool!


GNRR442GNRR443

Attachments

Images (4)
  • GNRR440
  • GNRR441
  • GNRR442
  • GNRR443

Weird stuff:

After installing the 1517 WOW 101 steam decoder in the GN R-2 2-8-8-2 by Tenshodo, it was time to give it a real test over the mainline versus a 'yard' test.

Got into the Cascade tunnel and the whole engine fell on it's side.  I don't think I've ever had that before.

Nothing on the track, let's try it again, same results (insanity definition!).

With all the weight in the boiler pushing down on the drivers, all of them have to be in contact with the rail and the front of the back drivers were sitting high and was riding over the rails and falling over, but just in this one spot. 

Had to put some kadee washers (4 on top and one on the bottom) to 'balance' out both sets of drivers to the rails.

GN R-2 2-8-8-2 27

Wheel on front truck wasn't always rotating: some hairy crud had developed in there over the last 3 decades!   Non rotating wheels will definitely cause derailments.


GN R-2 2-8-8-2 28

There is a track under this scenery where the engine was falling over.


GN R-2 2-8-8-2 29

The track is not easy to get to (yeah, I know that was stupid, but seemed like a good idea 35 years ago!).

Anyway I checked the track and all is good and looks pretty level: at least from the vantage point of being able to see plus, literally, thousands of cars have past this point and hundreds of engines with no problems: just this one engine.


GN R-2 2-8-8-2 30

Used some plaster for the road to cross the track and a low pilot coupler snagged it.


GN R-2 2-8-8-2 31

Another weird one.  Front truck wheel coming off at the points but in the opposite, or 'friendly' direction.  Turns out the point rail is just a little lower than the stock rail and the edge of the wheel would hit against the stock rail and force it off the tracks.  Only this engine: again, not the 1000's of cars or engines that have gone before it!   Was going to try to raise the point rail but easier just to file 'over' the inside edge of the stock rail.


GN R-2 2-8-8-2 32


Testing decoder options:

Decoder comes with 'keep alive'.
Has, in my opinion, excellent steam sounds and options.
When decreasing throttle, the engine will continue to coast until gravity stops it or F7 is pushed (5 times for full brakes) giving a squeal of the brake shoes. F6 releases the brakes.
When coasting the side rods clank.
Options to turn off marker(classification) lights and the 4 lights under the running boards to aid the engineer in checking/oiling his engine. In reverse, tender light comes on and head light goes off.
With sound off (F8), the engine goes into stealth mode, at least for this engine as it's extremely quiet. Tenshodo with their latest (1980's) 48:1 gear set and a can motor.

The chuff rate is set too high and had to be decreased a lot to get 4 chuffs a revolution.  The high gear ratio may have been a factor in needing to decrease the rate as this engine only goes about 45 scale MPH at full throttle.  Slow but can easily pull a 50 car train up the 0.5% grade from Seattle to St Paul.

In my option, an outstanding sound decoder.  Nice to have the 'keep alive' to avoid the irritating 'wait' for the decoder to re-start.

Video of some of the options mentioned:

https://www.youtube.com/watch?...amp;feature=youtu.be

Attachments

Images (6)
  • GN R-2 2-8-8-2 27
  • GN R-2 2-8-8-2 28
  • GN R-2 2-8-8-2 29
  • GN R-2 2-8-8-2 30
  • GN R-2 2-8-8-2 31
  • GN R-2 2-8-8-2 32
Last edited by samparfitt

GN Z-6 4-6-6-4 Tenshodo WOW 101 decoder install.

Well, glad this was the second complex install and not the first as it took a full day  to get everything working.

Forgot to install the resistor for the engine marker lights and they burned out.

After replacing the LED's, I failed to check if the engine marker LED light wires were not touching the brass castings and they shorted out.

Then I did the same for the tender marker lights, not checking for being grounded and those burned out.

I started yesterday morning and finished this morning.  Good thing this is a hobby as you couldn't pay me enough to do this as a job!

One nice thing about putting in 3 harnesses in the install:
Any problems, break up the components to at least find the general area at fault. 

Also, maintenance will be much easier.

WOW also has two harnesses so swapping out a decoder is easy should it 'smoke'.

Short test video:

I love the coasting affect when power is reduced and the side rods clank and the brakes squeal.

Jor, a railroad friend, showed me how to reduce the chuff rate.  For the most part, hit F8 four times and follow the instructions which is mostly option 3 and then keep hitting F1 until 4 chuffs a revolution.  Had to hit a lot of F1's to reduce it.

Also, interesting was no chuff when testing the engine, on it's back, with just one set of drivers.  I had to put some resistance to the drivers to cause the chuffing to work.  The engine with the large can motor and the extremely quiet and smooth gear drive mechanism must not create enough current draw to start the chuffing.

This engine also goes into 'stealth' mode when the sound is turned off.

https://www.youtube.com/watch?...amp;feature=youtu.be    

Cut a square out under the tender for the connection.  Works nice this way as the  8 pin connector can slide into the bottom of the tender. 

GN Z-6 4001 01

Slot is below the deck so not visible.
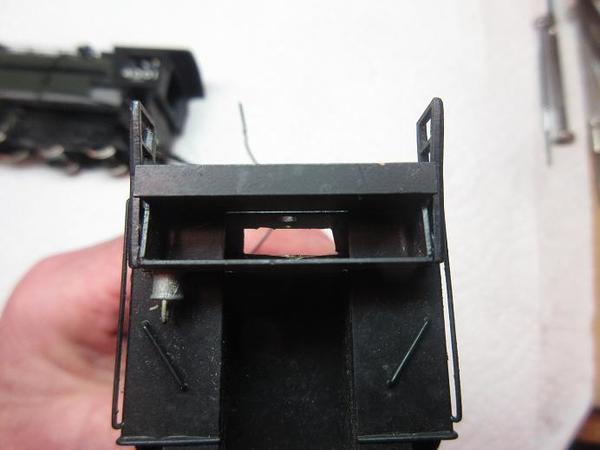
 

GN Z-6 4001 02

Pre-disassembly.


GN Z-6 4001 03

Lots of weight but, again, there happened to be a small hole along the boiler for the wires.
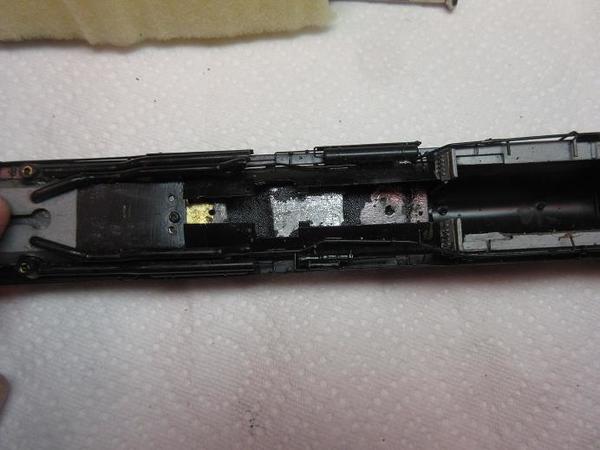
 

GN Z-6 4001 04GN Z-6 4001 05

Marker lights drilled out.

Painting the insides helps keep the bare LED wires from contacting the brass casting and grounding out, unless you burn them out and, when pulling out the old ones the paint is also removed so the next time, they short out!


GN Z-6 4001 06GN Z-6 4001 07

Holes for running board lights.


GN Z-6 4001 08

Tender marker lights and headlight drilled out.


GN Z-6 4001 09

Testing but I forgot to test if they are grounded.


GN Z-6 4001 10

Tender lights.


GN Z-6 4001 11GN Z-6 4001 12

Forgot that installing the LED's, previously, added to the total time spent on the install.


GN Z-6 4001 13

Filed a small groove for the headlight wires.

Nice 'touch'  by Tenshodo; the front of the firebox is screwed on instead of just the usual friction fit.


GN Z-6 4001 14

Lots of fun soldering 8 #30 wire to a connector less than a 1/2" wide!


GN Z-6 4001 15

Bench test motor and sound before doing lights.
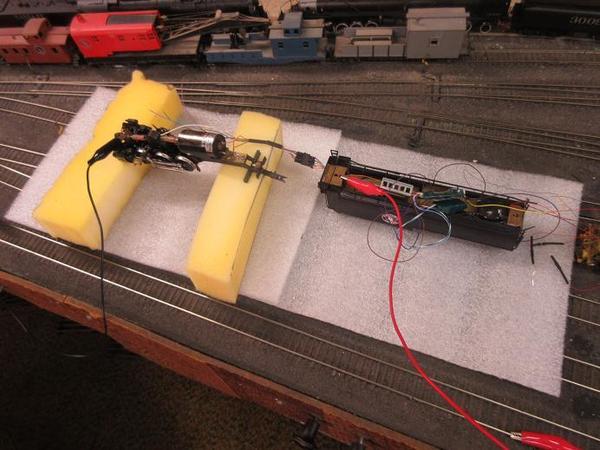
 

GN Z-6 4001 16

Good thing that tender is large!


GN Z-6 4001 17

Another nice construction by Tenshodo: that main steam pipe has a telescopic tube so the front of the pipe can be removed when the smoke box front is removed (just above running boards and just back and below whistle).
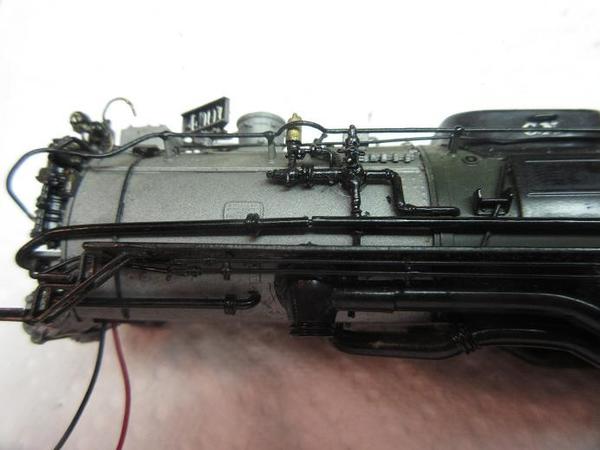
 

GN Z-6 4001 18

Wire harness (4 pin) for the lights in the boiler section. One blue (hot) and 3 for grounds of LED's.


GN Z-6 4001 19

Two pin connector to make maintenance of the pilot easier to work on.


GN Z-6 4001 20

Another nice Tenshodo build is a wire maintaining straight and downward pressure of the trailing trucks.


GN Z-6 4001 21

Finally, all together.

Digital cameras don't like led's!

GN Z-6 4001 22GN Z-6 4001 23

Running board lights.


GN Z-6 4001 24

Cab light and fire box glow.


GN Z-6 4001 25

Attachments

Images (25)
  • GN Z-6 4001 01
  • GN Z-6 4001 02
  • GN Z-6 4001 03
  • GN Z-6 4001 04
  • GN Z-6 4001 05
  • GN Z-6 4001 06
  • GN Z-6 4001 07
  • GN Z-6 4001 08
  • GN Z-6 4001 09
  • GN Z-6 4001 10
  • GN Z-6 4001 11
  • GN Z-6 4001 12
  • GN Z-6 4001 13
  • GN Z-6 4001 14
  • GN Z-6 4001 15
  • GN Z-6 4001 16
  • GN Z-6 4001 17
  • GN Z-6 4001 18
  • GN Z-6 4001 19
  • GN Z-6 4001 20
  • GN Z-6 4001 21
  • GN Z-6 4001 22
  • GN Z-6 4001 23
  • GN Z-6 4001 24
  • GN Z-6 4001 25
Last edited by samparfitt

New delivery and testing of new decoder install and re-assembly of engines.

After running the R-2 from Seattle to St. Paul, the reverse also had some problems.

The lead truck came off at one switch at hillyard.  Filed the points and all seems good.  While backing up to test the switch, the back truck came off, none of the 30 some cars, just the trailing truck.  Found a miss-aligned joint between two ends of rail. 

GNRR444

A meeting of the two new test engines.

Testing the GN Z-6 from Seattle to St. Paul ran with no problems.


GNRR445

New delivery:

I've had a semaphore hanging on the wall since the early 80's, with no glass lenses (just some colored cardboard).  It will look much better now, especially with a light behind them!

A couple more WOW 1517 decodes, 3 more throttle holders and a 15' extension to reach the command station from the laptop.


GNRR446GNRR447

Attachments

Images (4)
  • GNRR444
  • GNRR445
  • GNRR446
  • GNRR447
Last edited by samparfitt

One last bug on the GN R-2 fixed.

On the last test coming the opposite direction into Seattle's incoming track, while backing out of the escape track, the trailing truck kept coming off.

As with the incoming track to the St Paul yard, I thought the outer rail might be higher than the 'points' and forcing the truck to derail: nada.

Found the truck was hitting the screw holding the draw bar and not allowing enough vertical movement.  Removing some washers moved the screw head high enough to resolve the problem. 


GN R-2 2-8-8-2 37

Three incoming tracks with escape crossovers.


GN R-2 2-8-8-2 38

Being about 4' from the edge of the layout, some motive power had to be moved.   Those thick, packing foam saves the knees?


GN R-2 2-8-8-2 39

Attachments

Images (3)
  • GN R-2 2-8-8-2 37
  • GN R-2 2-8-8-2 38
  • GN R-2 2-8-8-2 39
Last edited by samparfitt

GN Z-6 4-6-6-4 with new decoder acting up a few times.

The engine would kind of slow down and then start again.

Found the ground (red wire) only had one strand attached to the ground: not good when 32 gauge wire!

Re-solder and test seems all good again.


GN Z-6 4001 26

A nice feature of the 1517 WOW 101 is no need to dial down the speed dial to stop, just hit F7 4 times to brake.  Then hit F6 to release brakes to get back to original speed, or reverse.  

After brakes are set, it appears one tap of F6 starts the compound air pumps.


GN Z-6 4001 27

Might as well take pictures while testing the engine.


GN Z-6 4001 28

Upper track lead to St. Paul's yard. Trestle is part of the mainline, about 160' from  St Paul.  The mainline goes around the 33'X47' basement 2.5 times for a total of 400' with passing sidings.

The logging road is at the bottom with two 'switch backs'.

This will remain DC.


GN Z-6 4001 29

Entering lead tracks to St. Paul's freight yard.


GN Z-6 4001 30

Attachments

Images (5)
  • GN Z-6 4001 26
  • GN Z-6 4001 27
  • GN Z-6 4001 28
  • GN Z-6 4001 29
  • GN Z-6 4001 30
Last edited by samparfitt

GN Q-1 2-10-2 Tenshodo 1517 WOW 101 decoder install.

As with the previous two installs, I've had this engine 3 or 4 decades and it had the PFM sound system installed.


GN Q-1 2-10-2 Tenshodo 2127 01

Holes for running board lights drilled out.


GN Q-1 2-10-2 Tenshodo 2127 02

Marker lights drilled out.  These had the original glass jewels installed.

Initially, I tried to pry them out with no success but found the drill bit for drilling the marker lights will 'pop' the jewels out after a few seconds of drilling around the edge, without damage to the marker light.


GN Q-1 2-10-2 Tenshodo 2127 03

The friction fit band around the front smoke box cover had to be re-soldered with  resistance soldering.


GN Q-1 2-10-2 Tenshodo 2127 04

Tender light drilled.


GN Q-1 2-10-2 Tenshodo 2127 05

To make room for the 8 pin connector the original slot under the front of the tender had to be enlarged by about a 1/16" on each side.


GN Q-1 2-10-2 Tenshodo 2127 06

LED's installed and glued in place. 

No backhead on this engine so no cab light.


GN Q-1 2-10-2 Tenshodo 2127 07

This engine has the latest Tenshodo motor/gear assembly.

Back then, they gave you a 'good size' lead weight.


GN Q-1 2-10-2 Tenshodo 2127 08

I finally remembered to put some heat shrink tubing over the WOW harness BEFORE wiring the new 'engine to tender' connector!  One 8 pin and one 4 pin connector cut, needed wire and heat shrink tubing ready for soldering, when my new soldering station arrives, today.


GN Q-1 2-10-2 Tenshodo 2127 09

Attachments

Images (9)
  • GN Q-1 2-10-2 Tenshodo 2127 01
  • GN Q-1 2-10-2 Tenshodo 2127 02
  • GN Q-1 2-10-2 Tenshodo 2127 03
  • GN Q-1 2-10-2 Tenshodo 2127 04
  • GN Q-1 2-10-2 Tenshodo 2127 05
  • GN Q-1 2-10-2 Tenshodo 2127 06
  • GN Q-1 2-10-2 Tenshodo 2127 07
  • GN Q-1 2-10-2 Tenshodo 2127 08
  • GN Q-1 2-10-2 Tenshodo 2127 09
Last edited by samparfitt

New deliveries.

The delivery was a comedy of my 'assumptions'!

The DCC stuff came from one vendor via USPS and the weller soldering station came from Amazon.  By chance, they both came within minutes of each other.  The USPS delivered and he said they have no other packages for me.

Went online and both packages said delivered.

Went and called amazon and found they have their own delivery service.

By chance, he came a few minutes after the USPS and left the package on the door.

Would be good if they rang the doorbell on deliveries!


Two more UR92 remote stations and two 50' cords to tie them into the main UR92.

People's bodies interfere with reception so these will be placed in the far two corners of the basement.  If one holds the throttle so a 'mass of water' is not in the way, it works fine but too much hassle to remember doing that!

Also, some colored wire that doesn't come 'standard' when ordering the multi-pack wire as there are colors in the harness that's not included in the multi-pack.

DCC digitrax 29

A nice weller soldering station.  Got an extra 5 different tips plus a brass cleaning device instead of using a wet sponge.

The 'web' said this is a very good product.  I'll find out!


weller soldering station 01

Attachments

Images (2)
  • DCC digitrax 29
  • weller soldering station 01

DCC UR92's installed.

Put one in the spare corner room and other in the opposite corner.

The 50' long cables went from the center UR92 to the spare room and from there to the opposite corner UR92.

Couldn't hook the last one up to power: will have to get some extension cords, tomorrow.


DCC digitrax 30DCC digitrax 31

Wish I would have bought this soldering station decades ago.  Really nice and the brass shaving for cleaning the tip is 100 times better than a wet sponge. 

The tip hardly oxidizes and, when some occurs, just push it into the brass shavings.

Looks like about 650 degrees is good to solder the small connectors.

I cranked it up to 850 degrees and it had no problem soldering a wire to the engine frame.

weller station 01weller station 02

GN Q-1 decoder assembly.

As usual, connect the needed wires to test engine and sound.


Another case where the motor and gear are so efficient that some resistance against the drivers were needed to get some chuffing.

GN Q-1 2-10-2 Tenshodo 2127 10

With the compact can motor, I figure I might as well add a back head.

Painted it first and then used the resistance soldering to secure it to the frame.

The heat and me holding the backhead in place with a band aid for heat protection, the pre-painted back head will need a little 'touch up'.


GN Q-1 2-10-2 Tenshodo 2127 11

I cut a lot of wire that was protruding into the cab and fire box area for a clean alignment.  A paper template was made to make sure the back head would fit.


GN Q-1 2-10-2 Tenshodo 2127 12

No pictures but tender is assembled.

The engine has three harnesses that were made: 8 pin to tender, 2 pin to motor and a 4 pin to the boiler.  The running lights, cab light, headlight in engine and tender and fire box are all good.   I burned out the marker lights and will have to replace them..grrrrrr.   I tested with the ground but can only do that momentarily and, for some reason, I left the ground on hoping it was not a short.

The soldering station made easy work of the harnesses.  I used the old soldering iron to heat the shrink tubing.


Attachments

Images (7)
  • DCC digitrax 30
  • DCC digitrax 31
  • weller station 01
  • weller station 02
  • GN Q-1 2-10-2 Tenshodo 2127 10
  • GN Q-1 2-10-2 Tenshodo 2127 11
  • GN Q-1 2-10-2 Tenshodo 2127 12
Last edited by samparfitt

New UR92's installed.

This morning, I got two extension cords to power up the two new UR92's. 

Had to plug the throttle unit back into the UR92 and power up the throttle again for everything to work.  Seems to be no dead spots anymore with both being in the opposite corners of the basement.  I didn't add any to the laundry room area figuring the two new UR92's are directly in line with the throttle and the walls don't seem to affect reception.

==========

GN Q-1 2-10-2 decoder install and road test.

This morning, I cut out the blown LED's in the marker lights and added new LED's.

Everything is functioning, properly, decoder wise.

On the St. Paul to Seattle road test, the front drivers were coming off at the bend at Glacier.  Spent about an hour checking track, etc before realizing that I had too scale of a distance between engine and tender as the two were just touching on that bend and causing a bind and forcing the drivers off the track.

After putting on a longer drawbar, nothing was working (no power).  Take everything apart again: Those thin wires can easily break: the red wire to the engine ground broke off, effectively shutting down all power to the engine. 

Finally, the train reach Seattle. 

Next test; Seattle to St. Paul.

The motor made by Tenshodo (or for) must be super efficient.  Maybe one of those coreless or brushless motors.

At two spots where the 0.5% grade is a little more, the chuffing disappears as I'm guessing there is little current going through the motor to maintain that speed.  All one hears is the clanking of the side rods. 

The fire box LED is rather large and not like the rest of the 0402 led's that I'm using.  The brightness was rather wimpy so I set up this decoder with the black wire ground in the tender to run to the engine and ran the LED across the black and engine  ground to give a 'proper fire' look.  Not sure why but the large LED's can handle the 15 volts.

GN Q-1 2-10-2 Tenshodo 2127 13GN Q-1 2-10-2 Tenshodo 2127 14GN Q-1 2-10-2 Tenshodo 2127 15GN Q-1 2-10-2 Tenshodo 2127 16

Attachments

Images (4)
  • GN Q-1 2-10-2 Tenshodo 2127 13
  • GN Q-1 2-10-2 Tenshodo 2127 14
  • GN Q-1 2-10-2 Tenshodo 2127 15
  • GN Q-1 2-10-2 Tenshodo 2127 16
Last edited by samparfitt

GN N-3 2-8-8-0 by Tenshodo decoder install 1517 WOW 101 steam.

You can buy connectors or make your own: I choose the latter.

I need an 8 pin, 4 pin and a 2 pin when headlight is mounted on the front engine.

If you can find the right pin count, buying them gets expensive.

A lot of care has to be done when making them.

After each wire is soldered to a pin, I visually check to make sure all strands are soldered to the connector.  It takes more time but it's going to 'be hell' finding a faulty solder job, after everything is done and even worse to fix it with all the other wires around it.   Having only one strand of a 32 gauge wire is going to create problems!

I find tinning the wires first greatly reduces the chance of stray wires not being soldered to the connector. 

Each heat shrink tubing is put on after each soldered wire and shrunk, which is also more time consuming, but that wire is now protected from a stray soldering iron and no worry about bridging two connector pins.


GN N-3 2-8-8-0 Tenshodo 07

I keep my 'chart' to insure all wires are soldered in the proper color order.


GN N-3 2-8-8-0 Tenshodo 08

Before soldering the wires to the harness, I put a bunch of short pieces of heat shrink (not heated) to protect the wires and the small pieces gives the wires flexibility.


GN N-3 2-8-8-0 Tenshodo 09

I'm getting brave and soldered all wires at once before 'step' testing. 

Although, for the initial test, I left the light connector disconnected to test just the motor and sound.


GN N-3 2-8-8-0 Tenshodo 10

In my opinion, the PFM speakers give a superior sound. Not sure why but the PFM speaker requires two capacitors to work properly (same as with the PFM sound system).

Everything is working but the tender tail light.


GN N-3 2-8-8-0 Tenshodo 11

Attachments

Images (5)
  • GN N-3 2-8-8-0 Tenshodo 07
  • GN N-3 2-8-8-0 Tenshodo 08
  • GN N-3 2-8-8-0 Tenshodo 09
  • GN N-3 2-8-8-0 Tenshodo 10
  • GN N-3 2-8-8-0 Tenshodo 11
Last edited by samparfitt

Sam, an ohm meter is the best way to test a pigtail. Visually it is easy to miss a strand. A visual is best for preventing future issues on strands not shorting yet.

On connecting plugs, Those look formed; solid. But many connectors have a tool that will remove the pins for soldering, and they just click back in place.  Make sure you look and/or ask. You can also usually make one from hollow brass (square/round tube)

GN N-3 2-8-8-0 decoder install (cont).

Final assembly of engine and all seems to work well.

I'm actually starting to think that I know what I'm doing!

After one does a few, the learning curve is fast and one gets into a 'routine' by following my color code chart.

If one leaves all the lights off, save the headlights in engine and tender, the install is fast and easy.

Half the test completed with 'road' trip on the mainline from Seattle to St. Paul.

Video 'road' test:

https://www.youtube.com/watch?...amp;feature=youtu.be   


GN N-3 2-8-8-0 Tenshodo 12GN N-3 2-8-8-0 Tenshodo 13

Another 'stealth' engine when the sound is off. 

Converted to can motor and Tenshodo's 48:1 quiet gear drive.


GN N-3 2-8-8-0 Tenshodo 14

Four 'road' engines are now complete.

The two switchers are also done along with the three engines bought with DCC pre-installed.

Now that all is working, I can paint those electrical wires black!


GN N-3 2-8-8-0 Tenshodo 15GN N-3 2-8-8-0 Tenshodo 16GN N-3 2-8-8-0 Tenshodo 17

Attachments

Images (6)
  • GN N-3 2-8-8-0 Tenshodo 12
  • GN N-3 2-8-8-0 Tenshodo 13
  • GN N-3 2-8-8-0 Tenshodo 14
  • GN N-3 2-8-8-0 Tenshodo 15
  • GN N-3 2-8-8-0 Tenshodo 16
  • GN N-3 2-8-8-0 Tenshodo 17
Last edited by samparfitt

The engine from hell!

Thought I'd install a decoder into one of my GN O-8 2-8-2 'mikes'.

I got the engine a few years ago and painted it with some LED's in the headlight, tender and marker lights.

With all the lead in the boiler and LED's already installed, but wired 'together', I decided to keep the decoder simple and leave the lights 'as is' in the boiler, instead of functions for each set of lights.   Only exception was adding a fire box light as this is separate from the boiler lights. This meant I only needed to make a 6 pin connector.

All went well with the decoder install and worked great in the yard.

A different story on the mainline.

The front set of drivers were lifting off the track on curves (mind you, minimum 48" so things have to be pretty bad for drivers to come off).

Item 1: the tender was pushing down on the draw bar and I thought this was the problem.  nada.

item 2: two of the bearing were 180 degree rotated so the springs had no recess in the bearings.  nada.

item 3: thought, maybe, the lead trucks were lifting the engine up, nil.

Item 4: found when I secured the front driver retaining plate, it was raising the front drivers up.  I put four kadee insulating washer under the plate and that solved the problem.  The frame is not warped but it appears the linkage between the motor and gear box has no flexibility so that is the fulcrum on the 3rd set of drivers.  Also, there is a lot of lead weight in the boiler and a lot is to the rear of the engine.  

Due to keeping the 'wiring' simple, when the tender light comes on, the marker lights as well as the front headlight go out.

GN O-8 2-8-2 open cab sunset 01GN O-8 2-8-2 open cab sunset 02

Only fire box light added.  No cab light as too much lead in the boiler and no room for extra wires and connectors.


GN O-8 2-8-2 open cab sunset 03

Hole striped out that holds the frame to the boiler.  Stuck the soldering iron in the hold and re-tapped it.


GN O-8 2-8-2 open cab sunset 04

A few years back, when I painted this engine, I added a front brass mount to the motor as it must have been vibrating.  I think this also led to the gear box not having much vertical movement.


GN O-8 2-8-2 open cab sunset 05

Finally, everything is 'staying on the track'. 

Always wonder when I hear announcers say 'they need to get off track': seems to me they need to 'get on track'!


GN O-8 2-8-2 open cab sunset 06

I was up until 2 AM trying to fix this problem.


GN O-8 2-8-2 open cab sunset 07

Attachments

Images (7)
  • GN O-8 2-8-2 open cab sunset 01
  • GN O-8 2-8-2 open cab sunset 02
  • GN O-8 2-8-2 open cab sunset 03
  • GN O-8 2-8-2 open cab sunset 04
  • GN O-8 2-8-2 open cab sunset 05
  • GN O-8 2-8-2 open cab sunset 06
  • GN O-8 2-8-2 open cab sunset 07
Last edited by samparfitt

GN O-8 video:

Always liked the GN 'mikes': big brute force, largest mikes made.  I've always like 'flying' air compressors up front and a low head light and the green boiler is a big 'hit' with me.  This one doesn't do bad: able to pull 33 cars up a 0.5% grade.

Neighborhood kid was operating the train.

https://www.youtube.com/watch?...amp;feature=youtu.be

Last edited by samparfitt

Interchange/staging loop.

After a couple of decades of not being used, I thought I'd get the 3 track staging loop working via DCC.

For the DCC I'm using the DCC specialties PSX-AR reverser.   I should be getting the reverser in a few days.  Very easy to install: two wires from DCC into one side of reverser and the two output wires goes to the, both rails, insulated section of the loop.  When a train crosses on the opposite side, the reverser will, automatically, reverse polarity for the train.

DCC digitrax 32

On this reverse loops, I'm just bypassing all DC toggles as I thought it would be easier to do.  The three new toggles (obvious to see which are new in the picture!), one for each of the 3 loops. 

The toggles will serve to turn the whole train off when in 'staging' should they be there for a long time.

This will also help alleviate the congestion in both freight yards as I've got too many cars (the result of 45 years of going to train shows!).


DCC digitrax 33

The new toggles are marked DCC and the remaining to the right are the DC toggles and I'll probably never use it for DC use.


DCC digitrax 34

About 20' before the yard is a turnout that also hasn't been used for a few decades as all trains took the left track into St. Paul's freight yard.  Had to clean all the track plus there were about 5 breaks in the rail that had to be soldered.  My 'topside' creeper was very helpful!

DCC digitrax 35

Here, the near track leads to St. Paul with the crossover where the switcher sits on the short drill track so the switcher can access the freight cars from the rear and re-arrange them in the yard.

The far track goes to the loops.

The 2nd track is the return from the loops.


DCC digitrax 36

The right two tracks are leading to the loops through the hole in the wall.

The left 3 allow access to the St. Paul freight yard.  Using #10 turnouts and a 48" radius, all that track was custom made.


DCC digitrax 37

The two loop tracks leading into the laundry room.


DCC digitrax 38

Two tracks lead to the 8' diameter, 3 track loop.

Need to move that superfluous laundry stuff to the garage!


DCC digitrax 39

Three loops go behind the water heater.  Back in the 80's I had to move the water heater out farther for 'trackage' rights!

I made the track 'bare bones' and didn't even use ties.  Direct spiking into the pine.


DCC digitrax 40

'Dressed' the loop up a little bit with some 'flats'.


DCC digitrax 41

The 3 loops swing around the gas furnace and connect back to the 2 incoming tracks.

Each of the 3 loops should easily handle a 24' train so no problems with most trains leaving Seattle's freight yard.

With no passenger station at St. Paul, they will go into the staging area.

Same with the ore trains.  The 'mines' will be located at the staging area.


DCC digitrax 42

Attachments

Images (11)
  • DCC digitrax 32
  • DCC digitrax 33
  • DCC digitrax 34
  • DCC digitrax 35
  • DCC digitrax 36
  • DCC digitrax 37
  • DCC digitrax 38
  • DCC digitrax 39
  • DCC digitrax 40
  • DCC digitrax 41
  • DCC digitrax 42
Last edited by samparfitt

Thanks, Mike.

Back when I built the layout, I had to save where ever I could.  Proportionally, it was just as expensive to build a large layout in the 80's as it is now.  That's why all track is hand laid on individual wooden ties and all turnouts are homemade (also, they didn't make #10 turnouts back then).

Your new structure is looking great.

===========

Pre work for DCC turntable.

With 98 engines and only 10 engines converted to DCC, the roundhouse stalls are staying DC.

I'm only putting in DCC to the lead tracks and the turntable.

For the St. Paul turntable, it looks pretty easy.

All I needed to do was use a DPDT toggle to have a choice of DC power or DCC power to the turntable.


DCC digitrax 43

There are three incoming tracks with escape tracks on them.

They lead to double tracks which lead into the turntable.

The double tracks are broken into six short blocks (6 toggles on fascia) to store/hold engines. 

The blocks already have DCC going to them (toggles thrown to the right feed from the mainline) so it makes it easy to just power the turntable for DCC. 

I've wired the DC into the turntable via the new toggle selection (DC/DCC) and it's still working.

Once the reverser comes in (due Saturday), I can then route the DCC power, via the reverser into the turntable.

DC still power the turntable motor but that's a separate entity.


DCC digitrax 44

There is also one track leading out at the upper right side which, once turned,

the engine can also leave via that exit.


DCC digitrax 45

The Seattle turntable will be setup the same way.


DCC digitrax 46

A little more wiring will be needed though as the toggles for the 3 incoming tracks to the turntable only allow DC from the yard or roundhouse DC power.

I'll have to route the yard and DCC power through a DPDT toggle for desired results. 

In both turntables, though, once thrown to DCC power, no toggles are needed to be thrown, just as on the mainline.

The three tracks are broken up into 4 blocks each, so the DCC engines can be stored there, although, FIFO will hold true (first in first out).

It will be nice to have the turntable DCC as, presently, I have to 'five finger' the engines to turn them 180 degrees.

Not good for all that fragile piping along the boiler!


DCC digitrax 47

Attachments

Images (5)
  • DCC digitrax 43
  • DCC digitrax 44
  • DCC digitrax 45
  • DCC digitrax 46
  • DCC digitrax 47
Last edited by samparfitt

Thanks, Mike,

Boy, your 'bar' must be pretty low!

=======

Turntable updates.

I've got one new Walther's turntable and just ordered another one.

Last year, I bought the first one as 'backup' to my present geiger turntables.

Turntables are the kind of items that, once they are sold out, you may never see them again.

The geiger's date back to the 70's and they have some slop in the bridge and the rails are a little lower than some lead tracks.  All can be fixed but decided to replace the old with the new. 

The accuracy of the Walthers is much better.

The old tables are 20" and the new is 18 3/4" (with lip, about 19 1/8").

My tenshodo Big boy wheels should fit on it with lots of overhang, but other than the one engine, the rest will fit the Walther's 130' table.

The Walther's isn't real deep so it appears that a center hole of the old table can be cut out and a donut shaped wood ring can be cut and put around the old turntable to support the Walther's table.  Since the track is hand laid, the storage tracks can be pulled forward to meet the new bridge.  Extension pieces would need to be soldered to the lead tracks.

Other than that, it seems like a realively 'doable' project that shouldn't take too much work!

turntable walthers 130 foot 03turntable existing 20 inch 01

Attachments

Images (2)
  • turntable walthers 130 foot 03
  • turntable existing 20 inch 01
Last edited by samparfitt

The old turntables have a very large square footprint and would require a lot of track removal to get them out.  That is why I'm just cutting a hole in the center of them so the new table will fit into the old one.

In the picture, over the 45 years that the table has been sitting there, you can see the outline of the table where some ground cover has cracked off about half way between the pit and roundhouse.

DCC digitrax 45

Attachments

Images (1)
  • DCC digitrax 45
Last edited by samparfitt

Having a layout built so long ago, it shows it's age.  Things that were cutting edge back then are 'stone age' now.  There's lots of things that can be improved on and, as they say 'a model railroad is never done'.  Besides, it's mine and I enjoy it, 'warts and all' (just like me!).

I've only got so much time and I have to prioritize what I do: presently, it's DCC installment on layout and engines.

Next is finish painting about 20 engines with lots of led's.

Turntables are probably next.

After that, who knows!

Summer comes and, around May to September, I'm into my RC planes.

samparfitt posted:

Thanks, Mike,

Boy, your 'bar' must be pretty low.

The bar only needs to be high enough to set your 

...glass on while using the restroom        

  But seriously, I've been following along with this fallowing for a long time. Although quietly, lest I disturb all the nice new growth.

....and now back to the regularly schedualed programing. 

Add Reply

Post

OGR Publishing, Inc., 1310 Eastside Centre Ct, Suite 6, Mountain Home, AR 72653
800-980-OGRR (6477)
www.ogaugerr.com

×
×
×
×
Link copied to your clipboard.
×
×