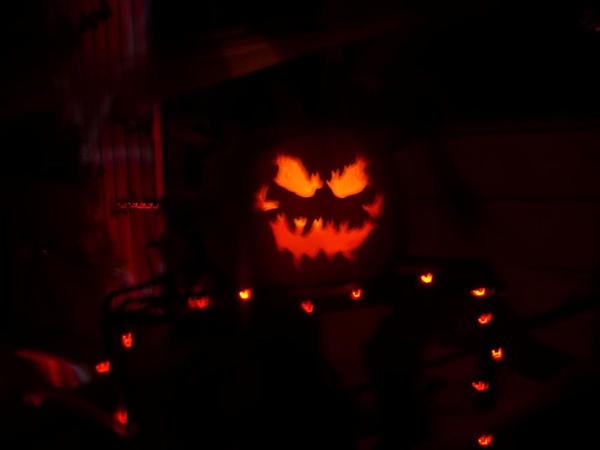
Here's a taste of things to come. Now that the portal is taking shape it's time to really get busy!!


Do you have something planned for Halloween?


|
|
Replies sorted oldest to newest
that is COOL !!!!!!!
Nice! How do you like the Halloween Mikado?
I have not heard from anyone else who bought one.
The Paint looks really good on these.
Ok, now this is something I gotta keep an eye on....Great idea!
cswalter posted:Nice! How do you like the Halloween Mikado?
I have not heard from anyone else who bought one.
The Paint looks really good on these.
Only thing I don't like is that the orange paint was a lot glossier in the catalog, I was pretty disappointed that it didn't exactly match the advertising.
That being said it is my first LC+ Loco. I wish the volume was just a touch louder, but that is personal preference.
With those small things out of the way, I really like this engine. The blue tooth control works flawlessly. I may never put batteries in the remote. The bell is a deep church bell sound. The whistle and other effects are great too. I will post some video in the next couple days.
A ribcage tunnel would be cool
Maybe rib texture in "stone"? ![]()
"A ribcage tunnel would be cool"
Halloween brings out the Tom Savini in a lot of us...![]()
I just got mine last Friday. In the process of doing a new layout but it'll be done a couple weeks before Halloween. Will have to wait until then to test mine. Am pleased to hear your feedback of the steamer. And you have it on the same foam base as me. Now if we could get some passenger cars to run behind it, we'd really be in business. Thanks for posting this.
IC fan posted:I just got mine last Friday. In the process of doing a new layout but it'll be done a couple weeks before Halloween. Will have to wait until then to test mine. Am pleased to hear your feedback of the steamer. And you have it on the same foam base as me. Now if we could get some passenger cars to run behind it, we'd really be in business. Thanks for posting this.
I am in almost the exact same boat you are. I wanted to have this project done by the beginning of October but it just not gonna happen that fast. If the wife and kids and the yard and football season weren't enough to keep me busy, I am also working 11 hour days right now. The layout is going to be basically 40" by 60", and obviously feature one corner tunnel. I am taking on a ton of tasks I've never done before to try to make this work. I am hoping I can use drywall anchors with some white glue and the screw the track down into that. I should do an experiment tonight but my mother is coming this evening so it will have to wait.
As to cars, some passenger cars would be great. the All Hallow's Eve cars from a few years ago are pretty nice, but all British and hard to find. A matching caboose would have been good. On the plus side, through the forum I was able to find a "spooky sounds" boxcar. It basically howls or makes creepy laugh noises when you hit the whistle button. It's pretty great although its much louder than the locomotive!
I hope I haven't bitten off more than I can chew!!
jhz563 posted:That being said it is my first LC+ Loco. I wish the volume was just a touch louder, but that is personal preference.
With those small things out of the way, I really like this engine. The blue tooth control works flawlessly. I may never put batteries in the remote. The bell is a deep church bell sound. The whistle and other effects are great too. I will post some video in the next couple days.
Did you use the remote or Bluetooth App to increase the volume. The one I saw at the shop the other day had it's volume turned down about half. Used the app to push it up and it was better. Worth checking if you haven't.
Okay so I found a reason for putting batteries in the remote. I tried to take some video tonight, only to realize I couldn't operate the engine from my phone and take video from my phone at the same time!! Oh the problems of modern society...
What I did do tonight is look around in the garage for a way to fasten the track to the foam base. I settled on screw-in drywall anchors, based on what I read elsewhere. I think these are just the ticket. ![]()
I put one in a scrap piece of 2" board with a little bit of white glue. I will see how snug it feels in the morning. In the meantime, here's a quick video of one the anchors going in, minus the glue.
More to come tomorrow.

Okay. i went back down to the garage this morning before work and the White glue attached to the drywall insert did not really make any difference. I don't really know that the drywall anchors actually need any adhesive in foam, but I would like to try. I have some of the Glidden Gripper primer to stack sections together. I will try that on another anchor and see how it works.
![IMG_1455[1]](https://ogrforum.ogaugerr.com/fileSendAction/fcType/0/fcOid/74918006403664637/filePointer/74918006450321918/fodoid/74918006450321910/imageType/LARGE/inlineImage/true/IMG_1455%255B1%255D.JPG "IMG_1455[1]")
Otherwise it is time to start laying out all the different Spooky goodies I have gathered so I can be imagining landscapes and tallying up power requirements. So I started gathering things up this morning. I actually realized I have even more goodies that are pictured, this should be a busy little display!
![IMG_1452[1]](https://ogrforum.ogaugerr.com/fileSendAction/fcType/0/fcOid/74918006403664637/filePointer/74918006450321916/fodoid/74918006450321908/imageType/LARGE/inlineImage/true/IMG_1452%255B1%255D.JPG "IMG_1452[1]")
![IMG_1456[1]](https://ogrforum.ogaugerr.com/fileSendAction/fcType/0/fcOid/74918006403664637/filePointer/74918006450321917/fodoid/74918006450321909/imageType/LARGE/inlineImage/true/IMG_1456%255B1%255D.JPG "IMG_1456[1]")
I was going to run the engine and take a video, but if I accidentally woke up one of the kids that early my wife would make me the next headless creature walking around!! To avoid that unpleasantness, here are just a couple pictures.
![IMG_1453[1]](https://ogrforum.ogaugerr.com/fileSendAction/fcType/0/fcOid/74918006403664637/filePointer/74918006450321919/fodoid/74918006450321911/imageType/LARGE/inlineImage/true/IMG_1453%255B1%255D.JPG "IMG_1453[1]")
![IMG_1454[1]](https://ogrforum.ogaugerr.com/fileSendAction/fcType/0/fcOid/74918006403664637/filePointer/74918006450321920/fodoid/74918006450321912/imageType/LARGE/inlineImage/true/IMG_1454%255B1%255D.JPG "IMG_1454[1]")
Have a ghoul day!!
![IMG_1452[1]](https://ogrforum.ogaugerr.com/fileSendAction/fcType/0/fcOid/74918006403664637/filePointer/74918006450321916/fodoid/74918006450321908/imageType/LARGE/inlineImage/true/IMG_1452%5B1%5D.JPG "IMG_1452[1]")
![IMG_1456[1]](https://ogrforum.ogaugerr.com/fileSendAction/fcType/0/fcOid/74918006403664637/filePointer/74918006450321917/fodoid/74918006450321909/imageType/LARGE/inlineImage/true/IMG_1456%5B1%5D.JPG "IMG_1456[1]")
![IMG_1455[1]](https://ogrforum.ogaugerr.com/fileSendAction/fcType/0/fcOid/74918006403664637/filePointer/74918006450321918/fodoid/74918006450321910/imageType/LARGE/inlineImage/true/IMG_1455%5B1%5D.JPG "IMG_1455[1]")
![IMG_1453[1]](https://ogrforum.ogaugerr.com/fileSendAction/fcType/0/fcOid/74918006403664637/filePointer/74918006450321919/fodoid/74918006450321911/imageType/LARGE/inlineImage/true/IMG_1453%5B1%5D.JPG "IMG_1453[1]")
![IMG_1454[1]](https://ogrforum.ogaugerr.com/fileSendAction/fcType/0/fcOid/74918006403664637/filePointer/74918006450321920/fodoid/74918006450321912/imageType/LARGE/inlineImage/true/IMG_1454%5B1%5D.JPG "IMG_1454[1]")
JHZ563, with your drywall insert being plastic, and your foam base being plastic, white glue will never dry. Can't get enough air. That's why the glue doesn't dry up in a properly sealed bottle. You would need something foam-safe that doesn't require air to dry. Epoxy comes to mind as it cures, not dries. And here's an idea, how about Lock-Tite? It dries in the absence of oxygen. I haven't ever tried this, so I don't know if it's foam-safe. But that might be the quick ticket. Would be worth a try on a scrap piece. ![]()
Can't wait to see your finished layout. I imagine everybody does a Christmas layout, but not too many do a Halloween layout. Cool! ![]()
![]()
![]()
![]()
Paul ![]()
We have been doing this for quite a few years, just making minor changes from year to year based on any of the Lemax accessories taking a dive.
Several of the neighbors come over and also participate in passing out the treats
The additional commentary in the video is perfect ![]() looking good and sounds spooky!
looking good and sounds spooky!
JD
Thanks for posting the pictures and Video.
This looks awesome! Happy that they put Halloween sounds in this Mikado.
I will be buying one soon!
Cheers!
Did you have a chance to check the volume. Can't tell from the video but the one I heard the other day seemed louder.
MartyE posted:Did you have a chance to check the volume. Can't tell from the video but the one I heard the other day seemed louder.
I didn't turn up the overall volume yet. It seems a little louder in person than the video. It's a really fun piece.
FYI Dollar General has a package of skeleton warriors for $1. They scale out a little tall but how big are skeleton warriors??? ![]()
I am looking forward to this year's Halloween layout in the garage, the local kids stop buy to check out the progress and run the trains.
This is from a few years ago, the new one is a 8x8 layout, it takes about a week to slap together.
Thanks for this vid. Mine isn't in yet. Excited
I bought one from Legacy station last night.
Here is another video.
https://www.youtube.com/watch?v=OD49SJk9h_U
I hope Lionel adds to the App the ability to turn off the key clicks like they did with the iCab.
Love everyone's videos and pictures!
That is a tremendous effort. Halloween at our house consists of shutting off the lights and watching Netflix in the basement!
Jon ![]()
jhz563, Where did you find that skull ?
The boars head skull came from House of Hauntz. Nice folks to deal with as they were very responsive to my email questions.
I actually bought two in case I really screwed up the first one. My kids now play with the second. The jaw moves open and shut a little bit. Obviously I had to cut the front of the jaw and spread it some to make room. I originally wanted a more ferocious dinosaur looking skull but couldn't find anything in the right physical size and price point.
I took some pictures of the spare at the kitchen table this morning, dollar bill used for scale. One thing you will not is the large bulbous piece between the hinge points of the jaw bone. I cut that section out to make room for the train. Also, the whole thing screws together, so it very easy to disassemble for rework. I initially wanted to go all foam for the frame of the skull piece but spreading the jaw pieces and holding everything required a bit more strength. The wood is screwed, glued and cut at all kinds of goofy angles. I still intend to cover the wood frame with foam carved to look like rock before I paint.![IMG_1467[1]](https://ogrforum.ogaugerr.com/fileSendAction/fcType/0/fcOid/74918006403664637/filePointer/74918006489412570/fodoid/74918006489412561/imageType/LARGE/inlineImage/true/IMG_1467%255B1%255D.JPG "IMG_1467[1]")
![IMG_1463[1]](https://ogrforum.ogaugerr.com/fileSendAction/fcType/0/fcOid/74918006403664637/filePointer/74918006489412566/fodoid/74918006489412557/imageType/LARGE/inlineImage/true/IMG_1463%5B1%5D.JPG "IMG_1463[1]")
![IMG_1464[1]](https://ogrforum.ogaugerr.com/fileSendAction/fcType/0/fcOid/74918006403664637/filePointer/74918006489412567/fodoid/74918006489412558/imageType/LARGE/inlineImage/true/IMG_1464%5B1%5D.JPG "IMG_1464[1]")
![IMG_1465[1]](https://ogrforum.ogaugerr.com/fileSendAction/fcType/0/fcOid/74918006403664637/filePointer/74918006489412568/fodoid/74918006489412559/imageType/LARGE/inlineImage/true/IMG_1465%5B1%5D.JPG "IMG_1465[1]")
![IMG_1466[1]](https://ogrforum.ogaugerr.com/fileSendAction/fcType/0/fcOid/74918006403664637/filePointer/74918006489412569/fodoid/74918006489412560/imageType/LARGE/inlineImage/true/IMG_1466%5B1%5D.JPG "IMG_1466[1]")
![IMG_1467[1]](https://ogrforum.ogaugerr.com/fileSendAction/fcType/0/fcOid/74918006403664637/filePointer/74918006489412570/fodoid/74918006489412561/imageType/LARGE/inlineImage/true/IMG_1467%5B1%5D.JPG "IMG_1467[1]")
![IMG_1468[1]](https://ogrforum.ogaugerr.com/fileSendAction/fcType/0/fcOid/74918006403664637/filePointer/74918006489412571/fodoid/74918006489412562/imageType/LARGE/inlineImage/true/IMG_1468%5B1%5D.JPG "IMG_1468[1]")
There are foam adhesives at the big box stores. The insert isn't a bad idea, but a wood screws tension will likely rip them away from the foam even glued. A machine screw version, (or machine threads cut into those) would be better as it doesnt have to be driven hard to seat.
Glue the track with laytex caulk. Lots of HO track gets planted that way. Done sparingly, it can be cut away and lifted with a putty knife later. Clean up is pretty easy, and laytex takes paint. Priming might help, but Im pretty sure laytex and that foam get along.


ghost train pulling into the haunted station......![]()


Got mine in today. It is nice. Also picked up the Halloween general. I just need the hallows eve train and I ll have all the ween engines. Can't find it anywhere though
jhz563 posted:Moving slowly, but the project is still alive!
Hi, Since it appears that the skull and jaw are articulated is it possible to attach a lever system and solenoid to the skull and sensors which would open/close the skull for the train passing thru?
PRRronbh posted:jhz563 posted:Moving slowly, but the project is still alive!
Hi, Since it appears that the skull and jaw are articulated is it possible to attach a lever system and solenoid to the skull and sensors which would open/close the skull for the train passing thru?
It would be possible but somewhat difficult. I needed to split the jaw and force the opening wider just to get a train through. Also either you would either have to articulate the whole thing or decide on a fixed point. Making the jaw fixed and raising the head might look a little odd. If you hold the head still and open the jaw then you need to deal with an actual opening for the track.
At this point I am way behind because I wanted to be painting by now and I am still imagining land forms. I have many parts to add and am not sure where to put them all yet. Hopefully in the next few evenings I will be able to get more of the foam cut to finish the tunnel and imagine a mountain face. the foam knife I have is okay but underpowered for 2" work so it's really slow going unless you want to make a huge mess. I also have a battery powered wire type cutter that runs off of 2 d cells. It works great even on the big stuff as long as you keep shoving fresh batteries in.
Micheals has there lemax stuff 50% off. I pick up a few scale figures. Think I might get a gondola and glue some creeepers standing u
I almost spoke for you on the time frame.
Animating in the future might be as simple as the train wheels/ a rely and a tiny 12v servo, thin rods, and hinges. Animatronics is really simple, it just seems like it should be complex.
"Happy Haunting"![]()
What a sweet little treat ![]()
Seeing the stacked foam, I see oportunity for a possible lighting addition, even last minute. There are small led battery opp. strobe lights "everywhere"/for about $5, and room for a "cave" to fit one, if a hole is dug in the back side of the forward section of raised earth, so the light is facing back into the canyon.(I think aimed right of center?) It should add action and interest in the canyon, without the overwhelming irritation strobes can be when used as flood lights. One or two more layers added so the back wall sits slightly higher would accent the canyon too, more so with the vertical light streaks you should get. Even if your canyon becomes a tunnel, I think the strobe would add to it.
Looks good though!
our layout for this year.
Joe Gozzo


Joe, that looks great! I won't have nearly as many goodies as this is my first time around.
Adratic, that area is to become a tunnel. Once the outer wall sections get glued together I do intend to cut another hole looking in. This should add visual interest and allow for a hand to reach in without taking the top off, if needed. The top of the tunnel/ mountain still needs to be resolved in my head but I have plenty of material to play with. The top portion will get some dowel rods for alignment but otherwise will lift straight up to handle the inevitable derailment in the tunnel and make the finished product easier to move through doorways.
not to sabbatoge but my video I took before I added rest of cars and to layout

jhz563 posted:cswalter posted:Nice! How do you like the Halloween Mikado?
I have not heard from anyone else who bought one.
The Paint looks really good on these.
Only thing I don't like is that the orange paint was a lot glossier in the catalog, I was pretty disappointed that it didn't exactly match the advertising.
That being said it is my first LC+ Loco. I wish the volume was just a touch louder, but that is personal preference.
With those small things out of the way, I really like this engine. The blue tooth control works flawlessly. I may never put batteries in the remote. The bell is a deep church bell sound. The whistle and other effects are great too. I will post some video in the next couple days.
Regarding the sound level issue your remote may be different than what they've shown in the instruction because mine was like that on a different Lionchief set so in order to turn up the volume instead of hitting the whistle and the bell button at the same time and turning the power up you push the shift button on the microphone for sound you hold that button-down and then turn the power button clock wise all the way up and then let go of the shift button and you're all your volumes should go up hope that helps.
Joe Gozzo
jhz563 posted:Joe, that looks great! I won't have nearly as many goodies as this is my first time around.
Adratic, that area is to become a tunnel. Once the outer wall sections get glued together I do intend to cut another hole looking in. This should add visual interest and allow for a hand to reach in without taking the top off, if needed. The top of the tunnel/ mountain still needs to be resolved in my head but I have plenty of material to play with. The top portion will get some dowel rods for alignment but otherwise will lift straight up to handle the inevitable derailment in the tunnel and make the finished product easier to move through doorways.
Thanks I appreciate the kind words it's taken many years to acquire those items either by buying them or making them but I'm glad you enjoyed it I really like your idea with the engine coming through the school that was pretty cool thanks for sharing that.
Joe Gozzo
I didn't like the Crusader's looks in the sales photos but it looks really good when surrounded by a proper setting.
I feast the same way, thought orange was gonna shine
Love these Halloween theme layouts - so creative!
The thread inspired me ![]() .......
.......![]()
Two cars and some rolling vignettes aren't done yet, but I haven't given up..
...the ghost ![]()

That's Casey Jones engine pulling the coffin tender ![]() and caboose though not as a tender yet.
and caboose though not as a tender yet.
Giant sharks in the Great Lakes region; Erie.... ![]()

I wonder what DNR would have to say about that pole...![]()

"..of course, I am Batman!" ![]()

I dont have enough track to run the R.I.P. Generals too, they get a year off.![]()
![]()
(....the witch is for NQDY Nichole, still her's ![]() .)
.)
Adriatic
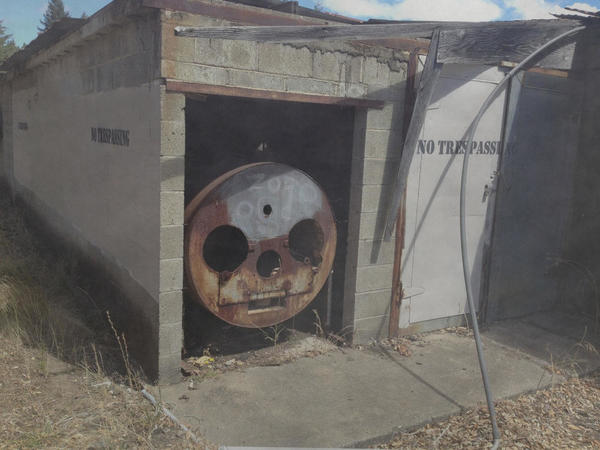
In the first photo, is that some type of skull mounted to the headlight of those two locomotives?
nycoolbreez posted:Adriatic
In the first photo, is that some type of skull mounted to the headlight of those two locomotives?
Two of them. I suppose Thomas gets some credit too, but someone posted the train cover from the Dark Tower/"Gunslinger" series and I ran with it. The first is a hand painted scull on half a bubble gum machine's prize bubble, trimmed to fit the boiler front on PW (1 screw on these 2) chosen because I shopped for goodies too soon in the season. The 3d engine is from a dollar store skeleton trimmed to fit the same size hole/notch. (both Hudsons 2046 and
The casket tender(earlier posts) is a gift box.
The skeleton's body served as the skeleton. I was going to invert the thing to chest up and load logs like a skeleton car sould have, but the webbed ribs covered too much of the wood.
I thiink the boiler faces would make a cool 3d printing novelty. Jack o Lantern , vampires, Rudolph, Santa, a bunny, a leprechaun, Uncle Sam, etc.
Since then, a piles of left over bones has found a home, and some black/brown paint and a pinch of putty for hoods ought to change these Holy Roller folks into a candle wielding cult pretty easy

I still need a stake car of wood for for vampire stakes and something silver.
If I get really bored I have a ton of "ivory" plastic beads that with some putty and fiber could become a gondola of garlic.
Oh, all the shots are not posted here. I've posted a few in " What did you do on your layout today" and once in "a shot in the dark" I think.
Halloween train at home on my permanent Halloween layout.

Jim R. posted:Halloween train at home on my permanent Halloween layout.
Permanent Halloween layout. You sir are my people. That’s what I’m mid building. I demand a layout vid ![]()
Same train at the Milwaukee Lionel Railroad Club.

Looking killer
Pennywise11788 posted:Looking killer
Hoping to paint this weekend. After looking over my inspiration photos I decided I didn't want any flat vertical surfaces. So last night I attacked the mountain faces.


I also bought some spray bottles and a cheap can off off spec black-ish latex paint. I intend to water it down and use the bottles for the base coat on the mountain face and edges. Then i will use rattle cans and whatever other method strikes me for accent colors.
Craft acrylics available at just about any dept. store (Wallyworld, OK-Mart, etx) are my fav. 60¢/89¢ (sm) to just under $3 (lrg).
Careful with the spray on the foam and laytex. You should test first, and let it sit overnight . And/or light mists then dry time to avoid paint reactions.
Here is a little something for Halloween.
https://www.youtube.com/watch?v=Rx47qrH1GRs
https://www.youtube.com/watch?v=SOFCQ2bfmHw
https://www.youtube.com/watch?v=kBfxl_T6ldg
Photos of 2017 to follow in a few days, still building it.

John P,
I actually had to play Purple People Eater for my oldest son last week. He thought I made it up!
Laid down a base coat on the vertical surfaces tonight. Pictures aren’t great quality. This was done by watering down some dark grey latex paint with about 1/3 water, 2/3 paint, applied with a squirt bottle. 

Tomorrow I will check it out in the daylight. If it looks half decent I will start with some accent colors.
The last thing will be laying light-ish brown on the horizontal areas and sprinkling ground cover. At this point I have completely missed any self imposed deadlines, but making it ready by Halloween night is still well within sight ![]()
John Pignatelli JR. posted:Here is a little something for Halloween.
https://www.youtube.com/watch?v=Rx47qrH1GRs
https://www.youtube.com/watch?v=SOFCQ2bfmHw
https://www.youtube.com/watch?v=kBfxl_T6ldg
Photos of 2017 to follow in a few days, still building it.
Added photos of the new 2017 Halloween layout,
![IMG_1424[1]](https://ogrforum.ogaugerr.com/fileSendAction/fcType/0/fcOid/74918006403664637/filePointer/75340558732465190/fodoid/75340558732465184/imageType/LARGE/inlineImage/true/IMG_1424%5B1%5D.JPG "IMG_1424[1]")
![IMG_1425[1]](https://ogrforum.ogaugerr.com/fileSendAction/fcType/0/fcOid/74918006403664637/filePointer/75340558732465191/fodoid/75340558732465185/imageType/LARGE/inlineImage/true/IMG_1425%5B1%5D.JPG "IMG_1425[1]")
![IMG_1426[1]](https://ogrforum.ogaugerr.com/fileSendAction/fcType/0/fcOid/74918006403664637/filePointer/75340558732465192/fodoid/75340558732465186/imageType/LARGE/inlineImage/true/IMG_1426%5B1%5D.JPG "IMG_1426[1]")
How about a Halloween version of Disney’s Castle? It looks so cool during the Hocus Pocus show that plays evenings of Mickeys not so scarey Halloween Party. Saw it in person last year.
Plus the intro is a rather contemporary version of Donovan’s-Season of the Witch.
Original Donovan song
The pink base was driving me nuts to look at. I painted it a medium brown I found in the garage, just finished a few minutes ago. Looks like tomorrow I will be adding some color to the mountain, with hopefully dry brushing Tuesday.


I love how this mountain face came out so far!! If I was trying to make a dark mountain for something a Lord of the Rings set I might stop right here. I have some chocolate, red, and yellow to add a bit of color. Hopefully it a little dab will do without making things too cheery.
jhz563 posted:The pink base was driving me nuts to look at. I painted it a medium brown I found in the garage, just finished a few minutes ago. Looks like tomorrow I will be adding some color to the mountain, with hopefully dry brushing Tuesday.
Looking good. I enjoy the updates you've been posting. I might have missed you telling us, but why that square cutout? What's it for?
ogaugeguy posted:jhz563 posted:The pink base was driving me nuts to look at. I painted it a medium brown I found in the garage, just finished a few minutes ago. Looks like tomorrow I will be adding some color to the mountain, with hopefully dry brushing Tuesday.
Looking good. I enjoy the updates you've been posting. I might have missed you telling us, but why that square cutout? What's it for?
Thanks for the feedback, it’s been much more enjoyable to share as I go instead of doing this totally alone.
The square cut out is for a specific accessory, I think I will keep you in suspense just for fun. Every thing should be clear by the weekend!
Looks great!
What did you use to mark up the smooth sides to the foam?
I’ve gotten satisfactory results on the edges, it’s the smooth sides that are the killer!
thank
BK
nycoolbreez posted:Looks great!
What did you use to mark up the smooth sides to the foam?
I’ve gotten satisfactory results on the edges, it’s the smooth sides that are the killer!
thank
BK
I used a hacksaw blade dragged at a 90° from normal use to cover a whole lot of area pretty consistantly. Then carved and scrapped further with saw blades, exacto, steak knives, and my favorite, a serrated butter knife.
(his smooth cuts are a hot wire tool)
My foam work was purely experimental, so I didn't didn't want to bother stacking, and just used "flat vertical walls". Plus the thickness would have killed my " close quarters" intentions Not the best look, but still good enough I expanded on it. I do black, the semi-dry brushing of two greys. Dark first, then highlights are lighter and brush drier.
It is hard to NOT make foam look decent imo.


nycoolbreez posted:Looks great!
What did you use to mark up the smooth sides to the foam?
I’ve gotten satisfactory results on the edges, it’s the smooth sides that are the killer!
thank
BK
Thanks much. I tried the knife bit but wasn’t having much luck. I had some good luck for material removal around the edges with 60 grit sandpaper. But the majority of the material was removed a pumice stone, normally used for taking care of rough skin. By using the edges and varying the amount of pressure, I was able to simply drag it on the surface to rough it up. Once the top layer is off you have to be careful not to dig a trough!

I added a few halloween items to my halloween float!!!


Still going strong. Nice ideal adding your floats. I picked up a few gondolas cheap on fleabay so I could do the same
Took some pics and some video of my Halloween collection running on the my layout. Had some fun setting up the lighting. Unfortunately, the camera app on the pone isn't great in low light. Oh well. 


That video above is epic. Some nice cars there. Been looking for the blinking pumpkin car for a while.
top notch man
Pennywise11788 posted:That video above is epic. Some nice cars there. Been looking for the blinking pumpkin car for a while.
top notch man
Blinking pumkin car eh? That explains it. ![]()
I just thought he had really dirty track ![]()
![]()
Boo-tiful ![]()
Enjoyed the video. How did you create the thunder and lightning effects?
Dad's - that's some pretty epic Halloween work!
So for my little project, last night was the last night of painting. (Thank Goodness!) Actually the painting was pretty fun, One thing I did learn is that you can't really do it wrong, so just enjoy what comes out.
Here is the mountain piece before and after "dry brushing"


I think for a non-Halloween layout in the future the objective will be to use a lighter color base coat. I am sure I will also try different method for sculpting and roughing up the surface.
Below is the overall shot before and after dry brushing. The after picture was taken using the flash on my phone, so the foreground is a little extra washed out.

Looking forward to moving on to track and decorating.![]()
![]()
![]()

Pat Kn posted:Enjoyed the video. How did you create the thunder and lightning effects?
Hi Pat Kn,
The thunder/lightning is a Halloween sound effects CD through PC speakers and also hooked to a box that I bought awhile back that flashes light to music, or in this case the thunder crashes. I connected a shop light and a strobe light to the box for the flashes.
Thanks everybody for the Likes and Kudos.
Lighter color base coat; I brushed two coats of Kilz 2 as my surface coat on the pink foam layout I built
Following along with a build by Jim Policastro, I built this back in 2010. It appeared in OGR Run 245. The layout has been popular with River City 3 Railers fall displays. Over the years, the scenery took a beating. It got a face-lift this year. Last night was the second of five displays planned for this year; Trunk-or-Treat at Wave Church. This afternoon, Trunk-or-Treat at River Road Church. As Jim alluded to earlier, this will be on our front porch again on Halloween delivering the candy to the children. Next Saturday at Ashland Train Day will be it's final appearance for the year. We'll be setup in the Henry Clay Inn.


Update: As of today, the train has "delivered" over 18# of Halloween candy.
jhz563 posted:Still need to add finishing touches tonight. Here's a peek.
Looks great. How much foam board did you use (not including the base layer)? After seeing your build, I want to try to build some mountains/hills on my layout. I'm not sure if I can get by with a single 4x8 (1in thick) or if I should get two. Thanks
JD
JHZ563, I've been following your build thread and looking forward to seeing a video of your masterpiece up close and in action.
I like everyone's Halloween layouts !
To the Original Poster , thanks for posting this subject & showing us your steps to the final layout .
JD2035RR posted:jhz563 posted:Still need to add finishing touches tonight. Here's a peek.
Looks great. How much foam board did you use (not including the base layer)? After seeing your build, I want to try to build some mountains/hills on my layout. I'm not sure if I can get by with a single 4x8 (1in thick) or if I should get two. Thanks
JD
Not knowing how much you want to build, I would start with 1 each of the 1" thick and 2" thick sheets. I bought 2 of the 2" ones and 1 of 1". I have more than half of a 2" sheet left and about half of the 1" sheet. If I was starting again from scratch I would add a second 2" layer to the base so it flexed less when moving it around. Also if you are going to build a tunnel, make sure you can access it. My whole mountain top comes right off. I refuse to build a derailment area i can't reach!!
ogaugeguy posted:JHZ563, I've been following your build thread and looking forward to seeing a video of your masterpiece up close and in action.
"MasterPiece"?? I wouldn't go that far, but I appreciate your support. This is my first go round at actually making anything near a finished piece. Hopefully it stays together long enough to see a few seasons.
Who makes the grave yard fence
Spook-tacular ![]()
If you stick with acrylic craft paint, even plain old white Styrofoam works for carving on ( stryofoam doesn't like most paint's chemicals)
E.g., these two buildings (attachment) are the bottom of an old Rivaarossi kit's box; plain white styofaom.

Pennywise11788 posted:Who makes the grave yard fence
Found it at Walmart in the craft section by accident. Was unpainted. Way over scale for O gauge but hard to argue about for $2.
Boo the way, when's the big reveal? Are you going to treat us by showing your H display in action or trick us by having it dissapear into the nether world before we see it?
ogaugeguy posted:Boo the way, when's the big reveal? Are you going to treat us by showing your H display in action or trick us by having it dissapear into the nether world before we see it?
Hopefully this afternoon, but likely after trick or treaters come through. I was wrapping up attaching final power leads at 11:30 last night and was told, in-no-uncertain-terms, to quit screwing around in the garage and go to bed!
I have now learned that building a project like this is alot like those hot-rod shows you see on tv; you get to basically build the whole project, then tear it apart to paint it, and then build it all over again! Also when you tell your wife that I just need to finish wiring this up "real quick", and it turns into 45 minutes or over an hour because of whatever reasoning that always makes wiring take 4 times as long as it should, she will not be amused, cause after-all, real quick in the rest of the world is 5 to 7 minutes!
Since I am on the subject of lessons learned,
1. Glidden gripper is great stuff to keep foam held together
2. Old school insulated rail wiring for accessory activation means sparks at the wheels.
3. If you leave little dc powered lights on the island in the kitchen, a three yr old will assume they are toys and hide them all over the living room. You will only find half.
4. Hitting anything with spray paint late in the evening is a bad idea. It will stink up the house no matter what.
5. Keep all the new Halloween items in one place, even when cleaning up.
6. You can actually paint with a spray bottle and watered down latex paint, but remember to send the first several squirts a different direction, water droplets in the paint look weird.
7. budget 4 times the amount of time you think you need for simple wiring. It will likely still not be enough. If it involves soldering upside down at night, forget it, (curse yourself for evening considering such a dumb idea), -and just go rummage around the parts bin for a terminal strip.
8. Put the accessory instructions back in the back so you can find them later - seriously!
9. Hot glue will go right through ground cover - and it does burn your fingers!
10. Michael's craft store will sell out of everything you actually want at least two weeks before Halloween.
I am sure I will have several other lessons after this night is through. Stay tuned for final pictures, video.
I think I just made what might be the most disturbing Halloween car ever ![]()
I wouldn't even mail it tonight ![]() ...
...![]() ...
...![]()
Allright here’s your treat. Now get off my lawn...!

I am not really into holiday trains per-se. Albeit right after Lionel's Polar Express came out I put together some cars from parted sets with a MTH RK PM Berk. The PS-2 with proto-cast can funnel the movie's sound track.
Any way when recently getting a New Haven EP-5 in McGinnis paint, said this could make a neat halloween train. Combined with McGinnis era painted box cars, the LionelJack-O-Lantern car, and Halloween Transfer Caboose.


Was going to embellish with this stuff. Some in open box car doors other crawling all over.

Well maybe next year, if.
Awesome job!!
Great job by the OP and all others. I'm just making it in before the witching hour and the end of the day. Here are the photos of my layout this year in which didn't get finished until today. First O Gauge layout at the new residence. The YouTube video can be seen at Halloween 2017


Adriatic posted:I think I just made what might be the most disturbing Halloween car ever
I wouldn't even mail it tonight
...
...

Can I see it now?
Thanks for sharing your build. I enjoyed it!
jhz563 posted:Adriatic posted:I think I just made what might be the most disturbing Halloween car ever
I wouldn't even mail it tonight
Can I see it now?
Nothing fancy; sick e-mail sent 
I'm thinking pantographs using a couple as pans might be interesting for next year.
Adriatic posted:I'm nearly done buiding cars I suppose. Here's what I have, the consists differ slightly position wise; but I swap things around often.
Train.#1 .."Mist-fits"
![]()
![]() Adriatic, are you switching to a bigger scale for this Halloween...
Adriatic, are you switching to a bigger scale for this Halloween...![]()
![]()

My former partner in junk art is going to love this shot
Access to this requires an OGR Forum Supporting Membership


