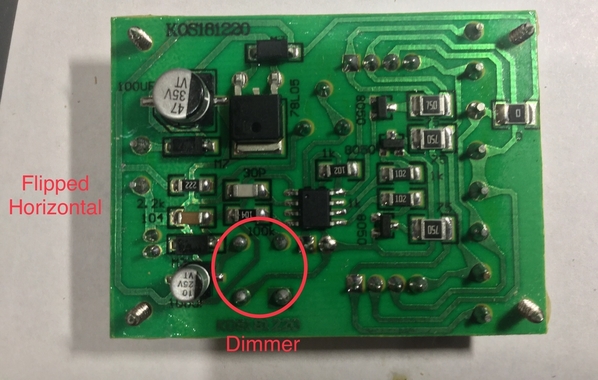
This generic signal flashing PCB really works nicely. It’s from a popular web site and I use it for a pair of road signals on a display shelf. Only problem is: each time power is turned off, the 4 position brightness setting returns to the brightest option. Won’t maintain the previously selected brightness. Kind of irritating to change it again each time you power up the layout. I figure once you select your brightness level it should stay there. Any simple, quick and dirty electronic solution available to cause it to hold the selection during power down? If you need additional photos or info, let me know. Thx in advance for any advice. These are my photos and video.
Replies sorted oldest to newest
Don't power it down. Given that it's an electronic dimmer, and there's obviously not non-vol storage on the chip, that's the logical solution.
What he said. The dimmer setting vanishes when you remove power. If it's practical to keep it powered, note that if you want to turn off the lights (but retain the dimmer setting) find a point in the circuit that is electrically downstream from the dimmer setting. The dimmer setting is stored in the chip - circled below in yellow. There's a common point in the circuit (after the chip) that feeds all the LEDs - circled below in red. This is a 0 Ohm resistor or essentially a jumper wire. Remove this resistor and solder in 2 wires (one to each solder-pad). Run these 2 wires to a basic SPST on-off switch. Now you can turn off the LEDs but power will still be applied to the chip and your dimmer setting is held.
Of course, what a darn nuisance having to keep the circuit powered indefinitely!
Another approach. Why not change the definition of full-brightness by inserting one or more 5-cent resistors. So when the circuit turns on at full brightness, the added resistor(s) will dim the LED brightness.
I found an ebay listing that looks like your circuit. The description says the LEDs are configured in a so-called common-anode configuration which means the red wire to each signal is common. So you can insert a resistor in that red-wire path and this will dim the brightness to the LEDs in that signal. Some experimentation would be required since I don't know what brightness you're looking for, but values like 47 Ohms, 100 Ohms, 220 Ohms would be reasonable starting points. Commonly available and inexpensive 1/4 W resistors are fine. In fact, if you have some resistors lying around, try temporarily inserting the resistor into the red-wire path right at the screw-terminal without having to cut any wires to test proof of concept.
Separately, if you are comfortable removing that 0-Ohm jumper resistor on the board you could effectively dim all the LED signals with just one resistor connected to the 2 wires that went to the SPST switch in the above example.
Attachments
Stan, thanks, swept the “jumper” off the board, added in my goldilocks resistor and voilà; the brightness is just right. And, as you figured, is the same on power up each time. Thanks again. BTW, I had that signal/board diagram you have in my original posting, but was informed I had to delete due to copyright. 🤷♂️


