Hi guys,

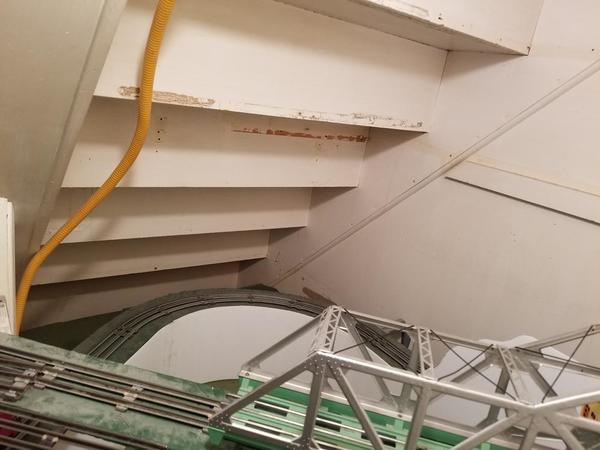
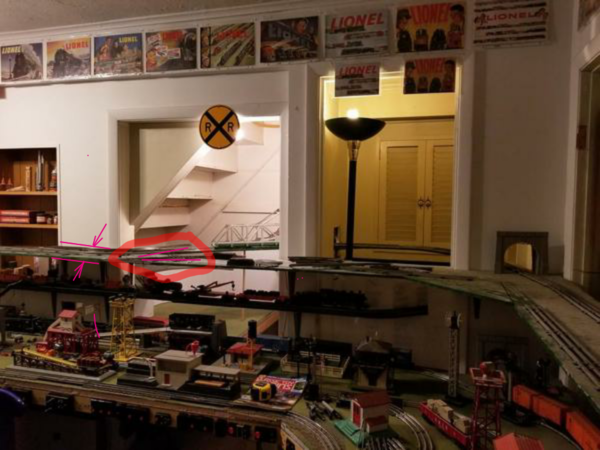
I was hoping to get some ideas on a better design on the upper part of my layout.  I am limited in space, so there is only so much I can do, but there is a section that I really don't like and was hoping to get some input.

https://www.youtube.com/watch?v=G_9g4gHk7Cs  This is a link to the video of my upper section so you can see what I have to work with.

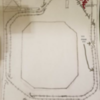
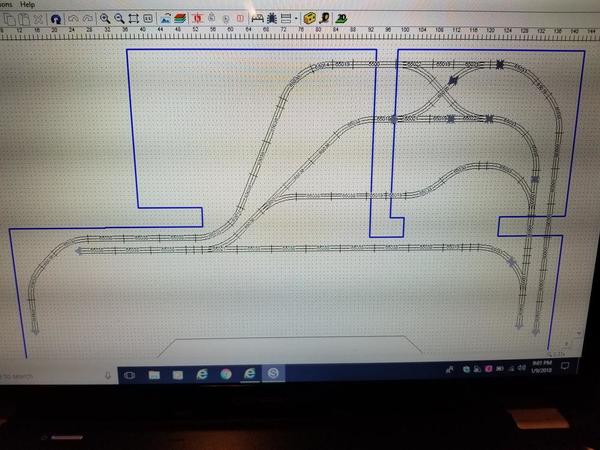
I  also attached a picture of a very not to scale (lol) drawing of what I was thinking about doing.  There are 2 loops and one loop of track I was going to raise 6" and use the paper scenery wood retaining wall sheets for a small amount of realism and also to give the trains some separation so one is not hidden by the other when they pass.

The section that is really bothering me is in front of the closet and bathroom openings where the bascule bridge is located.  I am very limited in space and the whole section in front of the closet opening blocks the open lower level space inside the closet visually.  I would like to be able to use that space for something.  Not sure what yet, but I hate that it is not really visible.  If you watch the video and look at my drawing you can see I eliminated the section of track that ran directly in front of the bathroom and closet openings.  Any ideas would be greatly appreciated! 

Yes, the bathroom is functional.  lol.  Working on rebuilding the faucet and have to re-plumb the old, rotted metal drain line.  Good thing i'm skinny and flexible so I can weasel into those tight spaces.  Ha ha!

The track is PW O27 and power is also PW.  I like keeping everything original PW.

I own my home, so nothing is off the table as far as construction goes (holes in walls, etc.) and my wife does not care what I do in here.   

Thanks for any help!  It would be very much appreciated!


20180106_093830

Attachments

Images (1)
  • 20180106_093830
Original Post

Replies sorted oldest to newest

That's a lot of action in a small space.   I hope I can accomplish the same.   In the process of clearing out a room that is roughly 17x11. Have to either take out a small wall or go through it.   Haven't decided yet.  I think I will make my levels closer together and join them either with a mini helix or hidden grade.   I been reading the "mistake" posts and seems a few regret not doing that and adding a reversing loop.  

carsntrains posted:

That's a lot of action in a small space.   I hope I can accomplish the same.   In the process of clearing out a room that is roughly 17x11. Have to either take out a small wall or go through it.   Haven't decided yet.  I think I will make my levels closer together and join them either with a mini helix or hidden grade.   I been reading the "mistake" posts and seems a few regret not doing that and adding a reversing loop.  

I tried to pack as much as I could in there.  lol.   I have been working on it for 12 years.  I run 4 trains on the main level.  The loop farthest out runs 2 trains.  I have a stop block wired in.  Then 1 on the middle level, 2 trains on the top level and 1 on the lower level for a total of 8.

That room is a good size.  You will be able to have a really nice layout.

I originally had some of the loops connected and was planning on doing grades, but found I was not going to have much room for accessories.  I scraped my original layout and created a layout that could accommodate a lot of trackside accessories. 

If I had a room that was as big as yours I would have been able to design a layout like you are taking about, run multiple trains and fit all my accessories.  I had to settle for multiple trains and lots of accessories, but give up reverse loops and different grades.  That's ok, I am very thankful for the space I do have!

I was reading the "mistake" thread also.  Good info in there!  I hope your layout goes well!


   Maybe worse than a bridge to nowhere, It's a bridge over nothing. You are seeing land mass that shouldn't be there.  It's messing with your sensibilities of purpose.

   I wanna say put the bascule in the knook, base towards the wall, sitting on a "plateau" (your exposed shelf backet); widen it to a base for the bridgehouse. Reduce the width of the hated area and use girder bridges or tressel  You might try them as under girders too.

At this point a second bascule bridge would be awsome instead

Or....I also want to turn it around, the bridgehouse at the wall, narrow it , give it a girder bridge for an abutment  effectively extending the narrow portion further into center. The lowerd bridges forward angle somewht paralleling the angle of the knook's shape.

Or...Narrow it from the bridgehouse, along the bridge edge then flair back out from the abutment at some point to catch the bumper. If you need more support to be narrow there back it with c channel aluminum or oak finish cut  1x1  (¾-⅞ ²), etc.. Even more track on the underside would stiffen it

  Alternates to cutting...Paint blue/green/brown/white "whatever" for water. Or use the background wall color, from and including the shelf edge, right up to the bridge edge to blend it into being narrow and more "open" visually.

  Some Christmas lights on a dimmer, l.e.d.s, grains of wheat, etc. tucked up along the underside of the shelves gives you a pretty cool  "city" lower level look; running in the dark under through the "overheads " ∆      ∆     ∆     ∆ 

  It looked like you had room to move the bridge left and add a right turnout to turn into the knook and another turnout before the wall giving a big reverse loop.

  Climbing grades is a pita. You wont be able to take your hands or eyes off that line. I started with a KW thinking "A up; B for down. Too much work.  I bought a Z for mine to do 4 blocks.  A=Grade 1 B=elevated C= Grade, D= ground level. 

  If you want to add interest, and add some action, use a crossover and or turnouts to swap postions, and some anticollision block wiring to slow a train and/or stop a train , till the other train reaches a safe point.

 Maybe add a shallow grade to raise the train against the wall just an inch or two tops.

Adriatic posted:

   Maybe worse than a bridge to nowhere, It's a bridge over nothing. You are seeing land mass that shouldn't be there.  It's messing with your sensibilities of purpose.

   I wanna say put the bascule in the knook, base towards the wall, sitting on a "plateau" (your exposed shelf backet); widen it to a base for the bridgehouse. Reduce the width of the hated area and use girder bridges or tressel  You might try them as under girders too.

At this point a second bascule bridge would be awsome instead

Or....I also want to turn it around, the bridgehouse at the wall, narrow it , give it a girder bridge for an abutment  effectively extending the narrow portion further into center. The lowerd bridges forward angle somewht paralleling the angle of the knook's shape.

Or...Narrow it from the bridgehouse, along the bridge edge then flair back out from the abutment at some point to catch the bumper. If you need more support to be narrow there back it with c channel aluminum or oak finish cut  1x1  (¾-⅞ ²), etc.. Even more track on the underside would stiffen it

  Alternates to cutting...Paint blue/green/brown/white "whatever" for water. Or use the background wall color, from and including the shelf edge, right up to the bridge edge to blend it into being narrow and more "open" visually.

  Some Christmas lights on a dimmer, l.e.d.s, grains of wheat, etc. tucked up along the underside of the shelves gives you a pretty cool  "city" lower level look; running in the dark under through the "overheads " ∆      ∆     ∆     ∆ 

  It looked like you had room to move the bridge left and add a right turnout to turn into the knook and another turnout before the wall giving a big reverse loop.

  Climbing grades is a pita. You wont be able to take your hands or eyes off that line. I started with a KW thinking "A up; B for down. Too much work.  I bought a Z for mine to do 4 blocks.  A=Grade 1 B=elevated C= Grade, D= ground level. 

  If you want to add interest, and add some action, use a crossover and or turnouts to swap postions, and some anticollision block wiring to slow a train and/or stop a train , till the other train reaches a safe point.

 Maybe add a shallow grade to raise the train against the wall just an inch or two tops.

Thank you for the great ideas!  The underneath lighting would look great!

I know it's asking a lot, but could you do a quick, rough sketch of the track ideas you suggested?  I understand part of what you are saying, but can't quite visualize some of it either.  I'm very much a visual learner. 

With a reverse loop; what do you do once the train is reversed?  How does it get un-reversed?  I don't think I have room for a second reverse loop.

I like the idea of the crossing over and using stop blocks.

Also you might be right about the bridge bothering me and not so much seeing back into that bottom section.  That would open up possibilities of better track work on the upper level as you are describing.

Thank you for the help!


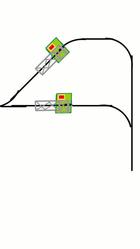
Reverse loops arent very common in real life, but are there too. For toy layouts, just gives you change in direction without a need to touch anything.  When looping we don't do a lot to mix things up. It's a small tool that has good play impact for the "easily entertained" looper( points at me anyhow ).

  With a small loop, you are limiting train length as the loco can hit the caboose. Adding a siding for allowing a loco "runaround" ( switching maneuver) to get to the tail end of a train to back the way it came it one way around using a small loop (wye would have needed similar runaround siding for real function... not that operations matter, this stuff turns minutes of fussing around into simply throwing turnout switches. 

  The bathroom line gives a good length, maximizing the potential of a reverse loop. 

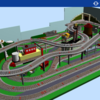
I'm just on an android ,but I'll try to pump out a drawing or two of some kind. I have better photo/graphics apps than "drawing" apps, but I cant download off YT to grab photos out of the video.

(if i could, it would be on scarm. If you have windows, this is free fun, not too hard. "Normal" 2d track laying with a 3d view. Extra features like simulation at a fee. Great for visualizing the basics.) the elevation was supposed to be double reverse, I still need two switches.....some day.

Screenshot_2017-09-13-23-28-57IMG_20170709_025409

Attachments

Images (2)
  • Screenshot_2017-09-13-23-28-57
  • IMG_20170709_025409

Thank you for the continued ideas and info!!  Love your "shoot my eye out" quote.  I love that movie!  I am a 43 year old kid!  lol.

I am going to download SCARM now and try to use that.  It would probably be very helpful in designing the upper level and will be nice to document my whole layout.

Thank you for posting the visuals and reverse loop explanation!  It's a big help!  I just measured out my room and will try and get the room dimensions set in SCARM.

When I posted the diagram of the track plan that had a couple over unders I don't think I explained myself very well.  I also understand that grades, especially in my small space, would be a big PITA.  I was going to raise one loop 6" all the way around with no grades; just elevated 6" higher than the other loop.  I was not going to try and go up and down with grades.

I removed the bascule bridge and all track from that whole section I don't like.  Depending on what the finished track plane is I may scrap the whole wooden upper level and build new benchwork for it.

I am going to work on SCARM now and will post when I put a couple different track plans together and see what you think. 

  I was Ralphie in so many ways it's like watching a rerun of life, right down to cracked glasses from a daisy ricochet at Christmas, and a pampered little brother. (ok.. my glasses just got a slight chip and I wasn't found out for months, but still awsome, especially first showing.... at the movies )

  I later had noticed the bridges indicated an even elevation.

   I think I recall you getting the bascule now too. You faced it that way to see the bridgehouse better.    I think the bascule can go about anywhere, and opening that knook area visually with open bottom tressel bridges vs shelves across the knook's opening would help. I want to see a valley in the knook. I want to look down into it, like being up high in the Cincinnati Valley.

  Gramps had three bascules at one point, and there are three real ones around here. I used to go under two in boats pretty often. (and cross/go under a swing bridge too, former RR now a traffic road). There are quite a few in Michigan, I think the most per state. I'm always jealous of their owners when I see them

Mike,

The layout displays your creativity.  My first thought was to not upset the room entirely and to focus on the closet/understairs area. A still of that area from outside the doorway would give me a better perspective.

Although three levels are busy, there is a prototype in Richmond, VA, where three competing railroads used to cross one another and different heights.

The Bascule is definitely out of place.

I like that fit that third line in there. It must look good when all of the trains pass at once.

I'd like to think that some rerouting of the lines and some visual tricky can change that all together and make it a focal point.

I'd like to take a crack at it, if you would put up a still of the area from some distance.

Mike, here is what I am thinking, no need for the still.

reshape the upper level deck and make a double main following the existing track . When it exits the bathroom work the curve with some half curves to get back to existing inside line. You will loose the spur and the switch.

Now that have cleared that deck away and the bascule bridge, it's time for color and scenery. This is the key.

Paint the inside of the closet from the middle train deck up and everything a nice light blue for sky.

The visual break that made for the middle line could be painted to look like rock or be a tall warehouse building front.

The upper level deck should be painted black to look like painted steel. Perhaps even the middle deck should be painted black where it crosses the opening.

The all and door block for the bathroom can be painted sky and hills coming from the lower deck.

So, I think a reroute and some color changes will do it for you and not disrupt your creation.

If you want to take that distance still and post it, I could play with paint. I don't have a photo editor to demonstrate how the colors will change it all, but it may help.


Attachments

Images (2)
  • Mike1
  • Mike2
Last edited by Moonman
Adriatic posted:

  I was Ralphie in so many ways it's like watching a rerun of life, right down to cracked glasses from a daisy ricochet at Christmas, and a pampered little brother. (ok.. my glasses just got a slight chip and I wasn't found out for months, but still awsome, especially first showing.... at the movies )

  I later had noticed the bridges indicated an even elevation.

   I think I recall you getting the bascule now too. You faced it that way to see the bridgehouse better.    I think the bascule can go about anywhere, and opening that knook area visually with open bottom tressel bridges vs shelves across the knook's opening would help. I want to see a valley in the knook. I want to look down into it, like being up high in the Cincinnati Valley.

  Gramps had three bascules at one point, and there are three real ones around here. I used to go under two in boats pretty often. (and cross/go under a swing bridge too, former RR now a traffic road). There are quite a few in Michigan, I think the most per state. I'm always jealous of their owners when I see them

Ha, that's funny! 

I'm liking the bridge and valley idea.  A nice open bridge spanning 2 or 3 feet and down 2 feet or so would really look cool!

You mnetioned the Cincy Valley.  Do you live/lived there?  I grew up in Fairfield and my Step-dad still lives in Mainville.  We go camping there once a year to see my Step-dad.

Moonman posted:

Mike,

The layout displays your creativity.  My first thought was to not upset the room entirely and to focus on the closet/understairs area. A still of that area from outside the doorway would give me a better perspective.

Although three levels are busy, there is a prototype in Richmond, VA, where three competing railroads used to cross one another and different heights.

The Bascule is definitely out of place.

I like that fit that third line in there. It must look good when all of the trains pass at once.

I'd like to think that some rerouting of the lines and some visual tricky can change that all together and make it a focal point.

I'd like to take a crack at it, if you would put up a still of the area from some distance.

Hi Carl,

I agree that I don't want to completely recreate the upper level, but there are some things I don't like.  I will take a still picture and post it when I get home. 

Other than the bathroom closet area bothering me I just dont like how both loops follow each other pretty much all the way around.  It just seems I could make it more interesting and not so level and bla.  That was what I was thinking when I first posted my sketch.  One loop raised 6" and a couple of over unders.

It definitely looks cool when the lights are off and I have 7 trains running at the same time! 

I agree that some rerouting and some visuals will do wonders!  Unfortunately for me, the artsy type stuff is where I fall flat on my face, lol, so I am very happy to hear ideas!  I will post a few pics when I get home today.

Moonman posted:

Mike, here is what I am thinking, no need for the still.

reshape the upper level deck and make a double main following the existing track . When it exits the bathroom work the curve with some half curves to get back to existing inside line. You will loose the spur and the switch.

Now that have cleared that deck away and the bascule bridge, it's time for color and scenery. This is the key.

Paint the inside of the closet from the middle train deck up and everything a nice light blue for sky.

The visual break that made for the middle line could be painted to look like rock or be a tall warehouse building front.

The upper level deck should be painted black to look like painted steel. Perhaps even the middle deck should be painted black where it crosses the opening.

The all and door block for the bathroom can be painted sky and hills coming from the lower deck.

So, I think a reroute and some color changes will do it for you and not disrupt your creation.

If you want to take that distance still and post it, I could play with paint. I don't have a photo editor to demonstrate how the colors will change it all, but it may help.


Great ideas!  I will definietly put that info to use!  Those are the kinds of things I have a very hard time thinking of.

Moonman posted:

Mike,

SCARM is no longer free - it is now a production final. Atlas offers it for free, but with only the Atlas library.

You don't need SCARM, just a paint brush and some paint. You created all that have without it.

Are you sure?  I just downloaded it last night and almost have the baseboard created.  It also seems to have an endless track library.  I know there is a paid version, but it seemed to be geared toward large/commercial type layouts.

I've been in IT my whole career and like messing around with stuff like this.   

TrainManMike posted:
Moonman posted:

Mike,

SCARM is no longer free - it is now a production final. Atlas offers it for free, but with only the Atlas library.

You don't need SCARM, just a paint brush and some paint. You created all that have without it.

Are you sure?  I just downloaded it last night and almost have the baseboard created.  It also seems to have an endless track library.  I know there is a paid version, but it seemed to be geared toward large/commercial type layouts.

I've been in IT my whole career and like messing around with stuff like this.   

Mike,

Very cool. Perhaps he just set a track piece limit or object limit. You'll hit it somewhere. I have the full version and have used it for a long time.

Nope, SCARM is at it's best with small layouts and the 3D.

Post the baseboard file when you are done. I can create the look of the under stairs area.

TrainManMike posted:

Are you sure?  I just downloaded it last night and almost have the baseboard created.  It also seems to have an endless track library.  I know there is a paid version, but it seemed to be geared toward large/commercial type layouts.

All the track libraries are in the trial version and the baseboard doesn't count, but you should hit a 100 track/object limit.

Last edited by DoubleDAZ
Moonman posted:
TrainManMike posted:
Moonman posted:

Mike,

SCARM is no longer free - it is now a production final. Atlas offers it for free, but with only the Atlas library.

You don't need SCARM, just a paint brush and some paint. You created all that have without it.

Are you sure?  I just downloaded it last night and almost have the baseboard created.  It also seems to have an endless track library.  I know there is a paid version, but it seemed to be geared toward large/commercial type layouts.

I've been in IT my whole career and like messing around with stuff like this.   

Mike,

Very cool. Perhaps he just set a track piece limit or object limit. You'll hit it somewhere. I have the full version and have used it for a long time.

Nope, SCARM is at it's best with small layouts and the 3D.

Post the baseboard file when you are done. I can create the look of the under stairs area.

Thank you!  I will the file in a few minutes. 

DoubleDAZ posted:
TrainManMike posted:

Are you sure?  I just downloaded it last night and almost have the baseboard created.  It also seems to have an endless track library.  I know there is a paid version, but it seemed to be geared toward large/commercial type layouts.

All the track libraries are in the trial version and the baseboard doesn't count, but you should hit a 50 track/object limit.

Thanks Dave! 

My dad and I did 4 years in the USAF and my sister pinned on E-7 a little over a year ago.   

Here is the SCARM file.  Keep in mind it is the whole basebord and middle cutout.  The track I am working on will be elevated and around the outer portion of the room.  I didn't get crazy and make a whole seperate baseboard elevation.  I just wanted something to work with so that I could get actual track placement.  If I decide to do my whole layout in SCARM I will just buy it. 

Attachments

   I was pretty sure the basic form was still free, so Carl's note was a dissapointing shock. I'm glad you got it. A slight learning curve but a good program. Hopefully your experience turns the curve into a fastball (highball )

 It only takes a week for me develop an southen Ohio drawl again. I am from Michigan originally, but spent various amount of time growing up and working in Ohio. From the WV border first, North to Twinsburg, N.W. to Elyria/ Vermillion and another little town in the Cuyahoga Valley (?), then far N.W.- Toledo/ Temperance, and back south east to Willard. I often travelled from Detroit to Dayton, Cinnci, and into the Kentucky hills for entertainment and visits, some extended. I love the valleys of Ohio... and Cincinatti Chili (3 way, extra cheese )

  Salt Fork, and much more so Wolf Run were our regular camping destinations. I pulled a weight record smallmouth out of Wolf Run ; short on length   but big on taste It had about a dozen crayfish in it; never seen a fatter fish.

  All happy memories of the past, at about your age I tore my diaphram, ending a non-carrer road travel average of nearly 200 miles a day for over a decade...  most in Michigan and Ohio.  Being "in park" restarted the childhood train hobby. I knew I'd be back, it just happened sooner than expected


   I think you should focus on the knook and or the "reading room".(is the throne accessible?) The knook is an awsome scene oportunity visually. The shelves might work better for you as a "birtday cake", wider at the bottom, narrow up high..?

  The reading room suggests any lack of creative aspect is a "crock" .  You might have patience and focusing trouble; prefer " pieces", but constantly scene experimenting in your head is what I see (projection? lol). But I'm guessing in general, perseverance usually brings your best ideas together for you in time too.

  On the undershelf /overhead lights...Grey a low section of shelf and the one above, maybe grey the wall (or use contruction paper),  insert a few grey round dowels, edge it with a foam ½ wall (quater wall?) and or X braces of trim wood/platic/or even metal strips etc..   X across the shelf edges for a fast city "basin" line/subway look or faux tressel bridge, etc.  I bet you'd have a blast with some scrap foam and some cheap waterbased craft acylics. (matte/flats, satins for gloss. Save real gloss for super clean or wet looks)

  I like a long straight. Going into a turn then a staight again more so. Adding over crossings, and/or S turns to shift the line around an "obstacle" here or there vs a dead straight on every line, every wall would add a lot of action, but I would try hard not to loose or break up the straights too bad.

  The run in front of the knook doesn't have to go. Narrowing it and design to open holes for background viewing is needed imo. Take a look at mine from above. I added the S shifts intending on having the controls on the snake side, but found myself contantly on the opposing side to eyeball the straights. While there, I also noticed the snake had added background action and it  drew my eyes across the layout into the background. Contols are on the left now and I mostly look over and into the background, stoop for some intersting shoot the gap angles, and have a great broad view and "edge of the rails" distance perspective all within three steps of me. Above the water tower to the right of the building there is a scrapped steamer. That is my only real blind spot.IMG_20170107_164052

Attachments

Images (1)
  • IMG_20170107_164052
carsntrains posted:
TrainManMike posted:

Here is the file without any track.  It's the one I meant to post.

Didnt get anything when I clicked that link but a funny page of numbers lol    I downloaded SCARM also and it helped me with my track problem!   Hope it helps you with your set up! 

Jim

Hi Jim,

Try right clicking the file and do a "save target as".  Save file to your PC and then open file from SCARM.    I'm glad it is working for you.  It did cap out once I used about 50 or so pieces of track, just like a couple people here thought it would.

Last edited by TrainManMike
Adriatic posted:

   I was pretty sure the basic form was still free, so Carl's note was a dissapointing shock. I'm glad you got it. A slight learning curve but a good program. Hopefully your experience turns the curve into a fastball (highball )

 It only takes a week for me develop an southen Ohio drawl again. I am from Michigan originally, but spent various amount of time growing up and working in Ohio. From the WV border first, North to Twinsburg, N.W. to Elyria/ Vermillion and another little town in the Cuyahoga Valley (?), then far N.W.- Toledo/ Temperance, and back south east to Willard. I often travelled from Detroit to Dayton, Cinnci, and into the Kentucky hills for entertainment and visits, some extended. I love the valleys of Ohio... and Cincinatti Chili (3 way, extra cheese )

  Salt Fork, and much more so Wolf Run were our regular camping destinations. I pulled a weight record smallmouth out of Wolf Run ; short on length   but big on taste It had about a dozen crayfish in it; never seen a fatter fish.

  All happy memories of the past, at about your age I tore my diaphram, ending a non-carrer road travel average of nearly 200 miles a day for over a decade...  most in Michigan and Ohio.  Being "in park" restarted the childhood train hobby. I knew I'd be back, it just happened sooner than expected


   I think you should focus on the knook and or the "reading room".(is the throne accessible?) The knook is an awsome scene oportunity visually. The shelves might work better for you as a "birtday cake", wider at the bottom, narrow up high..?

  The reading room suggests any lack of creative aspect is a "crock" .  You might have patience and focusing trouble; prefer " pieces", but constantly scene experimenting in your head is what I see (projection? lol). But I'm guessing in general, perseverance usually brings your best ideas together for you in time too.

  On the undershelf /overhead lights...Grey a low section of shelf and the one above, maybe grey the wall (or use contruction paper),  insert a few grey round dowels, edge it with a foam ½ wall (quater wall?) and or X braces of trim wood/platic/or even metal strips etc..   X across the shelf edges for a fast city "basin" line/subway look or faux tressel bridge, etc.  I bet you'd have a blast with some scrap foam and some cheap waterbased craft acylics. (matte/flats, satins for gloss. Save real gloss for super clean or wet looks)

  I like a long straight. Going into a turn then a staight again more so. Adding over crossings, and/or S turns to shift the line around an "obstacle" here or there vs a dead straight on every line, every wall would add a lot of action, but I would try hard not to loose or break up the straights too bad.

  The run in front of the knook doesn't have to go. Narrowing it and design to open holes for background viewing is needed imo. Take a look at mine from above. I added the S shifts intending on having the controls on the snake side, but found myself contantly on the opposing side to eyeball the straights. While there, I also noticed the snake had added background action and it  drew my eyes across the layout into the background. Contols are on the left now and I mostly look over and into the background, stoop for some intersting shoot the gap angles, and have a great broad view and "edge of the rails" distance perspective all within three steps of me. Above the water tower to the right of the building there is a scrapped steamer. That is my only real blind spot.IMG_20170107_164052

I'm familiar with some of the areas you mentioned.    I'm in the Souther Tier of NY now.  Sorry to hear about your problem.  Sure sounded like you were having a lot of fun!

Reading room.  lol.  Oh yes, it is fully functional.    I just have to finish some work on the sink, but it's all working!

Those are some good ideas for under the stairs!  I have to start thinking of the whole room as one instead of focusing on the track so much.  Gotta put it all together.

I really like the straightaways also.  I'm sure my problem is more the lack of scenery and not so much the track placement. 

You have a nice layout!  I'm jealous of all you guys with the great scenery.  Makes such a difference!  You really pack A LOT into that space! 


TrainManMike posted:
carsntrains posted:
TrainManMike posted:

Here is the file without any track.  It's the one I meant to post.

Didnt get anything when I clicked that link but a funny page of numbers lol    I downloaded SCARM also and it helped me with my track problem!   Hope it helps you with your set up! 

Jim

Hi Jim,

Try right clicking the file and do a "save target as".  Save file to your PC and then open file from SCARM.    I'm glad it is working for you.  It did cap out once I used about 50 or so pieces of track, just like a couple people here thought it would.

OK that worked.  The program is great but for me seeing it was more help.   I still think I would redo it and run a switch into the closet and continue on through the bathroom.  

Jim

carsntrains posted:
TrainManMike posted:
carsntrains posted:
TrainManMike posted:

Here is the file without any track.  It's the one I meant to post.

Didnt get anything when I clicked that link but a funny page of numbers lol    I downloaded SCARM also and it helped me with my track problem!   Hope it helps you with your set up! 

Jim

Hi Jim,

Try right clicking the file and do a "save target as".  Save file to your PC and then open file from SCARM.    I'm glad it is working for you.  It did cap out once I used about 50 or so pieces of track, just like a couple people here thought it would.

OK that worked.  The program is great but for me seeing it was more help.   I still think I would redo it and run a switch into the closet and continue on through the bathroom.  

Jim

Glad that worked!  I'm going to try a bunch of different track plans. 

I will post as I come up with ideas.

  I'm having some issues with a few aps and video today, hopefully it updates in the next few days.

Where are you watching from mostly?

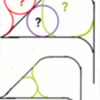
The new photos give a better perspective. You have more roomthan the camera let on. I really think the turnout footprint itself along with the angle of the deviation and the straight across(violet(zoom)), along with your viewing angle create a blocked view of the lower knook at the red. The bridge being centered was nice except it extended the blocked area even further right.sketch-1515554039612

Attachments

Images (1)
  • sketch-1515554039612

Add Reply

Post
The Track Planning and Layout Design Forum is sponsored by

AN OGR FORUM CHARTER SPONSOR

OGR Publishing, Inc., 1310 Eastside Centre Ct, Suite 6, Mountain Home, AR 72653
800-980-OGRR (6477)
www.ogaugerr.com

×
×
×
×
Link copied to your clipboard.
×
×