
I have been tryin to post a YouTube video following the instructions provided:


1.access the video on YouTube

2. Select Share

3. Select Embed

4. Copy the code displayed

5. Paste it here


But this is all I have been getting:


<iframe width="420" height="315" src="http://www.youtube.com/embed/GnDBTD3iN-8" frameborder="0" allowfullscreen></iframe>


If you click on the underlined link, it works, but how should it be done so the opening frame of the video is displayed?


Thx!


Alex


Alex-

Thank you so much for the RRTrack file. That request was actually from my eleven year old son. He is very into trains and designing layouts. He is in the process of learning RRTrack software and fell in love with your layout. I am sure he will have many hours of enjoyment with your layout file.


We are planning our own layout in space that is very similar to yours, though a few feet shorter. We could never build something as complicated, but will certainly, I am sure get many wonderful ideas from your layout.


P.S. - I am so impressed with it too! He better give me some time on the puter!

Wippen,


Attached is another RR-Track version of the same layout. The only difference is that I separated the upper level and "L" tracks from the lower level and graded tracks. It is just a bit easier to see and to work on.


If you look carefully, you will see that each of the double mains has a double reversing loop. There is another reversing loop around the turntable, but that one is easy to spot.


So glad to see your son involved - that makes my day  !


Thanks!


Alex

Attachments

Alex, your layout is spectacular... and what you have documented thus far is an inspiration to us all.  This is the first night I've actually read through your entire thread.  Thank you so much for sharing!!!


I have taken the liberty of pasting your youtube link into my post here so that the video displays directly within the forum.  When I created this post, I clicked on the vertical filmstrip icon that is two icons in from the right side of the editor toolbar.  And that opens up a dialog where you can either upload the video directly to the forum's server (based on the video file format) or simply point to an already uploaded file that exists somewhere else, which in this case was your Youtube video.


Enjoy everyone!!!


Thanks again for sharing your terrific talents with us, Alex!!! 


Best regards,

David

Last edited by Rocky Mountaineer

David,


Thank you for your nice comments and for posting the video link. I had not tried clicking on the filmstrip icon; I'll try that next.


I think a good portion of the enjoyment of this hobby is sharing what we know and what we do, and in the process we learn a lot as well. Unquestionably, the OGR forum is an excellent resource for this!


Thx again!

Alex

Originally Posted by Ingeniero No1: I wish that I had your artistic ability. Post a track plan if possible.
 
Lou
 

Finally started on the layout! But first, following your recommendations, I painted portions of the backdrop. I guess I am more of a carpenter than a painter, but it this will do for now. A couple of shots before starting the fun part.


A new leg design so the frame rests on the legs instead of on the screws that fasten the leg to the frame. (BTW - I just noticed that the camera distorts some of the images - the legs ARE SQUARE to the frame when done!)


Saturday:
Assembling one of the cross braces –


An afternoon’s worth of work - how it looked Saturday night (12' x 12' section):


A now to continue . . .

Alex


Hi Alex, Im Jake, you've been corresponding with my father. I have a love for trolleys that hit back and forth between bumpers. I use N scale along with O gauge. I do not know if i should expect you to know this or not but do you know if N scale trolleys also hit back and forth between bumpers also? Or do they just have the ability to go on a track without ending.

Wippen -

TRACK GAUGES

I can't find the original posting regarding the Track Gauges - it was back in April 2011, and is gone. Don may still have his material, however.


I made my gauges our of 3/4-inch, 13-ply birch plywood. They are 2 inches high and I used a thin kerf (3/32-inch) blade to cut the slots. I used a fine file afterwards to make the slots slightly wider as needed. The widest slots ended up at just a hair under 1/8-inch wide, and the gauges fit curves as well as straights. I used track spacing of 4-1/2 inches throughout the entire layout.


Track Gauges -3- med crp DSC03522


I could not have laid the track as I did without these gauges OR without scribing the curve radius on the surface. Using the gauges and the home-made large compasses, I was able to exactly match the RR-Track layout. I ended up cutting over 130 track sections, straights and curves, and I cut them exactly per the RR-Track design, and they all fit perfectly.


One thing I learned was that even when using sectional curved sections and joining them so there were no gaps, the resulting radius or diameter could be off by two inches or more from what it is supposed to be. Best to scribe the theoretical radius or diameter, and lay the track over that line.


Jake -

I do not believe that there are such trolleys in N-Scale. Many years ago, back ini my HO days, one of my sons was into N-Scale. He had trolleys too, but just the regular type. I did a quick Google search and did not find any.


F.Smaritano

Thanks! It was fun building the bridge and recording what I was did - just in case.


Thanks for looking!


Alex


Attachments

Images (1)
  • Track Gauges -3- med crp DSC03522

400e,


I have tried different size drill bits, and have settled on No. 48 (0.0760), but 5/64 (0.0781) works well also - for 16 AWG stranded wire and the No. 0 screw; that is.


After I drill the hole and insert the No. 16 AWG stranded wire (26 strands of No. 30AWG), I use a pick to separate the strands to make it easier to start the screw.


Let me know if I can be of further help.


Thanks for looking.


Alex

400e,


From Micro Fasteners. I tried different head configurations (button head socket, slotted, and phillips pan head) and these worked best for me:


Product No. SMPPK0004

Pan Head Sheet Metal Screw - Phillips

Size: #0 x 1/4

Finish: Black oxide

Price: 100 for$ 4.30


 http://www.microfasteners.com/...products/TWSSMPP.cfm 


While at their website, look at all the other stuff they have . 


And Thank You for your nice comment! 


Alex

Here is one of the areas I have been working on - around the turntable. Not done yet, but is getting there. All the tracks are fully operational (powered one at a time, with a rotary switch), and the indexing still is manually aligned (two speed) waiting for the automatic indexer (Dallee) - Thanks, Patrick.


 Birdseye view -

01 Turntable Area med crp DSC_0488


Challenger ready to go into the shed.

02 Turntable Area med crp DSC_0479


Railroad workers house -

03 Turntable Area med crp DSC_0496


MTH 4-6-4, Legacy 4-8-4, Legacy 4-6-6-4, MTH 4-8-8-4

05 Turntable Area med crp DSC_0512


Older gentleman sitting and admiring the engines - and a couple of fellows having a talk -

06 Turntable Area med crp DSC_0513


Thank you for looking!


Alex

Attachments

Images (5)
  • 01 Turntable Area med crp DSC_0488
  • 02 Turntable Area med crp DSC_0479
  • 03 Turntable Area med crp DSC_0496
  • 05 Turntable Area med crp DSC_0512
  • 06 Turntable Area med crp DSC_0513

Hi Alex, that look's beautiful as always.

Can't wait to see it finished.


Alex I just received my turntable from CSXAL this week.

I just started the install and wanted the thank you for all

the info you post here, because it helped me so much.

I used a lot of your method's for this install.I will post

all photo's when I'm done.THANKS AGAIN, ALEX


Alex did you get the challenger back yet.


THANKS ,ALEX

Alan, Roger -

Thank you - I have learned a lot and I am still learning from your fine work, and maybe it is beginning to show  .


Alex -


It is a nice turntable for sure - very well built, and runs so smoothly . . .


I have had it up and down (hatch opened and closed) many times in the past few days. It seems that just a minute after I raise it and button it up, I see or remember something else that I need to do that requires access 'through the TT hatch'. It is such a big hole that it is the nicest access I have in my layout. Don't hesitate to post or to email me if you have any specific questions.


Yes! I received the Challenger and it is runing fine again. I will now update that thread. (Completely forgot about it - thanks for reminding me.)


Thx!


Alex


 Here is a picture from two days ago.


Whisker Tracks HPJRR 02 med crp DSC04893

Attachments

Images (1)
  • Whisker Tracks HPJRR 02 med crp DSC04893
Last edited by Ingeniero No1
Originally Posted by Ingeniero No1:
Yes, the carts are working even better than we expected.

Glad to share what I am doing.

I finally made one of the several hatches I will need. This one is 14 x 18 inches, and although it is OK, the next one will be 14 x 20 inches. I used a Ø1” closet rod that I had, and it works well. Also, I will space the two supports further apart, perhaps 3 inches instead of just 1-1/2 for better stability. As they are they hold the hatch fine, but when raising it and lowering, it vibrates somewhat, and I hope further apart spacing will help.

The pictures should show what I did, but if you have any questions, p-lease let me know – I also have drawings.

The hatch lowered, in place.


The hatch raised and turned or swung.


Birds-eye view.


Underneath – hatch lowered.


Support detail.


Support with hatch raised.


Will have more pictures tomorrow.

Thx for looking.

Alex

Hope you don't mind but I am gong to have to steal your idea here and use it on my own layout.  Great job.

Glad to hear that the idea may be useful to you as well!


A couple of hints:


(1) Make the tube long enough to allow you to stand under the hatch without having to rotate it out of the way. I made one long and one short (because the tube I had wasn’t long enough to make them both long), and the longer one is nicer to use as I just raise it and stand under it. The shorter one requires that I raise it and then rotate it; no big deal but not as easy.


(2) Coat the tube with wax or something similar so the tube slides easily; it makes a big difference.


Good luck!


Alex

Originally Posted by Ingeniero No1:
Hey Patrick!

(Background painting is quite a learning process - thanks!)

The top of the frame is 47”, and when I add the 5/8” plywood and 1/2" QuietBrace, it will be just over 48”. I have tried different heights, starting at 36” and up to 44” which was my last layout – my first O-Gauge. (BTW, I am 5’11&rdquo

The reason is to make it easier to get under it. My back is not what it used to be, and I like to be able to sit on a short stool to do wiring without banging my head. (I have no hair left on top of my head to tell me that a 1x4 or 2x4 is in close proximity Smile) Also, the perspective for viewing the details is better in most cases. But since you cannot see the whole layout or get a birds-eye view, I will have a couple of platforms, about one foot high, from which to see the layout.

The main level will be 48”, the second level 57” and the “EL” train will be at 66”. My wife says that while standing on the floor, the “EL” train will appear to her as the real thing – she will have to look up to it. There is a lower level up front that will be 25” high, but that will be a gorge for my long trestle. I should finish this portion tonight or tomorrow night, depending on what time I get home from work, and I’ll post some pictures. BTW, I got that idea from you! (Hope you don’t mind.)


Thanks!!
Alex
 
Alex that looks great.May I ask how you did the rocks? I have similar issues.
 
Just about done with putting OSB on mine. Looks like I will need 44 sheets of Quiet brace if I decide to cover the whole layout. Hope my half ton pickup will handle the weight.
 
Do you rrecommend laying a road bed such as cork on top of the quietbrace ? I was thinking of just screwing it right ot it without it.
 
Dale H
 
Last edited by Dale H

Dale,


I you like the looks of the track over the roadbed as opposed to just over the Quiet Brace, then yes, and screwing the track would be fine if the screws are long enough to go into the QB most of the way.


However, if your concern is noise primarily, you really do not need anything between the QB and the track; the QB alone is quiet enough! (In my opinion, that is.)


I have run my trains silently (just like in the old HO days) and they are very quite indeed with the track directly over the QB. I used 5/8” plywood, the Quiet Brace over it, and fastened the Atlas track with Atlas track screws, which go through the entire thickness of the QB.


Here are a couple of pictures of a cutoff section of track just to show how the screw penetrates the QB. 


Atlas Track on QB 01 med crp DSC04997


Atlas Track on QB 02 med crp DSC04994


Good luck!


Alex

Attachments

Images (2)
  • Atlas Track on QB 01 med crp DSC04997
  • Atlas Track on QB 02 med crp DSC04994

Dale,


That is what I did where my dual-main was more or less by itself, as for the graded track sections. I used the jigsaw with the knife edge blade set at 30° to cut the QB road bed, and it looks great, and yes - it is quiet.


I started doing this (the angled cut road bed) in other areas, but then realized that it would be easier to have the surfaces even for the buildings and other scenery items I wanted to add, so I covered (almost) everything with QB.


Here are three pictures taken when I started this phase of the project - almost a year ago already!


QuietBrace-d Cut 01 med DSC03470


18-g DoubleMainTrack 01 med DSC03483


 17-f Grade West 02 med DSC03477


Alex

Attachments

Images (3)
  • 18-g DoubleMainTrack 01 med DSC03483
  • QuietBrace-d Cut 01 med DSC03470
  • 17-f Grade West 02 med DSC03477
Last edited by Ingeniero No1

Hi Dale....

If I may chime in here.......  I have been using the Quietbrace product for over 20 years.  Many years ago it was called Black Board and was used on the exterior of most new house construction much like foam and other products are today.


I covered entire areas with it on my layout to reduce the level of noise.  Because of the coating that is applied to the product, I soon found out that just laying it in place, through its own weight, it adhered to the substrate....no glue or screws needed.  I have never had any movement problems.  There has been much discussion over the past several years here on the forum about where to glue or screw this product...  If you screw it down, you MAY transfer a certain amount of  any vibrations (noise) to which those screws may be subjected and I would suspect the same of gluing it. 


If you limited your gluing and or screwing to the edges only, you may reduce the noise transfer though I doubt there will be much since the quietbrace is very good at absorbing vibrations.  MORE IMPORTANTLY.....when you screw the track down, only use screws long enough to go into the quietbrace but not into the substrate material below it.  Hope this helps....


Alan

Thankyou Alan and Alex for the heads up on this material and your time to answer my questions..


This material looks very promising. It reminds me a bit of the material used for expansion joints for cement. Just from observation it seems to be a more effective sound deadener than Homasote also lighter and easier to work with and the cost is about 1/3 the price of Homasote. Half inch Homasote at HD was about $27.  I knocked on the layout plywood with my hand and then knocked on the layout top with Quietbrace over it,a really big difference. This stuff really does not transmit sound.  I may also make a skirt using this material to deaden the noise further.  The layout is in a big building without carpeting so noise is an issue. As far as screw holding ability I screwed a #4 in about a half inch and picked up the hole sheet with the screw head. Where I live this material is not that common so I took a nice ride with the wife to buy some. Will do some cutting and fitting tomorrow. Was thinking of a few dabs of latex caulk to keep it from sliding and maybe just a few screws in the smaller pieces. This should be sound friendly since caulk is pliable. I may have to piece in some complicated curves with smaller pieces.


Dale H

Dale,


(I was gone for three days visiting Judy's family and did not have access to the forum.)


Alan is correct as far as the QB staying in place. However, when I used small sections of QB as for a roadbed, I used two 1" nails at opposite corners of the QB section to make sure it would not shift. Since I screwed the track just to the QB (second picture of my post on March 17, above) I needed a secure base to hold the track. Using an adhesive to secure the QB to the plywood, OSB, or similar top surface as you suggested would also work fine.


BTW, your bench work is looking superb. Do you have a track plan, maybe an RR-Track or similar rendition? I (we) would certainly like to see it.


Also, your layout certainly appears to be of the sort the warrants its very own thread on the forum. Of course I don't mind having it within my layout thread, but it is 'hidden'. I think that a lot of our forum friends have already seen my layout (this thread), may not look again and unknowingly and regretfully could miss yours! 


Good work!


Alex


Hi Alex


I am more of a toy train guy. My layout at home is carpeted. On parts of this one I may do the same thing. In the other room I may try to  do more realistic scenery but I am not good at this. It is more of a toy train display layout allowing trains to run automatically on timers without a lot of operator attention. The trains will run between 2 rooms with dog bone patterns to allow for the wide curves. On the perimeter on each of  2 levels there is room for double track O-120 K-Line Shadow rail. I purchased this when K-Line went under and have been waiting to use it for a while. On one end I will make a simulated switch yard where 3 trains per loop will be staged and be dispatched one at a time conventional using relays. Also I will use a soft start system with relays for realistic operation,automatic bell and whistle operation.. Only 1 train per loop will run at a time to reduce dueling sound systems. So 3 trains per loop on 4 loops would make 12 trains on the perimeter. Maximum train length would be 18 feet with a block system about 22 feet long per block.. I have an 8 car B&O 21 inch K-Line passenger set I want to convert to LED lighting and run so that is how I arrived at the length.  I could make one of these loop with a total of 6 trains with a passing siding running in alternate directions. However this may be asking for trouble as I am not sure how reliable turnouts are as far as derailments. Electronically it could be automated without issues. I was looking at the new Ross tubular O switches but am on the fence about doing it.


Then I have room inside for a 5th loop,O96 and some trolley lines. I may do a passing siding on this with 2 or more shorter trains running in opposite directions..


In the area where I live in western Pa, the building sits between the old B&O and WM lines the track right of way is cut through rock. (the parallel WM is now a bike path across the Castleman river) I was hoping to simulate this by filling in the area between the 2 levels. As I said I am not a scenery guy but would like to learn to do this. Below that is the picture of a 1920s bridge that is scheduled to be replaced in April. Through the trees on the right is an old school building,circa 1908 that I have been restoring for the last 10 years. That is where the layout is going. I Dont mean to hijack your thread but I learned a lot reading it and what I am doing is a bit similar so I thought I would post some pics. As for the scenery and bench work I am nowhere near the skill level of you guys. The bridge in OGR is incredible craftsmanship.


P1000103

P1000081

Attachments

Images (2)
  • P1000103
  • P1000081

Dale,


Honestly, I think your layout looks great, you have a clear idea of what you want it to be, and you most certainly are going to fully enjoy the fruits of your endeavor!


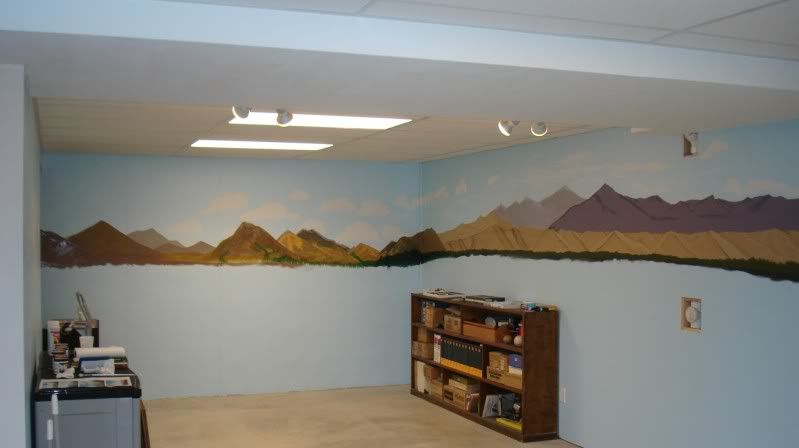
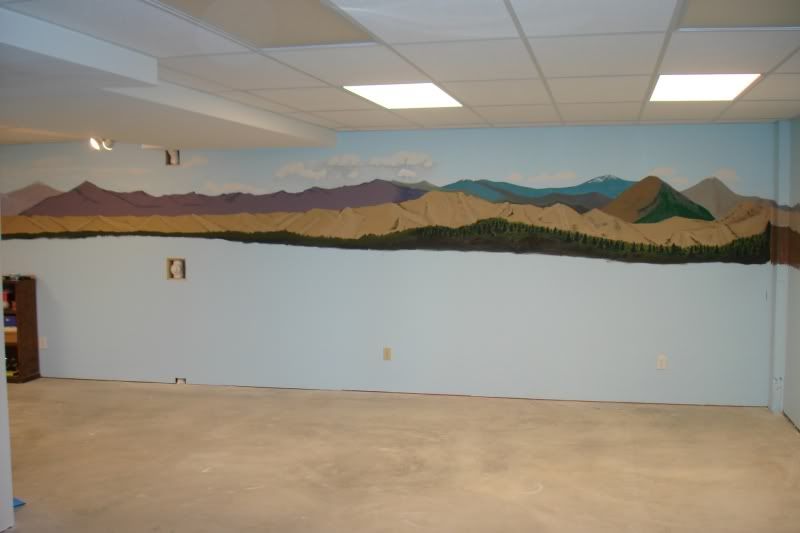
Learning to do the scenery will just take some experimentation, and as you alluded, this forum provides a world of ideas. Just a few days ago I tried one of the tricks provided by Jim Policastro in his last article in OGR Run 256, and it worked better than I had hoped. The trick was to lightly brush an off-white or similar color paint, using a dry brush, on surfaces that are supposed to be rocks.


I had added some rocks croppings to one of my otherwise relatively flat walls, and I just could not get them to look like rocks. I did as Jim suggested, and voila! All of a sudden the rocks looked like rocks. (Or at least they look much better, as the picture below depicts.) BTW, I have used many of Jim’s hints, including the use of Structolite, and I can’t thank him enough. 


Timber Rocks 01 med DSC_0518


Watching and emulating the works of Jim, Rich, Dennis, Alan, Elliot, Patrick, Alex (the other one), Roger, and of so many others is what makes this hobby so much fun.


Please, do keep us posted on you progress.


Thx!


Alex

Attachments

Images (1)
  • Timber Rocks 01 med DSC_0518

It has been a while since I post an update, but that does not mean that I have not been making progress - I have.


One of the areas I have been working on is an empty space right up front, under the second level, adjacent to the main yard. I was going to simply put some sort of retaining wall an let it go at that. But it seemed like such a waste . . .


So I made a subway shopping center, the Hidden Pass Mall. It has a small loop of track using Ø36 curves and 40" straights. It is controlled by a DZ-1220 for scheduled stops and annoucements, and the subway is a single car.


Here are some pictures. (Click to enlarge)


Future site - 

HPM 01 Future Site med crp DSC05091


Track table is 38" x 84" 1/2 OBS and 1x2 frame. Materials I already had.

HPM 02 Track med crp DSC05086


Pink Foam to make it the proper height for the passengers to board the subway car.

HPM 03 Riser med crp DSC05090


1/4" Foam Board and Google Images of store fronts.

HPM 04 StoreFronts1 med crp DSC05111


Cutouts for the lights to shine through. LED's behind the stores and also in front, at the top.

HPM 05 StoreFronts2 med crp DSC05109


Arches made out of pink foam.

HPM 06 Arches med crp DSC05207


How it looks now -

HPM 07 Shoppers1 med crp DSC05255


HPM 08 Shoppers2 med crp DSC05258


HPM 09 Shoppers3 med crp DSC05260


HPM 10 Diners1 med crp DSC05263


Another spaced properly used!

HPM 11 Finished med crp DSC05269


Thanks for looking.


Alex


Attachments

Images (11)
  • HPM 01 Future Site med crp DSC05091
  • HPM 02 Track med crp DSC05086
  • HPM 03 Riser med crp DSC05090
  • HPM 04 StoreFronts1 med crp DSC05111
  • HPM 05 StoreFronts2 med crp DSC05109
  • HPM 06 Arches med crp DSC05207
  • HPM 08 Shoppers2 med crp DSC05258
  • HPM 09 Shoppers3 med crp DSC05260
  • HPM 10 Diners1 med crp DSC05263
  • HPM 11 Finished med crp DSC05269
  • HPM 07 Shoppers1 med crp DSC05255

Alex,


This was fun to build.


I forgot to mention that it is hinged, so it is easy to remove to work on it. I installed three pins on the side opposite the hinge side, so I just pull those three pins, allow the board to swing down (another advantage of a high layout), slide two blocks under it, pull the two hinge pins, and it is free to slide from under the layout.


Thanks for your nice comments.


Alex 

Add Reply

Post
The Track Planning and Layout Design Forum is sponsored by

AN OGR FORUM CHARTER SPONSOR

OGR Publishing, Inc., 1310 Eastside Centre Ct, Suite 6, Mountain Home, AR 72653
800-980-OGRR (6477)
www.ogaugerr.com

×
×
×
×
Link copied to your clipboard.
×
×