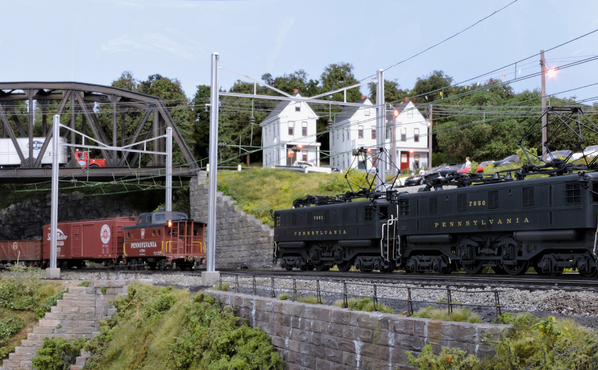
I am sure I am not the only DC area O scaler spending their summer preparing their layout for the upcoming O Scale National in Rockville, MD

In my case, "preparing my layout" meant getting some catenary up.  I am modeling the electrified main line through New Jersey in 1956. so its tough to justify not having it.   I won’t get as far as I would have liked by the time of the convention (As they say, “Life got in the way”), but I have completed one 20 ft double tracked section:

4300

The K-Bridge poles are made of brass, and built to my width specifications by Model Memories,

Don Silbauer, the owner, is very easy to work with

I added the angle corner braces, the signal wires, the rain caps, and made the bases look more like poured concrete than folded brass

I soldered together the catenary from 36” long lengths of .025” diameter Phosphor Bronze wire from the Tichy Train Group.  Steady wires and cross wires are made of the same material. The insulators come from Model Memories, as well as a stash I got from Ed Duddy many years ago.

Before going further, I owe a huge debt to Andy Rubbo.  He wrote a very comprehensive and detailed series of articles in the Winter 1996 Keystone Modeler on how he built PRR catenary for his HO layout.  Andy supplements his writing with a lot of photos, and even assembled some components on the bench just for photographs for the article.   (You can’t get this online, but you can get it in the Keystone Modeler CD-ROM No. 5, sold through the PRR society’s website, www.prrths.com.)  Andy has also been to my layout and offered even more tips.  He is very generous with his advice. And more importantly, he knows what he is talking about.  THANKS ANDY!

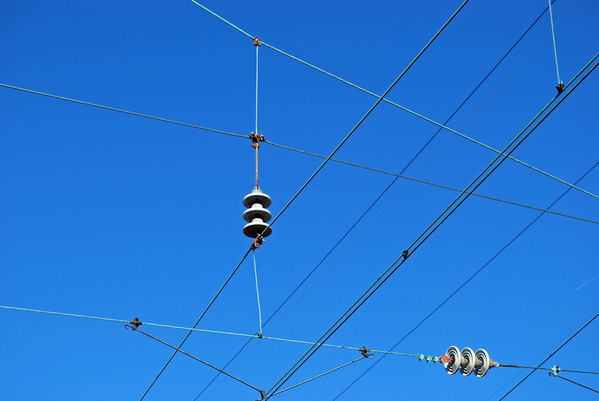
I also want to thank Rick Wright, fellow Burke O Scaler, who, during several of our pre York Rail fan expeditions took lots of photos of catenary construction.  Here is an example of his potential Pulitzer Prize winning work:

4171

Finally, I’d like to thank my back, for holding up during several hour-long sessions of stringing catenary wire with both hands.

One of the issues I faced is my sub roadbed is 1” pink foam sitting on ¾” thick plywood. This is great for scenery, as it readily allows below grade ditches, dips in the terrain, etc. However you can’t rigidly mount the K-Bridges to the foam. I had to make ¾” diameter x 1” long wooden plugs, and glue them into cylindrical holes drilled into the foam, sinking them down to the “bedrock” of the plywood. I made all sorts of silly jigs to ensure the plugs were positioned and oriented properly. Here is one of them:

4165

An equally silly set of jigs made sure the K-Bridges went in dead vertical:

4168

If you look closely you will see the bases have pointed screws temporarily bolted in place, to mark where the mounting holes go in the plugs

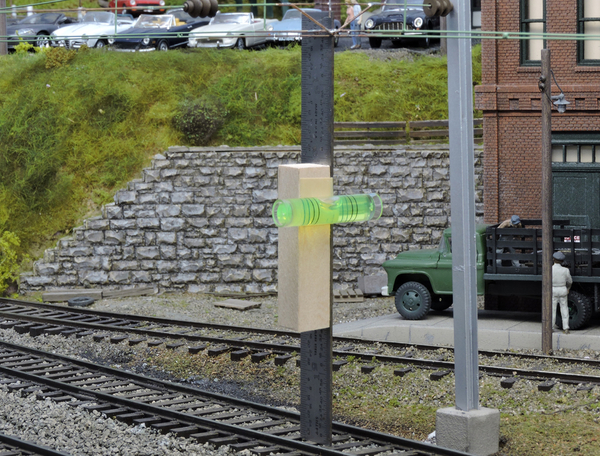
I used a camera, which is far more accurate (and less optimistic) than my eye to make sure the K Bridges are all dead vertical:

4176

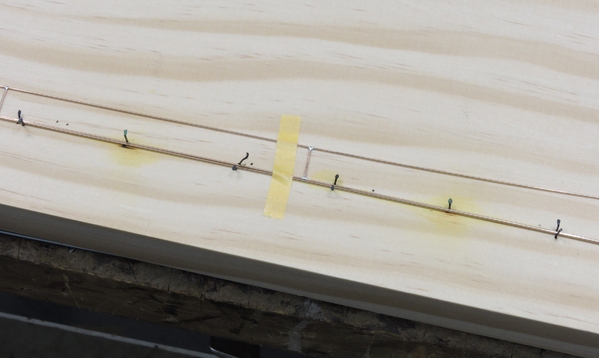
I soldered together the catenary with Staybrite Silver bearing solder and Superior Number 30 flux.  I drew a jig on a 1 x 6 poplar board, and used track spikes to hold the messenger (curved) and auxiliary (straight) wires in place, and used Tamiya masking tape to hold the vertical hangers:

4233

4236

Note that I needed a separate jig for each length of catenary. As you can see, mine range from 20” (for the tightest, 56” radius curves) to 34” for the main straight away.  The latter is not quite the scale interpole distance, but is limited by the length of wire I can get. Besides, it helps make the runs look longer.

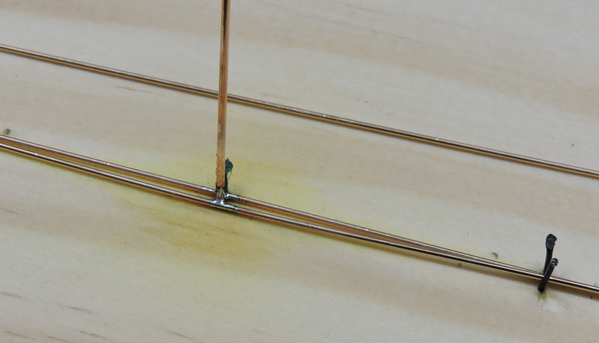
I added the trolley wire last, using .030” Phosphor Bronze wire as spacers.

42374234

When the .030" wire is trimmed flush it will look close enough to Rick’s photo above

By the way, my method of soldering follows what Andy did:   Tin the iron.  Apply a small bead of solder to the tip.  Apply flux to the joint. Touch the tip (and bead of solder) to the joint. When you hear the sizzling stop, the joint is soldered.  This is easy and fast, it makes a solid joint, and is counter to anything you learned in shop class.  The trick is to have the tip well tinned.  I use Thermaltronics Tip Cleaner I got from Amazon.

The Superior  30 flux is only mildly acidic, which is good. (The Staybrite flux is so acidic it tends to rust tools on my workbench.)  However the Superior  30 should still be neutralized with baking soda.  I soaked the catenary in a tray and used an old toothbrush to scrub things clean.  The problem was I needed a 40” long tray, and that well is outside the realm of what is commercially available. So I built a tray from two 2’  long planters taped together.

4237

The only reason I mention this is I finally found a use for that Flex Seal Tape (you know the tape that seals a boat cut in half) I bought from some very pretty young woman at a booth at the Daytona 500.  The tape really held the two pieces together and made a waterproof joint.

(By the way, ignore that Barkeeper’s friend in the photo above…I discovered baking soda works better)

Installing the catenary was tedious, but straightforward. And required serous stretching of legs and back before starting.   My trolley wire is 5  7/16” above the rails.   I chose this to be compatible with the pantographs on my MTH electric.  This works out be 21.75 feet above the rail head. Or about 3/4 of a foot (3/16”) too high. I can live with this.  Obviously you need a lot of jigs to hold the catenary at the right height while you solder it together.

4247

That black thing you see is supposed to hold jewelry bracelets. In my case, I used it to rest my wrist to allow more precise soldering.

I painted my catenary on the bench with Model Master Pale Green.  That is a close match to oxidized copper, which would have been the dominant color in 1956 when most steam operations were halted on the main line.  Besides, it shows up well.  I did not paint the ends or anything that would be soldered until after the soldering was done.  After everything was soldered, I touched up all the bare areas, and then went over everything with a dark gray wash.  That not only tones it down, but it highlights all those joints.

Here is a close up of one of the jigs in action.

4244

The plastic angles are made from styrene strip and have magnets glued to them, which makes it easy to attach (and remove) them from the top of the jig, which is a cut steel rule.   The paper clips prevent the insulator from falling into the messenger wire when you solder it to the vertical hanger.  They also help keep things together

Speaking of the verticals, I had to move several of them around. I retrospect, I should have not had them pre-installed, and waited until the bridge was installed to figure out exactly where they should go. It’s not that hard to drill a .025” hole and solder a new hanger in place.  I ended up with a lot of experience with that.  To know exactly where to drill the hole for the hanger (centered between the rails), I made yet another jig:

4249

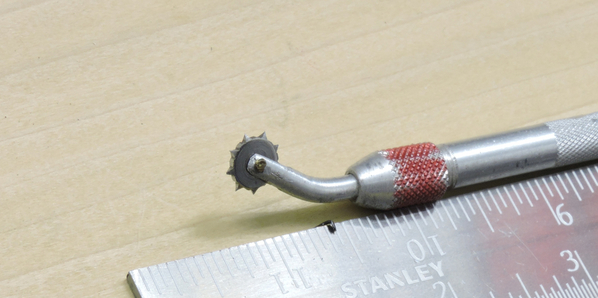
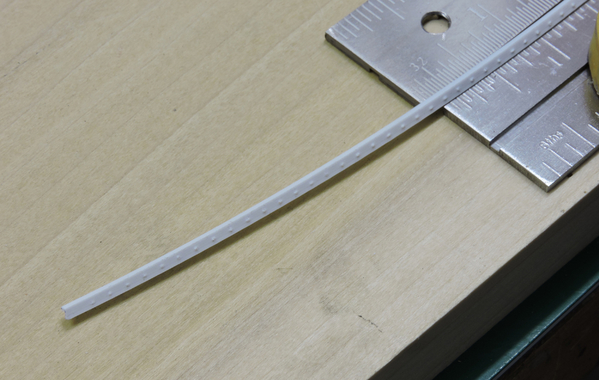
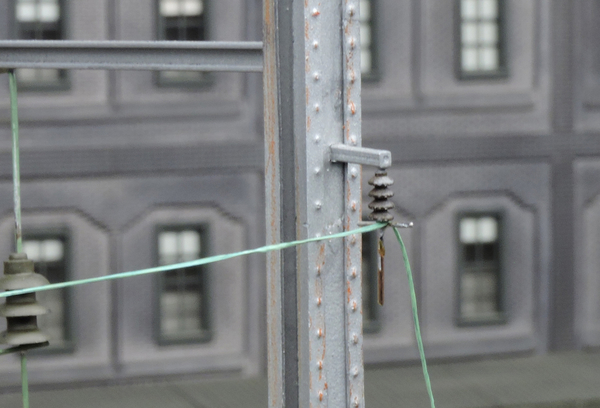
I made the vertical support angles from .080” styrene angle, and the rivets were made with a pounce wheel with half the teeth removed. This gives spacing much closer to the prototype:

42584259

I glued these in place with Gorilla Glue Super Glue gel. (My current favorite “go to” glue)   The angles are installed after the base is slid into position, so the angles appear to be embedded in the concrete as well:

4272

The upside of this is it looks realistic.  The downside is, since the base needs to be slid upward to get to the mounting screws,  you can’t remove the K-Bridge.  At least non-destructively.

The insulators for the signal wires (Tichy HO insulators) are held in place with square brass tubing and .020: diameter wires and were installed before the K-Bridges were installed. I used EZ line for the wires.

4275

I later painted the E-Z line a medium gray.  It’s tough to get a realistic sag with E-Z line.  Whereas I found it much easier with ordinary thread. As seen in the utility lines in the background of this view:

4299

I cheated a bit on the curves. In the real thing the catenary is “banked” with pull offs on the inside.  I got the banking right, but I could not get my pull offs to keep the catenary level. So I used the same type of "V" steady rods on the curves as on the straights.

4301

I am sure I will be asked if this catenary is live.  My polite answer is “No, but it can be.”  I have no intention of running under wire for a host of reasons, the most significant is I have lots of hidden trackage, and as noted modeler Allen McClelland  once said:  "Don’t model what you can’t see”   On the other hand, just for grins I applied power to this section and ran an MTH GG1 back and forth a couple of times.

I still have a ways to go, including putting the 30’ long four track portion under wire.  But that should be a bit easier, as the curves are much broader (as in 300” radius).  In the meantime, at least some of my layout has advanced out of the wireless era.

4278


4280

Attachments

Images (20)
  • 4300
  • 4171
  • 4165
  • 4168
  • 4176
  • 4233
  • 4236
  • 4234
  • 4237
  • 4247
  • 4244
  • 4249
  • 4258
  • 4259
  • 4272
  • 4275
  • 4299
  • 4301
  • 4280
  • 4278
Last edited by OGR CEO-PUBLISHER
Original Post

Replies sorted oldest to newest

Howdy John,

Absolutely Spectacular!   I’m a SPF (Slobbering Pennsy Freak) but I never got into the electrified aspect of it either in prototype or modeling.   However, I must admit that seeing your fabulous work may lead to electrification of a portion of my layout.   Outstanding craftsmanship indeed!

 Chief Bob (Retired)

I have been following John for some time and I absolutely love his work. After doing catenary on a 16 foot section of the New Munoz Lines, I have the greatest respect for anyone who does catenary and what John does is spectacular. Catenary work is, by far, the most difficult task I ever attempted on the layout and to do it as masterfully as John requires much research, patience, dedication and diligence. Great respect for what he has done.

Wonderfully realistic, as is everything else on your layout.  I sort of gave up on replicating the curved pull off wire in the name of simplicity on my crude catenary construction.  I also built with no plans to power the lines but found they serve as a great ground plain for improving TMCC signal.

Bruce


Thank you everyone for the kind words..and encouragement!  It’s always rewarding to hear praise from fellow modelers.  As anyone who has built any kind of catenary knows, it’s more an act of perseverance than anything else.  I am sure Andy Rubbo, Drew McCann, Elliot Scher, Bruce Webster and Marty Fitzhenry (who hasn’t weighed in here, but who has built a very impressive operating Lionel-like system) would attest, it’s not that hard, but it does require precision, and it does take time.  It also helps if you are not afraid of making mistakes.  My friends will tell you that I have been threatening to get some type of catenary up for quite awhile. I finally did it, and I am glad I did.  So for those of you still considering it, I hope this post inspired you, and above all…GO FOR IT!

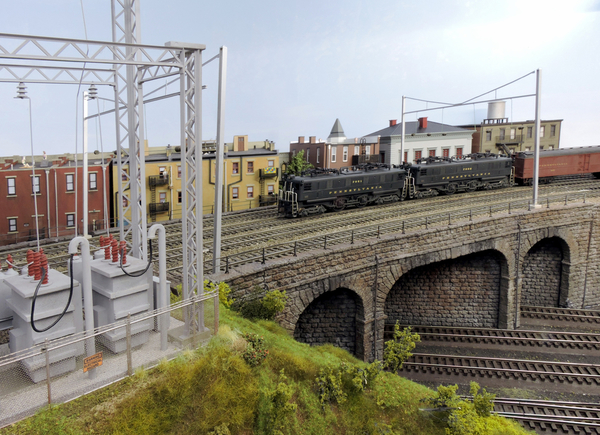
As I said, my next step is to add wire to the four track main line run. These will have the high tension masts, which make the K Bridges about 20” tall. (I could not put the masts in the existing section due to a thoughtlessly placed HVAC duct that protrudes down from the ceiling.  I commissioned Don Silbauer to make the basics of a signal bridge, based on the one at Princeton Junction.  I took several trips there to make sure its right.  I need to add the signals (proper double targets, with operating lights), the high tension masts,cross arms, ladders, rivets, concrete bases, and a few other details before it goes in.  I might have that bridge done by the O scale National. I also asked Stu Galnik to make one of his substations.  He does excellent work, and he followed my design very closely.  I am not quite sure my design is prototypically correct, but I am sure it is electrically correct.  (Autotransformers, with low breakers on the low voltage sides, and ground connection through pipes to the rails.)  The four arms of the substation will get connected to the high voltage masts on the K Bridges.  The basics of the scene look like this

4239

So stay tuned to this post for further development.  But you don’t need to stay close.  I guarantee you can walk away for awhile

Thanks again everyone!

Attachments

Images (1)
  • 4239
Last edited by John Sethian

As I've mentioned elsewhere (and you so kindly posted a link to this), amazing work! A question about the catenary support work. Yours are a wonderfully weathered silvery/gray. However, I've seen pictures of them in South Amboy (the area I'm potentially modelling) painted black. I'm not sure the year, but with the K4 in the picture, it has to be the mid 50's at the latest. Were they repainted at some point, or was this a regional thing (ie., maintenance painted them with whatever color they had on hand locally)? If you can possibly shed some light on this, it'd be appreciated.

.

4247

That black thing you see is supposed to hold jewelry bracelets. In my case, I used it to rest my wrist to allow more precise soldering.

I painted my catenary on the bench with Model Master Pale Green.  That is a close match to oxidized copper, which would have been the dominant color in 1956 when most steam operations were halted on the main line.  Besides, it shows up well.  I did not paint the ends or anything that would be soldered until after the soldering was done.  After everything was soldered, I touched up all the bare areas, and then went over everything with a dark gray wash.  That not only tones it down, but it highlights all those joints.


John,

Excellent job, including the choice of paint for the catenary.

What is the silver item to the right...it looks like a portable vise?

Tom

Wow, an old post brought back to the forefront!   Thanks again everyone for the comments.  To answer the specific questions:

Tom (PRR8976):  That silver thing is indeed a vise. A panavise to be specific. A very useful tool. Its available from a number of places, including MicroMark

MagicLand:  I can shed no useful light on the color.   I have seen the K-bridges and poles painted both silver and black.  And rust.  And despite looking at a lot of photos, I can't corrleate the paint to any locale or era.  So your "maintenance painted them with whatever color they had on hand locally" may be as good a guess as anyone's  Maybe some expert will chime in here.    Three thoughts on the matter:

1) A lot of times silver will appear black, if the poles are in the shadows, or excessively rusted

2) I have never seen the Princeton Junction signal bridge painted anything but silver

3) Silver looks a lot better, as it shows more of the detail (rivets, bracing) and weathering

While we are on the subject, the type of catenary support and high tension towers also varies dramatically:

a)    Sometimes the support are just poles with the steady span.   (I.E. no K-bridge).  This, I think, was used in places that the PRR by landrights and local topology could string guy wires laterally outward to hold up the poles.  In those cases there was usually no angle braces on the poles

b)  The high tension tower configurations also varied. Sometimes there are one cross beam per tower, sometimes two, sometimes one.  Sometimes there are two on one tower with an offset cross arm to hold up to four wires. These depended on the local geography as well as how far the tower was away from the substation.   Sometimes signal lines were up high on the towers, sometimes down low on the main poles.  Sometimes they were a single offset insulator, sometimes on their own cross beams.   Look at enough photos and you can find anything you want.   (I get a kick when someone sends me an e-mail saying I got the catenary wrong, based on one photo they saw.)

The resurgence of this post is timely, as I have started stringing up the catenary on the four track main.  This section will have the HT towers:


5184

70 Congo by moonlight 00

Attachments

Images (2)
  • 5184
  • 70 Congo by moonlight 00
Last edited by John Sethian

Thank you everyone for the kind words..and encouragement!  It’s always rewarding to hear praise from fellow modelers.  As anyone who has built any kind of catenary knows, it’s more an act of perseverance than anything else.  I am sure Andy Rubbo, Drew McCann, Elliot Scher, Bruce Webster and Marty Fitzhenry (who hasn’t weighed in here, but who has built a very impressive operating Lionel-like system) would attest, it’s not that hard, but it does require precision, and it does take time.  It also helps if you are not afraid of making mistakes.  My friends will tell you that I have been threatening to get some type of catenary up for quite awhile. I finally did it, and I am glad I did.  So for those of you still considering it, I hope this post inspired you, and above all…GO FOR IT!


John,

Do you have to have much (or any) horizontal tension on the messenger and auxiliary (contact?) wires to prevent the pantographs from pushing them upwards when they touch?

@Prr7688 posted:

John,

Do you have to have much (or any) horizontal tension on the messenger and auxiliary (contact?) wires to prevent the pantographs from pushing them upwards when they touch?

The only tension I have is at the ends. and it is provided by hidden /disguised thread.  It is needed because ends are not balanced in tension

It helps that I cheat: My catenary is non-functional per my intial post.  My pantographs are adjusted so they are about 1/16" below the wire. Thus any upwards pressure is momentary, accidental, and quickly rectified by me.   

Add Reply

Post

OGR Publishing, Inc., 1310 Eastside Centre Ct, Suite 6, Mountain Home, AR 72653
800-980-OGRR (6477)
www.ogaugerr.com

×
×
×
×
Link copied to your clipboard.
×
×