
Last year I purchased a couple of used K-Line passenger cars for their parts.  Since I don’t have extra storage space inside my train room I began wondering... what I could build with the extra parts on these cars?

  Washington View Penngolden parts 4

My first thought was to build a coach/chair car for my Union Pacific City of Los Angeles train.  Looking at the existing window arrangement of the Golden State parts car it would be possible to make a 44 seat coach similar to the Union Pacific's 5401~5449 series cars originally built by Pullman.  But it meant modifying the windows in the Golden State’s aluminum shell.  Also, after finishing my other more detailed interiors a chair car seemed simple and a little dull as it goes by on the track.   Building a chair car interior would involve just gluing in 11 rows of seats and making a couple of walls for the bathrooms.  Well, if I was going to modify the windows on this Golden State aluminum shell what other Union Pacific car could I build that would be more interesting for my visitors to look at?


I dug deep into the book "The Union Pacific Streamliners" by Ranks and Kratville and looked at all the plans and window arrangements used in the Union Pacific's City of Los Angeles Streamliner fleet.  Then I found a 1937 dormitory-club lounge car called "The Little Nugget".   I like challenging myself in each new passenger car interior but recreating The Little Nugget was going to be like nothing I have tried before.

The Little Nugget


Before I get into the How-To part of this write up, here's some background information about The Little Nugget.

In 1937 The Little Nugget was built as a dormitory-lounge car "LA-701" for Union Pacific's 7th train City of Los Angeles (CoLA).  What made this lounge car different was the interior was designed by the famous artist Walter Kuhn.  Its interior styling was a complete contrast to the Art Deco used in the rest of the CoLA train.  Its been described as an 1880's old west dance hall, prosperous hostelry of the bonanza days, gay 1890's saloon and a Victorian dream of red velvet.  Kuhn gave The Little Nugget a large pink cabbage rose pattern on the carpet, silver star-studded cerulean blue ceiling, red custom built rococo chairs, love seats and sofas, black marble table tops, twenty ivory painted winged cherubs holding up ten sets of triple brass gaslight fixtures, white embroidered lace curtains, red velvet drapes and a yellow mechanical canary in a gilded cage.  The semi circular bar with had upper and lower brass rails, winged cherubs on the front of either side, gilded ornamentation in between and beveled mirrors on the walls behind.  The woman’s bathroom had a damask style wallpaper print with history of the corset frieze across the top wall and mounted to the floor was a gilded toilet bowl, gilded seat with a rose painted on its lid (yep... you read that right, this car had a golden toilet).  Over the delicate rose vine wallpaper in the main lounge Kuhn put 125 paintings, drawings and photographs of vaudeville performers, dancers, jockeys and clowns.  Although The Little Nugget was replaced with more modern 9000 series dome observation lounge cars in 1955 nothing could replace its incredibly memorable over-the-top interior.   

It's interesting to note that in September 1936 the Pullman Standard Car Manufacturing gave Union Pacific a life expectancy of 12.5 years for these lightweight aluminum passenger cars.   By February 1939 Pullman increased the life expectancy to 15 years 8 months for new Streamline passenger cars.  From these life expectancy estimates you can see why the other Union Pacific lounge cars built build before 1945 were scrapped one by one in the 1950's.   The Little Nugget was retired by Union Pacific in July 1956 and donated to City of Los Angeles for display at Travel Town, Griffith Park.  To this day, Union Pacific still calls The Little Nugget its most elaborate lounge car ever used.


How to make The Little Nugget interior:

On your semi scale K-Line donor car start by removing the 2 black screws on each end that hold on the end caps.  Pull each end cap away from the shell and unplug the wires going to the overhead lights.  Slide the black metal frame with stock K-Line interior out of the aluminum shell.  Next, remove the small screws that hold the old plastic floor onto black metal frame.  Once the old plastic interior is gone, tack down 1/16" wooden strips with CA glue to elevate your new floor above the incoming power wires. Tack down a sheet of 1/32" basswood floor with CA glue to the wooden strips.   Mark where the windows are to be located on the basswood floor.

The nugget floor

I thought I was working with an K-Line 18" aluminum passenger car shell.  But I found out at this point the Golden State aluminum shell is only 17.5" long because it came from an observation car.   I did not want to scale down the lounge area because this was the most important part of the build to me.  Behind the lounge/club section was the dormitory rooms for the Union Pacific employees like the bartender, chefs, stewards and the mechanical road supervisor.  While putting up the walls I kept the plans printed on 11" x 17" paper close by and decided to compress the dormitory section of this car to fit the 17.5” shell.

The nugget floor 2

Add the pink cabbage rose carpet in the lounge area and put a primer/base coat of paint on the walls in the dormitory section.  Unfortunately, the original cabbage rose carpet was changed around October 1940 about the same time the mechanical canary in the gilded cage was removed.  For this interior build I was going to stick with how The Little Nugget looked brand new in December of 1937.   To make more head room inside this passenger car I'm planning on  changing out the stock K-Line incandescent bulbs and going with LED strip lights.  I left some room up front for a Henning's 21000 Passenger Car LED lighting kit's small LED circuit board in the hallway between the men's and women's bathrooms.  With that finished, the easy part of this build was done.

The nugget floor 6


The hard part is going to be getting the historically correct interior while matching window spacing in the Golden State aluminum shell.   While I have been to Travel Town in Griffith Park a few times as a kid, I had never stepped foot inside The Little Nugget.  Searching the internet I found The Smithsonian Institution had a public collection of Walt Kuhn papers and photographs.  Digging through this black and white photo collection I found the images needed to correctly make the original 1937 furniture.  I laid the floor plans next to a strip of 3/8" x 3/16" basswood and started making tables and chairs.

seat 1

The build sequence for making the 2 sofas, 3 love seats and 23 chairs and went like this:

seat 1 2 3

Kuhn added flowing green vines with brightly colored roses and golden ribbons accents on every piece of velvet covered furniture.  The miniature red Victorian/Rococo furniture looked like this when painted.  I left the legs off the furniture so my passengers would fit better and could see out the windows.

chairs 2


Kuhn put two stacks of colorful glassware in front of the beveled glass mirrors that were mounted behind the bar.  The bartender was given a crawl/access door underneath the bar on the back wall to get in and out of the bar section.  Some of the photos found in the The Smithsonian collection had writing on the back describing who was in the photo.  The two waiters names were Goldie and Scott and they wore white trousers with red pinstripes, emerald green double breasted jackets, white shirts with narrow black string ties.  The back of another photo said John T. Ruh was the bartender on The Little Nugget.   The bartender was dressed in period correct clothing and wore a fancy vest, red ascot tie with diamond horseshoe pin.  During an internet search for more information about the bartender I found a very similar name "John M. Ruh".   Curious, I sent John M. Ruh an email and waited for an answer.  Success!  A few days later he politely responded and confirmed he was the grandson of John T. Ruh.  He told me a few stories of his grandfather working as a bartender for the Union Pacific.  During his grandfathers time as bartender he had collected several signed photos from the big celebrities of the day that traveled on City of Los Angeles.  Here's a family photo John M. Ruh emailed to me of his grandfather working on The Little Nugget.

Nugget Bar John T Ruh3


Well, that did it.  If I was going to recreate a historically correct interior of this lounge car it was going to have a John T. Ruh as bartender!

bar10


Modifying and painting the aluminum shell:

Toward the end of 1941 the City of Los Angeles paint scheme of Amour Yellow, Leaf Brown with Gold lettering was changed to the modern Armour Yellow, Harbor Mist Gray with bright red lettering and stripes.  The full length anodized aluminum batten strips above the window were also added in 1941 but in later years these batten strips (that cover the rivet construction) were painted Armour yellow to match the car.   During its life on the rails Union Pacific repainted the outside of the car Amour Yellow at least 4 times and each shade of yellow underneath was slightly lighter than the shades on top (probably due to weathering).  Also, The Little Nugget shows it was re-lettered 4 different times as the Amour Yellow paint changed.   I picked its 1950's Union Pacific paint-lettering scheme so this car would better match my other K-Line streamline passenger cars.

Painting the shell was going to be an undertaking because I needed to buy an air brush.  And then, I needed to learn how to use an air brush.  I had already owned Amour Yellow and Harbor Mist Gray latex paint from another project.  Following the advice in posts from forum members about how to use latex paint in an air brush I went to work.  Even though my existing latex paint was a great color match to my other K-Line passenger cars I could not thin it down enough to flow out of the brush correctly.  First I tried to water it down 50/50, then 40/60 and finally 30/70 using both distilled water and Windex as recommended.  The final result worked but... I would not recommend using latex paint on a passenger shell to anybody, especially a first time user.  If I ever use this air brush again I will purchase air brush ready paints like Scale Coat II or Tru-Color.

The first step was to sand off the old red & silver paint.  Then, spray with gray primer.  Next, air brush on the latex paint colors (4 coats of yellow paint and 2 coats of gray).  Then, spray with Krylon glossy (3 coats).  Then, apply Microscale decals.  The final step was to spray with Krylon flat (3 coats)

Right side shell modifications.

Shell 1 2 3

Left side shell modifications.

Shell 1 2 34

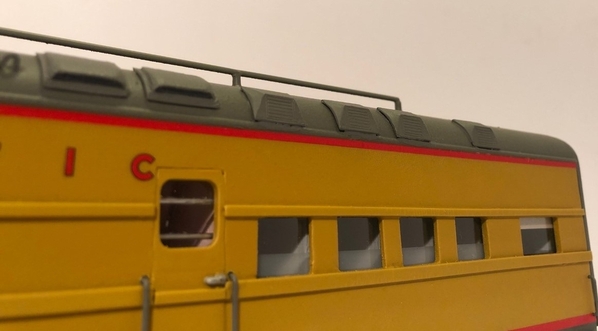
In the above progression of photos I used a flat sheet of Styrene (2.0mm thick) to blank off window & door openings in the Golden State shell.  New openings were carefully cut in to the shell using a Dremel tool.  Then finishing the new opening with a flat file to get a crisp straight edge.  Since this was a 17 1/2" semi scale shell I could not include all 5 window openings on the hallway side of the dormitory rooms.  Other details were added like the rooftop radio antenna, hand rails, full length moldings above & below the windows, foot steps and rooftop vents.  O-Scale Microscale decal sheet #48-114 was used for the red stripes, sheet #48-113 for the large Union Pacific name in the center and sheets #48-136 & #48-198 was used to create car number LA-701.  Also, following the advice of other forum members I used Micro Set under the decals and Micro Sol over the top of the decals and finally covering them with flat clear coats.

shell 3


Finishing the interior and making contact with Travel Town:

Recreating the 1937 interior colors would not have been possible without the knowledge and advice of Greg Gneier, President of Travel Town.  Over email he informed me the main dorm hallway was light pink with stenciled roses and the original floor was brown linoleum.  The pull down privacy shades were pinkish beige on the inside and silver on the outside.  The dorm room walls were a dull aluminum color with blue carpet on the floor.  Greg is the historian for The Little Nugget and gave me a great lead about a January 3rd 1938 LIFE magazine article that included a photo of the 1937 "History of the Corset" frieze and the Victorian damask style wall paper used inside the Woman’s restroom.   There are no known photos of the original men’s restroom but Greg confirmed the wall paper was the same as the women's restroom.  In a June 1948 Walt Kuhn letter to the Union Pacific the only mention that men’s restroom had a frieze of framed rooster fights.  

bar16

While passing through LA Union Station a few years ago I noticed Travel Town set up a display to help raise money for The Little Nugget's restoration.  At this fund raiser Travel Town volunteers brought in several original items from the cars lounge section.  I snapped a few photos (shown below) of the furniture but this was the closest I have been to being inside The Little Nugget's lounge.  Items like a red Victorian chair, small drink table and cerulean blue cast iron ashtray with two cherubs in the middle that holds a packet of cigarettes.  In my option, displaying the golden toilet from the woman restroom would have been a complete show stopper at LA's Union Station but unfortunately that item was changed out by Union Pacific some point before The Little Nugget was donated to Travel Town.   Here's a link to see the most current restoration information about The Little Nugget  https://traveltown.org/projects/nugget.shtml .

Union Station Display LA


As with my other builds I repainted the K-Line figures and turned their heads slightly.   I do this because don't like having all my passengers staring straight ahead at blank walls like zombies.  Even though these walls have the original looking paintings and nice wallpaper.  Also, I recommend trimming the bottoms on your K-Line 1/45th scale figures to make them fit in the seats better of a 1/48th semi scale car.  The toilets and sinks were from ScaleCityDesign.

thumbnail_IMG_7309


The Little Nuggets first paid service date was Dec 27th 1937 and it's still around today after 83 years.  83 years is pretty good for a lounge car that was only estimated to last 12.5 years.  Kuhn also created custom lounge interiors for the City of Denver's two Frontier Shack's and the Hollywood lounge car for CoLA.  None of these other lounge cars made it past the 1950's.  One day I would like to make it back out to Travel Town Museum in Griffith Park for a tour inside of The Little Nugget.   I'm curious on how far the volunteers made it with restoring the interior back to its original condition.   But for now, at least I can enjoy my miniature O-gauge version as it travels down the rails with the rest of my City of Los Angeles passenger cars.

thumbnail_IMG_7319

thumbnail_IMG_7306


Attached below are the patterns I used for this build for anyone that wants recreate this historic and unique lounge car for your train layout.   Thank you to all the OGR forum members for the positive feedback on these interior builds over the last year.  And thank you for following this series.


To look at the other interior builds in this series click on the links below. They are listed in the order I run them on my layout:

https://ogrforum.ogaugerr.com/...-an-e-8-cab-interior

https://ogrforum.ogaugerr.com/...interior-upgrade-rpo

https://ogrforum.ogaugerr.com/...6327-k4690#lastReply

https://ogrforum.ogaugerr.com/...car-interior-upgrade

https://ogrforum.ogaugerr.com/...enger-car-8003-k4690

https://ogrforum.ogaugerr.com/...lounge-car#lastReply

https://ogrforum.ogaugerr.com/...enger-car-1305-k4690

https://ogrforum.ogaugerr.com/...upgrade-k-line-k4690

https://ogrforum.ogaugerr.com/...upgrade-k-line-k4690

https://ogrforum.ogaugerr.com/...senger-car#lastReply

https://ogrforum.ogaugerr.com/...upgrade-placid-haven

https://ogrforum.ogaugerr.com/...oenix-aluminum-shell

https://ogrforum.ogaugerr.com/...pullman-sleeping-car

https://ogrforum.ogaugerr.com/...c-passenger-car-1575

https://ogrforum.ogaugerr.com/...-passenger-car-k4690

Attachments

Last edited by T.Albers
Original Post

Replies sorted oldest to newest

Thank you @Quarter Gauger 48   I admit, I didn’t know much about this lounge car in the beginning, just that it was saved by Travel Town because it was unique.  During the build I kept learning more & more about the interior details.    I would discover something new in a photo and say to myself, well I can’t leave out that important detail. 😊   It really is hard to believe this was a real passenger car Union Pacific had built just following the Great Depression .  It must have been quite the site to see for the first time traveler. 

Last edited by T.Albers

Well, you've managed to do 13 cars in a space of time where I have only managed 2.75. But my cars are bigger than yours - haha!

Your version of the Golden Nugget is of course unique and a masterpiece. I have the Streamliners book you mention but never took much notice of the references to this car. As you have found, books and web resources with blueprints and photos don't reveal what you get from museum and university library records about vital details on interiors, furnishings and sometimes even the car staff. Knowing who they were and being able to include a representation of one as in your case is truly special.

I have done that with an MKT car. But my Holy Grail in terms of a lounge car, which I may try to model some day, was not in the UP fleet but this tavern car in the SP Daylight fleet:

Daylight_Tavern

Attachments

Images (1)
  • Daylight_Tavern
Last edited by Hancock52

Very cool, very unique "little nugget".

Not very important, but the cigarette pack shelf in the ashtray. On the stands I'm familiar with, it is for matchboxes, or on some leaning a pipe. Later ones, the shelf is often just a slot or two, for matchbooks. Size might be the key, hard to tell how large it is. Simple, redundant stuff really, but with purpose, it falls into the "cool gadget" catagory for me.

Hahaha!  Thank you @Hancock52  I respect you guys with those 21" scale cars.  The only way I would be able to run full size cars like that would be to run a loop around the kitchen tile floor and back across the living room carpet.  And my wife would not be happy when she learned I fastened down the track with screws for more realistic operation.

I must say those leather booth seats in your tavern lounge look very comfortable for the SP Daylight passengers.  Is that the Cascade lounge car?   How do you plan on building those booths, Styrene or 3D printer?

@T.Albers posted:

Hahaha!  Thank you @Hancock52  I respect you guys with those 21" scale cars.  The only way I would be able to run full size cars like that would be to run a loop around the kitchen tile floor and back across the living room carpet.  And my wife would not be happy when she learned I fastened down the track with screws for more realistic operation.

I must say those leather booth seats in your tavern lounge look very comfortable for the SP Daylight passengers.  Is that the Cascade lounge car?   How do you plan on building those booths, Styrene or 3D printer?

And you would not be happy if your wife accidentally kicked one of your prize scale cars, as has happened in my household because I have an around-the-main-room carpet layout when actually running scale trains (which is all too seldom). 

A long time ago, when I was researching the tavern photo, I ran the history to ground and it came out like this (showing that the photo is of a "Timberline" lounge/tavern, the Cascade series being later):

"SP 10316 (83-T-1), Timberline Tavern lounge car, inspired by the Timberline Lodge on Mt. Hood east of Portland, built by Pullman-Standard in May 1949 (lot 6805, plan 7575). This car and twin SP 10317 were used in the heavyweight Cascade for a few weeks until delivery of the Cascade Club cars, after which they entered service on the new Shasta Daylight. They were replaced in mid-1955 by dome-lounge cars."

As an aside, K-Line and Lionel used the basic Cascade interior design for many of their cars, including some boat-tail observation cars. With one exception none of these were very prototypical. The exception is the fine Lionel 18" aluminum Shasta Daylight set made about 10 years ago, which has a great observation car but no tavern car.

OTOH, what is prototypical is this c. 2008 GGD Tavern car that I have, numbered SP 10314, which I think makes it a Coast Daylight model. In the second photo you will see that the interior is a representation of the prototypical Tavern booth seats:

IMG_0672IMG_0674

The booth seats and tables are actually available from a 3rd party supplier, from memory it might be Precision Scale, and I have them as well as those in the car as supplied. But they are true O scale size so quite big in what is actually a sub-scale interior (as most 3rail passenger cars actually have). Anyway they would not have to be scratchbuilt, which to me is a great relief. They would have to be re-painted and other features, including the ubiquitous ashtrays and smoking stands, sourced or built from stock metal or plastic. This I have done before.

But I have not tried building out the interior of this car to match the Timberline photo because, as you can see from the top photo, the body panels on both sides of the bar area are solid and you couldn't actually see the bar from the outside - except by peering at an angle through other windows. In the GGD model that area is blanked out with no fittings and has no lights. However, in about 50 years' time when I have finished my two current projects (Texas Special and UP Excursion, both having at least 7 cars with full interiors), I will revert to this one!

As a postscript, I think I have posted this before but this is the fantasy bar (and poker) section in my TX Special observation car, built about 3 years ago:

1_TXSp_Bar_Car copy

And this is the representation I made from a contemporary photo of the train's bar and dining staff, which takes the place of the city skyline mural that probably would have been at the end of food/beverage service cars:

15Partition_Rear copy

Attachments

Images (4)
  • IMG_0672
  • IMG_0674
  • 1_TXSp_Bar_Car copy
  • 15Partition_Rear copy
Last edited by Hancock52

This is one of the most impressive things I've seen today!  Totally awesome!!!  I did over a set of cars for a friend to make a transition-era version of the Lehigh-Valley's John Wilkes when they were shifting from the fancy striped paint scheme to all-red cars.  I did detailed interiors on all of the cars, and even made a fancy diner-lounge and an observation that's similar to this, but nowhere as awesome as this car.  If you want, I can send some pics I took when I did it.  

@Adriatic posted:

Very cool, very unique "little nugget".

Not very important, but the cigarette pack shelf in the ashtray. On the stands I'm familiar with, it is for matchboxes, or on some leaning a pipe. Later ones, the shelf is often just a slot or two, for matchbooks. Size might be the key, hard to tell how large it is. Simple, redundant stuff really, but with purpose, it falls into the "cool gadget" catagory for me.

Hi @Adriatic, thank you for letting me know.  I dug back into the Smithsonian Institution's public photo collection this morning and found out you are completely correct! 

Below is a zoomed in image of that ashtray from a 1947 Union Pacific Black & White publicity photo.  I thought that was a pack of cigarettes being held up by the two cherubs but as you pointed out, that's really a box of matches.  The main clue I missed from this photo is only a matchbox would have a vertical strip going up the side for lighting a match.   Also, logically it did not make sense to me why the Union Pacific would be giving away free cigarettes (there expensive) but free matches makes a lot more sense.   Thank you for letting me know it's a unique little item that was included for the convince of the passengers and I like knowing the historical details are correct as possible. 

1938 The Little Nugget Ashtray2


As a side note: In this 1947 photo above check out the condition of that cast iron ashtray's outer ring.  Judging by the chipped paint its gotten lots of heavy use since Dec 1937 from people knocking the ashes out of their smoking pipes.

Attachments

Images (1)
  • 1947 close up photo of The Little Nuggets cherub ashtray
@tcripe posted:

Excellent work. While I have modified a number of passenger car exteriors, I've never tackled interiors. You did your homework and created an impressive result.

Terry

Thank you Terry.  I have read other forum member posts here and seen there great results creating custom exteriors.  But I admit, this was the first car exterior I have attempted.  The shell painting and full set of car decals were all brand new to me and I learned a lot along the way.  Even though K-Line's Union Pacific aluminum cars are excellent, K-Line didn't make a huge selection of different looking 18" cars.  I'm happy with the end result of this interior-exterior build and The Little Nugget blends in nicely with the other stock K-Line cars.

thumbnail_IMG_7333     

Attachments

Images (1)
  • 18" K-Line UP car colors
@PR&NJRR posted:

This is one of the most impressive things I've seen today!  Totally awesome!!!  I did over a set of cars for a friend to make a transition-era version of the Lehigh-Valley's John Wilkes when they were shifting from the fancy striped paint scheme to all-red cars.  I did detailed interiors on all of the cars, and even made a fancy diner-lounge and an observation that's similar to this, but nowhere as awesome as this car.  If you want, I can send some pics I took when I did it.  

Thank you @PR&NJRR I appreciate that!

Yes, please post photos of your Lehigh-Valley's custom interiors.  I'm still learning in this hobby and like seeing other car custom car interiors and seeing the creativity of other forum members. 

Hello T.Albers,

Fantastic Job!!!

I've been on this forum nearly since it first came online.  I have to say, that I've never seen anyone go through the detail you've done in your cars along with a complete how to list that is very well written.  Your velvet chairs are remarkable along with the amount of research you invested in to capture the look and feel of the original car.

Equally remarkable you found the grandson of one of the bartenders!!!  How fortunate was that?  He must have been thrilled to learn someone was researching his grandfather and that he was also trying to model him as well.   

It just goes to show what a little initiative will pan out if you keep at it.  

I must also admire your zeal to complete a complete interior build of 11 cars in as many months.  For some, including myself, it would represent years of work to complete that many along with the needed research.

Keep up the good work.

The editor should do an article on your interior builds for the magazine.  It think it would be an enjoyable read.

Thank you for the support @Allegheny  You are correct, I spoke to the grandson yesterday and his is thrilled that people can learn about The Little Nugget's history from this How-To post and he really hopes it will help get more visitors to Travel Town and help finish The Little Nuggets restoration effort.  

Researching and building these interiors makes railroad history come alive on my small layout and I'm glad I can share this history with the OGR forum.  When I built my first interior I only owned 4 of these K-Line Union Pacific cars.  I enjoyed researching and building these 4 interiors so I bought more UP cars along the way.  I admit, my builds are slowing down now because any new 18" passenger car I attempt (I'm not doing any car twice) will need full interior and then window modifications, paint and decals to the aluminum shell. 

Thank you for following this series and hopefully within a few months (if I can get paint to flow through that darn air brush correctly) I will have something new to share.  


Last edited by T.Albers

My hats are off to both of you T.Albers and Hancock! I have enjoyed following your posts about doing the interiors of your trains. Since you have both taken K-Line passenger cars apart I was hoping you could possible answer a question for me. I have the 21" UP and SP Daylight trains plus the matching 18" business cars. What I am wondering is if you think it would possible to take the rear platforms off the 18" cars and put them on a 21" car? I was lucky enough to take a tour of the UP business car "Cheyenne" back when I was in college and have always wanted an O scale model of that car. Any advice would be appreciated! Thanks!

Hi @Texas Eagle 77 .  Yes, technically it would be possible to put an 18” cars observation end on your 21” car but you would have to major cutting into the roof and back skirts of that 21” car.  Plus all the cuts you make on that car would be visible so it should be done by a professional with a mill or CNC machine.  And then you would need to match any paint chips if it gets scratched at the mill.

Honestly, I would recommend getting one of the new Union Pacific 21” business car that’s being put out by Lionel right now.  It’s fully done with the correct interior, correct windows and rear platform that you want.  There other posts in this forum by members like @John Rowlen and @Norton and @Hancock52 that can point you in the right direction about the 21” excursion cars like the Cheyenne.  Here is a link to a thread post:

https://ogrforum.ogaugerr.com/topic/96317884353627708

@John4884 posted:

You can get O Scale "The Little Nugget" decals from Ebay... BTW I want this car so freaking bad. If it can be for sale, let me know...


https://www.ebay.com/itm/Champ...5:g-oAAOSwO09cw6zK

Hi @John4884, that's a great lead on the Champ Decals.  It looks like Champ produced two different sets of there O-Gauge P-30 Streamliner "City of Los Angeles" decals.  One of those P-30 sets included "The Little Nugget" in arched red lettering and the other set of P-30's does not.   I clicked on your link and both sets of those decals with The Little Nugget red lettering were sold within minutes of you posting that link.  It looks like we are going to see a couple more O-Gauge Little Nuggets built by forum members very soon.    Thank you for the offer to purchase but I'm planing on keeping this one.  Yes, I live in California.     

Last edited by T.Albers

My hats are off to both of you T.Albers and Hancock! I have enjoyed following your posts about doing the interiors of your trains. Since you have both taken K-Line passenger cars apart I was hoping you could possible answer a question for me. I have the 21" UP and SP Daylight trains plus the matching 18" business cars. What I am wondering is if you think it would possible to take the rear platforms off the 18" cars and put them on a 21" car? I was lucky enough to take a tour of the UP business car "Cheyenne" back when I was in college and have always wanted an O scale model of that car. Any advice would be appreciated! Thanks!

While I think that the answer is basically what @T.Albers and @Norton have already said, there's likely to be a difference in dimensions between the 21" and 18" body shells (both width and height)  that would make mating up the platforms from the latter to the former pretty messy/difficult. That is the case although some (but by no means all) of the K-Line shells were really just shortened versions of their scale car shells. 

The simpler (although not exactly cheap) course is to get one of the UP Excursion business cars and re-letter it. I though I saw somewhere that the Kennefick car was now being offered as a single car but it's not in the new catalog as such and so you'd need to source the expansion pack that has the Lone Star car plus a dome.

I may have missed what Ricky was saying. If you have K-Line cars and want to add the platform off a Lionel car the dimensions are off in height and width. Lionel 18" cars are the same dimensions as their 21" cars though. 

K-Line on the left, Lionel right.

image

FYI UP made the buisness cars out of other cars without the platforms. It may actually be easier to do likewise.

Pete

Attachments

Images (1)
  • image

@t.albers, if you haven't done so already, kindly start a thread detailing how you added, altered, and filled in windows, as appropriate, to model the prototype.  I'm particularly interested how you drilled the aluminum shells without a drill press, and using Dremel bits and files.

I ask because I have several aluminum passenger car projects that would benefit greatly with similar mods.

Always enjoy your projects and your comprehensive threads detailing the builds.

Good Morning @Pingman .  Sure I would be glad too.  I left those photos out of this post above because I felt most people would skip that part of the build process.  But I’m glad to hear your are interested in modifying the windows in your aluminum shells.  
Give me a few days to find the photos that best show the process and I will put together a quick step by step.  Since I have only done all these steps you need on The Little Nugget’s shell I will add it to this thread and put the word update in the title.  

@t.albers, that's great news; your write-up will be a great aid.  My first candidate for changing windows configurations will be to model a Northern Pacific North Coast Limited "Traveller's Rest" lounge car.

These "Traveller's Rest" cars were heavily promoted by NP along with their vista dome cars  on the NCL.  And are a separate purchase car in GGD's forthcoming O scale, NP NCL passenger train set.

Looking forward to your photos and techniques.


Good Morning @@Pingman  You will have fun modeling the interior of that lounge car.  I remember seeing color photos of your Traveler's Rest lounge car in the books "Classic American Streamliners" and "The Art of the Streamliner".  The floor to ceiling mural of the Pacific Northwest map will be nice for your visitors to see and fun to recreate on the wall of that car. 


Here’s a brief how-to guide on filling in the windows openings on an O Gauge aluminum shell.  Tomorrow I will post a second how-to guide on cutting in new window opening on an aluminum shell.  Disclaimers for anyone trying this: Start with a practice shells.  Besides the obvious risk of personal injury, cutting new window openings into an aluminum shell with a high speed Dremel can go terribly wrong if the tool gets away from you.  The following steps listed below are helpful but not the only methods available to passenger car modelers.  There are other options and techniques available and these how-to steps below may not be correct for your exact application.  That being said, here are the steps I used to modifying the aluminum shell when building The Little Nugget passenger car.  Proceed with caution, go very slow and be careful.


How-to fill in the windows on an aluminum shell. 

The easy part.  This might not be the fastest way to do this job but it is easy to master.   Get a micrometer (you can find them for about $10.00 online) and measure the thickness of your aluminum shell.  On this K-Line shell it measures 2.0mm thick.  Always check the thickness before proceeding because I have also seen 1.5mm thick K-Line shells.

thumbnail_IMG_7424 

Purchase 2.00mm Styrene sheets at your local hobby store or online.

 thumbnail_IMG_7178

Then, pick-up an ultra-fine 0.05 tip Staedtler pen.

 thumbnail_IMG_7433

Trace an outline of the window you want to fill onto the sheet of Styrene. Always use a cloth towel or foam under your shell to protect it from scratches.

 thumbnail_IMG_7425

Move the shell and your traced outline should look like this. The pens ink stays wet for a long time and will smear if touched.

thumbnail_IMG_7427

Cut your new window blank out of the Styrene sheet.  Then sand/file down your window blank to the outside of your marked lines.  Test fit several times and sand/file down as needed.  If you don’t like how it looks or fits in the shell at this point, you can always start over and cut a brand new window blank out of Styrene.

 thumbnail_IMG_7430

Make sure the window blank is perfectly flush with the outside surface of your shell and then use CA glue to secure in place.

 thumbnail_IMG_7431

If you have small openings around the new window blank fill in these tiny gaps with HobbyLite micro filler (or similar model airplane mirco filler) and let it dry.  After the filler dries, sand away any excess with fine grit sand paper.  Be careful not to scratch the shell.

 thumbnail_IMG_7434

Here a look inside The Little Nugget’s shell.  You can see the 3 center windows I blanked off using 2.0mm Styrene.

 thumbnail_IMG_7208

Primer the outside of your shell and look for any imperfections from the blanked off window sections.  If you find any, sand down or fill the imperfection and primer again.  Repeat this process until the area is perfectly smooth.

 thumbnail_IMG_7115

You can now finish painting the outside of your shell and putting on decals.  Here’s a before and after look at the Golden State shell.  To better match The Little Nugget plans I shorted some windows, blanked other windows and a blanked off a vestibule door on this side of the car.

Shell before and after


Tomorrow I will post the more difficult task of how to cut in new window opening on an aluminum shell.  

Attachments

Images (11)
  • thumbnail_IMG_7424
  • thumbnail_IMG_7178
  • thumbnail_IMG_7433
  • thumbnail_IMG_7425
  • thumbnail_IMG_7427
  • thumbnail_IMG_7430
  • thumbnail_IMG_7431
  • thumbnail_IMG_7434
  • thumbnail_IMG_7208
  • thumbnail_IMG_7115
  • Shell before and after
Last edited by T.Albers

@T.Albers, Wonderful photos and details, especially the photos of the products used.

Question:  How did you eliminate the vestibule doors?  I ask because the Traveller's Rest had vestibule doors removed at some point in its operation and I'd like the option of modeling the vestibule-less iteration.

Also, what product did you use to sand the filler material to avoid scratching the aluminum?

Again, thanks for the comprehensive update.

Last edited by Pingman

Good Morning @Pingman I completely removed the K-Line end cap with vestibule doors from that side of the car then blanked off the side openings with cut outs from the 2.00mm sheet of Styrene.  Once that side was finished and painted I used a regular type K-Line end cap (without doors) on that end of the car.   To sand down the micro filler I used 600 ~ 800 grit sandpaper, just be careful to sand only the filler away and not the aluminum. 

Here’s the second part of the posting from yesterday on how I cut in new windows for The Little Nugget.  I my case I could not find an 18” shell with windows and doors in the correct location for this car.  That’s why I choose to make my own openings.  Modelers that own 21” passenger car shells do have more options then people with 18" cars.  They can go to the UnionStationProducts website and ask them create an exact replica car sides with all the correct details, windows and doors.  Also, I have heard if Union Station doesn’t already have the cars sides they are able to create the sides you want by if giving them the exact Pullman plan number.   You are in luck if you are modeling a 21” car because they already have the correct sides for that Northern Pacific’s Travelers Rest lounge for about $40.99 plus freight, part#7511-R PS NP.  But if you are working with only an 18” car like me… here’s the write up you asked for.


How-to cut in new windows on an aluminum shell

This is the more difficult and risky part.  Please read the disclaimer(s).  Your results may vary depending on the sharpness of the drill/bits used and different experience levels.  Each new window opening in the shell took me at least 1-hour to complete.  Do not rush the steps below.  Test your skills on a practice shell first and always wear protective eye glasses.  If you don’t have a practice shell buy a 2mm sheet of aluminum flat stock at your local hobby store or online.  For best results only cut in new windows openings on an unpainted aluminum shell that you were planning on fully painting anyways.

Using your existing windows as a reference for the top and bottom of the new window, draw horizontal lines across the shell with a ruler and ultra-fine 0.05 tip Staedtler pen.  Remember the ink stays wet for a little while and will wipe away with alcohol if dried.  Next, get the vertical support dimensions (the columns in between your window openings) with the micrometer and mark that on the shell at this time using the ruler.  Then use your micrometer to double and triple check your lines for the new window.  I have heard the saying measure twice and cut once.  But I’m sure I measured way more times than that.  The next part I call the point of no return. 

Start with a brand new drill bit and make a ¼” pilot hole in the center of your soon-to-be window opening. Then enlarge the opening with a 3/8” drill bit as shown below.  Your drill bits must be new and sharp or they will dance across the side of your aluminum shell.  Wear protective eye glasses for the aluminum debris.  Use a cloth towel for protection from scratches under your aluminum shell.

 7

Once you have the opening in the shell.  Use a Dremel with a sharp cutting bit too slowly enlarge the space.  Use a small cutting bit on your Dremel at first.   Then switch to a larger bit if needed.  You will have the better results use the name brand “Dremel High Speed Cutter” cutting bits.  You shouldn’t have to force the tool through the aluminum shell.  A sharp blade will do all the work for you.   Important: Do not go all the way to your drawing line.  Just slowly remove aluminum inside your drawn window at this point.  Take your time on this step, aluminum is soft and this is where a 10,000 RPM Dremel with a high speed cutter can really mess up your shell, mess up your new window opening and mess up your eyes.

thumbnail_IMG_7436 


After the Dremel step is finished the window opening in your shell should look like the photo below.    

4

Put your shell on a work bench and place a cloth towel on the bottom to protect your shell.  Next is the slow part.  Continue on to the marked line with a flat file. Do not go past your marked line.  Keep your file strokes horizontal to the shell so your window comes out square.  I used a flat file with medium grove teeth/mill ******* cut.    

thumbnail_IMG_7437

Important:  As you get closer to the marked line try not to file only in one spot.   You will risk filing too much away in that single area.   Once you are near the marked line go across your whole window opening with a long filing stroke.  This will produce a straight window line.   Going slow, continue using this method to file down to your drawn line.  Keep re-measuring your opening with the micrometer so you don’t go too far.

8 

You should end up with sharp crisp lines and square corners.  Any extra ink from the pen will wipe away.

 6

In closing, I do not recommend cutting in windows on a painted shell like shown in my photos above.  Because if you did, you will now be on new quest to find matching paint to cover those shiny window openings.  At this time I’m still working on a solution for making more rounded corners for those new windows.  Remember the above write up is only suggestions based on the hand tools I currently have at my disposal.  If I had a mill or small CNC machine inside my garage I would have used those tools instead.  

Attachments

Images (7)
  • 7
  • thumbnail_IMG_7436
  • thumbnail_IMG_7437
  • 8
  • 8
  • 6
  • 4
@grfd59 posted:

Why couldn't you use an appropriate sized drill in each of the 4 corners to get the correct radius of the curve?  You would want to make sure the shell cannot move at all.

Gene Anstine

Based on my own experience of drilling into these shells, you'd really need a drill press for the purpose you describe and it would have to be dead on accurate in terms of where the four rounded corners are to be placed. Securing the shell in place while you are trying to do that is no easy task and you have to bear in mind that some long shells have a certain amount of give or flex in their sides that can result in a hole that is not truly straight. You can support the side you are working on by putting a wooden block inside it but with my drill press (a Micro Mark model) it's slow going to prevent the vibration from moving the shell out of place.

There is not the same problem with drilling into the roof of one of these aluminum cars but then most of them are curved towards the sides. But added to everything else is the need for a very sharp as well as small bit to duplicate the quarter section of the circle that is the corner.

I've learned that it's simply not possible to be as accurate as machine-made products are, especially with hand tools. For me, T.Albers has certainly captured the essence of the bodywork of this car; and as 3rail O scale passenger cars are mostly no more than a representation of the real thing, that's fine by me.

@T.Albers, thanks for the descriptions and photos.  

I've ordered the pen you referenced previously; however, I've had zero luck on line trying to find the HobbyLite Filler--well, I actually found one vendor who wanted $6.99 to ship the 8 oz., $4.99 item.   I struggle with some of the shipping charges.

As Hancock52 mentioned the use of a wood block to support the backside of the work side of the car, have you tried this?  I ask because I would be concerned with the aluminum tending to flex under the pressure of the pilot hole and/or Dremel cutting tools.

Last edited by Pingman
@grfd59 posted:

Why couldn't you use an appropriate sized drill in each of the 4 corners to get the correct radius of the curve?  You would want to make sure the shell cannot move at all.

Gene Anstine


Hi Gene, I’m going to try your method using a flat sheet of aluminum to see how close I can get.  

For a a car shell I think a drill press would be best as @Hancock52 mentioned.  The big problems would be securing the shell so it does not move on the drill press and then not damaging the soft aluminum shell with the clamps that are holding it in securely place.

@Pingman posted:

@T.Albers, thanks for the descriptions and photos.  

I've ordered the pen you referenced previously; however, I've had zero luck on line trying to find the HobbyLite Filler--well, I actually found one vendor who wanted $6.99 to ship the 8 oz., $4.99 item.   I struggle with some of the shipping charges.

As Hancock52 mentioned the use of a wood block to support the backside of the work side of the car, have you tried this?  I ask because I would be concerned with the aluminum tending to flex under the pressure of the pilot hole and/or Dremel cutting tools.

Hi @Pingman using a block of wood inside to support shell from flexing under is good advice.  If the drill bit is sharp you should not be using very much pressure.  Let the drill bit do the work, its going to go right though the soft aluminum, almost too fast.  Same with the high speed Dremel bit, it cuts through the aluminum scary fast.  But during the file step you will be using lots of pressure.

@T.Albers, unfortunately, Hobbico HobbyLite Filler is nowhere to be found at least not from any web-based vendor my internet searches have turned up.  It's usually shown as "out of stock" and/or"discontinued;"  the latter due to Hobbico's recent bankruptcy and acquisition by a competitor offering a similar product at twice the price.

If you have a suggestion for an alternative product, please offer it.  Otherwise, I am familiar with the Squadron, Tamiya, and Testor's filler products and will probably try them for this application.

@Pingman posted:

@T.Albers, unfortunately, Hobbico HobbyLite Filler is nowhere to be found at least not from any web-based vendor my internet searches have turned up.  It's usually shown as "out of stock" and/or"discontinued;"  the latter due to Hobbico's recent bankruptcy and acquisition by a competitor offering a similar product at twice the price.

If you have a suggestion for an alternative product, please offer it.  Otherwise, I am familiar with the Squadron, Tamiya, and Testor's filler products and will probably try them for this application.

Good Morning @Pingman several years ago I did use another brand of light weight micro filler to rebuilt the upper decks and main cabins of this 1937 RKO movie prop.  I appreciated working with this type of filler because it was lightweight, sandable and easily accepted paint.   That's why I choose a micro filler again to fill-in the tiny gaps on The Little Nugget's windows. 

Mona

Sorry, its been a long time and I don't remember that other brand fillers name.  I would suggest checking with your local hobby shop that carries R/C planes for a recommendation on their current brand of light weight and sandable micro filler for balsa wood airplanes.  


Attachments

Images (1)
  • Mona

Before I try and answer Carl’s question, I should say I have taken the bait and tried to work out which RKO 1937 movie the scale model pictured above is from and what it represents. @T.Albers if you have worked on things of this kind you have some (more) serious modeling experience (than I do).

RKO made numerous interwar films that fall into the genre of “preparedness” movies, as in, “We’re not in the war yet, but . . .” The 1937 film  that I think fits the bill is “Sea Devils” which is actually a Coast Guard film. This screen grab shows the model, which is of a cutter that might have been named “Taro” (the movie dialogue I have heard is indistinct):

E3D1F70F-C984-4853-9233-EA3140FC4B90

Plus there’s this highly melodramatic YouTube clip “Distress Call” in which the cutter goes to the rescue of the burning S.S. Paradise, which is having a Titanic experience:

Back to the filler. I used lightweight/balsa aircraft filler a long time ago while building car models. Unlike the styrene fillers of the time, which dried rock hard/inflexible and had a tendency to crack, balsa filler was light and sanded into contours easily. These products tend to be discussed only on balsa plane model forums.  They are still used by RC aircraft modelers, some of whom actually recommend Elmer’s light wood filler and ordinary spackling paste as an alternative.

That suggestion makes sense because if you are only filling very small spaces between metal and a plastic infill that is flush with the metal surface, you do not need a filler that is going to produce a noticeable edge where it meets the plastic surface. Nor do you need to cover that whole surface to make the painted insert appear to be a continuation of the metal surrounding it.  I have used Alclad grey micro-filler to prime plastic parts that need as near as possible a perfect finish i.e. if a simulated metal finish is going to be applied over them. Fortunately ordinary acrylic paint finishes are a lot more forgiving.

Attachments

Images (1)
  • E3D1F70F-C984-4853-9233-EA3140FC4B90
Last edited by Hancock52

@Hancock52  It took me 16 long, long,,  years of going to the Academy of Motion Picture Art Library to find the name of that old RKO movie, LOL.  At that time they only had microfiche.  You found it in a single afternoon with a Google search.  Yes, the movie is Sea Devils and the person that build the boat was Vernon L. Walker.  Vernon is the same guy that build the movie props for RKO's 1933 King Kong.   

I passed on getting the Coast Guard cutter "Taro" because it was a smaller movie prop at only 4 feet long.  I went for the 8 foot long yacht called Mona.  The Mona was sank at the end of Sea Devils during the climax when the hero went down the the ship (yacht).  The movie's scrip only gets 3 1/2 stars but the quality of Vernon's special effects for this RKO movie gets 10 stars.   Over his career he was nominated 4 times in Special Effects for an Academy Award. 

Mona

Back to trains... My grandfather put in sealed bid on a large pile of trains in an old warehouse at Paramount in 1988.   He won the bid and the trains were delivered (still in a pile).  As he dug through those old RKO and Paramount movie props from the 30's, 40's and 50's he found they gave him more that just the trains.  There were three silver B-36 bombers with 9 foot wing spans (I found out much later these were from the Jimmy Steward movie "Strategic Air Command").  His plan was to sell all the trains so he put an add in the local paper and got a great response from collectors.  He was not happy the black steam engines went first without the cars.  Eventually he sold all the box cars but it took months.  These trains were all hand made with tiny nails and wood.  They were larger than G scale and I remember they looked like British trains to me.  Most had evidence of being blown up in the 1940's war movies.  Only the three bombers and two boats were still left over at the end.  He gave me the Mona if I promised to restore it.  The Mona had a lot of water damage and was wired for 120 volts to power the interior lights.  It did not have a motor or RC because back then they used divers under the boat to move it around.  At 214-lbs it looked real good in the water on the flooded sound stage's ocean scene during the final ship wreck.   It took twenty years to restore but I finally finished it.  Unfortunately my grandfather passed away before it was done.  The Mona sits on a shelf behind me as I type this.

Back to trains...  nope, I don't have more modeling experience.  The first time I used Micro filler was for restoring the Mona.  The second time was for The Little Nugget.  I was hoping someone would jump in and give some better modeling advice than I had.  I have heard there are other types of fillers out there but since I still new to the model train hobby and have not used any others I could not give a personal recommendation.   Thank you for jumping in with helpful advice!  


Attachments

Images (1)
  • Mona
Last edited by T.Albers

Well, thank you @T.Albers  for telling the story - I thought that there was more to it than the partial photo of the model but the full saga is really compelling!

I don't think it would be off thread if you could be persuaded to post a complete picture of the boat as you have it displayed. 8 feet is pretty ginormous but in the past there have been photos on the Forum of people's semi-scale ore boats that were no less than 14 feet long! Or in one case I think that a guy was only able to model the bow of the ship to fit it in his O scale DM&IR ore depot. Anyway it's your thread.

Incidentally, while Hobby Lite filler might have ceased production there is a similar product called "Model Lite" that is also made for lightweight filling applications and comes in both natural wood and plain white colors. RC shops like Tower Hobbies (who I have dealt with before) appear to stock it.  

Thanks again.

Last edited by Hancock52
@John4884 posted:

I'm down for one of the B-36's if they are still around!

Good Morning @John4884 The fate of the three B-36 Peacemakers movie props did not end up well.  They were made of solid wood, difficult to move and very heavy.  No landing gear on any of them but each Peacemaker had an increased level of detail.  The most detailed one could have been displayed in an Air Force museum.  I have not seen the 1955 movie Strategic Air Command but I'm sure the model makers put the prop with the most details closet to the camera during filming. 

It was summer 1989 and at that time nobody wanted to buy the B-36 bombers.  He had already made a profit by selling all the miniature trains and boats to movie prop collectors.  He tried to store the bombers until somebody wanted to purchase them.  Because of there massive wing span each one had to be placed on top of one of my grandfathers antique cars.  It took two strong men to lift each plane and the heavy planes smooth belly pushed down on the roofs of each car.  Their demise came when a bomber accidentally got knocked off a roof and severely damaged the car it was sitting on.  The last time I saw the bombers they were just small silver wings and fuselages parts in the bottom of a dumpster.   Back then if he only new the name of the movie... If he only knew a big star like Jimmy Stewart was in the film...   If he only had Google the bombers might have found a good home.

At least the movie prop collectors purchased all the miniature trains and boats and those items were saved for future generations.


Last edited by T.Albers
@Hancock52 posted:

Well, thank you @T.Albers  for telling the story - I thought that there was more to it than the partial photo of the model but the full saga is really compelling!

I don't think it would be off thread if you could be persuaded to post a complete picture of the boat as you have it displayed. 8 feet is pretty ginormous but in the past there have been photos on the Forum of people's semi-scale ore boats that were no less than 14 feet long! Or in one case I think that a guy was only able to model the bow of the ship to fit it in his O scale DM&IR ore depot. Anyway it's your thread.

Incidentally, while Hobby Lite filler might have ceased production there is a similar product called "Model Lite" that is also made for lightweight filling applications and comes in both natural wood and plain white colors. RC shops like Tower Hobbies (who I have dealt with before) appear to stock it.  

Thanks again.

Hi @Hancock52 , sure but first here's a photo that shows why it took so long to restore.  It had lots of water damage after being sunk at the end of the movie.  Also, check out those glass AC light bulbs used on the side.  

Mona 1989

Today the Mona's in much better shape.   So readers of this O gauge forum can get an idea of the boats size I put a Lionel caboose next to it.

Mona Aug 2020

Attachments

Images (2)
  • Mona 1989
  • Mona Aug 2020
Last edited by T.Albers

Wow, great work and I understand why you took on the job of restoring it. Actually, good as the workmanship on the original was, it was made for a purpose which was temporary and could have destroyed it. I think you've actually improved on the original, not just preserved it.

The largest model loco set I have is on the rails now - the three unit MTH UP 80 coal turbine - but it's no more than half the length of that yacht (makes a lot of smoke, though).

Last edited by Hancock52
@Hancock52 posted:


Incidentally, while Hobby Lite filler might have ceased production there is a similar product called"Model Lite" that is also made for lightweight filling applications and comes in both natural wood and plain white colors. RC shops like Tower Hobbies (who I have dealt with before) appear to stock it.  

Thanks again.

The folks who bought Hobbico's HobbyLite out of bankruptcy, sell "Model Lite" which is a $12 product compared to the $5-6 for HobbyLite.  Just a bit of whining--I am sure I'll succumb and buy the higher priced spread when it comes to filling in windows on aluminum pax cars.  The project cost of using an inferior product is simply too high to go cheap.


If you are putting what is essentially a plastic "plug" in an opening in an aluminum body, as T.Albers says it should be the same thickness as the body shell to ensure it's flush with the exterior surface. With this sort of exercise I have found that it's best to put a backing on the "plug" that extends past its sides to ensure it's held in place - otherwise you are relying on the small amount of glue that gets between the plastic and the shell to hold it in place. If the shell and the new piece are flush on the outside, the amount of filler that should be necessary to cover any gap between the shell and the plastic on the exterior side of the car should be limited and not cover the plastic surface.

All this also relates to a subject we have not discussed, which is how these mods look when viewed through the windows on the other side of the car. (I always find that visitors will peer inside of any lighted passenger with a full interior and at such close range all manner of things become visible.) You can't do much to conceal them other than to paint them the same color as the inside of the shell was to being with, which with aluminum shells from Lionel and K-Line was usually standard interior cream or light green. Many prototype streamliners had wood panelling on the interior walls but I have not tried to duplicate that (yet). 

Some window inserts can't be concealed and basically you have to live with them. All of Lionel's 21" ABS cars fall into this category. Earlier models with window strips are a lot more forgiving.

Update 09/24

Last week in another passenger car thread @Hancock52 wrote "Finishing touches" often means that you haven't finished, or won't ever finish at all.  Well guys, he is correct.  As I was looking over old photos I took during my last visit to The Little Nugget realized I was missing a few finishing touch details on my miniature O-scale version.  The first item I needed to add was an access ladder under the bar/pantry service door.

Ladder 1

I looked in my spare parts box and found one.  Okay, now it’s fixed.

Ladder 2


I was thinking this gray ladder rest on The Little Nuggets roof would be a nice detail to include on my model.

Ladder rest 1

After a bending a 1/64th thick rod, now that’s done.

Ladder rest 2


Also, my model should have better looking exhaust & intake vents on the roof above the bar & crew dormitory section.

vents 1

Not a problem, I purchased a few roof vents and now that part is complete.

vents 2


Then, everything came to a halt when I saw this photo of the trucks underneath The Little Nugget w/dual center mounted brake cylinders and oval holes in the side frame.

Trucks The Little Nugget

Darn it… my O-scale trucks from K-Line didn’t look anything like The Little Nuggets trucks.Trucks K-Line

Down the rabbit hole I went trying to find the correct style trucks.

Searching the internet I discovered the Pullman Library at the Illinois Railway Museum. This library offers a nice online document for people researching different kinds of prewar & postwar passenger car trucks. Click on: http://pullmanlibrary.org/ then look in the middle of the page for a document called model passenger truck visual index.  It’s a good research tool for modelers.  Unfortunately for me, the library’s passenger truck index did not include the passenger car trucks I needed with oval holes in the side frame.


Therefore, with a large magnifying glass in hand I studied all 402 pages of black and white photos inside my books The Official Pullman Standard Library vol. 13 and vol. 14. These reference books showed two different styles of Pullman trucks appearing in 1937 on Union Pacific’s new Streamline passenger trains.  They looked a lot like Pullman 43R style with roller bearings, elliptical springs and dual brake cylinders mounded at the top center of the side frames.  This style of truck has the nickname “Napoleon Hat” because of the bell shaped journals.  The best I could tell, the pre-war code for these Pullman style trucks might be U-43R.  If it is, then it breaks down as U Union Pacific assigned cars, 4 four wheels, 3 triple bolster, R equipped with roller bearings.  


I was getting closer to an answer of what type of truck was used but needed help unravelling why two different styles of trucks were installed under the same passenger train consist.  To answer that question I reached out for expert knowledge from Greg Gneier, at Travel Town in Los Angeles, Ca.  As luck would have it, Travel Town is restoring three pre-war Union Pacific streamline passenger cars The Little Nugget, Hunters Point and Telegraph Hill/Rose Bowl.  Two of these cars The Little Nugget and Telegraph Hill/Rose Bowl were built by the Pullman Car and Manufacturing Corporation in 1937.  Over email Greg informed about the differences in prewar lightweight streamline trucks.  He said, both pre-war style trucks came with roller bearings, dual brake cylinders mounted in the top center and were built at the same time.  One of the main visual differences is the Pullman owned sleeping cars used General Steel Casting Corporation (GSC) trucks with round holes in the side frames.  While the Union Pacific company owned cars like lounges and observation cars used a different version truck with oval holes by Locomotive Finished Material Company (LFM) of Atchison, Kansas made to Union Pacific’s exact specifications.  Mystery solved!


An interesting side note from Greg was the museum’s 18 roomette Pullman sleeping car that ran on Union Pacific’s City of San Francisco train.  When this passenger car arrived at Travel Town back in 1992 it had both styles of 1937 lightweight trucks underneath it.  It has GSC trucks under the vestibule end w/round holes in the side frame.

Trucks GSC

And LFM trucks at the other end w/oval holes in the side frame.

Trucks LFM

This sleeping cars original name was Telegraph Hill.  Union Pacific changed the cars name to Rose Bowl when it was reassigned to the City of Los Angeles train set.  You can read about Union Pacific’s Telegraph Hill/Rose Bowl here:  https://www.laparks.org/travel...cSleepingCarRoseBowl


Now that I had an answer on which truck to use, I spent several more hours online looking for these exact LFM-Atchison trucks w/roller bearings, w/dual brake cylinders and w/oval holes in the side frames in O-scale.  Unfortunately, I couldn’t find anybody that makes an LFM truck in O-scale probably because they were only used on UP company cars in the 1937 CoLA and CoSF train consists.  The closest 43-R style trucks (with round holes) I could find was Keil-Line part# 4897.  That’s okay I guess, if any of my visitors is sharp enough to point out that I have the incorrect 1937 Napoleon Hat style trucks installed underneath this UP company owned streamline lounge car they will probably notice the third rail on my layout.

thumbnail_IMG_1305


Stay tuned for the next update as I try to assemble this O-scale white metal truck kit for The Little Nugget lounge car.

Thank for following this thread

Attachments

Images (11)
  • Ladder 1
  • Ladder 2
  • Ladder rest 1
  • Ladder rest 2
  • vents 1
  • vents 2
  • Trucks The Little Nugget
  • Trucks K-Line
  • Trucks GSC
  • Trucks LFM
  • thumbnail_IMG_1305
@brwebster posted:

Your skill and attention to detail really shines.  I may need to get this in-depth if I ever hope to fill out my UP set of K-Line 21" cars.  Outstanding work!

Bruce

Thank you @brwebster.  Some of the enjoyment in projects like this comes from building and some from researching.  This hobby offers a little bit of everything.

Have fun building the interiors and filling out your 21" K-Line cars.  They will look great on the track and on display.  👍

@Pingman posted:

@T.Albers, vendor and part number for the vents?

Great job as usual.  Thanks.

Thanks @Pingman, here are the part numbers for the ScaleCityDesign streamline intake and exhaust vents.

part numbers


By the way does anybody know where to purchase more of these O-scale roof top ladder rests?  It was real tough trying to bend a 1/64th rod into the correct shape.  I need several more ladder rests for my other streamline passenger cars and don't want to make a bunch of these.   

part number Ladder rest


Thanks!

Attachments

Images (2)
  • part numbers
  • part number Ladder rest
Last edited by T.Albers

I have not seen this particular part ready-made in O scale although from memory some Lionel aluminum passenger cars have had them as part of the body assembly. May be only limited help but Detail Associates makes HO 24” roof access ladder rests under part 6603, available from a few online suppliers. At that scale these parts would only be about 1/4” wide BUT that may be enough for your purposes depending on whether your car body is true O scale or somewhat smaller and whether they look proportionate to other roof details:

F1D95D20-DA4D-434A-9C26-D47C402E2BFC

I suppose another option is to get ordinary O scale grab irons from a supplier like Des Plaines Hobbies and bend them to shape, which might save some labor compared to making them from scratch.

P.S. If you really want to go in for making a lot of these from scratch there are wire bending tools (basically pliers with shaped jaws) that might work. This one is from MIcro-Mark:

2281C360-B73E-4DFE-82CA-42B3BF5E325A

Attachments

Images (2)
  • F1D95D20-DA4D-434A-9C26-D47C402E2BFC
  • 2281C360-B73E-4DFE-82CA-42B3BF5E325A
Last edited by Hancock52
@T.Albers posted:

Thank you @brwebster.  Some of the enjoyment in projects like this comes from building and some from researching.  This hobby offers a little bit of everything.

Have fun building the interiors and filling out your 21" K-Line cars.  They will look great on the track and on display.  👍

T.Albers

We gain satisfaction from the same aspects, although I tire from searching online when I don't have comprehensive literature on hand.  Luckily, you've done all the UP research legwork needed.  A great big thank you for taking the time to document all your fine work here on OGR.  Bravo!

Bruce

Update 9/26:

The silver K-Line trucks that are currently mounted on my O-scale lounge car are similar to postwar 41-C or 41-N lightweight passenger car trucks.  These are getting swapped out with a more prewar correct Napoleon Hat style truck.  Now all I have to do is build a set of trucks from this pile of 74 metal parts.

thumbnail_IMG_1314


Once separated into individual truck assemblies the smaller pile did not look so daunting.  Although, it’s still an impressive amount of parts for one truck!

thumbnail_IMG_1310


The first step was cleaning and filing the white metal parts before assembly.  I used a soft wire brush, 0000 steel wool and jewel’s files.  Here’s a close up of the journal in case you haven’t figured out how they got nicknamed Napoleon Hat.

Napoleon Hat Journal


Start by pressing the brass eyelets into the retainer plates.  The instructions said for wheelsets with pointed axles (like used on K-Line wheelsets) use the side of the retainer plate with the countersunk depression.

thumbnail_IMG_1327


Next, the instructions recommend attaching the retainer plates to the backside of the journals using a few drops of CA glue/epoxy.

thumbnail_IMG_1329

thumbnail_IMG_1334


After the glue has dried, install your coil (aka helical) springs.

thumbnail_IMG_1336

thumbnail_IMG_1339


Now, glue in place your leaf (aka elliptical) springs in the center of the side frame.

thumbnail_IMG_1342


To secure these new white metal side frames to my existing K-Line center bolster I drilled and tapped two #4-40 holes on the back of each side frame.

thumbnail_IMG_1346


Since I’m mounting the new 43-R side frames underneath the K-Line 3-rail center bolster pickup assembly I needed to make large openings in the plastic base to allow the screws through.

thumbnail_IMG_1364


Four #4-40 x1/2” screws can now be used to attach the side frames to the K-Line bolster. During this test fit you can see the new 43-R Napoleon Hat trucks (on the left) should support The Little Nugget’s car body at about the same height as the original K-Line trucks (on the right).

thumbnail_IMG_1322


I was hoping this kit included eight brake cylinders (two cylinders per side frame) to better match the 1937 Union Pacific City of Los Angeles passenger cars.  But since the kit only came with one brake cylinder per side frame that’s what getting installed.

thumbnail_IMG_1352 - Copy

I’m still not sure yet if the two cross members/beam ends that connect between the side frames will have enough clearance under lounge cars lower skirts.  Stay tuned for the next part, I’ll work on painting these new 43-R trucks and installing them under my O-scale version of The Little Nugget.

Thanks for following this thread

Attachments

Images (13)
  • thumbnail_IMG_1314
  • thumbnail_IMG_1310
  • Napoleon Hat Journal
  • thumbnail_IMG_1327
  • thumbnail_IMG_1329
  • thumbnail_IMG_1334
  • thumbnail_IMG_1336
  • thumbnail_IMG_1339
  • thumbnail_IMG_1342
  • thumbnail_IMG_1346
  • thumbnail_IMG_1364
  • thumbnail_IMG_1322
  • thumbnail_IMG_1352 - Copy
Last edited by T.Albers

Update Oct 1st

Next, spray the side frame assemblies and cross members with gray Tamiya primer.   

thumbnail_IMG_1355


After the primer dried, the side frames and cross members were painted with Scale Coat II Harbor Mist Gray (part #2032) to match Union Pacific’s streamline passenger cars paint scheme between 1941 ~ 1955.  Once the paint is dry you can assemble the trucks and mount them under your car.  CA glue is used to hold the cross members in place.

thumbnail_IMG_1356


I’m pleased to report the 43-R truck did not change the height of this car and it matches the roof lines my other cars perfectly.  In the next photo below you see The Little Nugget with its new trucks on the left and a normal K-Line car on the right. Also, this photo is a good example of what the trucks looked like before and after.

thumbnail_IMG_1379


Kevin J. Holland wrote an article in the February 2005 issue of Model Railroader Magazine, called “Modeler’s Guide to Lightweight Passenger Trucks”.  On page 67 there is a short section on some of the Pullman’s triple bolster lightweight trucks.  Also, I heard the Railroad Prototype Cyclopedia vol. 6, covers the subject of passenger car trucks.  If anyone has vol. 6 of the Cyclopedia let me know if it has any useful information on Union Pacific’s LFM hybrid triple bolstered trucks.

thumbnail_IMG_1388

Tamiya flat black, (part# XF-1) was used to help create to the look of hand hole/inspection openings into the side frames.  Almost all the parts in the Keil-Line kit were used except the brake shoes and bolster castings.  The brake shoes weren’t installed because of potential clearance issues with my track.   

The horizontal cross members used between two side frames are important part of this white metal truck kit.  Their job is to keep the side frames at the proper distance apart so your wheelsets can roll freely.  All during this build I wasn’t sure if they would have enough clearance under The Little Nuggets lower side skirt.  Luckily, they cleared the side skirts while going around my layouts turns and look good underneath the lounge car.

thumbnail_IMG_1389

In the early streamline years Union Pacific was continuously searching for better riding high-speed trucks to go under their lightweight aluminum passenger cars.  1937’s version of the triple bolster truck design made by LFM with oval opening in the side frame didn’t make it into Union Pacific’s next generation passenger cars built in 1941.  You can see builder’s photos of this newer version U-43-HR truck design on pages 207 and 208 in the book The Union Pacific Streamliners.  Also, you can see U-43-HR trucks in person if you visit either Travel Town’s third pre-war Union Pacific Pullman sleeping car named Hunter’s Point or visit the Civic Center at the Millbrae Train Museum near South San Francisco.


Although I wasn’t able to install the exact LFM triple bolstered trucks under my O-scale version of The Little Nugget at least I was able to build a nice set of pre-war 43-R trucks that still look great.  These smooth running Napoleon Hat style trucks are a much closer match than what was underneath the car before and they have working spring suspension. 

thumbnail_IMG_1388

Thank you for following this project!

Attachments

Images (6)
  • thumbnail_IMG_1355
  • thumbnail_IMG_1356
  • thumbnail_IMG_1379
  • thumbnail_IMG_1388
  • thumbnail_IMG_1389
  • thumbnail_IMG_1388

Add Reply

Post

OGR Publishing, Inc., 1310 Eastside Centre Ct, Suite 6, Mountain Home, AR 72653
800-980-OGRR (6477)
www.ogaugerr.com

×
×
×
×
Link copied to your clipboard.
×
×