
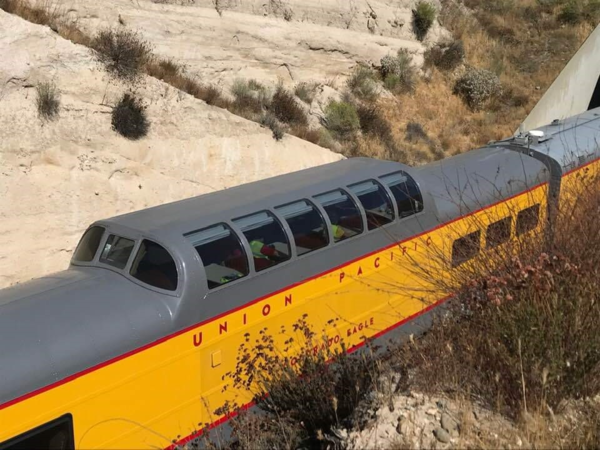
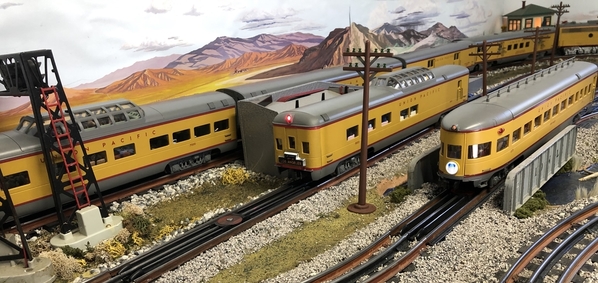
I have a small train layout and cannot run the full size 21" passenger cars from Lionel or K-line but always liked the look of the Union Pacific's dome observation lounge car.  To get a flat observation end for my 18" Union Pacific dome car I realized I was going to have to create one myself.  The dome car in the center of the photo below shows what this new end cap looks like when placed on the back of a K-Line car.   So... I took some photos and made this walk through for anybody that wants to create their own end cap for a 18" K-Line K4960-38003 Union Pacific dome car to make it look like a 9000 series dome observation lounge car.


.


Day-1

Finding a suitable donor for the end cap.  From what I have seen on this forum K-Line made five different flat-end/blunt-end passenger cars with end caps that would fit my existing 18” Union Pacific dome car.

1.  Union Pacific, 9002, K4690-49002 (the exact look I'm going for)

2.  DL&W, Phoebe Snow, Tavern Lounge, K-4638-10790

3.  PRR, The Congressional, George Washington, K4680-10010

4.  PRR, The Spirit of St. Louis, Alexander Johnston Cassatt, K4680-38424

5.  Rock Island, Golden State, Golden Divian, K4632-0479

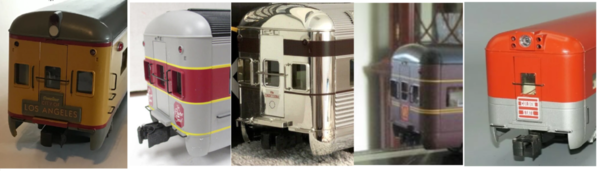
After studying the photos, I found the middle three K-Line cars above used the same exact plastic mold for the window locations, tail lights and handrails as the 21” long Union Pacific K4690-49002 I was trying to duplicate.  So, the easiest route would be to purchase one of these three cars with existing windows in the end cap and simply paint my new end cap Armour Yellow and Harbor Mist Gray.  Well, after hunting for several months none of the other cars with windows in the end cap came up for purchase.  At this point my only choice was to buy one of the 18" Golden State passenger cars part# K4632-0479 for sale online and create new rear windows into its end cap.   I looked around and found an 18” Golden Divan car selling for $40.00 and clicked Buy Now.


Day-2

The 18" Golden State donor car arrived and I quickly started disassembling it.  I hoped the end cap was going to be a direct fit onto my existing Union Pacific dome car but it didn't.  I found the screw holes on the inside plastic mounting tab of the new end cap did not line up with holes on the passenger cars black metal frame so I will need to add these later.  Also, to make this new end cap fit correctly I will need to trim back the lower silver skirt edges (as seen in the photo below).


Day-3

Point of no Return

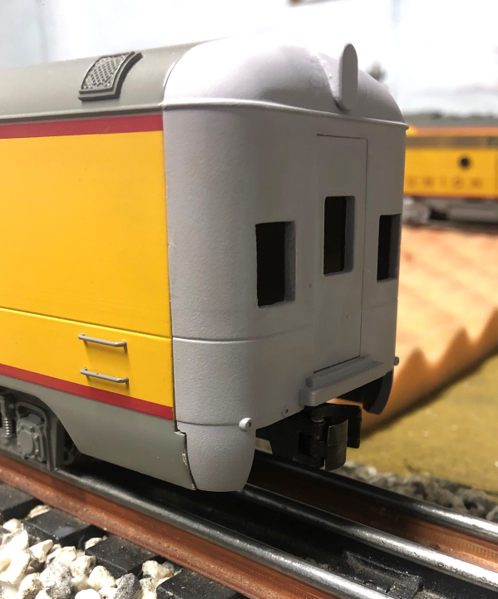
a.  Trim the silver bottom edges.  b.  Cut in two new rear windows.  c.  Remove the Golden State sign.  Cutting in new windows was a challenge.  I wanted the new window dimensions to be the same as the rear door window.  But to look like the real Union Pacific observation car the new windows also had to be lower so they were inline with the passenger windows along the sides.  As it turned out the bottom of the existing red paint line was the perfect height for the base of the two new rear windows.  All I had to do was cut and file the plastic very slowly and make sure I kept the new windows square.


Day-4

The disassembly was going well, but I still needed to choose which version of Union Pacific dome observation car was I going to model.
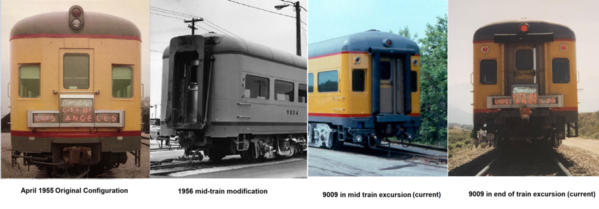
Version A.   In April 1955 Union Pacific received their first order of 9000 series dome observation lounge cars from the American Car Foundry.  These 9000 series dome observation cars had two rear windows, red side marker lights mounted on both the left and right sides, flush mounted rear door with a window, center mounted flashing red mars light, white back-up light, safety bar mounted below the rear window and either a City of Los Angeles, City of Portland or City of St. Louis neon tail sign.  

Version B.  By mid 1956 the Union Pacific figured out they could get more cash revenue from the bar sales if the observation lounge car was in the middle of the train (and not the end of the train).  Also, these observation cars added extra time at the stations because they had to uncouple then recouple the observation car every time they added more Pullman sleepers as the train crossed the country.  So, all the 9000 series observation lounge cars were modified for mid-train use by October of 1956.  American Car Foundry did this by moving the rear door inward, removing the side mounted marker lights, removing the rear facing red and white lights, blanking off both rear windows and adding a diaphragm w/striker plate.

Version C. and D.  Currently the only dome observation lounge car that can run at the end of a train is owned by the Union Pacific.    Its car number 9009, now known as the City of San Francisco.  The Union Pacific has modified the 9009 to current safety standards with three rear red lights, a modern diaphragm.  They reinstalled both the rear facing windows and sometimes even hang a neon City of Los Angeles tail sign on the end.

Day-5

I liked the classic look, so I chose the original April 1955 configuration.  This meant sanding off the existing roof mount that held the five Golden State tail lights and adding a new roof mount for the red Mars light and white backup light.  I used micro filler putty to fill the holes left in the roof after sanding.  This was also a good time to relocate the safety bar to its correct location below the center rear window (instead of across the middle of the rear window).


Day-6, 7, 8, 9, 10, 11 through 20

Yellow paint is really difficult...

I went to my local hobby store with my K-Line car to buy Union Pacific Armour Yellow and Harbor Mist Gray.  They said sorry, they would not be able to exactly match the K-Line paint.  Apparently K-Line paint is a slightly different shade Armour Yellow than Lionel paint, MTH paint, Williams paint, etc... Plus, the hobby store said the age of my passenger car might make it several shades off.  And if I did not match the original undercoat from the K-Line factory the new yellow paint will also come out looking different.  The hobby shop recommended painting the whole passenger car to make it match the new end cap correctly.  And if I did that, this single passenger dome car would not match the rest of my consist!

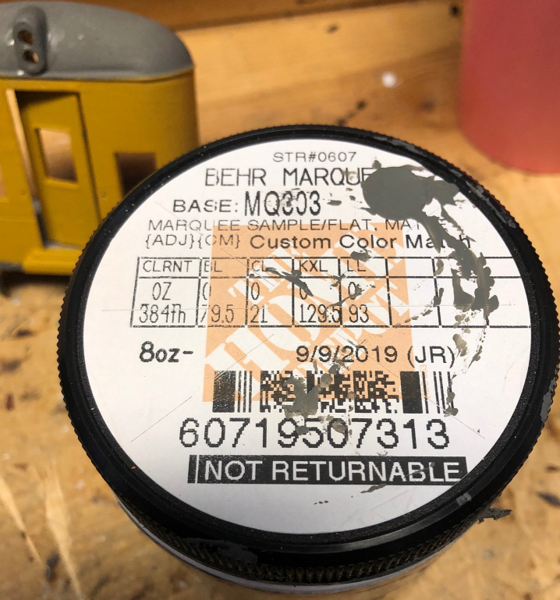
I only wanted to paint the new end cap.  So, I decided to go to Home Depot and asked them do a paint match on my K-Line passenger car.  Home Depot was able to get an exact color match on my K-Line passenger cars yellow and gray.  Below is a photo with the paint codes on the Home Depot cans if anyone wants to have your local Home Depot store make you some 8oz. samples.  But, the guys at  Home Depot could not match the UP red stripe because they said it was too small for their computer to pick up.

With the correct yellow and gray colors I started painting.  The grey was a perfect match and never gave me a problem.  But the yellow.  The hobby store was right. The yellow paint needed a special under coat (maybe white or silver).  My first coat of yellow looked very dark because it was sucked up by the grey primer. The second coat of yellow also looked dark but not as bad.  The third coat of yellow looked the best but I smudged the paint and had to sand down the end cap and start over again.  I painted the end cap six times before starting to lose some of small plastic lines and fine details.  I called it at done after six times and figured that is close as I'm ever going to get to the K-Line factory color with my limited painting skills.  Yellow paint is very difficult.


Day-21

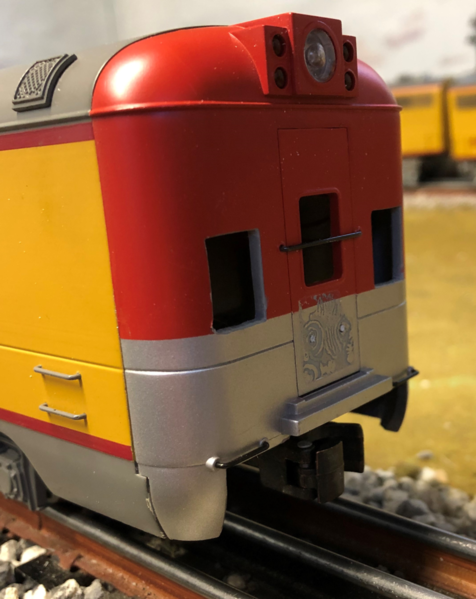
I tried 7 different gloss red paints but never found the exact match to the existing Union Pacific red stripe.  I chose the red paint that the was closest and then installed the clear windows, the red blinking mars light and white back up light inside the new roof mount.  After painting the grab bars gray I reinstalled them the correct places to match the grab bars on a real Union Pacific dome observation lounge car.  Here’s a test fit of the freshly painted end cap at this point.  It snaps right on to the back of my existing 8003 dome diner and I did not have to modify anything on this passenger car.


The illuminated City of Los Angeles neon tail sign could have been a project write up on its own.  I first tried to make the neon tail sign out of plastic with three LED disk lights.   But after reviewing with Hancock52 he recommended using multiple smaller LED lights to lessen the chance of bright hot spots showing through the tail sign.


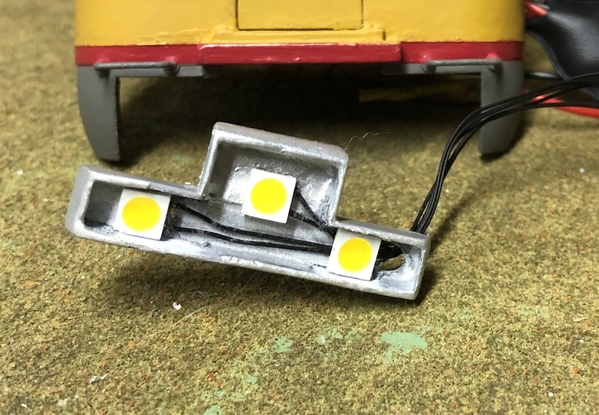
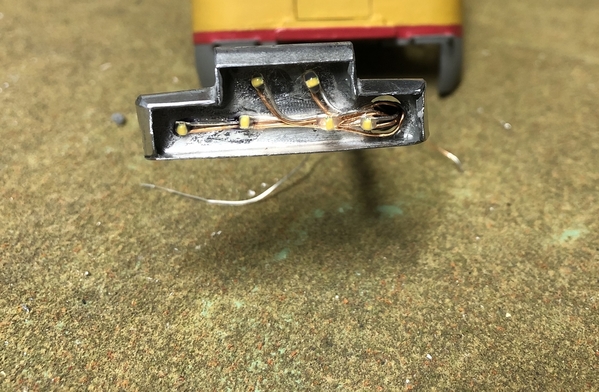
I wanted the neon tail sign box to look shiny but was not getting this effect using silver paint.  The box above still looked plastic.  So, I gave up on the plastic design and made second tail sign by bending a thin sheet of glossy .008 flat metal from K&S Precision Metals.  Then installed six, 3-volt micro LED’s and wired them in series (to handle the 18-volts direct from the track).


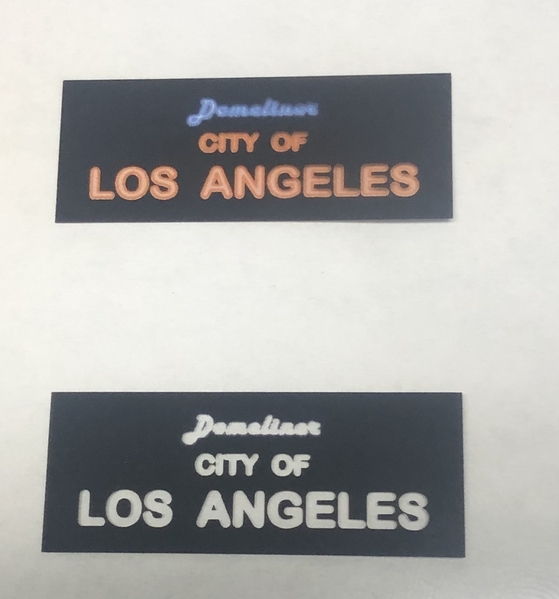
To get the neon effect I used four layers on the sign.  The bottom layer was clear plastic, the 2nd layer was 20 weight white paper (as recommended in a GRJ posting), the 3rd layer was a black and white City of Los Angeles sign and finally on top was the full color City of Los Angeles sign.  That way, whether the LED lights were shining or not it would still look like a neon sign.  The double layers of black helped stop the LED's from bleaching out the sign.  Also, you may need to seal the black edges of the new sign with black paint to stop the LED's from creating a halo effect around the CoLA signs edges.  I will attach my .pdf file with the CoLA Sign already sized correctly for O-Gauge.   Just print it on a sheet of clear 8 1/2" x 11" and trim the CoLA sign to fit your application.


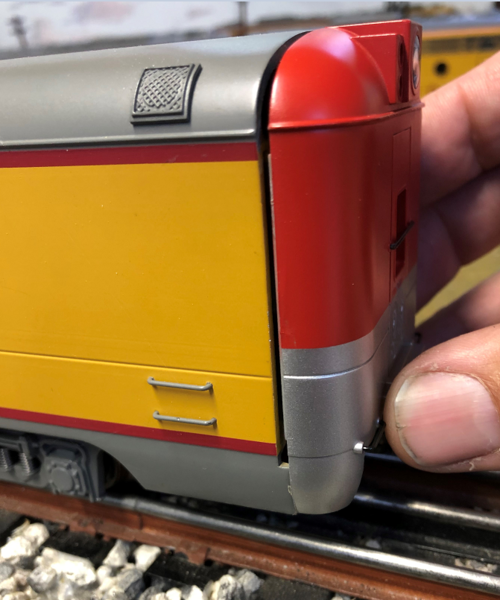
Here is another photo of the end cap temporarily snapped on the back of my existing dome car.  This photo shows without power and not screwed on to the car yet.  The rear coupler fits under the new end cap very nice and goes around 42" curves without any problems.


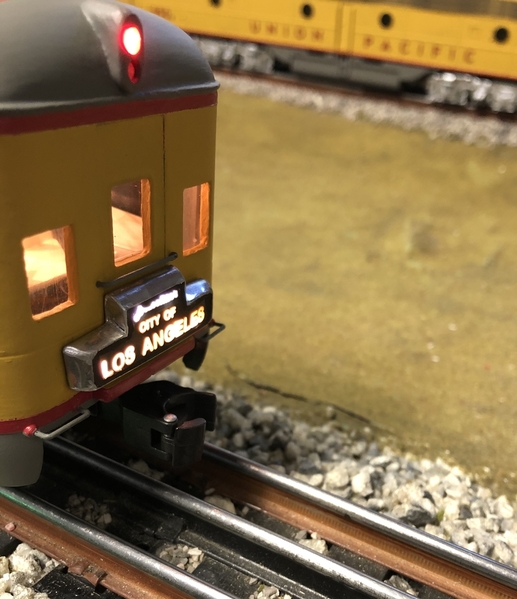
And the end cap with neon City of Los Angeles tail sign and flashing Mars light temporarily connected to track power.  Notice how far out the coupling sticks out in the photo below?  To get this last photo I had to connect the end cap back onto the original Golden State donor car to power the Mars light and CoLA sign.  In conclusion, I’m pleased with the end cap results so I purchased another K-Line 8003 dome car with the intentions of making it into a full 9000 series UP dome observation lounge car.  The next step in this project will be to create an 18" long 9000 series lounge car by adding windows and fully painted interior per the 1955 Union Pacific plans so this new end cap will have a permanent home on my layout.


I hope this walk through can help others that want to create their own end cap for a 18" K-Line K4960-38003 Union Pacific dome car.

Thanks,

*** Edit***

To look at the other interior builds in this series click on the links below. They are listed in the order I run them on my layout:

https://ogrforum.ogaugerr.com/...-an-e-8-cab-interior

https://ogrforum.ogaugerr.com/...interior-upgrade-rpo

https://ogrforum.ogaugerr.com/...6327-k4690#lastReply

https://ogrforum.ogaugerr.com/...car-interior-upgrade

https://ogrforum.ogaugerr.com/...enger-car-8003-k4690

https://ogrforum.ogaugerr.com/...lounge-car#lastReply

https://ogrforum.ogaugerr.com/...enger-car-1305-k4690

https://ogrforum.ogaugerr.com/...upgrade-k-line-k4690

https://ogrforum.ogaugerr.com/...upgrade-k-line-k4690

https://ogrforum.ogaugerr.com/...senger-car#lastReply

https://ogrforum.ogaugerr.com/...upgrade-placid-haven

https://ogrforum.ogaugerr.com/...pullman-sleeping-car

https://ogrforum.ogaugerr.com/...c-passenger-car-1575

https://ogrforum.ogaugerr.com/...-passenger-car-k4690

Attachments

Images (19)
  • mceclip0
  • mceclip0
  • mceclip0
  • mceclip1
  • mceclip2
  • mceclip0
  • mceclip1
  • mceclip0
  • mceclip1
  • mceclip0
  • mceclip0
  • mceclip1
  • mceclip0
  • mceclip1
  • mceclip2
  • mceclip3
  • mceclip4
  • mceclip6
  • mceclip7
Files (1)
Last edited by T.Albers
Original Post

Replies sorted oldest to newest

AGHRMatt posted:

Great job. Great write-up. Did you airbrush the paint?

Thanks Matt, 

I’m new to the hobby and have not purchased an air brush set up.  But I read its possible if you thin down the Home Depot paint with water it will work in an air brush.  Hopefully an air brush would give better results also.

For those that don't want to cut windows into the back of a Rock Island, Golden State, Golden Divian, K4632-0479, 18" passenger car.  You're welcome to just paint that Golden State car Armour Yellow & Harbor Mist Gray with a red stripe and it will still be historically correct. 

During my research I found out Union Pacific's City of San Francisco ran that exact 10/6 sleeper car (SP car number 9040) on the end of there 1954 train.


Thanks,

Attachments

Images (2)
  • K4632-0479 K-line Golden State Golden Divian
  • CoSF sign
Last edited by OGR CEO-PUBLISHER

Really great job and a good writeup on what you did and your perseverance -- not to mention your 'obsession' with the fidelity to the prototype.  At some point in the late '50s/early 60's I rode in one of UP's blunt end observation cars -- don't think it was the dome version.  It was on the connecting train UP ran between Seattle and Portland, timed to meet the out-bound City of Portland.  I don't recall UP having boat-tail observation cars -- at least not on the two City of (Portland and SF) trains on which I rode.  My recollection is that the last car in the consist was typically a sleeper that had a 'portable' Mars light stuck in the vestibule before the diaphragm, along with a waist-high 'gate' to prevent someone from falling out of the car should they have managed to get by the disabled pneumatic door at the end of the car.

I have in mind a similar project -- the CA zephyr at one point sported a dome - observation car (a 'boat tail' version), in fact I think one of those cars still exists.  American Flyer (S gauge) made a four-car Aluminum passenger set -- combine, coach, dome and observation car.  I have extras of the dome and observation cars purchased with the idea of removing the boat tail on one and attaching it to the dome car.  In this case, its gonna require some cutting of the end of the dome car to get the truck position correct.  The only way I can see to do that - since I don't have a milling machine and I'm certain I can't make a straight enough cut with a hand saw - is to fire up my radial arm saw with a non-ferrous metal cutting blade and see if I can get a straight and square cut that way.  I've seen a picture of someone else's attempt at this - which was well done - but no details on how they did it.  Since these are 'generic' passenger cars, there are few true prototype details, so this will be, at best, a "if you squint your eyes, it looks pretty good" effort.

Last edited by richs09

Outstanding, both in terms of explanation of what you did and the result.

Regarding the UP red striping, I have seen the original color duplicated accurately on decals. It is not easy to cut and apply decal striping in long straight lengths, however, and then it has to be overcoated with clear (usually Dullcote) to make sure it sticks and does not flake off. But even that would not be a guarantee of matching the K-Line color, which was probably applied over the yellow used for the car sides.

Anyway, it all depends on how the car itself looks to your eye. This page, on how UP engine and passenger car colors come out on the internet, was an eye opener to me in terms of trying to match what you can see in photos: http://utahrails.net/up/up-paint-html.php


richs09 posted:

Really great job and a good writeup on what you did and your perseverance -- not to mention your 'obsession' with the fidelity to the prototype.  At some point in the late '50s/early 60's I rode in one of UP's blunt end observation cars -- don't think it was the dome version.  It was on the connecting train UP ran between Seattle and Portland, timed to meet the out-bound City of Portland.  I don't recall UP having boat-tail observation cars -- at least not on the two City of (Portland and SF) trains on which I rode.  My recollection is that the last car in the consist was typically a sleeper that had a 'portable' Mars light stuck in the vestibule before the diaphragm, along with a waist-high 'gate' to prevent someone from falling out of the car should they have managed to get by the disabled pneumatic door at the end of the car.

I have in mind a similar project -- the CA zephyr at one point sported a dome - observation car (a 'boat tail' version), in fact I think one of those cars still exists.  American Flyer (S gauge) made a four-car Aluminum passenger set -- combine, coach, dome and observation car.  I have extras of the dome and observation cars purchased with the idea of removing the boat tail on one and attaching it to the dome car.  In this case, its gonna require some cutting of the end of the dome car to get the truck position correct.  The only way I can see to do that - since I don't have a milling machine and I'm certain I can't make a straight enough cut with a hand saw - is to fire up my radial arm saw with a non-ferrous metal cutting blade and see if I can get a straight and square cut that way.  I've seen a picture of someone else's attempt at this - which was well done - but no details on how they did it.  Since these are 'generic' passenger cars, there are few true prototype details, so this will be, at best, a "if you squint your eyes, it looks pretty good" effort.

Thank you Richs09 for the support.  I have read the Union Pacific stopped using the Sun Valley boat tail observation car in April 1955 for the City of Los Angeles train when they got there dome cars.  I have not researched when the UP stopped using the Nob Hill (City of San Francisco) or the Ogallal (City of Denver).

Also, since I'm only modeling the City of Los Angeles train I have not tracked down the history of the other City trains that used flat end observation cars.  I know the Union Pacific still had flat end cars like the Baldy Mountain, Russian Hill (aka Hoover Dam) that got used well into the 1950's.

The California Zephyr observation dome car you are looking for is named the "Silver Solarium".  Yes, it's a great car an still exists today.

Thanks,

Last edited by T.Albers
Jeff78rr posted:

Nice job and excellent write up! What type of paint is it that you got from Home Depot? Just curious, what a great idea!

Thanks Jeff.  The paint was Behr 8oz samples. I asked for a flat finish in the Armour yellow and matte finish in the Harbor Mist gray.  Although the gray roof of the K-Line passenger car has some shine on it, I was worried a satin finish would give too much gloss.

richs09 posted:

                                              ***********************

I have in mind a similar project -- the CA zephyr at one point sported a dome - observation car (a 'boat tail' version), in fact I think one of those cars still exists.  American Flyer (S gauge) made a four-car Aluminum passenger set -- combine, coach, dome and observation car.  I have extras of the dome and observation cars purchased with the idea of removing the boat tail on one and attaching it to the dome car.  In this case, its gonna require some cutting of the end of the dome car to get the truck position correct.  The only way I can see to do that - since I don't have a milling machine and I'm certain I can't make a straight enough cut with a hand saw - is to fire up my radial arm saw with a non-ferrous metal cutting blade and see if I can get a straight and square cut that way.  I've seen a picture of someone else's attempt at this - which was well done - but no details on how they did it.  Since these are 'generic' passenger cars, there are few true prototype details, so this will be, at best, a "if you squint your eyes, it looks pretty good" effort.

Rich:  (1) can you remove a dome from one of your extra cars; and, (2) do you have an extra observation car?

I did basically that with a PW LIONEL 2531 observation car using a donor dome from a 2532 vista dome coach many years ago using a beater obs car and beater dome.  Actually, the cut in the roof was done by a buddy--I just gave him the aluminum shell and the dome.  Worked just fine.  Even offset the dome towards the rear of the obs car, rather than center it.

My suggestion would be to find a "buddy" with a mill and have the job done right.

Good luck with the project. 

Last edited by Pingman
Hancock52 posted:

Outstanding, both in terms of explanation of what you did and the result.

Regarding the UP red striping, I have seen the original color duplicated accurately on decals. It is not easy to cut and apply decal striping in long straight lengths, however, and then it has to be overcoated with clear (usually Dullcote) to make sure it sticks and does not flake off. But even that would not be a guarantee of matching the K-Line color, which was probably applied over the yellow used for the car sides.

Anyway, it all depends on how the car itself looks to your eye. This page, on how UP engine and passenger car colors come out on the internet, was an eye opener to me in terms of trying to match what you can see in photos: http://utahrails.net/up/up-paint-html.php


Wow, great link to Union Pacific paint information Hancock.   I feel much better about how my paint colors turned out after reading that link.    


Also, last week the Union Pacific just ran an 25 car excursion passenger train through the Cajon Pass with the Big Boy in the lead.  After studying the photos I noticed the Harbor Mist gray on the roof of the 4808 (City of Los Angeles diner car) in the front is much lighter than the following dome car 8008 (Colorado Eagle).  Even the blanked off window section in the middle of the 8008 side are a slightly darker shade Armour Yellow than the rest of the car in this photo.

I still have to wait another week for my next K-Line 8003 project car to arrive.  Once it does I will keep you updated on the progress to make it into the 9003. 


Attachments

Images (1)
  • mceclip0

T. Albers -- thanks for the info on the various UP observation cars -- quite a variety, including - indeed - boat-tail cars.  Who knew... (not me in any event).  The last one you show with the round windows looks very "Art Deco-ish", I wonder if it was designed by Keene, who had designed some motor cars with, IIRC, round windows (and a tapered tail).

One of the current UP tail-end cars (the only one??) -- the Kenefick -- as it appeared as part of the 4014 tour (note the drumhead) - we saw it in southwestern UT a few weeks ago.  This picture was taken in the big town of Modena (pop. 21), where there must have been over a 1000 people trackside waiting for 4014 (it was a 'lubrication' stop).  This picture was taken 'downstream' of the crowd as the 4014 was headed out of town.

Kenefick

Indeed, the old CB&Q CA Zephyr vista dome/observation car is the Silver Solarium (apparently the only one remaining out of seven built).  Its now owned by a private company that does rail charters.  It was built in 1948 and refurbished a few years ago (my aspiration doesn't extend to doing the interior...).  Here's a link to some nice interior shots  http://www.libertyship.com/LA_.../Silver_Solarium.htm  and more detail.

Carl -- my original thought was to do as you suggest, cut a hole in the top of an existing observation car and insert the dome (even easier with the successor passenger cars to the Al ones, as they were made of plastic).  But I like the 'more authentic' look of the smaller windows (where the passage way goes around the stairs going up to the 'real' dome) and, of course, having the dome offset.  The smaller windows are only available on the Al cars -- the later plastic versions all had identically sized windows the length of the car.   The pictures below show what someone else did (a nice job IMHO).  When Gilbert built the Flyer Al passenger cars, the ends of the cars, including the boat tail, were cast Aluminum with a small flange that fits inside the Al car body and is held in place with the screws shown in the top views (hardly prototypical...!).  The geometry of the window placement and the wheel 'well' forces one to make a cut just before the last window of the original dome car - even though the wheel well is a bit elongated.dome observation conversiondome observation conversion 2dome observation conversion 3

The other thing that these photos show is the good job the person did in polishing the Al (I don't remember where these photos are from -- eBay I think) -- I have a jar of Mother's Al and Mag wheel polish all ready to go...


Attachments

Images (4)
  • Kenefick
  • dome observation conversion
  • dome observation conversion 2
  • dome observation conversion 3
Last edited by richs09

Rich, thanks for the photos, especially the dome observation car--I agree, the fellow did a very nice job.  And thanks also for the detailed description of your choice and plans.  Looking forward to following your progress.

In my case, I was premature with my project by about a decade since LIONEL eventually produced a dome observation car that was included in a four-car Santa Fe Super Chief set of 15" shiny cars around 2001. 

T.Albers posted:
Also, last week the Union Pacific just ran an 25 car excursion passenger train through the Cajon Pass with the Big Boy in the lead.  After studying the photos I noticed the Harbor Mist gray on the roof of the 4808 (City of Los Angeles diner car) in the front is much lighter than the following dome car 8008 (Colorado Eagle).  Even the blanked off window section in the middle of the 8008 side are a slightly darker shade Armour Yellow than the rest of the car in this photo.

That same color difference is evident in various photos of the actual Overland dining car that is part of Lionel's current Excursion Car offerings. Here is one example of it in an Excursion consist:

Overland2

I put the difference down to either wear and tear or a different paint used on the roof because of the presence of diner kitchen exhaust vents. Notably, in fine scale brass HO Excursion Cars, the paint difference is not replicated. Frankly, the HO researchers' approach is good enough for me and on the Lionel 21" Overland StationSounds diner I am working on I don't propose to change the stock roof color, which bis the same as all the other cars in the set.

Attachments

Images (1)
  • Overland2
Lou1985 posted:

Nice job.

I made my own end cap because I did not want to purchase a whole car just for the end cap. Then I'd have to go through the trouble of selling the rest of the leftover car. 

I tried sacrificing a K-Line Golden Divan for my Lionel dome and it truly was a "sacrifice" because nothing lined up.  I whittled away at it but couldn't get the profile or the guts to line up, ruined the end cap, threw in the towel and started posting a Topic on the Forum.  My belief that K-Line copied Lionel exactly was debunked and I now have the leftover parts, per Lou's speculation. 

However, inspired by your fine work and Lou's great success, my next attempt will use a standard Lionel car end casting as a platform on which to build my own blunt-end cap.  Starting out with guts and carbody profile that line up plus standard attaching hardware functional seems like the way to go.  Thanks to all who contributed!

Once, again, the Forum turns out to be the most important tool in my toolbox!

Add Reply

Post

OGR Publishing, Inc., 1310 Eastside Centre Ct, Suite 6, Mountain Home, AR 72653
800-980-OGRR (6477)
www.ogaugerr.com

×
×
×
×
Link copied to your clipboard.
×
×