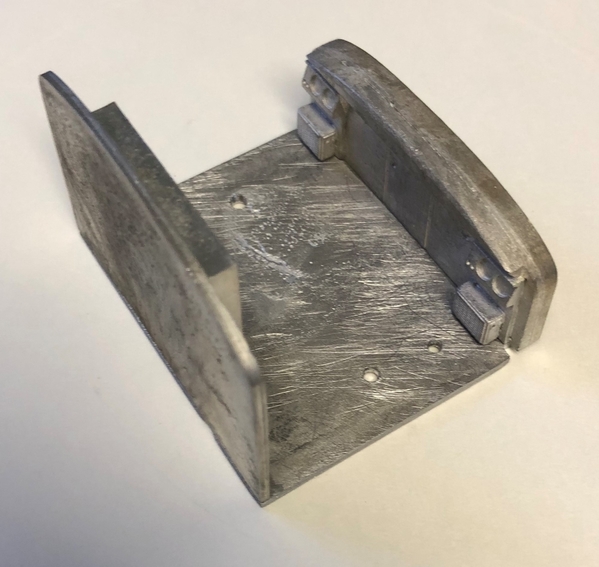
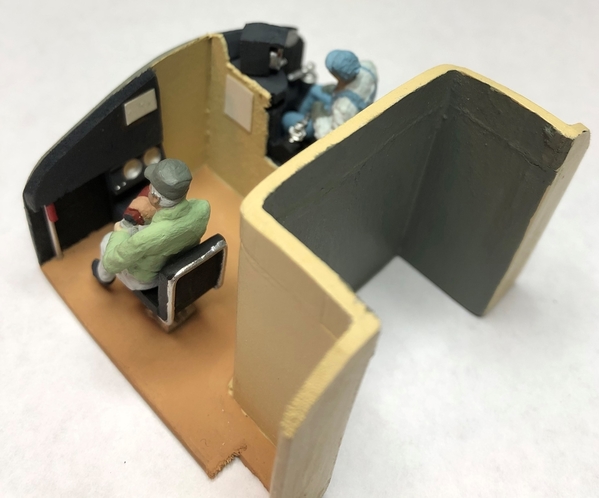
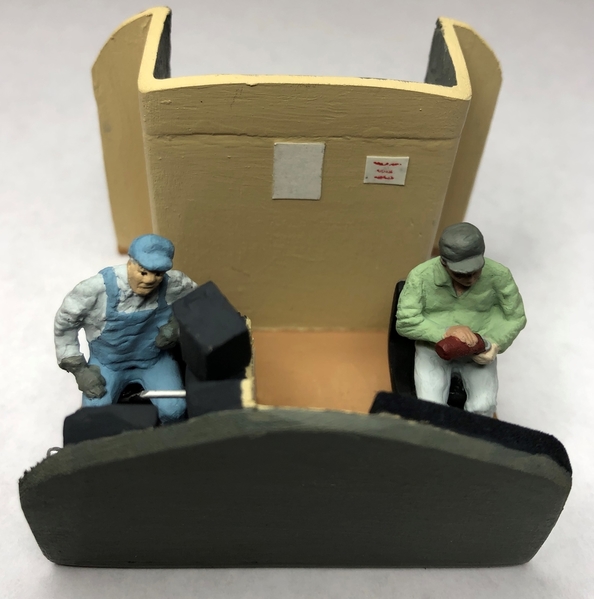
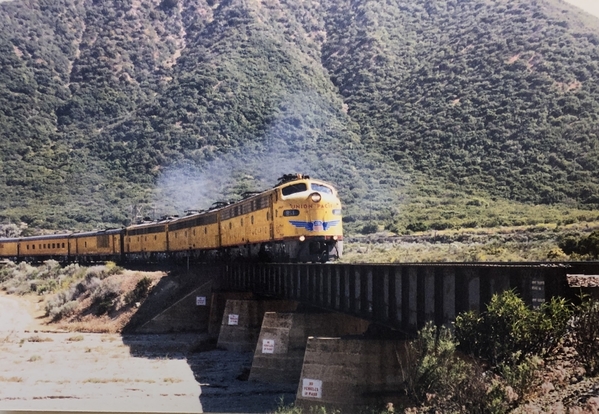
As I was building my Union Pacific City of Los Angeles passenger car interiors I figured should also do the cab interiors of the E8's pulling the train.  A while ago I re-painted the stock engineer and fireman figures but knew the cab interiors of these K-Line part# K-28901S could look a lot better.  First I looked at Precision Scale’s website that offered beautifully detailed brass interior parts for EMD E8 diesels cabs.  But after reading other postings on this forum about how visitors cannot see most the details you install inside an E8's cab I decided to buy a less detailed interior kit #48-041 from ScaleCityDesigns.  This all white metal kit has two chairs, rear electrical control panel wall, front dash, controller, heaters, gauges, air brake valve.   Scale City's description said it was made for early Weaver FA-2 O-scale diesel cabs.  I knew it would not exactly match my E8 diesel cab interior and I would have to do some minor modifications.


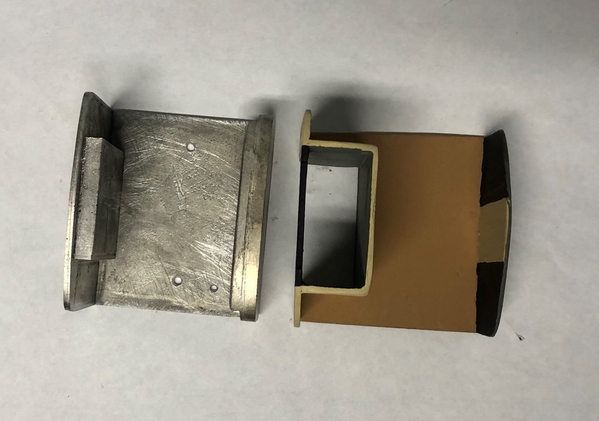
After putting together the all metal FA-2 cabs floor and walls the first thing I noticed was the rear electrical control cabinet wall did not leave enough room for my K-Line's forward motor.   All the other detailed parts provided in this kit looked like they were going to work great.  But the FA-2 metal walls and floor were not going to fit in my E8 application.  At this point the modifications were not going to be minor anymore.

cab17


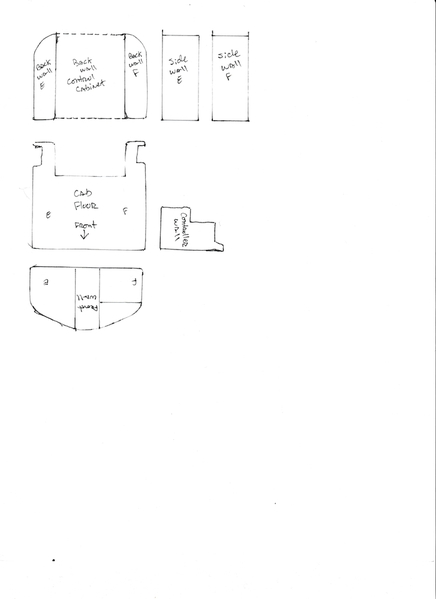
So, I took some measurements and built a new floor, front dash wall and rear electrical control cabinet wall.   The new floor and walls were made from a sheet of 1/16"x 3"x 24" basswood and provided the room needed for the K-Line motor.

cab3

In the photo below you can get an idea of the extra motor clearance needed at the rear of the cab.  In my early attempts to make the back wall I included an overhead support in the engine room.  I had to remove this overhead support after my test fit to allow more room for the motor.

cab8


To build this interior correctly I wanted to visit a real Union Pacific E8A to get some photos for my research.   Accorded to their website the Orange Empire Railway Museum in Perris, CA (now called the Southern California Railway Museum) had this exact style locomotive in their collection I needed to research.  Their Union Pacific #942 was built in 1953 to pull the City of Los Angeles trains.  The OERM spec sheet provided for guests said it was rated for 2250HP and has two 12 cylinder diesel electric engines.  For a fee, the OERM also teaches a 1-hour diesel engineer class.  In this class the OERM instructors allow you to drive the 942 on the museums tracks.   

IMG_5901


The people at OERM were friendly and I carefully climbed up the ladder and into the E8's cab.  I found myself on the left side of the cab standing next to the fireman's seat.  In front of the seat toward the lower left side was a red emergency brake valve.  On the lower right side was the floor heater with round dial.  The single seat located on this side of the cab was mounted on a plywood floor and white papers were hanging on a dark gray dashboard.  According to the UP plans it should have two seats on this side.  But since the 942 only has one seat, that's what I duplicated in my E8 interior.

E-8 interior fireman a


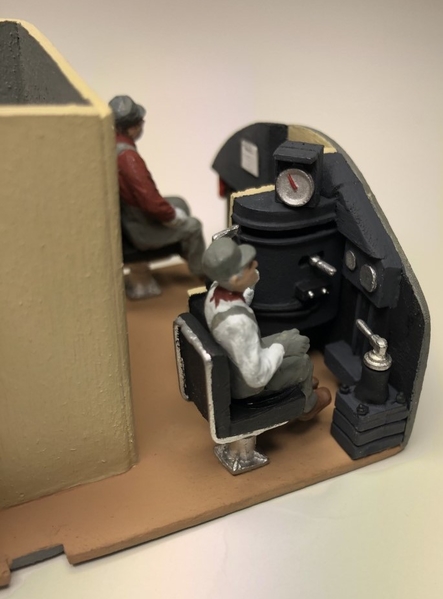
In my o-gauge reproduction of this E8 cab next to the fireman's seat I recreated a brake valve with red handle, paperwork and heater mounted to the front wall.   Both figures in the cab are from Artitsta, part numbers 1176 (fireman) and 1143 (engineer).

cab26


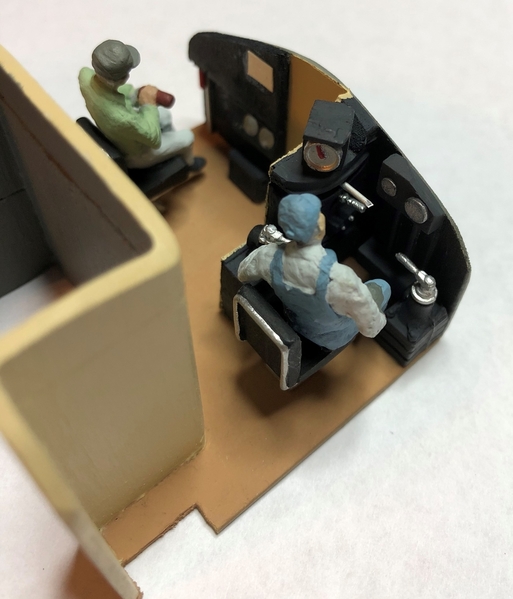
On the other side of the 942 I found the engineers seat, controller and instrument panel.  On the lower right mounted to the floor just in front of the engineer was the air brake valve.  The big square box with round dial mounted on top of the controller (on the engineers upper left side) is the speed recorder.   The smaller box is the communications radio.

E-8 interior engineer c

Since these FA-2 metal parts from ScaleCityDesign where not made for my E8 cab interior I had to file the metal controller in half and mount it to the cab's center wall.  Also, I modify one of the metal gauges supplied in the #48-041 kit to look like a speed recorder for this E8 application.

cab23


Mounted on the back of the 942's electrical control cabinet wall was paperwork and a small painted sign that said "DANGER 600 VOLTS".

E-8 interior rear wall center

cab29


Below is a view looking forward next to the 942's front 12 cylinder engine.  You can see the door going into the engineers side of the cab is light tan and most the walls inside this section are grey.
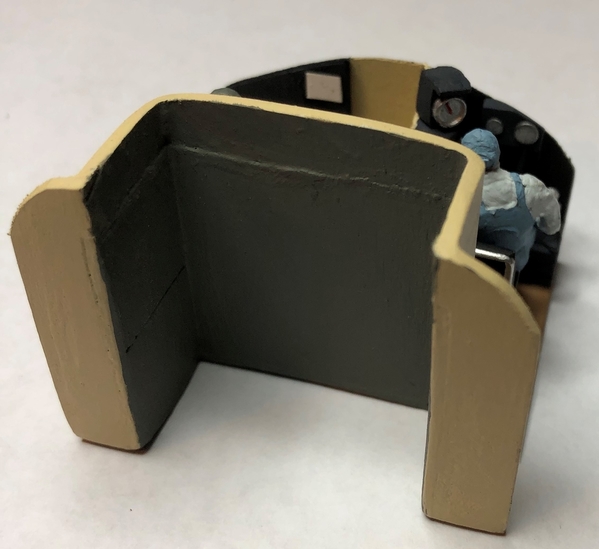
IMG_5917

cab31


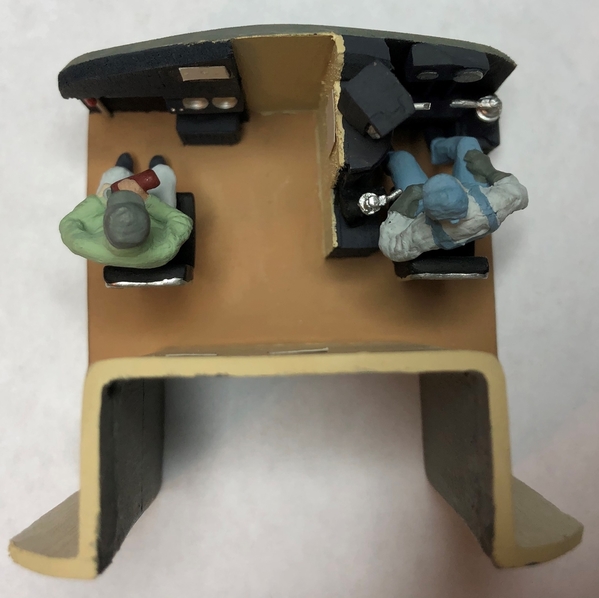
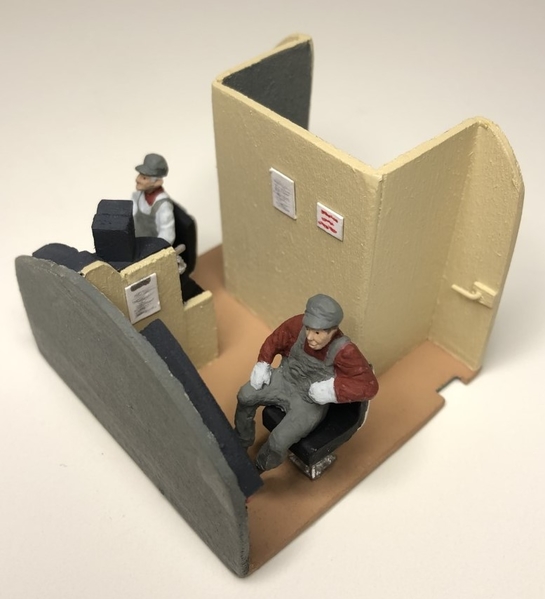
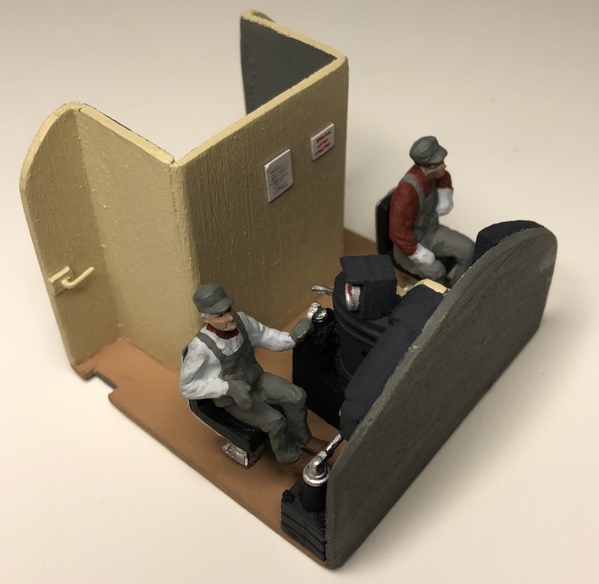
Here's an overhead view of the finished E8 cab.  At this point I mounted a small warm white LED to the shell above the cab section to lighten up the new interior.

cab28


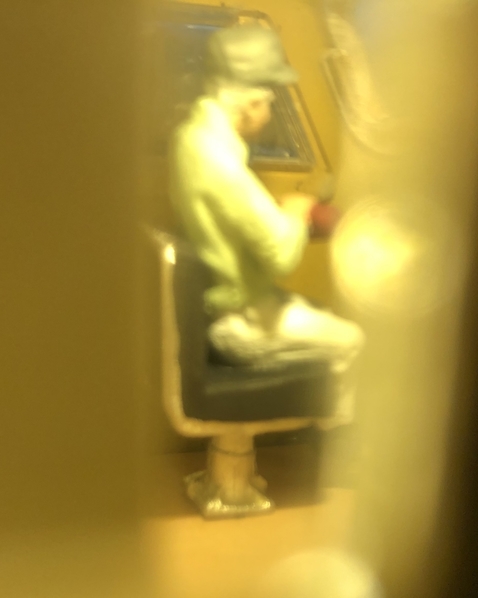
It was difficult getting a clear photo inside the finished cab with the shell on either because the little plastic windows blurred the cameras view, the figures were to close to the camera or the figures got in the way of the shot.  But I'm happy with the end results of this build even if the camera cannot get a good photo.  The older postings on this forum on how little detail you can see were correct, you just can't see much an E8's cab interior with the shell on.  But the new cab interior is better than stock and it looks great to my visitors as it goes by pulling the rest of the detailed passenger cars.

46A5E508-B019-4A13-9E05-627B6DEC0192


I'm attaching my final drawings for the walls and floor for anyone who wants to make there own K-Line E8 cab interior.  Just print the drawing on a sheet of 8 1/2" x 11" paper and it will be sized correctly.

E-8 cab floor and walls drawing


Thanks,


To look at the other interior builds in this series click on the links below. They are listed in the order I run them on my layout:

https://ogrforum.ogaugerr.com/...-an-e-8-cab-interior

https://ogrforum.ogaugerr.com/...interior-upgrade-rpo

https://ogrforum.ogaugerr.com/...6327-k4690#lastReply

https://ogrforum.ogaugerr.com/...car-interior-upgrade

https://ogrforum.ogaugerr.com/...enger-car-8003-k4690

https://ogrforum.ogaugerr.com/...lounge-car#lastReply

https://ogrforum.ogaugerr.com/...enger-car-1305-k4690

https://ogrforum.ogaugerr.com/...upgrade-k-line-k4690

https://ogrforum.ogaugerr.com/...upgrade-k-line-k4690

https://ogrforum.ogaugerr.com/...senger-car#lastReply

https://ogrforum.ogaugerr.com/...upgrade-placid-haven

https://ogrforum.ogaugerr.com/...oenix-aluminum-shell

https://ogrforum.ogaugerr.com/...pullman-sleeping-car

https://ogrforum.ogaugerr.com/...c-passenger-car-1575

https://ogrforum.ogaugerr.com/...-passenger-car-k4690

Attachments

Images (18)
  • cab17
  • cab3
  • cab8
  • IMG_5901
  • E-8 interior fireman a
  • E-8 interior engineer c
  • cab13
  • cab26
  • cab26
  • cab23
  • E-8 interior rear wall center
  • cab29
  • cab31
  • IMG_5917
  • cab28
  • 46A5E508-B019-4A13-9E05-627B6DEC0192
  • E-8 cab floor and walls drawing
  • E-8 plans 2250hp
Last edited by T.Albers
Original Post

Replies sorted oldest to newest

Wow, fine work! Having to rebuild the interior walls must have been a pain but obviously worth it in the end.

I've thought about similar projects but all of my E series engines are too small in the cab area to allow any margin for measuring mistakes, which I invariably make. Plus most 3 rail diesels, especially from 3rd Rail, have a lot of lighting wiring stuffed around the cab interior assembly.  If I did try something like this, I'd be strongly tempted to illuminate the gauge faces just for the fun of it. 

Thanks for posting this and the rest of your series.

prrhorseshoecurve posted:

Ok I'll bite, why didn't you just modify a P&D hobby F unit can interior? Please don't take this the wrong way your work is gorgeous... I'm just suggesting the P&D kit for savings of time.

Hi PRR, great lead on detailed parts. 

Honestly, I did not find P&D Hobby Shop when I first searched for E8 cab interiors.   But I just looked at their website and I will be using them for detailed parts in the future.  On their website they offer a full EMD F A unit cab kit part #PDP5790K but they did not post images of whats included inside the kit.  I will reach out to P&D Hobby Shop for more information.  

Thank you for the lead!


Last edited by T.Albers
Hancock52 posted:

Wow, fine work! Having to rebuild the interior walls must have been a pain but obviously worth it in the end.

I've thought about similar projects but all of my E series engines are too small in the cab area to allow any margin for measuring mistakes, which I invariably make. Plus most 3 rail diesels, especially from 3rd Rail, have a lot of lighting wiring stuffed around the cab interior assembly.  If I did try something like this, I'd be strongly tempted to illuminate the gauge faces just for the fun of it. 

Thanks for posting this and the rest of your series.

Thank Hancock, the stock K-Line circuit boards and wiring took up a lot of room in the shell.  Your posting is correct, the front of the K-Line shell was also full of wires plus a MARS light circuit board under cab area when I started. 

XWMG8851 [1)

I should have informed everybody in my original post that I also changed out all the stock K-Line electronics and went to EER.  The newer EER components are much smaller and they left tons of room up front.  With all the wiring and MARS circuit board out of the way and all I had to do was hot glue the finished cab interior into the shell.

I like your idea about illuminating the gauge faces.  But, I'm not good in the field of electronics.  My electronics limit was pushed just doing this EER upgrade.  Even though the EER boards had a full set of instructions I still was stressed I would mess something up of burn out a new board.

Attachments

Images (1)
  • XWMG8851 (1)
Last edited by T.Albers
Pingman posted:

Couldn't you find a photo of an actual E-8 City of LA engineer and a fireman to model using the Artista figures?  I ask only because you have represented everything else.

Wonderful photos and text--the "how to" of this and your other projects--is greatly appreciated.

LOL, Thanks Pingman. 

I have to say after posting this topic yesterday I found I missed a major detail from inside the cab.  I forgot to install the white pull cord with black handle for the horn.  I added the warm white LED cab light and got it working but completely forgot to install a pull cord and handle coming down from the ceiling.  It should be easy to make and it will add some movement inside the cab when this EMD locomotive is going around the corners.  While I didn't find any real UP engineers or fireman to pose for my interior I will be taking the cab out of the shell again and installing this missing detail!  

E-8 interior engineer e


Attachments

Images (1)
  • E-8 interior engineer e
Last edited by T.Albers
T.Albers posted:
Thank Hancock, the stock K-Line circuit boards and wiring took up a lot of room in the shell.  Your posting is correct, the front of the K-Line shell was also full of wires plus a MARS light circuit board under cab area when I started. 

XWMG8851 [1)

I should have informed everybody in my original post that I also changed out all the stock K-Line electronics and went to EER.  The newer EER components are much smaller and they left tons of room up front.  With all the wiring and MARS circuit board out of the way and all I had to do was hot glue the finished cab interior into the shell.

I like your idea about illuminating the gauge faces.  But, I'm not good in the field of electronics.  My electronics limit was pushed just doing this EER upgrade.  Even though the EER boards had a full set of instructions I still was stressed I would mess something up of burn out a new board.

I notice from the above picture and the top of the body shell that this is one of those K-Line diesels that came with motorized roof fans instead of a smoke unit. The pulley mechanism is superior to the much later Lionel geared roof fans (VL Centipede). However I just wonder if you powered this arrangement from the ERR boards and if so how you wired it up? I have one K-Line E8 A-A set where the power supply to one engine's set of fans has failed but have not got around to installing a new DC power source for the motor.

Mike CT posted:

Custom cut stryene sheet installed in front of the door behind the cab window allows for a small bench seat, done with a piece of wood.  Engineer figure.  Weaver E8 models with upgrades. Original motors/ replacement motors, new electronics, bottom picture.

Nice job Mike!  That’s real clean work.

Hancock52 posted:
T.Albers posted:
Thank Hancock, the stock K-Line circuit boards and wiring took up a lot of room in the shell.  Your posting is correct, the front of the K-Line shell was also full of wires plus a MARS light circuit board under cab area when I started. 

XWMG8851 [1)

I should have informed everybody in my original post that I also changed out all the stock K-Line electronics and went to EER.  The newer EER components are much smaller and they left tons of room up front.  With all the wiring and MARS circuit board out of the way and all I had to do was hot glue the finished cab interior into the shell.

I like your idea about illuminating the gauge faces.  But, I'm not good in the field of electronics.  My electronics limit was pushed just doing this EER upgrade.  Even though the EER boards had a full set of instructions I still was stressed I would mess something up of burn out a new board.

I notice from the above picture and the top of the body shell that this is one of those K-Line diesels that came with motorized roof fans instead of a smoke unit. The pulley mechanism is superior to the much later Lionel geared roof fans (VL Centipede). However I just wonder if you powered this arrangement from the ERR boards and if so how you wired it up? I have one K-Line E8 A-A set where the power supply to one engine's set of fans has failed but have not got around to installing a new DC power source for the motor.

Hi Hancock, the rotating roof fans are a nice feature on these K-Line engines.  I did not tie the power for the fans into the EER board because I was not sure how much current they drew.  For my setup 18VAC goes into a small circuit board for the fans (mounted on the shell) and then DC voltage come out for the small fan motor with pulley.  Instead of connecting it to the EER board I took the easy way out and connected the input for the small circuit board to the red pick up wire and the black common wire.  The down side is the fans rotate anytime the track has power. 

Also, I'm working on another passenger car for this series.  I picked up a National Border Pullman and should have it done in a few weeks.
"Hi Hancock, the rotating roof fans are a nice feature on these K-Line engines.  I did not tie the power for the fans into the EER board because I was not sure how much current they drew.  For my setup 18VAC goes into a small circuit board for the fans (mounted on the shell) and then DC voltage come out for the small fan motor with pulley.  Instead of connecting it to the EER board I took the easy way out and connected the input for the small circuit board to the red pick up wire and the black common wire.  The down side is the fans rotate anytime the track has power." 

I can't recommend this for all cases because I don't know if it would cause any sort of electrical feedback issue (it hasn't in my experience), but I have wired DC power supply circuit boards to the motor inputs of my TMCC/ERR-equipped diesels so that the power comes on only when the motor is running. The motors for these roof fan features appear to me to be smoke unit fan motors and so they draw something like 5 VDC. The DC power source I have used is a very small board that comes from Ngineering (designed for LED simulator modules) which has an onboard rectifier so can be hooked up to an AC input although the power to the motors is DC.  

Here's an update to the E8 cab interior project.  I run my K-Line locomotives in the A-B-A configuration.  The engine numbers in my set are 949, 950B and 951  The E8 that got it's cab interior updated last month was the 949.  Now, here's a look on how the 951 turned out.  In this update I’m just going to point out a few of the differences between the two cab interiors.  In the 951 cab you will find I added a few more details this time around and I feel it turned out better. 

I went back over my 942 photos from the museum visit and found I wanted to add more details like door handles and writing on the papers that were on the clip boards.  Here's a photo of the real door handle on the fireman's side of the 942.

 E-8 interior rear wall fireman doora

And my o-gauge reproduction of the door handle and paper work with writing.

thumbnail_IMG_6338

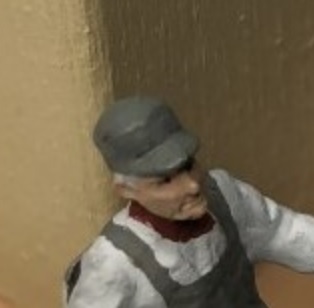
I didn't find the happy expression on the young fireman's face until I zoomed in on the photo above.  It must be his first day in the cab as a fireman. 

951 Fireman


On the engineer side of the cab you see the other door handle and paper work on the back wall.

thumbnail_IMG_6343

Also, the confidence on the engineer's face makes it look like he still enjoys his job.

951 Engineer


Side view of 951 cab

thumbnail_IMG_6339

And a close up view of the controller and dials

thumbnail_IMG_6341


The Arttista figures used in this interior upgrade were part numbers 1226 (engineer) and 1522 (fireman).  I will post some finished photos when the cab interior is back inside 951 shell again. 

Thanks,


Attachments

Images (7)
  • E-8 interior rear wall fireman doora
  • thumbnail_IMG_6338
  • 951 Fireman
  • thumbnail_IMG_6343
  • 951 Engineer
  • thumbnail_IMG_6339
  • thumbnail_IMG_6341
Last edited by T.Albers

 Outstanding work and precise modeling'... I am in need of cab interiors for two EMD F7s, by WIlliams.  Do you think your schematic will work in a F7?  Either way, I thank you very much for posting the print out... I half assed tried making an interior out of paper, but wasn't too successful.. Looking forward to trying yours'... 😉

Quarter Gauger 48 posted:

 Outstanding work and precise modeling'... I am in need of cab interiors for two EMD F7s, by WIlliams.  Do you think your schematic will work in a F7?  Either way, I thank you very much for posting the print out... I half assed tried making an interior out of paper, but wasn't too successful.. Looking forward to trying yours'... 😉

Thanks QuarterGauger, my plans should be pretty close for your EMD F7’s.  I don’t remember where the electronics sit inside the shell of a Williams F7 locomotive but post your build photos so we can see how it turns out.  

Earlier in this thread PRR had a great lead on a detailed interior from P&D Hobby Shop.  This kit might work better if you don’t want to scratch build an interior out of basswood or stryene.  You can find it by going to their website and searching for EMD F A unit cab kit part #PDP5790K.  I tried but could not find any online images of whats included inside this brass kit.

prrhorseshoecurve posted:

Ok I'll bite, why didn't you just modify a P&D hobby F unit can interior? Please don't take this the wrong way your work is gorgeous... I'm just suggesting the P&D kit for savings of time.

F-units had a different type of control stand from the E8 and E9.  

In an F-unit, the control stand is slender and cylindrical.*  On E8's and E9's, the control stand is shaped similarly to the Alco-GE control stand, with flat sides and a rounded rear.

*  Earlier E-units had the fat cylindrical control stand also used on switch engines.  And late-model F-units and E9's had the "small cash register" control stand, a rectangular cube with plastic handles for the throttle and transition lever.

Last edited by Number 90
T.Albers posted:
prrhorseshoecurve posted:

Ok I'll bite, why didn't you just modify a P&D hobby F unit can interior? Please don't take this the wrong way your work is gorgeous... I'm just suggesting the P&D kit for savings of time.

Hi PRR, great lead on detailed parts. 

Honestly, I did not find P&D Hobby Shop when I first searched for E-8 cab interiors.   But I just looked at their website and I will be using them for detailed parts in the future.  On their website they offer a full EMD F A unit cab kit part #PDP5790K but they did not post images of whats included inside the kit.  I will reach out to P&D Hobby Shop for more information.  

If you find out what is included, please share.  P&D is not big on photos of many of their items.  We need photos.  and good descriptions...

 Thanks'

On their website they offer a full EMD F A unit cab kit part #PDP5790K but they did not post images of whats included inside the kit.  I will reach out to P&D Hobby Shop for more information.  

Great work again and seeing it does make me think that if you are going to model this sort of locomotive equipment, scale accurate fidelity to the prototype is the only way to do it. You have the advantage of having seen a prototype preserved in a museum.

I’m also grateful to be reminded of Precision Scale’s cab detail parts. I imagine that these are true O scale and so fitting them in a sub-scale interior, if that’s what 3 rail O scale models come with (as I believe to be the case) might be a challenge.

One belated question: you noted above with respect to the motorized roof fans on these engines the following-

”Hi Hancock, the rotating roof fans are a nice feature on these K-Line engines.  I did not tie the power for the fans into the EER board because I was not sure how much current they drew.  For my setup 18VAC goes into a small circuit board for the fans (mounted on the shell) and then DC voltage come out for the small fan motor with pulley.  Instead of connecting it to the EER board I took the easy way out and connected the input for the small circuit board to the red pick up wire and the black common wire.  The down side is the fans rotate anytime the track has power.”

What circuit board did you use for this purpose? I have repurposed some very small HO DC power supply boards in the past but now wonder whether they are up to the task of constant running with an 18 volt input. Finding small enough AC to DC boards is not easy, especially if they have adjustable DC output, although there are some that are built for LED strip lighting. Did you use one of these or something else?

I wanted to post some finished photos of the cab when it was back inside the 951's shell again but the overhead LED lights were so bright they were washing out my photos.   

The problem was I glued 2 micro LED's to the ceiling so the light coverage would be good on both sides of the cab.  But the light pattern from the micro LED's were shining on the windshield causing a bright glare on the glass.  Next they were causing bright reflections off the green paint on the engines nose.  It was just too much light for this small area.

before 20 weight paper


So I took the cab out of the shell again today and installed white 20 weight paper on the ceiling underneath the LED lights.  The results look much better.  The bright glare on the front windshield is gone.  The nose of the engine is not reflecting as much light back up at the viewer.  Now the color inside the cab looks more natural and the viewer can see more of the interior details as the engine goes by.

after 20 weight paper 6546


Next, I will post finished exterior photos of the 949's cab after its overhead light get fixed.

Thanks,


Attachments

Images (2)
  • before 20 weight paper
  • after 20 weight paper 6546
AlanRail posted:

This looks like a job for a 3D laser printer. Since I now have some time I'll give it try based on the dimensions above. I can import the drawing into Rhino6. Then created the 3D model to then print.


Alan, that would be great to see!  Please post photos of how the 3D printed cab turns out.   Your 3D printed cab would save a lot time and steps for others that don’t want to build a cab from scratch. 

Thanks!

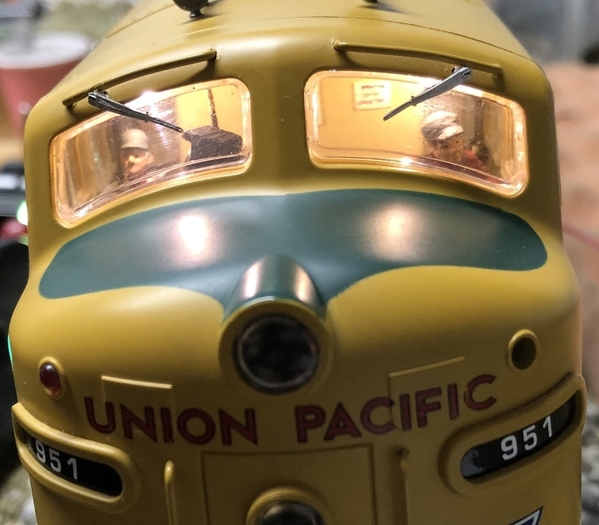
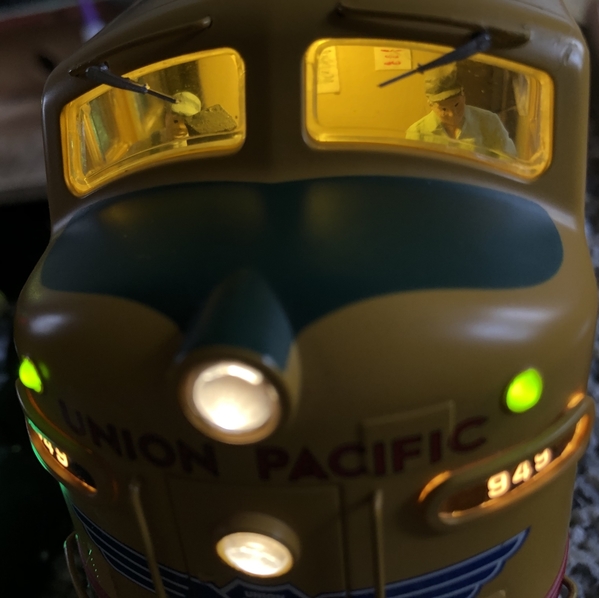
As promised here is a photo of the finished 949's cab interior from the outside.  I used a single overhead LED to illuminate the cab this time and centered it in the middle of the two windows.  Doing this seems to have removed the glare off the nose of the locomotive.  The engineer, fireman and signs on the back wall show up well with this new lighting arrangement.  Also, I upgraded the windshield wipers on both my 951 and 949 with part number 48-34 from ScaleCityDesigns.  

IMG_6569


Just for fun here's a photo I took of the real 949 on May 22th 1994 in Hesperia, CA next to my K-Line version.

949 and 949


Attachments

Images (2)
  • IMG_6569
  • 949 and 949
Last edited by T.Albers
Hancock52 posted:

Great work. There are subtle little differences between the prototype and the model (food for rivet counters) but your work makes the model a truly fine representation of the real thing.

The single overhead LED looks to me to be even better than incandescent lighting, which is saying a lot.

Thanks Hancock, I was also able to snap this photo of the UP 951 as the front unit of an ABA during the summer of 1998.  It was running full speed up Cajon Pass at Pine Lodge pulling a business train of 13 Union Pacific passenger cars.

IMG_6557


If I added a smoke unit to my K-Line 951 it would match better!

951 and 951


Attachments

Images (2)
  • IMG_6557
  • 951 and 951
Last edited by T.Albers

Add Reply

Post

OGR Publishing, Inc., 1310 Eastside Centre Ct, Suite 6, Mountain Home, AR 72653
800-980-OGRR (6477)
www.ogaugerr.com

×
×
×
×
Link copied to your clipboard.
×
×