POST 20:

Light replacement in MTH N&W 70' Madison (heavy weight) passenger cars.

Base removal is easy on these cars.  Just 6 screws hold the metal base frame to the top plastic shell.

A nice touch by MTH using small copper tabs in the shell to make contact with the base, eliminated any wires between the two, which make it much easier to PM the cars.


premier N&W madison pass cars 01


These cars are pretty old and they have incandescent lights along the top of the car.

I'm guessing that newer cars are probably using LED's.

Again, I didn't want to wait to order new bulbs, so I used some Christmas replacement bulbs from a wal-box.  They are only 12 volts so time will tell if they hold up to the 18 volts.  Even though the bulbs are in parallel, I'm hoping running all the cars together, reduces voltage to each light and survives the 18 volts to the track.  These light bulbs have been used in some of my modern accessories where this type of bulb is used.  I find it easier to just replace the bulb versus trying to have a lot of different bases available for each type of accessory, and keeping the voltage at 12 or lower usually extends the bulb's life.


premier N&W madison pass cars 02


The new bulbs had shorter leads on them so I had to extend the leads but cutting off the old bulb's leads and sticking them into the holes and wrapping them along the sides of the base (not very professional but it seemed effective!).  Some new bulbs would be a lot easier but 'good enough' for now.  I also noticed that the new bulb's leads had a coating on them and some fine sandpaper was needed to make good electrical contact.


The grey interior seat/wall piece has a hole in one end which goes over those two copper tabs, allowing the lights to make contact with the metal base.


MTH has a nice web site for ordering parts via the online.  If you can't find the part, you can also call them and order direct.

Also, if you need a tech guy, it appears that Tuesday through Thursday from noon to 5 (EST) are their 'help the customer' hours.


Old burned out bulbs:


premier N&W madison pass cars 03


New bulbs:

premier N&W madison pass cars 04


New bulb in old socket:
 

premier N&W madison pass cars 05

Attachments

Images (5)
  • premier N&W madison pass cars 01
  • premier N&W madison pass cars 02
  • premier N&W madison pass cars 03
  • premier N&W madison pass cars 04
  • premier N&W madison pass cars 05
Last edited by samparfitt

POST 21:

MTH track voltage monitor (pretty cool option).

While 'playing' with the remote while the engine was running, I discovered I could find the track voltage at the location of where the engine is located on the track.


In my case, this track loop voltage is set by VAR 1 option (in this case I put it at 22 volts).  Initially, I was just using 18 volts so as to not overload TMCC engines but the max voltage at the wires via the engine only read 14.5 volts.


track voltage 01


I then selected ENG and scrolled back to the engine that I was running.

I hit soft key S5 (-- >  ) three times and then hit S4 (more) to get to the more options screen.


track voltage 02


I then scrolled down to 'track voltage' option.


track voltage 03


Each time I hit the speed roller, the voltage shows up for where the engine is at that time on the track.

Obviously, the highest voltage was where the wires connected to the track (only one set for the loop).  What was surprising was the voltage found was only a max of about 16.4 volts.  The far end of the loop got down to around 15.0 volts.

The amount of voltage screen shows for several seconds and then goes back to the 'track voltage' screen, so clicking again on the speed roller gives a new location track voltage.

This gives one a good way to analyze for low voltage spots on the railroad.

Pretty cool, and a lot easier than using a volt meter, especially if you have tunnels!


I've only tried this on a MTH engine.  I'll have to try it for a TMCC engine to see if it works, although I'm thinking it won't due to software needed to be in the engine's circuit board to 'talk' back to the DCS remote.

NOTE: Checked the TMCC engine and it doesn't have this option.


I did make the assumption that the reading is from the engine.  Those more knowledgeable, correct me if I'm wrong.


track voltage 04

Attachments

Images (4)
  • track voltage 01
  • track voltage 02
  • track voltage 03
  • track voltage 04
Last edited by samparfitt

post 22:

MTS DCS options:

Sounds:

On my DM&IR steam engine;

Pushing the Menu button and then Sounds,


coupler sounds (auto coupler) were activated.

pressing S2 to make auto so when the engine starts, coupler noises are made.


COUPLER SOUNDS 01


Brake sounds were also initiated:

Again selecting S2 for auto.


BRAKE SOUNDS 01


There is a 'clickity clack' sound that comes on after 30MPH but it turns off the chuff so I left this option off.


Marker lights are turned on/off with LIN (lights interior) at the bottom of the screen.

Headlight turned on/off with HDLT button at bottom of remote.


Again, this is for the DM&IR steam engine.

I'm assuming these same commands are valid for other MTH steam engines and, I'm sure, diesels have their own idiosyncrosies.

Attachments

Images (2)
  • COUPLER SOUNDS 01
  • BRAKE SOUNDS 01

Mark,

Always glad to help.

To be truthful, I'm also doing this thread for a selfish reason; it gives me a reference, in the future, when I have to do the same thing, I don't have to 're invent the wheel'.


============

POST 23:

Double decker full done cars, 70' by MTH.

I had the lights on two dome cars flickering so I figured a bad connection, somewhere (a light wack on the top would have them lighted for a short time).


Eight screws hold the base to the top plastic shell.

There's two sets of plastic interiors (top and bottom) that have to be removed. 


double decker dome cars 01


I found all kind of moth/insect parts inside: don't know how they managed that (plus he didn't even pay a fare!).


double decker dome cars 02


There are two sets of electrical contacts for the lower and upper lights.  They seemed a little squished so I used a small flat screw driver and elongated the spiral contacts (along with a little oil). 


double decker dome cars 03

double decker dome cars 04


Elongating the contacts seemed to fix her up.

It takes a little more finesse to put the bottom seat set and truck assembly back into the car shell with the upper seat set already in there as one set slides over the other set. 

All eight screws also need to be snug and everything fitting perfectly so those electrical contacts are flush to each other.


double decker dome cars 05

Attachments

Images (5)
  • double decker dome cars 01
  • double decker dome cars 02
  • double decker dome cars 03
  • double decker dome cars 04
  • double decker dome cars 05

POST 24:

More MTH DCS observations:

Some cool options under the softkeys at the bottom of the screen.


1. Measured route.

Can find out how long your loop of track is in scale miles.

Press speed roller once at a specific spot and hit the roller again after the train reaches that same spot after making the desired route.


measure route 01


2.  scale miles on your engine (Odometer)


odometer 02

odometer 01


3.  number of hours on your engine (chronometer):

In hours, minutes, seconds.


chronometer 01

chronometer 02


4.  commands for TMCC engines via the DCS remote:

    the bottom row on the screen has AX1 which is equivalent to AUX 1 on the TMCC remote.  Press on the button S1 just below  AX1 on the screen, then any number pushed on the keypay corresponds to a TMCC command, ie: AUX 1 and 9 gives smoke.


AUX ! under dcs


5.  appears that turning on the Interior lights on most of my DCS engines turns on either/or marker lights/number boards.


interior lights 01

Attachments

Images (7)
  • measure route 01
  • odometer 02
  • odometer 01
  • chronometer 01
  • chronometer 02
  • AUX ! under dcs
  • interior lights 01
Last edited by samparfitt

POST 25:

Fixing a paint chip.

My GN W-1 had a paint chip along the top center edge of the model.

I found some of my scalecoat great northern green was a very close match.

The paint is gloss versus the mat finish on the model so I put some minwax polycrylic satin over the paint after it dried.  I still need another coat of satin to remove some more of the gloss finish but you have to know where to look to see it.

I used a toothpick to apply the paint.  It best to just fill in the bare spot but I applied too much and it flowed past the chip.

There were a few other scratches on the horn and some piping but those were easy to paint without noticing that it's a touch up.

Places, like along the nose and flat areas viewed from the top are very difficult to fill in without noticing it.  Corners and lower sides are easier as light and the viewing angle makes it difficult to notice.


paint chip 01

paint chip 02

paint chip 03

Attachments

Images (3)
  • paint chip 01
  • paint chip 02
  • paint chip 03
Last edited by samparfitt

POST 27:

Uploading MTH manuals.

Figured I'd get all my manuals into my PC for future reference.

1) I don't have to dig the manual out of the original box

2) in case MTH drops the manual listing on their web site, I have it.  (didn't find a manual for my GN W-1)


MTH web site for manuals:

just type in the MTH model number and click on the 'open book' and then click on 'download' (upper right hand corner).  This asks for an open or save: I save it. It goes to my 'documents and setting'  but a search all documents will find it for you.  Then just copy and save to the desired file.


http://mthtrains.com/doc-search-results/20-2478-1

Last edited by samparfitt

POST 28:

CLOUDS for you layout (why didn't I think of that, 40 years ago!)


My Feb, 2015 NMRA shows how to add clouds to your layout.

Pretty cool.

Sorry, this isn't really a how to as the article is 10 pages long but the concept is simple and cost effective. 

The main parts are tulle (yeh, I've never heard of it either!), normally used for wedding veils at fabric shops and comes in different colors and poly fiber fill for the clouds.


ps: I wish the web's software wouldn't rotate the pictures 90 degrees!


clouds 01

Attachments

Images (1)
  • clouds 01
Last edited by samparfitt

Bobby, thanks for more posts.


=============

POST 30:

Added coupler slack noise but wasn't working.

With the other MTH engines, I only had to select the soft keys and select 'more' and then click S2 to move the 'coupler slack' noise.


With the GN R-2, I was getting no 'coupler slack' noise when starting the engine throttle.


MTHDCSSYSTEM 17


I also wasn't getting any smoke so I deleted the engine and re-added the engine.

That fixed the smoke but not the 'coupler slack'.

After 'playing around' with the remote for several minutes, I found that I had to increase 'engine sounds volume' under the menu key under sounds.

The volume was at zero.   A simple scroll of the throttle wheel increased the volume.


MTHDCSSYSTEM 18

Attachments

Images (2)
  • MTHDCSSYSTEM 17
  • MTHDCSSYSTEM 18

POST 31:

Resistance soldering.

A GN switcher's cow catcher's soldering joint broke free from the horizontal platform.

After cleaning off the paint in lacquer thinner, a little flux along the soldering joint, the two parts were clamped together with an alligator clip.

An anvil with an alligator clip help the parts, the resistance soldering ground was then clamped to the anvil.  With the solder held along the seam, it took about 2 seconds (if that) to melt the solder once the positive side tip was touched to the seam.

Any other method of soldering would probably have resulted in a lot of soldered parts falling off.


resistance soldering 01

resistance soldering 02

Attachments

Images (2)
  • resistance soldering 01
  • resistance soldering 02

mega steam smoke fluid.

Ordered the 8 oz bottle online after not finding it during the winter at any of the train shows.  Tried about 5 different brands and I find this best for the Lionel units that aren't as robust as MTH engines.  I think you could dump motor oil into the MTH unit and it would smoke!

$16 is a good price and will last a long time.

8 bucks extra for shipping (paper envelope had $2.76 for mailing to Cincinnati, Ohio).

Last edited by samparfitt

Old fashion sawdust grass:

In case anyone wants sawdust grass (etc) a fellow still sells it.  I only see him at the Dayton NMRA show and didn't find any web site for him.  I'm assuming you'll have to write him via snail mail for the product.  I got a few bags of it.

Of all the meets that I go to in the mid-west, this is the only person I know that sells this stuff.  The bags are very in-expensive.  Good for those who want to make vintage looking layouts.

This guy is pretty old so you better buy it now if "you're thinking about it" (I don't think he even buys green banana's!)

See pictures for his address.


sawdust scenery 01

sawdust scenery 02


During the summer, I work on my RC warbirds, so I'll be away for awhile.  Presently, I'm finishing up a 120" B-25 Mitchell.


I did just get a new engine that will have to be painted (grey boiler). a nice NP A-4 4-8-4.


northern pacific A-4 09


See ya' in the fall.

Attachments

Images (3)
  • sawdust scenery 01
  • sawdust scenery 02
  • northern pacific A-4 09
Last edited by samparfitt

" During the summer, I work on my RC warbirds, so I'll be away for awhile.  Presently, I'm finishing up a 120" B-25 Mitchell."


Cool, who's kit was it and what engines are you using?


I was heavily into R/C planes and turbines but not any more, my new addiction is O scale "stuff"


I still have a bunch of Gas and nitro engines...


Love the B-25. We had a full size one in our small airport in San Martin, California. we were supposed to restore it, but some how the plan went cold. Last time I saw the poor B-25, it had some covers on the cockpit and looking so lonesome....what a waste!!!


BTW: Beautiful brass engine, please show us how you paint it...Cheers!

Last edited by BigBoy4014

BigBoy4014,

The B-25 kit is Ziroli's and two DA-50's go on the business end.

Here's my build thread if you want to see pictures of it (since the web cops won't let any non RR  items be pictured).


http://www.rcuniverse.com/foru...-25-mitchell-19.html  


Here's video of my 110" F4U corsair:

https://www.youtube.com/watch?v=ERTe1bnuPck  


If you do a search for my name samparfitt,  under the warbirds category, you'll find my other build threads:

P-47 thunderbolt

SBD dauntless dive bomber

F9F panther

P-61 black widow

B-26 marauder

F4U corsair

Nieuport 28

F6F hellcat

P-51 mustang

P-38 lightning


======

Painting engines:

All the parts are dis-assembled and laid out in a tray to keep everything in proper order.  I like to put all parts back where they came from since these are handmade so a side rod on one side might be a little different than the other side, etc.  There can be up a hundred pieces laid out.

The headlight is drilled out.  A new drill bit is used as an old bit may grab the headlight and twist it off the boiler front.  I use some pliers to hold the head light. 

The boiler front usually is just force fit onto the front of the boiler.

Sound cams are usually added, a slot needs to be cut into the bottom brass plate holding the drivers to the frame.

Alcohol is good for cleaning them up removing the grease and oil without affecting the clear finish.  Tarnish is OK as the paint sticks to that.  No primer is used, likely to cover up detail.

I'm partial to scalecoat so I use an airbrush to paint them and then a toaster oven set at 200 degrees for two hours to cure the paint.  Always put a thermometer in the oven, don't need to melt that solder!  Only one coat is needed (assuming you did a good first spray!).

This engine will be a gray boiler so any parts (like domes, etc) usually have a screw holding them on so they can be removed.  This saves time having to tape them up.

I just use lots of small pieces of masking tape put on a mirror and cut with an xacto knife into some very small pieces (1/16" thin or so to mask domes, cab front, etc that don't come off. 

All piping is done with a fine paint brush.


Last edited by samparfitt

This is a fantastic idea. I know there are several approaches to organizing this type of thread but it is well worth the looking through everything to see what you might be able to use. I have thoroughly enjoyed the many folks on the forum who have helped me this past 3 yrs. I find the search function does not get me where I need to go very often. Maybe so coaching as to how the search engine is designed to look up items would help.

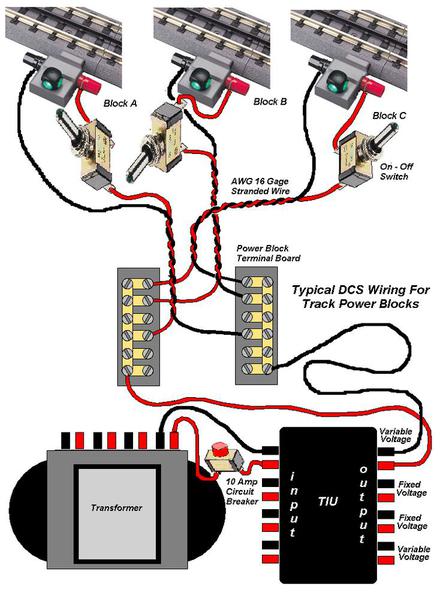
I believe that's called 'star' wiring because, theoretically, if you put the panel in the center of a circle of track and route wires to an even distribution around the circle, it will appear like a star.

Since MTH uses the rails to transmit the frequency, the star pattern gives the most uniform pattern to get the frequency to the motive power, versus just putting one set of wires on one side of the loop, resulting in the frequency to, possibly, weaken by the time it reaches the far side of the loop of a large layout.

Last edited by samparfitt

POST 32:

Make a functional back plate for a closed cab steam engine.


The back of that cab needs an enclosed back plate housing.


closed cab back plate 03


Some brass sheeting curved to match the width of the 'door' in the back of the cab.


closed cab back plate 02


Some flat brass sheeting soldered, (using resistance soldering) to the ends of the curved piece of brass sheeting.  The flat sheeting was larger than the curved piece to make alignment easier and then the waste was just cut away and filed smooth.


closed cab back plate 04

closed cab back plate 05


The back plate was made using some flat brass stock and soldering some L stock around the sides and then trimming to fit.  The inside hole made large enough to just fit over the cab 'door'.


closed cab back plate 06


Some U stock was drilled and soldered to the back plate.  Holes drilled in the U shaped pieces to hold the rods that will guide the back plate and go into the front of the tender.

Dry fit between tender and cab.


closed cab back plate 07


Fortunately, the supports for the rods are already on the tender but holes had to be drilled into the tender supports.


closed cab back plate 08

Attachments

Images (7)
  • closed cab back plate 03
  • closed cab back plate 02
  • closed cab back plate 04
  • closed cab back plate 05
  • closed cab back plate 06
  • closed cab back plate 07
  • closed cab back plate 08
Last edited by samparfitt
Love your videos nn Utube. I build a P 47 scale once. Loved RC flying but now spend all my time on trains. As a Naval Aviator though it is still in my blood. Originally Posted by samparfitt:

BigBoy4014,

The B-25 kit is Ziroli's and two DA-50's go on the business end.

Here's my build thread if you want to see pictures of it (since the web cops won't let any non RR  items be pictured).


http://www.rcuniverse.com/foru...-25-mitchell-19.html  


Here's video of my 110" F4U corsair:

https://www.youtube.com/watch?v=ERTe1bnuPck  


If you do a search for my name samparfitt,  under the warbirds category, you'll find my other build threads:

P-47 thunderbolt

SBD dauntless dive bomber

F9F panther

P-61 black widow

B-26 marauder

F4U corsair

Nieuport 28

F6F hellcat

P-51 mustang

P-38 lightning


======

Painting engines:

All the parts are dis-assembled and laid out in a tray to keep everything in proper order.  I like to put all parts back where they came from since these are handmade so a side rod on one side might be a little different than the other side, etc.  There can be up a hundred pieces laid out.

The headlight is drilled out.  A new drill bit is used as an old bit may grab the headlight and twist it off the boiler front.  I use some pliers to hold the head light. 

The boiler front usually is just force fit onto the front of the boiler.

Sound cams are usually added, a slot needs to be cut into the bottom brass plate holding the drivers to the frame.

Alcohol is good for cleaning them up removing the grease and oil without affecting the clear finish.  Tarnish is OK as the paint sticks to that.  No primer is used, likely to cover up detail.

I'm partial to scalecoat so I use an airbrush to paint them and then a toaster oven set at 200 degrees for two hours to cure the paint.  Always put a thermometer in the oven, don't need to melt that solder!  Only one coat is needed (assuming you did a good first spray!).

This engine will be a gray boiler so any parts (like domes, etc) usually have a screw holding them on so they can be removed.  This saves time having to tape them up.

I just use lots of small pieces of masking tape put on a mirror and cut with an xacto knife into some very small pieces (1/16" thin or so to mask domes, cab front, etc that don't come off. 

All piping is done with a fine paint brush.


Samparfitt, thx...Great WWII collection, all are my favorites, plus the FW-190D and the Zero....


That is a great F4U, the folding wings look fantastic and the engine (what is it?) and the four bladed prop sounded great. Is this the German Corsair Kit??


I flew Turbines powered F16, F18, F15 and so on...great EXPENSIVE hobby that was...Can't afford it anymore...

Great brass work too....How do you paint the drivers in black and keep the edges nice and shiny?


quizshow,

speaking of P-47:

110", scratch built, cut all my own wood.

takeoff:

https://www.youtube.com/watch?v=yATZhz6mAKc  


landing:

https://www.youtube.com/watch?v=YFoYkFPhYxQ


I was in the Corps, many moons ago.

====


Bigboy4014:

the engine is a Moki 250.  Has 5 radial cylinders and is a 4 stroke.  The prop is a 32", 3-blade, adjustable prop.

Yes, this is a Carf airplane.  The only one that is not built from a kit but still required a lot of hours to finish.

I'm mostly WW II prop but I have two jets: F9F with a jetcat P70 turbine and an F-86 that still needs an engine.

Like trains, these can get expensive. 

All mine are in the 8-10 foot wingspan and, except for the WW I nieuport, all have retractable landing gear.  Most have full cockpit detail, functional canopies, functional cowl flaps, navigation and landing lights.

I have a simple philosophy on spending:

If I bought a 40K car, nobody blinks an eye about that.

If I bought 40K worth of trains or planes, non hobbiest thinks that's crazy.

But, after 10 years, do I still have that vehicle and, if I do, what's it worth?

Yet, many years later, I still am enjoying my hobbies, and, they probably won't be worth what I paid for them, they are still worth more than that vehicle plus I can enjoy them for the rest of my life.  Besides, I worked 38 years (plus 3 years serving my country) and I deserve them

With the house and vehicle paid, my expenses are food, utility bills and house taxes: might as well use that 'old mortgage money' to buy something that I want!


Last edited by samparfitt

Quizshow904,

It is STAR wiring because it does not use any wire feeds that are common to more than one block. That is to say that every block has its own pair of (-) and (+) feed power feed wires. This style of wiring is advantageous for the DCS operating system because it minimizes digital signal distortion to Proto Sound locomotives.

DSCN1329

Conversion to LED lighting is underway in a Rail King 027 observation car. Note the lighting over the observation platform. The unconnected wires will feed 3mm LEDs to illuminate the marker lanterns.

DSCN1340

This observation has LED lighting. The drumhead is by Dan Maher. Why LEDs you ask? Relative to incandescent lighting,LEDs last thousands of hours, they draw much less current and LEDs are much less expensive than incandescent light bulbs.

Attachments

Images (2)
  • DSCN1329
  • DSCN1340
Last edited by Bobby Ogage

Add Reply

Post

OGR Publishing, Inc., 1310 Eastside Centre Ct, Suite 6, Mountain Home, AR 72653
800-980-OGRR (6477)
www.ogaugerr.com

×
×
×
×
Link copied to your clipboard.
×
×