I have a set of Lionel Madison-style cars (Irvington, Madison, Manhattan, Sager Place) that came out in 2008 as a set. They are very nice and look just like the originals from the 1940s. They have incandescent bulbs and light up very nicely. Replacing bulbs is super easy via a round metal cover underneath the cars. I thought I would try to conserve some power and tried replacing the 18v incandescent bulbs with 18v LED bulbs. Problem was, the LED bulbs barely lit up the cars. Anyone out there try this already? Any ideas? Should I have used a more powerful LED bulb?
Replies sorted oldest to newest
The issue with some of the direct replacement LEDs is their light distribution is not uniform like an incandescent bulb. Some are focused out the top rather than the sides. Many vendors don't get into the detailed specs of the bulbs and so it is hard to know what you are getting. You can always try another vendor and cross your fingers.
A lot like to use LED strips. @gunrunnerjohn has a great kit fit for purpose: https://hennings-trains.shopli...ed-lighting-kit.html
I agree. The distribution is the key. I found out the hard way.
The incandescent bulbs illuminate well and the light is nice and warm. They look good with the opaque windows. I thought the LED bulbs would be an easy and smart alternative, but I was wrong. The LED bulbs did not disperse the light like the incandescent bulbs, even at full power. They barely looked lit even in a darker room. I took the LED bulbs out and put the incandescent bulbs back in the cars. If I cannot find a better LED bulb that disperses the light like the incandescent bulbs, I will use the LED bulbs for lighting scenery and keep the incandescent bulbs in the cars.
LED's naturally shine mostly straight ahead like a flashlight. What you're looking for is a bulb that casts light in all directions. Some LED bulbs are built this way--by using multiple LED's within the larger bulb, pointing sideways. I'm not certain that LED bulbs of the size used in traditional passenger cars are available this way. There may be some who have addressed this characteristic in other ways,
---PCJ
@RailRide Exactly. It is the dispersion. I noticed that right away when I put the LED bulbs in and powered them up. They worked almost like a flashlight and shot straight up towards the ceiling of the cars. To tell you the truth, I am OK with the incandescent bulbs. They look super when they light up. I just thought I would try the LED bulbs. I'll use them for scenery illumination in the future. No loss in the end. Thanks!
I can assure you the LED's I use in the Passenger Car LED Lighting Kit
don't have that problem, they provide a very even lighting of the car. You'll find it far superior to the stock incandescent lighting, and the intensity is adjustable as well.
@gunrunnerjohn posted:I can assure you the LED's I use in the Passenger Car LED Lighting Kit
don't have that problem, they provide a very even lighting of the car. You'll find it far superior to the stock incandescent lighting, and the intensity is adjustable as well.
How easy are they to replace? My cars were produced in 2008, so replacing the bulbs takes 5 seconds via a round metal plate underneath. The cars I have take 2 bulbs each. What is involved in using the kit that you reference?
Obviously, you have to take the car apart to install the kit, so if you're looking for the five second solution, you need to keep looking. ![]()
@gunrunnerjohn posted:Obviously, you have to take the car apart to install the kit, so if you're looking for the five second solution, you need to keep looking.
I am going to stay with the incandescent bulbs that are in the cars. They look great when illuminated with the opaque windows. I was just curious about LEDs, but I don't want to take the cars apart. It is not that important an issue to me, but thanks for responding. I appreciate everyone's time.
I use the LED lighting because of all it's other positive attributes.
- Even lighting as the light comes from many wide angle LED's instead of two or three pinpoint sources of light.
- Low power, about 5-10% of the power consumption of incandescent lighting.
- Flicker-free lighting.
- Intensity adjustment for the perfect level of interior light.
- The ability to select any color temperature to suit the exact lighting/vintage situation.
Wow. Now you are tempting me...
@DILLI posted:Wow. Now you are tempting me...
And the saga continues;
This is where it started for me (a fairly long read).
https://ogrforum.ogaugerr.com/...n-for-passenger-cars
My first conversion is documented in this thread.
@DILLI posted:Wow. Now you are tempting me...
One of our club members brought a set of C&O heavyweight passenger cars to run on our traveling layout on the the Saturday before Christmas. Truly handsome cars in blue and yellow. But I could hardly watch them go around the layout with their hot spot, incandescent lighting: two spots per car and 12 in the six car set since becoming accustomed to the even lighting of LED strip lighting. I regret not getting photos of them; they'd be the best advertisement for converting to LED strip lighting.
Having converted my silhouette passenger cars several years ago, I've come to really appreciate the even lighting more than anything else. But if I ran 7 to 10 car passenger trains, the reduction in current draw would be more important.
Here's a comparison photo of a club member's GN Empire Builder observation car with Town and Country LED replacement screw type LED bulbs, with my LED strip lighting equipped GM&O car. Both are PW LIONEL style silhouette cars. The screw-type LED's seem to reduce, but not eliminate, the hot spot effect. (I prefer a brighter effect than most.)
And here's a couple of photos: a before and after comparison of LIONEL's incandescent bulbs and LED strip lights in a full dome car I recently did for a club member. These aren't the standard, PW style silhouette inserts; they're more translucent. But the hot spots of the incandescent bulbs v. the even lighting of the LED strip lights remains.
@gunrunnerjohn's kits make the installation of strip lights very easy for anyone who can uses a screwdriver.
(Click on the images to view full size.)
Attachments
I used the same lighting option from Hennings Trains that gunrunnerjohn mentioned. Have 4 long passenger trains and run 3 on one of my mains at a time. After converting the lighting in all cars to these LEDS, power consumption was greatly reduced with little to no flickering.
I have done about 14 cars so far using GUNRUNNERJOHNs lighting strips in my passenger fleet without any problems. Also is a fun and easy project. Thanks GUNS for this innovation.
They look great, guys! GRJ's system looks awesome.
Thing is - I have no experience doing this. I am interested in learning - just really nervous about attempting it myself.
@DILLI posted:Thing is - I have no experience doing this. I am interested in learning - just really nervous about attempting it myself.
Experience is not really necessary. You get experience by trying something new! If you can solder, you're home free. The lighting module has two track power inputs and DC outputs for the LED strip.

Attachments
I hasten to add, if you're using the full upgrade kit and not just the modules, there is no soldering needed, the full kit was designed to be solderless.
@GRJ My soldering experience is extremely limited. How much soldering is needed to do the LED upgrade? I would be willing to pay you to do it. (Not sure if you even do that.)
Sorry - just saw you new post after responding.
Yep, the full kit is for folks that don't want to solder. All you need to do is tap into the track power wires with the solderless connectors provided and plug the light strip in. Each lighting kit comes with two of the pieces below, one kit does two cars.

Attachments
I bought at least 25 the full kits. I didn’t use the connectors as I found them bulky. Instead I used shrink tubes. The interior wires are small and the shrink tubes were a lot easier to conceal in the cars with decorated interiors. For the window silhouette models I used the included connectors.
@gunrunnerjohn posted:I can assure you the LED's I use in the Passenger Car LED Lighting Kit
don't have that problem, they provide a very even lighting of the car. You'll find it far superior to the stock incandescent lighting, and the intensity is adjustable as well.
Hello John,
Could you or someone be kind enough to post an interior photo of one of your kits installed in a passenger car?
Also do you sell or plan to sell a smoke unit for non-TMCC engines? I have a few QSI systems I'd like to upgrade and/or even a few non electronic conventionally run engines.
Thanks!
@Allegheny posted:Also do you sell or plan to sell a smoke unit for non-TMCC engines? I have a few QSI systems I'd like to upgrade and/or even a few non electronic conventionally run engines.
I actually don't sell smoke units as a rule, I use them in upgrades from a puffer to fan driven smoke. Smoke unit installs are typically custom mounting and stacks, not something that can be easily "kitted".
@Allegheny posted:Could you or someone be kind enough to post an interior photo of one of your kits installed in a passenger car?
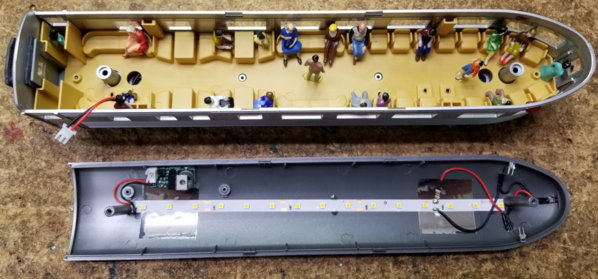
I don't use the kits as I'd rather solder and customize the fit to the car. By necessity, the solderless kits are more generic than custom fitting the led strips and hand wiring them. I've posted many examples of lighting cars over the years, he's a Railking observation car including the markers and taillights.
Attachments
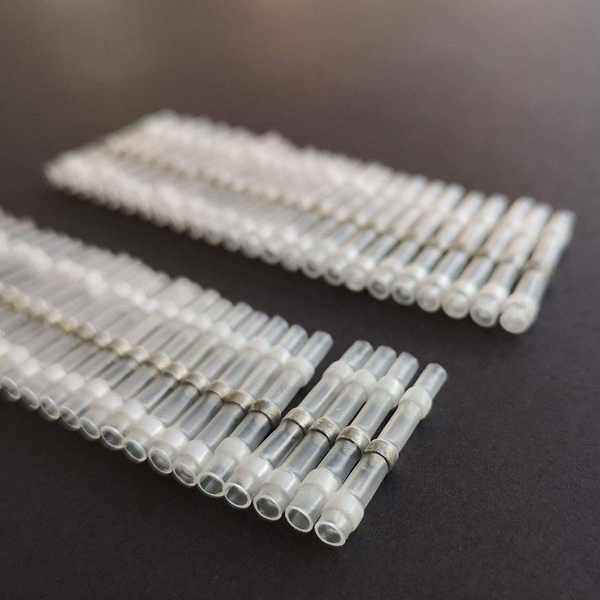
@KnobKnee posted:I was also disappointed with the connectors provided in the kits. I have been using 50 pcs Solder Seal Heat Shrink Butt Connectors 26-24 AWG, Electrical Waterproof Insulated Marine Automotive Wire Terminals (White) from amazon with good success. You need a good heat gun but they work.
What didn't you like about the bean connectors? Just strip the wire and crush them with a pair of pliers, you have an excellent connection. I don't see any need for waterproof connectors for doing your passenger car lighting. If you have water in there, you have bigger issues than the lighting!
They were just too big for my taste.
@gunrunnerjohn posted:I don't use the kits as I'd rather solder and customize the fit to the car. By necessity, the solderless kits are more generic than custom fitting the led strips and hand wiring them. I've posted many examples of lighting cars over the years, he's a Railking observation car including the markers and taillights.
Thank you very much John for the photo's as it cleared up what the installation looked like.
The basic install for a coach would be even simpler, the markers and taillight would not be there. It would be just the strip and the regulator.
You'll note on this installation I put a connector on the AC feed so I could totally separate the roof for any maintenance if needed.
The LED light strips are the way to go for passenger cars.
I just went through looking for LED direct replacement bulbs for passenger cars. I looked at specs for brightness, lumens etc. Even ones that were for "lionel" replacement. I went through many that should have met the same brightness as the incandescent. They did not work well. For many applications the LED bulbs are OK. For passenger cars, I have not found an LED replacement bulb that satisfies.
In the early days of LED bulbs for automobiles I went through the same thing. They were, and some still are, labelled "for off road use only". Usually in very small print on the back of the package, don't use them. Example the brake light needs to be 7x brighter than the running light for DOT specs. I had to use an LED Light strip setup for my brake lights to meet DOT or normal brightness. If you look at many modern cars, they still use an array of LED lights for running/tail/brake lights.
$40-50 for a car for the light strips vs. $5-10 for the LED bulbs is usually the hold up for many.
Why replace the incandescent? First is heat, in some they are close to the plastic shell and can melt the shell when run for extended periods. Firefighting car and the 2671 tender reverse lights are 2 examples. For passenger cars it is power, they use the amps. lights on 4-5 passenger cars, 8-10 bulbs, may pull more amps than the engine. Also brightness changes as Speed/voltage changes. The LED strips are at full brightness at low speeds.
If you are worried about re-sell value, just keep the old bulbs. Leave the brackets in the car, just make sure they wont short out without a bulb.
@VHubbard posted:$40-50 for a car for the light strips vs. $5-10 for the LED bulbs is usually the hold up for many.
$40-$50 a car? You can do LED strips for a whole lot less than that! For the turn-key kit, it's $20/car, Passenger Car LED Lighting Kit. If you're not adverse to a little soldering, you can bring it down closer to $10, buy a reel of the strip LEDs and these LED Lighting Regulator boards.
Is there any problem with the light strips coming loose from the ceiling ?
Any advice on preparing the ceiling first, should it be wiped down with alcohol ?
Yes, I wipe the ceiling with a solvent, typically Isopropyl Alcohol. I also put a spot of CA adhesive at the ends and a couple in the middle as well. I've had good luck with the strips sticking properly, but I have had reports of them coming loose. That being said, I go with the belt and suspenders approach to keeping them in place.
@gunrunnerjohn posted:$40-$50 a car? You can do LED strips for a whole lot less than that! For the turn-key kit, it's $20/car, Passenger Car LED Lighting Kit. If you're not adverse to a little soldering, you can bring it down closer to $10, buy a reel of the strip LEDs and these LED Lighting Regulator boards.
GRJ,
Any additional discount on price when buying 10 or more. I'd like to convert my passenger fleet, and all my cabooses to COB LED Strip Lights, see: https://smile.amazon.com/24V-w...pd_gw_ci_mcx_mr_hp_d.
Probably looking for like 50 of them.
Thanks
@DILLI posted:I have a set of Lionel Madison-style cars (Irvington, Madison, Manhattan, Sager Place) that came out in 2008 as a set. They are very nice and look just like the originals from the 1940s. They have incandescent bulbs and light up very nicely. Replacing bulbs is super easy via a round metal cover underneath the cars. I thought I would try to conserve some power and tried replacing the 18v incandescent bulbs with 18v LED bulbs. Problem was, the LED bulbs barely lit up the cars. Anyone out there try this already?
DILLI, I also prefer GRJ’s lighting system but before that I did use replacement LED,s. The photo attached is the LED on the left and the standard incandescent. Worked fine and much less amp draw. I got them from Town and Country. They offer both style. One for signals and one for passenger cars. Make sure you get the ones designed for passenger cars.
Attachments
@gunrunnerjohn posted:Yep, the full kit is for folks that don't want to solder. All you need to do is tap into the track power wires with the solderless connectors provided and plug the light strip in. Each lighting kit comes with two of the pieces below, one kit does two cars.
Any option to buy one? I only need one more.
Cheers, Dave
The kits come with two sets, but if you don't mind a little soldering, I could probably arrange to get you one regulator board as a strip of LED's.
@romiller49 posted:DILLI, I also prefer GRJ’s lighting system but before that I did use replacement LED,s. The photo attached is the LED on the left and the standard incandescent. Worked fine and much less amp draw. I got them from Town and Country. They offer both style. One for signals and one for passenger cars. Make sure you get the ones designed for passenger cars.
Thanks, Rod. Actually, I sold all of my postwar equipment. I decided to stick with Lionel Legacy locomotives exclusively and new freight/passenger cars. As a result, all of my passenger cars already came new with LED lighting. I appreciate your post, though.
@gunrunnerjohn posted:The kits come with two sets, but if you don't mind a little soldering, I could probably arrange to get you one regulator board as a strip of LED's.
Thanks for the reply John! I bought one of your kits last summer and used it to light my W24 and coach 33 project. The Northland car came with incandescent lighting. I am thinking of upgrading the lighting to LED. I also have all the parts (Digi-Key) needed to regulate the power for a Mars Light Simulator - N8031C. Would the regulator for the LED strip also supply proper power for the simulator board? If the answer is yes, it would simplify the MLS instillation. I do not mind soldering but may need some direction for the connections.
The current lighting board also powers the marker lights and tail end light which are both LEDs. I assume that the regulator would also work for them.
Again Thanks for the help!
Cheers, Dave
Attachments
GRJ will respond but out of curiosity did you remove the brown circuit board with the bulbs? It looks like there are 3 pairs of wires, 2 for the markers and 1 for rear light. Where do these LED wires go? I'm guessing there are some components or maybe even a small circuit board to handle just the LEDs - especially since each marker appears to be 2 LEDS of different color.
When I do these, I removed the board in total. I just string the two or three LED's for the markers/taillight in series and use a balancing resistor to adjust the brightness of those as compared to the strip lights.
Stan, I believe the markers have a single LED, the lenses on the markers create the different colors.
@stan2004 posted:GRJ will respond but out of curiosity did you remove the brown circuit board with the bulbs? It looks like there are 3 pairs of wires, 2 for the markers and 1 for rear light. Where do these LED wires go? I'm guessing there are some components or maybe even a small circuit board to handle just the LEDs - especially since each marker appears to be 2 LEDS of different color.
When I do the LED upgrade, I will remove the brown board and tape the LED strip to the cars ceiling. The marker lights are part of the original circuit so yes, there is a small circuit for the LED lights. I added the rear tail light and connected it to the same marker light circuit. I want to know if the regulator that comes with the LED kit will also supply the correct power to the N8031C Mars Light Simulator and the current LED marker lights. John advised me earlier as to what I needed in order to operate the MLS with the old lighting system (brown board). I have the parts to build the circuit he suggested but, If the regulator that comes with the lighting kit will supply the proper power, I can save time and space by using the kits regulator for the MLS. That's my dilemma.
Cheers, Dave
@gunrunnerjohn posted:When I do these, I removed the board in total. I just string the two or three LED's for the markers/taillight in series and use a balancing resistor to adjust the brightness of those as compared to the strip lights.
Stan, I believe the markers have a single LED, the lenses on the markers create the different colors.
Thanks John! I will remove the board. The marker lights have a single LED. The taillight is connected to that same circuit. I am hoping to use the Light kit LED circuit for the marker lights, taillight and mars simulator. Look forward to any other suggestions regarding this project.
Cheers, Dave
If the N8031/A/C is to be used in a stationary (not track powered) application, it can also be powered by any well-filtered and regulated DC power source with an output of 6-18VDC.
What is this circuit that GRJ provided to drive the 8031C? If you're going to use his LED board, and you're somewhat handy with a soldering iron, you should be able to tap into his LED board to materially reduce the extra components. That is, I believe you can re-use the bridge rectifier, capacitor, and DCS inductor (if applicable). The Ngineering requirements are somewhat confusing as I think it odd to say a regulated DC with such a wide range. In any case you do need to knock down the DC voltage as 18V AC track voltage will exceed 18V DC.
I'd say not to use the lighting regulator for the MARS simulator. Since the LED lighting board is a constant current board, it's voltage varies dependent on the load. Given that fact, I'd want to use a true constant voltage board for the MARS simulator. I have used this board for the MARS simulator in a number of installs. You can use an LM78Lxx regulator, a good choice is the LM70L08 for 8 volts out. Enough for the MARS simulator board, but not enough voltage to overwhelm it.
Here's the connection diagram.

Here's the BOM for the parts.

Note that C1 is optional, I stick them in as it helps with stability of the regulator if the load is distant from the board. The 22uh choke is for DCS compatibility, if you really don't want to include it, just jumper that position. So, you can really build this with just three parts if you want to go "bare bones".
Here's the schematic for this board.

Here's the Gerber files if you want to make a few and keep them around for similar projects. Just drop this at OSHPark and they'll whack you out three boards for $1.40.
LM78Lxx Power Module Gerber.zip
Attachments
@stan2004 posted:The Ngineering requirements are somewhat confusing as I think it odd to say a regulated DC with such a wide range. In any case you do need to knock down the DC voltage as 18V AC track voltage will exceed 18V DC.
There is a tiny regulator on the Ngineering MARS board, but it doesn't have any filter caps, so that's why they're saying "regulated". I really think they mean smoothed DC, but that's my interpretation. I also don't recommend my constant current board as the adjustment could easily force the voltage to exceed 18 volts if the MARS board isn't drawing enough current.
@gunrunnerjohn posted:Here's the connection diagram.
Thanks Stan & John for your help and suggestions. John specials thanks for the schematic and parts list. I will be messaging you sometime this week regarding an LED light strip and regulator.
Cheers, Dave


