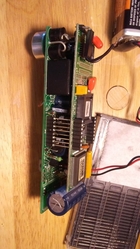
I have a steam ProtoSound 1 module I would like to install in a conventional steamer. Does anyone know where to attach the wires depending on their color? There are 5 wires in essentially the same area on the board; black, white, brown, red, blue. On what appears to be the sound side of the board, there are two black wires that plug in to the cb (speaker?).  Thanks!

JPThut

Last edited by JPThut
Original Post

Replies sorted oldest to newest

Ignoring the brown wire, the other four are lined up just like my diagram, and that's what their function is.  I suspect the brown wire may have been a tap in for a light, but that's just a guess without actually tracing it out.  It looks like it taps into the bridge rectifier on the track power.  If you look closely at the other four wires, you can see there are holes next to them that would have accepted the connectors that are illustrated on my drawing.  I'd insulated the brown wire and install the board, then you'll see if you even have a use for that brown wire.

Last edited by gunrunnerjohn

I have never seen that configuration of the bottom board.  The orientation of the Power supply and the White connector.  What does the other side look like, what silk screen id is printed on top?

Many times there is small silk screen to identify AC ACG, M1 M2. 

Is brown and white the same continuity?  Early stuff did use brown as a AC Outside rail or ACG.  G

George, I have a board that has holes for the white connector in exactly the same place, it's from an SW8/9 switcher.  There's no connector soldered onto it in that position, but it has provisions for it.  It also has those two silkscreened squares that you see right below the zip-tie.  However, the TO-220 package doesn't face the way it does on that board. 

I looked at about a dozen of the board sets in my box of PS/1 boards, and I see all sorts of minor variations on parts positioning, I wonder how many versions they had of these???

Gentlemen,

I'm including a picture of the top of the DCRU board. It and the QSI sound board are connected by 8-pin connectors on each side. The were rather tight and I began to wonder if there was solder involved but I was able to gently work them free and separate the boards for the picture. Incidentally I tested the unit yesterday by applying power and attaching a speaker using GunrunnerJohn's diagram and ignoring the wire colors on the diagram since mine don't match. It fired right up with the hoped for "2 clinks". The variations in color and other things make me a little nervous!

JohnDCRU top

Attachments

Images (1)
  • DCRU top

That is the Very Early MTH PS-1.  QSI made it, but it is MTH PS-1.  The bottom board has built in Coupler section with large cap.  The cut black wires are probably the switch for turning on and off on the battery.  Top board is the low memory version with no memory jumper.  But it also seems to be missing the Volume pot jumper.

QSI board was a three stack and also had a 4th board for couplers if equipped early on.  G

A report on the PS1 installation: I'll call it a "partial success". The engine runs well but there is no chuff, only background sounds and a strange acting whistle which blows on both the whistle and bell buttons (At first only the bell would activate.) Maybe I can solve that with some re-programming. My main concern is the missing chuff; When I removed the unit from the Williams tender I don't remember any trigger for the chuff sound. Did the PS1 units have a trigger or was that sound dependent on the speed of the motor?

JPThut

Last edited by JPThut

Speed of motor.  Need to do a reset 18.  Those older units had limited options in reprogramming, though I do think Bell/Whistle was one. That top board has early software and components so typically later chips and such do not work in that top board, and that chip will not work in later boards.  You will get a software conflict.   G

I've tried the #18 reset a couple of times but it doesn't do anything to correct the problems. I'll keep trying. I'm sure the chuff is still there somewhere because I got to the chuff once -- I think it was in the "chuff rate" section of reset. That system is so cumbersome that I'm not sure I'm in the correct area most of the time. 

JPThut

Add Reply

Post
The DCS Forum is sponsored by

OGR Publishing, Inc., 1310 Eastside Centre Ct, Suite 6, Mountain Home, AR 72653
800-980-OGRR (6477)
www.ogaugerr.com

×
×
×
×
Link copied to your clipboard.
×
×