Since there was some interest expressed in the Williams GP9 pilot thread here, I figured I would post some details of the design for the pilots I'm doing for my SD90. It's an old one and we've been through a lot together, lol, so it's also one of my favorites.

First, a few overall views of the design:

front1front2rear

The blue and gray parts are models of the existing chassis and body shell. Everything else is part of the new assembly. The pilot is intended to be bonded to the body shell, so that the joint can be made seamless, and so that full length handrails can be permanently attached to it (0.040" mounting holes are provided for this). The various air hoses are separate parts, to facilitate painting and weathering. The cut lever is part of the main part and is fixed. The main air hoses are modeled as though they are suspended below the couplers by a chain or lanyard. I figure a bit of thread or tiny chainlink will do here. The MU cable and junction box for the front is a separate part that can be added if desired.

Here is a view of the assembled unit from the underside:

frontunderside

The coupler mount is a separate part, and is bonded directly to the engine chassis. This does a couple of things. Most importantly, it provides a way to disassemble the engine without having to make any changes to the original parts. It also provides a good load path from the coupler to the chassis - the pilot, plow, and body shell are purely cosmetic and carry no load. The engine can even be run, tested, etc. without the body shell installed, but with the couplers in place.

The pilots are intended to be bonded to the body shell first, and then serve to locate the coupler mounts on the chassis during their bonding, to ensure reliable alignment of everything. No guesswork. You can see the features on the pilot that facilitate this in the pic below.

couplermount

Here is what the body shell looks like fully assembled and removed from the engine:

frontshell2frontshell

And here is how it comes apart for maintenance, once everything is installed:

sd90exploded


As far as applicability to other models, the exact model I have is this one: http://mthtrains.com/20-2370-1. It's a 2002 model, but I imagine the newer models probably use the same molds, etc., at least judging from a few of the pics I've looked at. Once the design is truly finalized, I will post detailed dimensions of the parts, so that folks can verify that it will fit their models. Who knows, it may fit other units as well!

So there it is. Comments, suggestions, ideas for tiny-but-cool details to add, whatever - have at it. 

Eric

Attachments

Images (8)
  • front1
  • front2
  • rear
  • frontunderside
  • couplermount
  • frontshell2
  • frontshell
  • sd90exploded
Last edited by OGR CEO-PUBLISHER
Original Post

Replies sorted oldest to newest

Mike DeBerg posted:

Eric, Looking great!  I thought I recall you saying that the MU, air lines and cut levers are now separate?   Are you thinking you might add a tie or holder for the extra MU hose (yellow) you are showing?  Are you going to add any rivet detail on the lower sheet for the rear pilot?

Ah, the fun stuff! Who doesn't love rivets? I added them on the GP9 pilot as sort of a proof of concept, to see how they looked when printed. But when I looked at a bunch of pics for the SD90 pilot, I didn't' see any. For example:

http://www.railpictures.net/im.../5452.1239945437.jpg

http://www.railpictures.net/im.../4235.1093403940.jpg

http://www.railpictures.net/im.../3296.1218412585.jpg

So I chose not to add any. I do want to improve the detail on the cut lever mounting, so I may add some bolts or rivets there.

I sort of envisioned the MU cable just lazily draped over the cut lever, rather than secured. But looking at pics again now, all the ones I see are actually tied up in some way, so I may revise that. And I think I will add the retaining bars for the hoses, so the crew can then not use them, as seems to be the standard in those pics, lol.

These pics are also where I got the idea for the spare coupler. But rather than two, I figured my crew had already busted one, so they just had the one spare left.

The detail parts are now separate. My thinking was this would make it easier to detail paint and weather stuff. But maybe that's just my limited painting skills talking...

I really like this -- cleaner than cutting down the die cast pilot and merging it to a spacer. I especially like that the coupler mounts to the steel chassis as opposed to the body. Are these going to be available for sale? I have a pair of SD9043's that would really look nice with these in place.

I have an odd mix of MTH (FP45, SD45, SD60, GP9, GP20, GP30, FT, SW1500, H10-44, SD9, SD24, C40-8) and Atlas (B40-8, B40-8W) locomotives I don't run that often if you need to borrow some Guinea pigs for prototyping. My recollection is that the SD60 and SD45 have the same pilot structure; the SD9 and SD24 are virtually the same locomotive).

Last edited by AGHRMatt
Laidoffsick posted:

When you installed the pilot on your Williams engine, what did you use to "bond" it to the chassis/frame?

I like the fact that the couplers are screwed into the frame, because they have to be to pull a sizeable load, or even used in a consist with other powered engines.

Nothing fancy, just gap-filling CA glue. I did prep the surfaces pretty carefully, though - sanded to remove any high spots and to give the surfaces some roughness, followed by an acetone wipe. Stuff is wicked strong with good surface prep.

thor73 posted:
AGHRMatt posted:

I really like this -- cleaner than cutting down the die cast pilot and merging it to a spacer. I especially like that the coupler mounts to the steel chassis as opposed to the body. Are these going to be available for sale? I have a pair of SD9043's that would really look nice with these in place.

I have an odd mix of MTH (FP45, SD45, SD60, GP9, GP20, GP30, FT, SW1500, H10-44, SD9, SD24, C40-8) and Atlas (B40-8, B40-8W) locomotives I don't run that often if you need to borrow some Guinea pigs for prototyping. My recollection is that the SD60 and SD45 have the same pilot structure; the SD9 and SD24 are virtually the same locomotive).

Yep, my plan is to throw them up on a Shapeways shop, after I've checked out the finished product myself. It looks like the cost will be about $45 to $55 per set, for the frosted ultra detail acrylic, which worked well for the GP9 set. I still need to set that up, but once I figure it out, I should be able to post pics, detailed dimensions, and so on right on the shop.

Definitely appreciate the offer of some guinea pigs, but it will be be a little while before I get to that point, lol!

Following the thread, so my order for three pairs will probably go in about five minutes after I open the E-mail notification. Keep us posted. Given EMD's habit of re-using existing components, I suspect the pilots will be a close fit for other modern "M" series engines.

Glad to hear the design has the coupler screws going up into the frame. I would be concerned about the load on the plastic alone.

So what is Shapeways Frosted Ultra Detail Acrylic like?  Is it flexible?  Brittle?   I wonder how it would hold up in an accident or derailment, especially since it's bonded to the frame.  Mounting it with screws would allow you to swap out a replacement if it was damaged, where as the glue-mount might be a real mess to do a second time.

I'm not trying to be critical, just wondering what you think seeing as how you've actually done what I've only thought about.

Oh yeah and here's my order...
MTH GP38s and GP40's
MTH SD70M

AGHRMatt posted:

I really like this -- cleaner than cutting down the die cast pilot and merging it to a spacer. I especially like that the coupler mounts to the steel chassis as opposed to the body. Are these going to be available for sale? I have a pair of SD9043's that would really look nice with these in place.

I have an odd mix of MTH (FP45, SD45, SD60, GP9, GP20, GP30, FT, SW1500, H10-44, SD9, SD24, C40-8) and Atlas (B40-8, B40-8W) locomotives I don't run that often if you need to borrow some Guinea pigs for prototyping. My recollection is that the SD60 and SD45 have the same pilot structure; the SD9 and SD24 are virtually the same locomotive).

They maybe in real life but there is a difference between the MTH SD9 and SD24 if you look in my thread on the SD24 and the SD45 it will show you what I had to do for a kadee conversion. https://ogrforum.ogaugerr.com/t...73#61965511445937073  . The MTH RK SD9  pilot is the same for the RK Scale SD45.   The Premier SD45 2/3R is the same pilot used in the Premier 2/3R SD24. The RK use a different powered truck .  The RK coupler mount is farther back then the premier which has the 2/3R powered truck assembly and it is also longer then the RK version. The older Premier SD45/SD9 use the same Powered truck assembly as the RK. So it is important to know the difference between the premier line. For the new premiers SD24/45 (2/3R) and the Older Premier SD24, I would recommend using the 743s. Also if your going to bolt the Kadee mount directly to the frame. You will need to use a plastic draft gear box to keep the coupler isolated from the frame when you screw them down. This will prevent the coupler from frying the components in the event of a derailment and the coupler makes contact with the third rail. .  

Last edited by suzukovich
suzukovich posted:
AGHRMatt posted:

I really like this -- cleaner than cutting down the die cast pilot and merging it to a spacer. I especially like that the coupler mounts to the steel chassis as opposed to the body. Are these going to be available for sale? I have a pair of SD9043's that would really look nice with these in place.

I have an odd mix of MTH (FP45, SD45, SD60, GP9, GP20, GP30, FT, SW1500, H10-44, SD9, SD24, C40-8) and Atlas (B40-8, B40-8W) locomotives I don't run that often if you need to borrow some Guinea pigs for prototyping. My recollection is that the SD60 and SD45 have the same pilot structure; the SD9 and SD24 are virtually the same locomotive).

They maybe in real life but there is a difference between the MTH SD9 and SD24 if you look in my thread on the SD24 and the SD45 it will show you what I had to do for a kadee conversion. https://ogrforum.ogaugerr.com/t...73#61965511445937073  . The MTH RK SD9  pilot is the same for the RK Scale SD45.   The Premier SD45 2/3R is the same pilot used in the Premier 2/3R SD24. The RK use a different powered truck .  The RK coupler mount is farther back then the premier which has the 2/3R powered truck assembly and it is also longer then the RK version. The older Premier SD45/SD9 use the same Powered truck assembly as the RK. So it is important to know the difference between the premier line. For the new premiers SD24/45 (2/3R) and the Older Premier SD24, I would recommend using the 743s. Also if your going to bolt the Kadee mount directly to the frame. You will need to use a plastic draft gear box to keep the coupler isolated from the frame when you screw them down. This will prevent the coupler from frying the components in the event of a derailment and the coupler makes contact with the third rail. .  

Forgot about the updates in the Premier line. Good advice on using plastic coupler boxes with the 3/2 engines. My SD24's are the original Premier and used the same truck blocks as the SD9's.

Wow! Very nice. I also like your concept for mounting everything. Kudos especially for modeling the actual prototype pilot (unique to the SD 80s and 90s) and not simply fabricating a "full" version of the pilot supplied with the model (a re-used SD 60 pilot).  Consider making the holes for the handrails smaller, maybe 0.20. Some of use finer wire for full handrails, and newer MTH models are closer to that. The modeler can enlarge them if heavier wire is used. I dabble in UP and broke down and bought an SD90/43 from the last run to upgrade, but haven't gotten around to it. This makes it a more appealing project.

RM

AGHRMatt posted:
suzukovich posted:
AGHRMatt posted:

I really like this -- cleaner than cutting down the die cast pilot and merging it to a spacer. I especially like that the coupler mounts to the steel chassis as opposed to the body. Are these going to be available for sale? I have a pair of SD9043's that would really look nice with these in place.

I have an odd mix of MTH (FP45, SD45, SD60, GP9, GP20, GP30, FT, SW1500, H10-44, SD9, SD24, C40-8) and Atlas (B40-8, B40-8W) locomotives I don't run that often if you need to borrow some Guinea pigs for prototyping. My recollection is that the SD60 and SD45 have the same pilot structure; the SD9 and SD24 are virtually the same locomotive).

They maybe in real life but there is a difference between the MTH SD9 and SD24 if you look in my thread on the SD24 and the SD45 it will show you what I had to do for a kadee conversion. https://ogrforum.ogaugerr.com/t...73#61965511445937073  . The MTH RK SD9  pilot is the same for the RK Scale SD45.   The Premier SD45 2/3R is the same pilot used in the Premier 2/3R SD24. The RK use a different powered truck .  The RK coupler mount is farther back then the premier which has the 2/3R powered truck assembly and it is also longer then the RK version. The older Premier SD45/SD9 use the same Powered truck assembly as the RK. So it is important to know the difference between the premier line. For the new premiers SD24/45 (2/3R) and the Older Premier SD24, I would recommend using the 743s. Also if your going to bolt the Kadee mount directly to the frame. You will need to use a plastic draft gear box to keep the coupler isolated from the frame when you screw them down. This will prevent the coupler from frying the components in the event of a derailment and the coupler makes contact with the third rail. .  

Forgot about the updates in the Premier line. Good advice on using plastic coupler boxes with the 3/2 engines. My SD24's are the original Premier and used the same truck blocks as the SD9's.

Just updated my thread for older Premier SD24. I also covered the SD9/45 which share the same pilots. To be honest. If he can do MTH SD9s/24/45, Alco C628/630, and GP30/9 that would make life easier.  I defintly like the idea of body mounted Kadees.

https://ogrforum.ogaugerr.com/t...73#61965511445937073

1-DSCF51311-DSCF5132

Attachments

Images (2)
  • 1-DSCF5131
  • 1-DSCF5132
CentralFan1976 posted:

Awesome. 

What I really need are the Lionel ALCo RS-11 and FM H16-44 pilots, with steps... 

The Lionel ones just aren't up to task. I can add my own cut levers. 

image

imageimage

Funny with that I took a look at my Weaver RS11. The pilot turns out although less detailed,  did have a correct pilot as in the above pics.

Thanks for the suggestions, everyone. I had a little time to play with the model this morning, and I've incorporated most of them, along with a few other tweaks. Here's the latest:

front3rear3


I also added some real estate on the coupler mount to allow the use of screws in lieu of adhesive, if desired. The mount will have reference marks on it for suggested locations that avoid some features in the original body shell. There is enough room to allow up to five screws.

couplermount2

I should clarify that the coupler screws do not go all the way through the coupler mount into the chassis. I did not want the position of the coupler to be driven by features on the chassis. Most importantly, with the coupler in the correct position the row of three coupler screws overhangs the edge of the chassis.

couplerscrews

I'm ready to call it done at this point, so I'll let you know in a week or two how it turns out!

Attachments

Images (4)
  • front3
  • rear3
  • couplerscrews
  • couplermount2
Last edited by OGR CEO-PUBLISHER
Mike DeBerg posted:

Eric,

Really great work!     

Definitely looking forward to getting a couple of these to test them out!   Will be waiting to hear/see about your initial results!

I have a couple Indiana Railroad SD9043's!

I can hardly wait. I'll be able to do this consist again (sold the hi-rail Bush 41 when I bought the scale-wheeled Proto-3 version):

Picture 002

Attachments

Images (1)
  • Picture 002
Last edited by AGHRMatt

Hey, if anyone has the newer SD90 models, could you post a couple pics of the underside and chassis? Here is what mine looks like:

IMG_5626IMG_5619

I noticed as I was taking measurements on my ES44AC that the chassis and shell have features that I assume are there to accommodate mounting of the 2-rail pilot:

IMG_5717IMG_5759

Just curious if the newer SD90 models are set up like that as well.

Attachments

Images (4)
  • IMG_5626
  • IMG_5619
  • IMG_5717
  • IMG_5759
Mike DeBerg posted:

Hi Eric,

Any updates from the first run of these conversion pilots?

Yep, the parts arrived while I was on vacation last week. I haven't had a chance to go over them in detail, but a quick fit check looked promising:

IMG_5885[1]

BTW, if you are ever in the Denver area, be sure to check out the Georgetown Loop Railroad. They have an operating Shay locomotive as well as a few diesels. http://georgetownlooprr.com/

Attachments

Images (1)
  • IMG_5885[1]
AGHRMatt posted:

AWESOME! Great description and instructions on the page. Is the GP9 you're working on for the MTH locomotives?

suzukovich posted:

I just read it too.  Great instructions. If your doing MTH GP 9 that will be great. I will need 5 pairs at least.

The GP9 I was referring to is the Williams one I posted about in this thread, which I just put the finishing touches on.

I do have an MTH GP7 that I am going to do. I assume that would be the same as a GP9. Will keep you posted...

Eric


thor73 posted:
AGHRMatt posted:

AWESOME! Great description and instructions on the page. Is the GP9 you're working on for the MTH locomotives?

suzukovich posted:

I just read it too.  Great instructions. If your doing MTH GP 9 that will be great. I will need 5 pairs at least.

The GP9 I was referring to is the Williams one I posted about in this thread, which I just put the finishing touches on.

I do have an MTH GP7 that I am going to do. I assume that would be the same as a GP9. Will keep you posted...

Eric


MTH GP9/7 are one and the same.  Thanks.

Well it took me a while, but I finally got around to finishing up the detailing and installation on these things. Here are some pics of the end result:

With Kadee 740s installed:

IMG_6021

IMG_6027

This engine is a monster, and has massive overhang on O63 curves, which I use in some spots on my layout. So I will probably run mine with Kadee 746s installed:

IMG_6029

IMG_6035

Here is a view of the underside, showing the coupler mount and the interface between it and the pilot:

IMG_6020

And finally, here it is with a car behind it!

IMG_6041

The handrails look rather comical now, I will have to work on those next.

Eric


Attachments

Images (6)
  • IMG_6021
  • IMG_6027
  • IMG_6029
  • IMG_6035
  • IMG_6020
  • IMG_6041
Last edited by OGR CEO-PUBLISHER

Thor,

Very, very nice, indeed. Good job on the paint match too. I ordered a set of your parts last week from Shapeways to install on my UP SD90. They should show up any time now. It might be a little while before I find the spare time to prep, paint and install the parts, but I'm looking forward to the project. Thank you for all your efforts and sharing them with us.

RM

Rich Montague posted:

Thor,

Very, very nice, indeed. Good job on the paint match too. I ordered a set of your parts last week from Shapeways to install on my UP SD90. They should show up any time now. It might be a little while before I find the spare time to prep, paint and install the parts, but I'm looking forward to the project. Thank you for all your efforts and sharing them with us.

RM

Cool, looking forward to seeing how they turn out!

The paint match was dumb luck - Vallejo Model Air Olive Green turned out to be pretty much spot on.

theteejmiester posted:

Man. That is awesome! Wanna buy a SD90 just to convert. Any chance of making these for the Lionel GP30? Or atlas units? And I am willing to send send you one of my locos if needed to use.

Thanks for the offer, heh! The design process is pretty time consuming, so for now, I am focusing on engines that I own. After that, I suppose anything is possible.

Laidoffsick posted:

Probably easier to just drill the holes yourself since the pilot itself doesnt have any holes. 

Agreed. Having seen some early 2-railed hi-rail locomotives, the regular handrails don't look that bad as they're still "reachable". Also, on some of them, the bends in the hand rails were such that if you could unbend them without breaking them, they'd be pretty close to the correct length -- you'd need to drill the holes yourself.

Hi Mike, sorry for going AWOL for so long, got a little busy with the  holidays, aftermath, etc. (and another model train project as well, more on that later...   )

The ES44 pilot design is mostly done, I just need to check some key dimensions and I think it's ready to go. I'll try to get a Shapeways page up for it in the next couple weeks. The SD45 will be next.

Any pics of your models with the SD90 pilots?

thor73 posted:

Hi Mike, sorry for going AWOL for so long, got a little busy with the  holidays, aftermath, etc. (and another model train project as well, more on that later...   )

The ES44 pilot design is mostly done, I just need to check some key dimensions and I think it's ready to go. I'll try to get a Shapeways page up for it in the next couple weeks. The SD45 will be next.

Any pics of your models with the SD90 pilots?

No worries. Let me see what I can dig up.   I really am looking forward to the ES44, SD40-2, and SD70ACe/M-2 pilots! hint, hint!  I have far more of these locomotives that could really use a makeover!

L & N posted:

Is there the possibility of making the plows for this one and the ES44 available separately?

Steve

Yeah, I've thought about doing that, in case of breakage or whatever. When I get a chance to generate some new files, I'll see if i can throw them up on the pages as an option or something. I will probably include all the detail parts as well, so it would be everything except the pilots and coupler mounts.

Just finished the updates to this one, so that it's similar to the more recent ones I've done, with the plow and detail parts separate from the pilots. So it's a little more flexible for customizing or repairs.  The finished appearance is identical to the previous version.

The complete set now looks like this:

kit

Detail parts:

details

Attachments

Images (2)
  • kit
  • details
Last edited by OGR CEO-PUBLISHER
Mike DeBerg posted:

Awesome!  Great job on the updates!  Are the SD40-2's and SD70M-2/ACe's in the backlog?   Since this model doesn't have a fixed pilot option, would open up some options for 3RS and 2R modelers.

Well, I don't have nearly the extensive collection most of you guys have, lol - I've actually now done the pilots I need for my diesels.

Are those models not the same as, or similar enough, to the SD45 or SD90 to use those parts? The models may be the same, even if the prototypes differ. For example, my SD45 even says 'SD40-2R' on the cab.

 I do still have an Alco S2 I'm going to do at some point, but beyond that, it may be a while. 

Sounds like an opportunity to expand your diesel fleet!    Seriously I would be happy to send you a locomotive for prototyping, measurements, etc.

When I first purchased the pilots for the SD90 they did not fit the SD70ACe/M-2, will have to check the SD45 pilot, but think it will be different enough that the SD40-2 will need it's own pilot.

Mike DeBerg posted:

Sounds like an opportunity to expand your diesel fleet!    Seriously I would be happy to send you a locomotive for prototyping, measurements, etc.

When I first purchased the pilots for the SD90 they did not fit the SD70ACe/M-2, will have to check the SD45 pilot, but think it will be different enough that the SD40-2 will need it's own pilot.

The 90 and the 70 pilots are shaped different. I think that's where MTH may have made an error at first or knew this? I bet they learned it fast. They made a modern GE pilot and a modern EMD pilot. The models are different. I took plastic versions, mounted them, and ignored this.

I'm not sure if that's why they did not release some diesels in 2 rail versions that did have 3/2 trucks and pilot mounts?? They would need to invest in fixed pilot molds for each model that is different? This method of custom pilots for each model is the way to go for pickier (concerning) customers.

BTW maybe the MTH 2 rail plow is the same for all the models too?

Last edited by Engineer-Joe

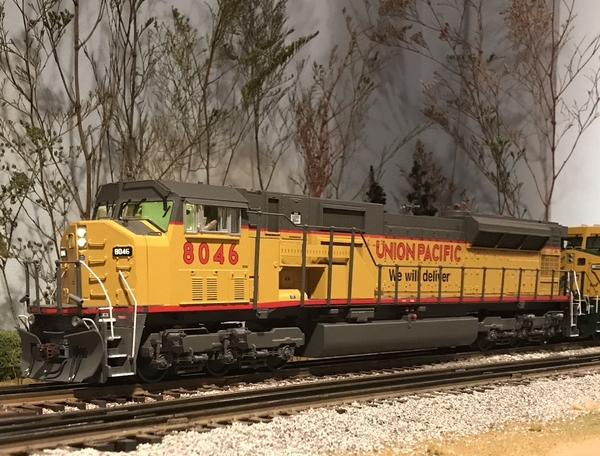
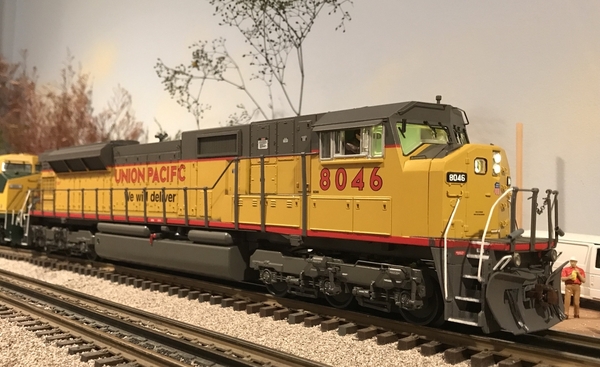
This thread is an oldie but a goodie worth bringing back to the top. I finished this project late last summer, but never posted pictures. Looking back it’s hard to believe how long ago I ordered the parts before getting around to this one. I dabble in UP and always had a soft spot for the SD90/43 MACs.

The original idea of “three-rail scale” and this sub forum was to eliminate the vestiges of toy train compromises (floating pilots, oversized couplers and the like) as much as possible. Erik’s parts are another great resource for doing that. Thanks again, Erik!

A8B2B468-F5C3-4BBA-B5D2-6E7EE4946A0ACA4CE028-91C5-4D57-8B13-C77E71F1BE1B87060F2A-AF5A-45BB-8B3E-A5BAB1540384

RM

Attachments

Images (3)
  • A8B2B468-F5C3-4BBA-B5D2-6E7EE4946A0A
  • CA4CE028-91C5-4D57-8B13-C77E71F1BE1B
  • 87060F2A-AF5A-45BB-8B3E-A5BAB1540384

Hey Rich,

I'm glad you brought this thread back up. I will be trying my hand at 3-rail scaling a few of my diesels in the near future. Is the unit you posted made by MTH or Lionel? If it is an MTH product, do you know if these pilots will work on other MTH models such as the SD40-2?

Dave

Dave,

That’s an MTH model. No, these pilots won’t work for the SD40-2. The frame and pilot contours are very different. Having converted a couple of SD40-2s, I can tell you there’s no good or easy solution for converting them. Even when I was done I wasn’t happy with the appearance. The MTH tooling is old tooling and inaccurate in a lot of ways. You might consider instead ordering the Sunset Third Rail model, which should actually make it into production later this year, according to Scott Mann.

RM

This thread is an oldie but a goodie worth bringing back to the top. I finished this project late last summer, but never posted pictures. Looking back it’s hard to believe how long ago I ordered the parts before getting around to this one. I dabble in UP and always had a soft spot for the SD90/43 MACs.

The original idea of “three-rail scale” and this sub forum was to eliminate the vestiges of toy train compromises (floating pilots, oversized couplers and the like) as much as possible. Erik’s parts are another great resource for doing that. Thanks again, Erik!

A8B2B468-F5C3-4BBA-B5D2-6E7EE4946A0ACA4CE028-91C5-4D57-8B13-C77E71F1BE1B87060F2A-AF5A-45BB-8B3E-A5BAB1540384

RM

Rich!! Those look fantastic!! Great work and like the full handrails so much

This thread is an oldie but a goodie worth bringing back to the top. I finished this project late last summer, but never posted pictures. Looking back it’s hard to believe how long ago I ordered the parts before getting around to this one. I dabble in UP and always had a soft spot for the SD90/43 MACs.

The original idea of “three-rail scale” and this sub forum was to eliminate the vestiges of toy train compromises (floating pilots, oversized couplers and the like) as much as possible. Erik’s parts are another great resource for doing that. Thanks again, Erik!

That looks amazing, Rich, nicely done. Looks great in UP colors. The full length handrails really finish it off - I still need to do that on mine, actually.... 

How did you match the paint to the existing colors so well? I have a couple of these pilots that I've designed and printed for my ES44s and SD45, but the projects stalled when I had difficulty matching the BNSF black. I thought black would be easy, lol. I remember taking quite a few iterations to get the UP gray right on my SW9 a while back as well.

Erik,

Thanks for the kind words. I kind of lucked out on the paint. I remembered from another project some years ago that Scalecoat II is a near perfect match for MTH’s rendition of Harbor Mist Grey. (Atlas is another story).

In addition to adding full handrails, I swapped out the factory windshield wipers with Bachman parts for a more prototypical look. I also changed the horn and fabricated the MU cable holders on the handrail stanchions from cotton swab stems. I’ve got to thank you again for designing these parts. They work really well and perfectly capture the unique contour of the SD90 step wells.

I like your parts so much I have another project in mind using your ES44 pilots.

RM

Here's a UP ES44 I've been working on using Erik's Pilots.  This ES44 has been converted to full time 2 Rail, started life as a standard MTH "Hi-Rail" model.  I've also done a SD80mac using the SD90 pilots.  I still need to remove the shell and make new full length handrails that are mounted to body, same as I did for the handrails at the anti-climber. I also added a few of my own details such as grab irons and hoses.  Color matched the parts using Scale Coat II UP Harbor Mist with a coat of Dull coat, all parts were painted with an Airbrush to keep it smooth.

Erik did a great job on these, I hope he does more in the future.  I know this takes a long time to develop as we model in Revit for BIM ourselves.  I'd guess between 30-40 hrs per pilot including all the needed measurements and studying online pics of the prototype. They are fragile, hopefully in the future shapeways adds a different print medium option.  These would be awesome in some type of printed metal but I'm sure that would be $$$$$$.

Side note; does anyone know if the SD90 pilots would fit the MTH SD70mac?  MTH never offered these with scale wheels and fixed pilots.

Attachments

Images (2)
  • IMG_1880: ES44 2 Railed
  • IMG_1884: ES44 2 Railed
Last edited by NSPirate

Add Reply

Post

OGR Publishing, Inc., 1310 Eastside Centre Ct, Suite 6, Mountain Home, AR 72653
800-980-OGRR (6477)
www.ogaugerr.com

×
×
×
×
Link copied to your clipboard.
×
×