Min radius is 0-72. Running primarily scale passanger trains.
I use a Mac and don't have access to any of the good software - and I can't figure out Wine
Thanks!


|
|
Replies sorted oldest to newest
Hi Ned,
Use some graph paper and pencil the layout shape that you envision. Post a photo of it.
then, those of us with Windows software can design it and post images or pdf of the track plan and inventory.
There is railmodeller for mac. it has a FasTrack library.
That will work.
here's something that's a quick read with some guidance from the old designers. it may help with what you want.
Passenger car service areas are neat and can take up 10' as well as a large multi-track station. Engine service area. Country stops.
I got an alert that someone had asked this question - but I can't seem to find the post.
Just a bit of background on me.
I have been into O scale model trains since the early 90's when my parents bought me my first "set" for Christmas. By set I mean that my dad splurged on an engine and bought me a freight consist to go with it. It is an O Scale KCS diesel that I run to this day. At that time I was using Lionel's o-27 tubular track in a simple layout on my carpet - lol - yes I know - but this was in the days before Fastrack.
I have previously built a round the room ceiling layout in my old apartment, wired that up with a bus system and TMCC Cab 1 to control the track voltage (to control a conventional locomotive.)
This is our first house, and therefor my first opportunity to build a proper layout. I am excited for the challenge and the opportunity to actually have the layout I have wanted since I was a kid.
11 X 18 is a nice area. Are the any obstructions, doors or windows that need to be considered?
Pictures would definitely help. There are many people on here that should offer suggestions. I have a Fastrack layout that is 28 X 15 with O84 outside and O72 inside curves. It looks like a upside down G. Mine is a walk in design. A O72 circle of track takes up about 6 1/2 feet. Are you thinking around the room, in the center so you can walk around the layout, duck unders.
Ned,
How about an around the room type? 30" wide table around the 11 x 18 perimeter. Easy reach. Large radius. (096 loop used as an example) Space in center for a few people. Could expand in there with a peninsula.(yard) Simple construction. Multiple lines. Pass thru yard. Reversing, maybe not. Tunnels\Mountain. Bridge. Small elevation of outer possible.
Pics attached.


Those pictures show the built-ins and the walls that my layout is planned to go against.
Like I said, the room is 13'x25' and I get 11'x18' of that. I don't want to push it further than 11' because I still want to be able to access the built-ins. I am looking for an "L" shaped, possibly an "E" shaped walk-around layout to take up that space.
072 min radius curves with at least 2 mainlines. They don't have to be all straight - but I would like some mainline trackage for my passenger trains. I would like to incorporate a yard and a roundhouse, tunnels and bridges, and perhaps a station somewhere. I downloaded the railmodeler Pro and am trying to figure it out - its slow progress.
Ill upload a sketch of what Im trying to do - but any other ideas are welcome.
The space isn't as large as you think it is. an 072 minimum needs an 084 outer mainline. See attached.
060\048 may work for an L. An E would be 048 036 with 4.5' wide legs of the E with 24" openings.
What is wrong with the around the perimeter of the 11 x 18?

Make circles of track and move them around the 11 x 18.
Smaller layout that uses O 54 max curves. O45 inner loop. Has a tunnel, bridges, and a turntable/roundhouse. 12'8" X 12'
First addition was a turntable round house into the next room.
Final Coal tipple display.
Layout camera walk-around. Click on the underlined phrase.
So this is what I have come up with. ![]()
I was hung up on the 0-72 curves because of my Williams Scale GG1 - but they advertise down to 0-48, so I went with 0-60 min curves. Seems to have worked out well.
I don't see myself shelling out for the Big Boy or any other Lionel/MTH high priced engines in the near future (especially with having to track down all these switches O_O )so the GG1 looks like its my largest engine. I have MTH's Alco PA ABA set on order but those will do 0-48 as well, so I should be good ![]()
Thankfully I have a good stash of Fastrack - but its going to be mostly the straights, terminals, and the odd pieces that are going to help me - nearly all off the curves need to be replaced. If anyone wants to buy a crap-ton of tubular track and 0-36 Fastrack curves - let me know - lol.
Since I dont have any Command control locomotives, aside from the MTH one on order, I will probably be using DCS eventually. I have TMCC Cab1 that I was using to control track voltage on a previous ceiling layout - but I eventually want to be able to upgrade all of my engines to DCS or TMCC.
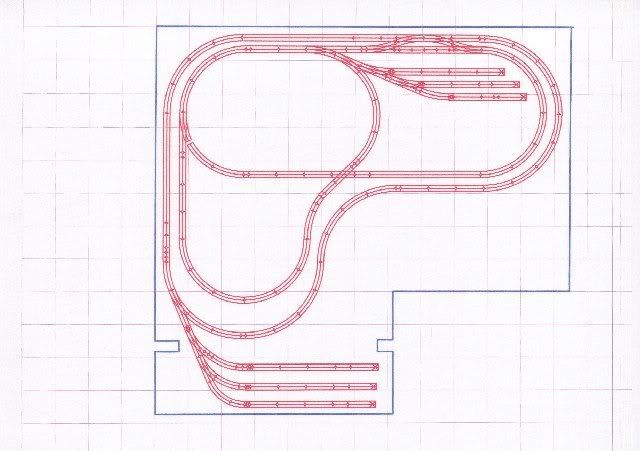
Anyways - here it is.
The mainline is 0-72 and is indicated in green.
The second line is 0-60 and is indicated in purple
The reversing "loop" is indicated in yellow
The yard, turntable, and engine storage tracks are mainly 0-60 and indicated in cyan
The access line to all drops down from the layout and travels through a "tunnel" to get there. I will use a cheap video camera and display built into the control panel to monitor that, and access will be by crawling under the layout. Ideal, no, but it was the only way I could find that made it work in the space I have. The yard, turntable, and storage tracks are lower than the main layout.
Let me know what you guys think - it was my first shot.
Nice layout. You have to plan for access hatches.
Impossibility Alert: Have you calculated what the grade will be on that orange line? From looking at your design, it appears that each square on the grid is equal to 10 inches, and that the orange section is about 50inches. Physically speaking, it is not possible to drop down low enough within 50inches to get under that track. If you're going down about 7" that is a 14% grade!! To put it in perspective, I have a 4% grade and it sent my GG1 flying off the layout!
I apologize if my estimates are off, and perhaps magnetraction allows for steeper climbs, but it really looks like you're trying to shoehorn something in that won't fit.
Let me know if it works, it would certainly save more space than a 1.5% climb!
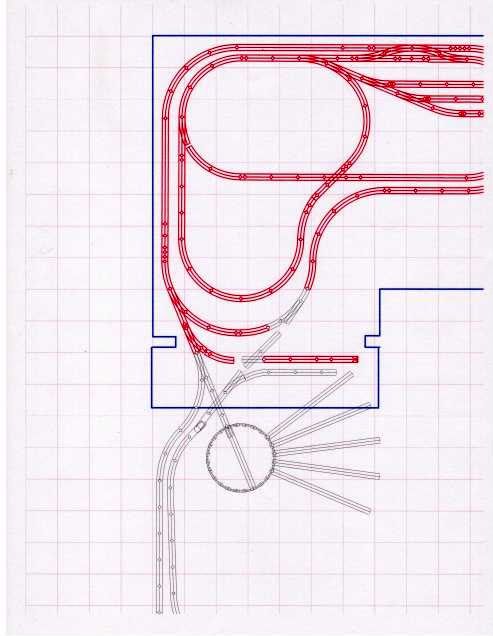
What about this?
I have also gone ahead and changed the units from every 10 to every 12 - so it is easier to see how many feet of space this is taking up. I still am managing to fit this in a 12x18, so I am pretty happy ![]()
The only problem that I see with this is that the "hand of God" will have to either reshuffle coaches to keep streamliners pointed in the right direction - or all trains will have to back into the yard.
Oh well....we can'y have everything I suppose.
I think the grade should be acceptable now. Let me know what y'all think.

That looks better. Why not shorten the green and purple tracks on the top and run the orange track on the top outside. That way you can avoid the tunnel. Just a thought.
Rick
here's something that's a quick read with some guidance from the old designers. it may help with what you want.
Moonman, that's an excellent doc. I have an early John Armstrong layout design book and recognize elements of it in the doc you supplied. Thanks.
Carl,
I liked it when I found it, so I try to share it when I can. Yes, I thought the author did an excellent job of bringing key styles and techniques from a few of the greats.
Carl
Ned, a small engine and the turntable solve the alignment problem. Somewhere I have a satellite photo of the Amtrak yard in Maryland where they still turn the cars with a turntable that looks like an Atlas O TT and build the trains that way.
A couple of thoughts:
I liked the idea of shortening the loops and keep the orange line flat.Edit-not careful reading, I like the under and around.
Move the crossovers the turns at the end. EDIT: oops, I see that you can't because of the r-loop switch.
What did you use to make the r-loop fit. It doesn't work for me. Are the 1 3/8" half-roadbed pieces in?


Why cant you have everything?....Yours, Ned...its yours!![]()
I would want to add a 4th "thru" siding along, or around the vertical yard. I don't like backing long trains, and train assembly(shunting) on it would be easy. You have those reverse loops too. All together you would seldom need to touch anything rolling except to remove it, or put it on the rails. You could also gain a 3rd full loop, or a wrap around the bottom a bit, with block control. That could add another track for "look ma no hands"3 train looping, with a little automated stop & go for anti-collision on the shared track.
FYI, The way you are loading pictures, without the attachment tool. Does not allow for my pc to zoom without great pixilation. Ie, I cant see any detail, or read anything on your diagram. I can't open it in another window/tab either.![]()
![]() I don't know if its the nature of a mac, android, i phone, or whatever. But in general, I know I don't have the time, patience, or memory to download every photo loaded like this,(oh, and then open it an image viewer, then post, then go back, and delete the photo.
I don't know if its the nature of a mac, android, i phone, or whatever. But in general, I know I don't have the time, patience, or memory to download every photo loaded like this,(oh, and then open it an image viewer, then post, then go back, and delete the photo.![]() , and I see the load method more and more
, and I see the load method more and more![]() .
.
Doing it "your" way may be easier for you, but it just as well may be an avatar shot to me. Seeing tiny things is hard sometimes.![]()
If you can, when prudent, use the attachment tool. At least on those photos that people may wish to zoom on. That way certain pictures, where detail is key, would more accessible to all.![]()
Your max grade (I cant see, doh de doh, doo doo doo...F.Zappa![]() )
)
It will highly depend on your locos abilities, and what they are pulling!
I would carpet test my min-max grade capabilities before committing to anything!![]()
That way, your not using 2-sided tape (de-tacked top) on one rail for the 5.5% climb![]() .
.
I'm at 5.5% on one side of a room and 3.5% on the other because of using a wall/ceiling joint for just one measurement, instead of my digital level.. oops![]()
![]()
![]() I guess 1% over 15ft of a 1950s drywall ceiling joint isn't too bad. On the bright side I am using a Virginian E33 coal trail, so its a challenging but fun climb
I guess 1% over 15ft of a 1950s drywall ceiling joint isn't too bad. On the bright side I am using a Virginian E33 coal trail, so its a challenging but fun climb![]() .(of course I climb the steep side. At least 90% of the time anyhow
.(of course I climb the steep side. At least 90% of the time anyhow ![]() )
)
Take care Ned.
Ned, a small engine and the turntable solve the alignment problem. Somewhere I have a satellite photo of the Amtrak yard in Maryland where they still turn the cars with a turntable that looks like an Atlas O TT and build the trains that way.
A couple of thoughts:
I liked the idea of shortening the loops and keep the orange line flat.Edit-not careful reading, I like the under and around.
Move the crossovers the turns at the end. EDIT: oops, I see that you can't because of the r-loop switch.
What did you use to make the r-loop fit. It doesn't work for me. Are the 1 3/8" half-roadbed pieces in?
I dont know - it just works - lol
I am using the remote switches with extensions from the Rail Modeler Pro Fastrack lib.
Here is a closeup of the section you are trying to replicate.

Why cant you have everything?....Yours, Ned...its yours!![]()
I would want to add a 4th "thru" siding along, or around the vertical yard. I don't like backing long trains, and train assembly(shunting) on it would be easy. You have those reverse loops too. All together you would seldom need to touch anything rolling except to remove it, or put it on the rails. You could also gain a 3rd full loop, or a wrap around the bottom a bit, with block control. That could add another track for "look ma no hands"3 train looping, with a little automated stop & go for anti-collision on the shared track.
FYI, The way you are loading pictures, without the attachment tool. Does not allow for my pc to zoom without great pixilation. Ie, I cant see any detail, or read anything on your diagram. I can't open it in another window/tab either.![]()
![]() I don't know if its the nature of a mac, android, i phone, or whatever. But in general, I know I don't have the time, patience, or memory to download every photo loaded like this,(oh, and then open it an image viewer, then post, then go back, and delete the photo.
I don't know if its the nature of a mac, android, i phone, or whatever. But in general, I know I don't have the time, patience, or memory to download every photo loaded like this,(oh, and then open it an image viewer, then post, then go back, and delete the photo.![]() , and I see the load method more and more
, and I see the load method more and more![]() .
.
Doing it "your" way may be easier for you, but it just as well may be an avatar shot to me. Seeing tiny things is hard sometimes.![]()
If you can, when prudent, use the attachment tool. At least on those photos that people may wish to zoom on. That way certain pictures, where detail is key, would more accessible to all.![]()
Your max grade (I cant see, doh de doh, doo doo doo...F.Zappa![]() )
)
It will highly depend on your locos abilities, and what they are pulling!
I would carpet test my min-max grade capabilities before committing to anything!![]()
That way, your not using 2-sided tape (de-tacked top) on one rail for the 5.5% climb![]() .
.
I'm at 5.5% on one side of a room and 3.5% on the other because of using a wall/ceiling joint for just one measurement, instead of my digital level.. oops![]()
![]()
![]() I guess 1% over 15ft of a 1950s drywall ceiling joint isn't too bad. On the bright side I am using a Virginian E33 coal trail, so its a challenging but fun climb
I guess 1% over 15ft of a 1950s drywall ceiling joint isn't too bad. On the bright side I am using a Virginian E33 coal trail, so its a challenging but fun climb![]() .(of course I climb the steep side. At least 90% of the time anyhow
.(of course I climb the steep side. At least 90% of the time anyhow ![]() )
)
Take care Ned.
Adriatic I edited the relevant posts so folks could see them better - sorry - I wasn't aware of that method.
Ned, a small engine and the turntable solve the alignment problem. Somewhere I have a satellite photo of the Amtrak yard in Maryland where they still turn the cars with a turntable that looks like an Atlas O TT and build the trains that way.
A couple of thoughts:
I liked the idea of shortening the loops and keep the orange line flat.Edit-not careful reading, I like the under and around.
Move the crossovers the turns at the end. EDIT: oops, I see that you can't because of the r-loop switch.
What did you use to make the r-loop fit. It doesn't work for me. Are the 1 3/8" half-roadbed pieces in?
I dont know - it just works - lol
I am using the remote switches with extensions from the Rail Modeler Pro Fastrack lib.
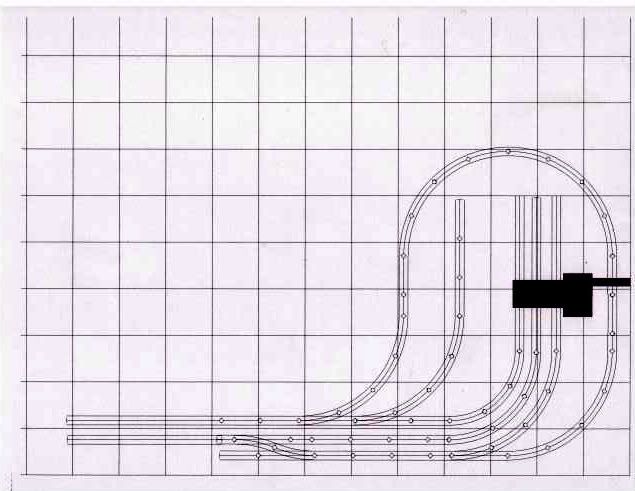
Here is a closeup of the section you are trying to replicate.
There are two half-roadbed pieces, 1 3/8" long that must be used on bith the divergence and the thru on the divergence end with 060, 072, 072 Wye & 22.5° crossing.
You don't have the piece on the divergence(turn-out) segment. Even without it on both switches the alignment on the other side is still 1/2 a track off.
Does Railmodeller give you details of a track piece? Like on a curve, the radius and length of the piece and the arc angle. An 060 has a R=30" A=22.5 and the length is 11.78 inches.
I am not busting your hump, it really doesn't fit like you have it. Here's RR-Track-same as SCARM


It won't fit. Adjust your track plan now. See previous post for correct fitment. It's because 060 is the weird-o of FasTrack. The swictch turn-out is not equal to a full curve. All other sizes are. be sure to use the 1 3/8" half-roadbed pieces that are included with the switches in your plan, also.
Ok here's how it fits. You have to 2 1 3/4" in the center of the curves at the ends of the loop and a 1 3/8" in the center of the curves between the switches.

Then, you'll have to do the same for the green line, put 2 1 3/4" in the center of the curves and take up 3" more of the table. Then see how the blue and the orange fit.
I designed enough FasTrack layouts that were built to know that SCARM and RR-Track are accurate.
Did you update to RailModeller Pro 5.04 2-20-15 to see if it corrects this? App store.
This may help if you don't have FasTrack lengths reference. Possible combinations of factory pieces for various lengths.
I get annoyed when I don't have this for other mfg's tracks.
I can't tell-can you find properties of a piece of track by right clicking it or another way in the software? It's only the 060 switch, which is unique in FasTrack in it's sizing. I try not to use them.
I went on their site an emailed them a description of the problem. I'll post the response next week, I suppose.
It's still in development, but they cut it loose anyway. Like iOS, if it works 98%, we'll fix the rest as we go. Read their version history. I didn't notice any other errors in your plan, but the photo was fuzzy. Remember to use the little pieces on the switches. It fills in the roadbed.
Perhaps, if you look at the track join settings for a high tolerance or auto-fill\complete feature that you can reduce or turn-off.
I thinks it's the length of the turn-out section of the switch.
They do differentiate between switches WITH extensions and WITHOUT extensions - I am using the ones with extensions - if that makes a difference.
Ned, saw the updated pic, man I like your design. I dig the symmetry. Question: How low are you planning to get your yard track under the mainline? It looks like you've worked in about 12ft to drop below, assuming you're going for 6.5" under which is a bear minimum that's about a 4.5% grade. Not impossible, depending on what you're pulling, but you're going to really have to watch your speed going down or you'll have locos flying off the curve. Of course there are all kinds of ways you can reduce speed.
One suggestion though to get a more gentle slope: On the yard side of the layout, put your turnout for the orange line in the straight area between the two switches going to the purple line. Shorten the bottom side of the layout a smidge, and as was mentioned earlier you can have the graded track wrap around outside the curve. Personally I think it would be visually impressive to see that gentle slope falling away in front of your layout, with the added benefit of putting the switch out in front and not in the back (I'm assuming the yard side is the front). That simple change could add at least 14 MORE FEET onto your grade! That will cut your grade in half! My math is assuming the orange line is 12ft now, plus 14ft which adds up to 312in; a drop of 6.5in divided by the length of 312in equals a 2.08% grade, much more manageable. Give yourself another half inch of depth to account for roadbed and tall cars, total depth of 7in equals only a 2.24% grade, still good.
But please, PLEASE watch the pantographs on the GG1, those things are TALL!!! You'll need to remember to drop them when going under or have an overhead skid ramp built in to push them down for proper clearance.
Here's the two loops with the switch for the under that fits.

This is what I get when I tried to replicate your plan - it doesn't work.
So one of the programs is wrong ![]()
This is very disheartening.
Might as well finish it sir - make sure the rest of it works - but lets move the turnout for the sloping down line to the front - put the o-72 turnout there and wrap it around to connect - less of a grade and I can see it better. I attached my full attempt so you can see what Im talking about. Adds .5" or so (who knows since this program seems to be flawed ![]() ) to the layout - but it greatly reduces the grade.
) to the layout - but it greatly reduces the grade.
Thanks


Here's the two loops with the switch for the under that fits.
This is what I get when I tried to replicate your plan - it doesn't work.
So one of the programs is wrong ![]()
This is very disheartening.
Might as well finish it sir - make sure the rest of it works - but lets move the turnout for the sloping down line to the front - put the o-72 turnout there and wrap it around to connect - less of a grade and I can see it better. I attached my full attempt so you can see what Im talking about. Adds .5" or so (who knows since this program seems to be flawed ![]() ) to the layout - but it greatly reduces the grade.
) to the layout - but it greatly reduces the grade.
Thanks
Instead of trying to fit the S curves in on either side, why not have them cross in and X through the middle?

Access to this requires an OGR Forum Supporting Membership


