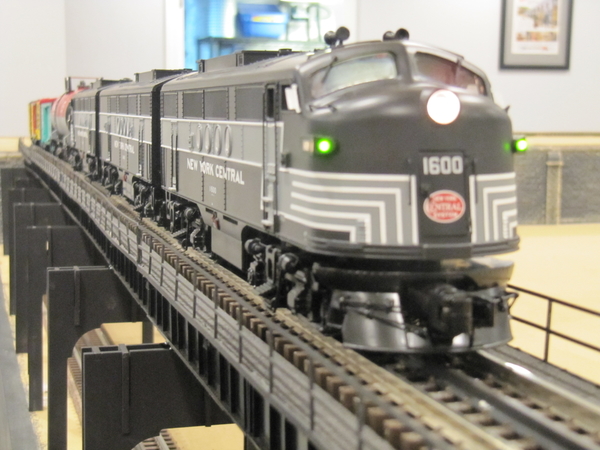
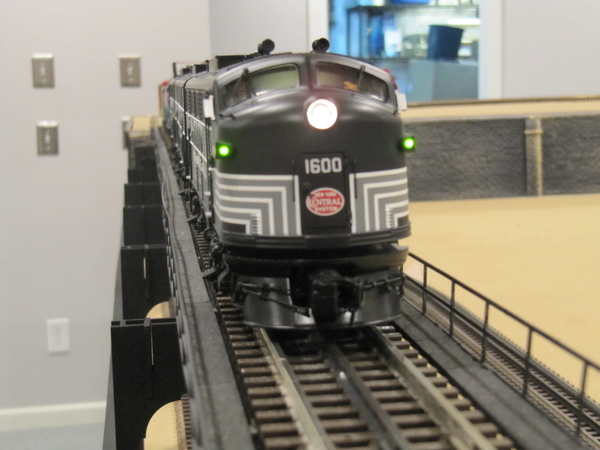
Looking great... i was going to "borrow" your skirting idea. I know it comes in a lot of different thicknesses, what brand/where did you buy it? I looked at the one at lowes tonight that was rated 15 years, it looked like a possibility, but did look a little thin. It might work though. Your's looks great, looks like it hides everything really well.
I got the black landscape cloth at home depot, it was available in two roll sizes, I used the larger one. It was the one that was more cloth like than plastic, easy Gardner 4 x 220 ft polypropylene pro landscape fabric is the name, about $45.

While it looks thin, since no light comes from under the cloth, you don't notice the "holes" however when you are under the layout, the light from the room comes in, and you can see to move around.

Good luck, I got this tip here on the forum from others and it worked great.

11-27-11
I have like three projects going, the round house, backdrop and the harbor, all in some portion of completion, I have been alternating between them as I wait for things to dry in some cases.

To start I wanted to have a large roundhouse, I looked at several models, and decided on the Korber. I used the larger of the two kits, the 304, however I was unable to get additional stalls, but I was able to find one of the shorter kits 320. So this is a kitbash of two Korber kits together. I built up addition wood bracing, added a floor, and will add lighting before adding the top.
 
IMG_2737IMG_2738IMG_2739IMG_2740IMG_2742IMG_2743
In another project I have finally started to install a backdrop. I went back and forth on what to do, was I going to paint one, or would I purchase one, and in purchased, from whom. After some research, reflecting on my painting ability, and viewing multiple people layouts and efforts on the web, I selected some from Backdrop Warehouse.
I went for the higher resolution, 12’ by 42” ones with a selection of seven 12’ sections that all match to crease a continuous backdrop around my layout. While these are not the least expensive, so far I am happy with the results.
IMG_2731
Laser level on top of paint buckets
IMG_2735 
The back corner was rounded using 1/8” Masonite sheet.
IMG_2734
To align it, I used an inexpensive laser level from HD, and to attach to the wall, I used carpet tape as suggested by Patrick H on the OGR forum, and it worked well for me. I still have more to do, including finalizing the seams, but so far so good. It really transforms the room and layout. I had guests over for thanksgiving, and received a ton of complements.
IMG_2732IMG_2733IMG_2736

The third areas I mentioned was the harbor, you can see some of it in the above pictures, including the tank farm. I have some glass to paint and put down for the water.
As always open for comments and suggestions.

Attachments

Images (12)
  • IMG_2737
  • IMG_2738
  • IMG_2739
  • IMG_2740
  • IMG_2742
  • IMG_2743
  • IMG_2731
  • IMG_2735
  • IMG_2734
  • IMG_2732
  • IMG_2733
  • IMG_2736
Last edited by Rich883
Thanks Guys,

Stu, I upgraded to the Millhouse River studios motor kit. This provides a geared drive system with a slow operation DC motor, a geared belt, and a large wooden gear to replaced the drive system that is standard with the Bowser. This makes manual control very easy, I can line them up by eye. I highly recommend anyone look in to this upgrade, I think it was worth the money.
Last edited by Rich883

Thanks Patrick,

I have a long way to go to get to the level you have going. Thanks for the help.

12-5-11
Completed hanging the backdrop, I am really happy about the outcome, looks great, and really adds a lot to the layout. I have a cover flush to the wall for the power panel, I have to trim that out when I get a few minutes. The carpet tape method worked really well for me, and I also used a double back tape for the seams a well. A bit of work to hang, but far better than anything I could paint.


IMG_2747

IMG_2749IMG_2759IMG_2760
A NYC GP9 in the yard on the way to the engine service area
IMG_2761 
I spent some time on the harbor area. I completed the glass for the water. I used the method Dennis B covers in his book, the aquatex glass painted on the back side with rustolium camo green paint. I think it looks realistic.

IMG_2750IMG_2751IMG_2752IMG_2753IMG_2754IMG_2755IMG_2756IMG_2758
A NYC freight makes its way thru are harbor area.

Still more to do, back to the round house soon, I may add some support to the elevated area I got from bridge boss.

As always open for comments and suggestions.

Attachments

Images (14)
  • IMG_2747
  • IMG_2748
  • IMG_2761
  • IMG_2750
  • IMG_2751
  • IMG_2752
  • IMG_2753
  • IMG_2754
  • IMG_2755
  • IMG_2756
  • IMG_2758
  • IMG_2749
  • IMG_2759
  • IMG_2760
Last edited by Rich883
Rich,

That looks fantastic! You are doing an excellent job.

To reiterate what Alan said, any details you care to share about the 'aquatex glass' would be greatly appreciated. I certainly am going to look into that method for my bigger lake - (but what am I going to do with the two quarts of EnviroTex I already have? Roll Eyes)

Thx for sharing!

Alex
Thanks for the nice comments guys.

Here is a link to the type of glass I used aquatex

I got the ideas for this approach out of Dennis B's book.dennis brennan’s book

I measured the opening I made for the harbor water area, and went to a local glass store. They cut the glass to match the outline I had measured, and beveled and sanded the edges to get rid of any sharp edges. The buildup of the dock area is done using the pink foam, and I put a coat of "muddy sand" paint on it as a base. The back of the glass is painted Rust-Oleum CAMOUFLAGE SPRAYCOLOR: 1919830 - Deep Forest Green. Several light coats on the back to create an even covering. You can also paint the structure under the glass if you want to make sure you don’t have any reflections.

I believe the glass comes in sheets up to 72" x 84". This is used typically on patio type table tops, or shower doors.

I plan to build a sea wall around the harbor, and add some other details.
Thanks, Rich -

I am going to see this weekend how available that glasss is around here. Coincidentally, that is the same green I used for the arch structure and stanchions on my turntable (which you already saw - & thx!) Finished Turntable

When you said, "You can also paint the structure under the glass if you want to make sure you don’t have any reflections." Did you mean that it may be possible to see reflections through the painted glass? Just wondering . . .

THX!
Alex
Alex
I also used the same Aquatex glass/Dennis B method Rich has on his layout.
I spray painted the underside of the glass and was very happy with the way it turned out.
However---it was a little transparent

I had a quart of ext. flat house paint tinted to match the camo spray and rolled a coat over the spray paint.
This gave the green surface a little more body/solid feel.
Also a little more scratch resistance/protection.

I could not be happier with the way the "water" on my layout looks.
Thx again Dennis B
Joe S Cool

12-14-11

I jumped to another section of the layout to complete a project that has been on my list for a while; the elevated steel line leading to and from the future city hi rise area. This section started on my layout before I embarked on this expansion, and linked to a kitbashed bridge to make an inside curve around a post.

When I cut the layout apart and moved sections to be a portion of the new expanded layout, I ended up needing to run track under this to accommodate both a mainline and several passenger sidings to be part of the large station. It also had to have a curved section added to meet the new bridge in the harbor area. I have been using pieces of MTH stone bridge support and sections from a graduated trestle set that I had started with before which you can see in the following shots.

While this approach looked ok when I didn’t have track under the elevated section as it was before, I didn’t like the look it had now. I searched around to find something that would work and look good, and found several solutions from a few suppliers. I met Jim from Bridge Boss at York, and really liked his approach. We discussed what I was trying to do, and I left to go back and take some measurements and placed an order shortly after for some ELC – 6.0 supports, as you can see form the chart below, there are a lot of support choices.

el%20column%20family


IMG_2763IMG_2764


Now I want to point out this elevated section is a kitbash I did for the steel girders using upside down HO atlas bridge sections, and I simply added the Bridge Boss supports, they do however have a nice system for elevated sections if you are starting with out anything, I think others including Rich Batista have posted pictures on that. These supports come flat packed and require some simple assembly, one was assembled in the box as a sample. I painted them flat black using the rustolium camouflage paint to tie in with the black girders I used before.

IMG_2765IMG_2766IMG_2767IMG_2768IMG_2769IMG_2770IMG_2771IMG_2772IMG_2773 

I am happy with the outcome; I think it looks much better than before. Still more to do, back to the roundhouse soon, and the harbor, the wall will be next I think.

As always open for comments and suggestions.

Attachments

Images (12)
  • IMG_2763
  • IMG_2764
  • el%20column%20family
  • IMG_2765
  • IMG_2766
  • IMG_2767
  • IMG_2768
  • IMG_2769
  • IMG_2770
  • IMG_2771
  • IMG_2772
  • IMG_2773
Last edited by Rich883
Rich,

That looks REALLY good. I think eventually I will look into something along those lines for my “L” train.

You have a long(er) span without supports, about where the lower track exists the elevated supports. Do you plan to add a support there? It appears that you could cut (kitbash) one of the supports and make it narrower so it won’t interfere with the lower track.

I had something similar, but had to make the support wider to straddle the lower track. In my case, I was able to turn this section into a tunnel. But I have another section where I had to have a very long girder span without regular support, so I made up a 'concrete' column, and was able to add it without it interfering with the lower track. (With Big Boys and DD40s the clearance around curves (inside and outside) sometimes is a challenge. (Speaking of which, Santa should be bringing me a 'Challenger'!)

Good work – keep the pictures coming.

Thx!

Alex

12-29-11

Thanks for the nice comments guys.

Alex, yes there is a bit larger gap there for the curved part. While it is not really needed for support, I think I will get back to it from an aesthetics point of view. What I think I need is a bit wider support (these are the narrowest from Bridge Boss)t so I can align the aisle side up with the others, and cross over the lower level track.

The roundhouse is built!

After getting the track down, and turntable installed in my engine service area, I moved on to the main structure that will be there, the Round house. I used two different size Korber kits as additional stalls for the larger one that I started with were not available any longer. I had to build up addition wood bracing at the two kits came with different sized wood.

P1010033P1010037
I built the round house in the shop area for easy access. The kit in built on a ¼ plywood base (it is sitting on saw horses with a piece of scrape OSB as a work table). The interior floor is made of painted foam core. I added LED lights in side, I added some addition wood cross pieces as a way to hold them and run the wires. The wires are consolidated at the front right side of the roundhouse to crease a main feeders for the +12VDC.

P1010061P1010062P1010063P1010064 

Since this was a kit bash of two different sized units, the sections are slightly different widths, this caused for a bit of cutting in the roof windows, and I needed to create a custom roof. I used matt board, and covered it with the fine ballast that came with the kits for the roof cover.
So far so good, now on to installing it on the layout and wiring up the power for the tracks and the lights.

As always open for comments and suggestions.

Attachments

Images (6)
  • P1010033
  • P1010037
  • P1010061
  • P1010062
  • P1010063
  • P1010064
Last edited by Rich883

1-8-12

Thanks for the kind words Pops!

Well I have been working on a few projects. I have been meaning to add a drop down door access to the electrical panel area, and while I built the bench work to support this, I didn’t complete the task. Additionally I had installed the backdrop over the panel with the intention of cutting it out and attaching to a removable panel.

Here are some shots of the work in progress, and the completed set up. The door drops down to create the opening.


P1010065P1010066P1010067P1010068
I have a bit more details to fool with, but for the most part I am happy with the progress.

The second thing I was working on was to get the round house on the layout and the track power wired up. So far so good.

P1010075P1010078P1010079P1010086P1010090P1010091

As always open for comments and suggestions.

Attachments

Images (10)
  • P1010065
  • P1010066
  • P1010067
  • P1010068
  • P1010075
  • P1010078
  • P1010079
  • P1010086
  • P1010090
  • P1010091
Last edited by Rich883
Rich that is some fantastic work. Call this a suggestion or request but you need to make a sign,white with red letters or yellow with black letters at least 4 inches tall that says "Electrical panel" with an arrow pointing down and place it above back drop above the panel.

It's never a good idea to totally conceal the panel but if you do it should be marked so that if your not there it can still be found during an emergency.

Great work.

David

Glad that helped Alex, I really like using that material, it worked really well for the roof.

Based on David’s good suggestion I made up some signs (after a trip to the store for more ink for the printer).

P1010096P1010097
I have started working on the harbor area of the layout. I ordered some plastruct detail parts, and started to add them to the storage tanks. I plan to add some cat walks, ladders and piping.


P1010102
I have also started on the steel seawall that will line much of the harbor. I started by laying out a piece of duct tape sticky side up, and laying out cut pieces of screen framing. The framing is cut to 2” length complements of Patrick H. I intend to paint and weather it as well.

P1010103P1010104
As always open to suggestions and comments.

Attachments

Images (5)
  • P1010096
  • P1010097
  • P1010102
  • P1010103
  • P1010104
Last edited by Rich883
Everything is looking very good.

The UPSIDE Down HO scale bridges for the El line... very nice concept.

I will say those were a professional challenging problems for my Rig directly underneath down the avenue in NYC at times. Some of those posts are offset in places where if you are not paying attention at nighttime, you will run head on into one.

Rich,  Just discovered this post and all I can say is Wow!  What a great looking layout.  The room alone is awesome.  Must be a new house with a great basement like that.  Seems like you are making great progress too.  The  backdrops look good, you did a real professional job putting them up.   Best of luck as you move on.  

Add Reply

Post
The Track Planning and Layout Design Forum is sponsored by

AN OGR FORUM CHARTER SPONSOR

OGR Publishing, Inc., 1310 Eastside Centre Ct, Suite 6, Mountain Home, AR 72653
800-980-OGRR (6477)
www.ogaugerr.com

×
×
×
×
Link copied to your clipboard.
×
×