Everything you've done Rich looks Great! Thanks for sharing. ![]()
What I would like to know is, Where in that basement is your wife's space?????????????
Thats one heck of a layout..
I have been making some progress on the layout, especially in the harbor area. In a few of the shots you can also see an Atlas bridge I added to the double track main lien in the back.
First I painted and installed the seawall I had started the construction on before, I capped it off with some painted wood as a top plate.
I additionally dressed up some large tanks I had and did some weathering. I have a bit more to do on the landscape here, but it is a start. I also installed some flashing red lights in the tops of these tanks, but have not connected the power yet. The second tier behind these tanks will be done as well, I started with the front row.
I also added the coaling tower I ordered at York, it finally came in. I have a ash hoist to add next. I am happy with the craftsmanship, it is really nice.
As always comments and suggestions welcome.
Rich
Attachments
Looks fantastic Rich!
I found these pictures when googled "Steel Sea wall" It might help when you caulk where the aluminium meets the glass and put the final touches on it.If i had to do it i might put masking tape along it before i caulked and finished weathering it.
Just an amazing Harbor!!
Attachments
Rich,
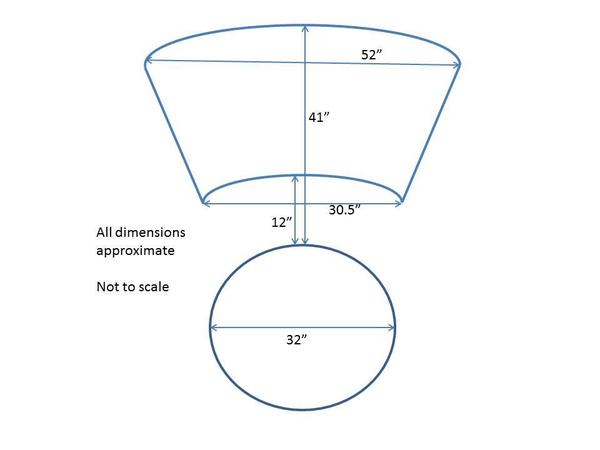
Love the water! Question? Can you tell me what the widest dimension of your round house is from the outside radius point to point? And could you also tell me the measurement from the center back radial wall to the TT including the tracks from the TT to the RH is? I am currently laying out my TT/RH area and those dimensions would be very helpful.
Rich that sea wall looks awesome, wow great job.
Looks so real.
Rich,
Wow, now that I can look at the sea wall in context with the water, it came out great! Looking forward to seeing the coaling tower with scenery!
Thanks for the update.
-bruce
How much time do you think you have invested in getting it built to this point, Rich?
Rich,
Your layout is looking fantastic!
I just love the harbor.
Dave
Rich,
Your efforts are surely paying off - everything looks great!
Did you paint the bottom of the Aquatex glass camouflage green? I am about to start on mine, and only hope that it will turn out close to as good as yours did (and make Dennis B. proud)
Thanks for sharing.
Alex
Great work. The harbor scene is a real eye catcher.
Thanks for the nice comments guys,
good call on the caulking Patrick, the gap was larger than I liked.
Alex, yes I used the green camo paint, you need to be careful as it can have some thin spots that only show up when you place it over something light in that the light int he room reflects off the lighter color below. It is critical to get good coverage, also good to paint the table below a similar dark color.
Greg,
I will look on the round house and measure. I used the paper templates with the Korber kit, so the width and depth of the actual roundhouse is about the same. I installed the track on the board I built the round house on, and left them long and moved them into pace and cut at the edge of the turntable. May not be the best way, but worked for me. I will re-post when I get the measurements.
Greg asked about dimensions of the round house placement.
I went downstairs and took some measurements, and this is what I came up with, please note this drawing is not to scale.
When I placed the round house, I did a bit of messing around with the paper template of the round house and the turntable, and that helped me place the turntable. After marking out the rough placement, I installed the turntable, and then built the round house in the shop.
Once built, I again did a bit of moving around to get the final placement of the roundhouse.
I hope this helps Greg.
Looking forward to seeing your progress.
Rich
Attachments
Rich,
Thank you for posting this as this is very helpful to me. I'm going to make some templates to help me get a better visual on my TT placement.
My 32" ROSS turntable is already in place and I'm building the flatwork which surrounds it. The Kobler kit roundhouse will be built to go with it.
Your diagram is very helpful and I think the suggestion to "fit up" the trackwork to a diagram of what the built footprint will be is the only way I'm going to make mine come out correctly.
Thank you!! Very helpful.
Hey, Rich!
Where are you with your fine layout?
Haven't heard for a while, and was just wondering . . . ![]()
Thx -
Alex
Hi Rich, You have made WONDERFUL progress on your layout. I like the Sea wall piling and the Aquaglass look.
Good Luck moving the Korber items and getting the production restarted.
I will be driving out east before too long to bring the Korber Power Plant and office complex, Coal Mine and Grain Silo Complex back to Micigan. Hope to rent a Yukon or Surburbon to haul them back. Alan made them on long base sheets and they will fill a 4'x8' cargo space.
Very nice job on your 6 stall RH.
Rich, Thank you for the reply. The material looks good. I think I will get some and see how it works for me. Thanks again.
It has been a while since i posted an update, partly working on moving and res starting the Korber Models business, partly I hand't taken some pictures of work done.
I was kind of at a stand off on what to do for ground cover in my engine service area, but after some encouragement by some of the high railers here in Cincinnati, and a visit to the spectacular layout of Bill Bramlage's I got motivated to move forward.
Below are some photos of the ground cover-ballast I used, and some photos of the new Weaver water tower.
I have more work to do, but I am happy get some progess.
Attachments
Very nice! Great looking roundhouse. Where is the coaling tower from?
Hi Rich looks beautiful, glad to see your making some progress
on the layout.
Thanks for sharing, Alex
Rich, fantastic progress on the roundhouse scenery, looking great!
-bruce
Very nice! Spent the last hour observing your pictures.
You used Woodland Scenics inclines? How far did you go upgrade or down and how high did you go with them?
Your Oil Tanks are nice with the man ladders on the side with top cages. Did you build or buy the man cages for the tanks?
Rich,
Looks great! Gives me good ideas on what to do around my steam engine facility.
Thanks for sharing -
Alex
Rich, the layout is looking amazing. A question regarding the aquatex:
I believe you said you have a seam in the glass underneath the lift bridge. How visible is this seam when the two pieces are placed together?
That is a nice engine facility, the coloring and ballast work is fantastic. Great job.
Rich, the layout really looks good. Been awhile since you updated. Maybe you have MORE TO SEE ![]()
Thanks for the proding Pops...
I did some small items, and worked a bit on more ballasting. I added a water column near the coaling tower., I will look to get soem of those pictures.
Here is a new structure I an working on. This is something I see all the time in HO, but not as much in O, a shallow relief building. Kind of like a flat, but with some depth.
This is intended to be an apartment type builing that you might see backed up to the tracks. The roof like is the back of the building. I have some down spouts to add, and some fire escapes, and steps, so this is a work in process.
It seems like a lot of times you see a store front as a flat up against the wall with the tracks in front of it, but I think more likely the tracks ran behind the store in my case the apartment.
As always comments and suggestions welcome.
Attachments
Hi Rich very nice building, is it a laser cut kit or a plastic kit.
Anyway nice to see you working on the layout a little.
Thanks, Alex
P.S. Hope to meet you at york
Hello Rich, I have a few questions on your post dated 12-14-11 about your steel elevated line. I like how you used the HO girder bridge upside down.. It looks like you have the track sitting on something that rests on the girder bridge, what is sitting on? And what did you use for the guard rails? Thanks for your help! Your layout is awesome!
Ralph
Thanks guys!
Ralph, I appreciate the comments on the elevated section. lets see if I can help. The upright supports are from bridge boss, I purchased them as a kit, simple glue together, then paint with the rustolium camo flat black, in fact all the parts are painted the same color.
The HO girder bridge sections are placed upside down over a 3/4" x 1 1/2" piece of wood (size is approximate), and the sections are screwed into the wood using track screws (I use atlas).
There is a walkway on both sides of the section for most of the length. This is made by placing a square dowel piece under the track, between the ties. In my case, as I am using Atlas track, this makes a support that is about level with the ties, but stick out a bit more. I use a piece of strip wood glued tot he wood support that is about 12 scale inches wide (just a standard piece of basswood from Hobby Lobby).
The railing is from plastruct, and glued to the side of the strip wood at the bottom. The entire ting is painted the flat black as noted.
Pretty straight forward, the only real attention to detail is to either build it in place, or carefully measure the ties spacing. In order to fit the cross supports under the track, and align to the ties it works best to build in place, then once the glue is dry remove for painting, and re install.
BTW the key to cost on this it to look for sales in walthers when they have a reduced price on the bridges, and measure how many you need. I think they are like 50% off some times.
All that said, I started this project using a different base support, and I was spanning a larger distance between supports. If I had to do this over, I would have purchased the entire set of parts from Bridge Boss. The have some very nice elevated section sets, and you can have them built up, or as a kit.
I hope this helps.


