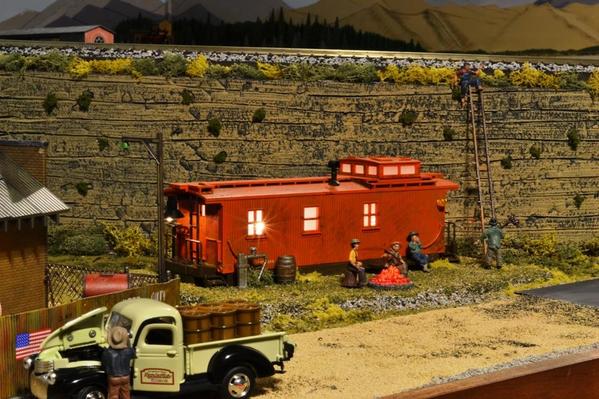
Since I started with this layout, my plans have evolved. First it was about getting things started and running some trains, then I realized I wanted to finish the room – unfortunately around the layout – I migrated to liking more scenery, and so on. Over this time I found I really liked to run longer trains and more running than my current layout could allow. I liked the scenery work I had done (maybe 1/3 done) and I didn’t want to lose the work I had sunk into it. All this had me thinking about ways to expand what I had done, but shift to the approach I was looking for, a new base to grow from.
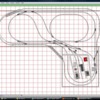
Here is the basic track plan I started with, while the scenery and building placement is not real accurate here, the track plan is what I have been running, it take up about 24ft x16ft. I use Atlas track and switches.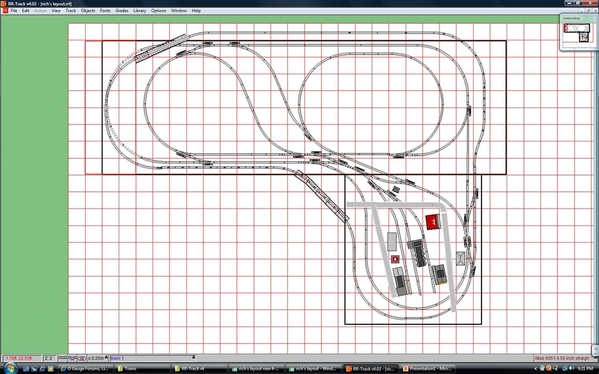
Here are some photos taken a bit before I decided to make some changes.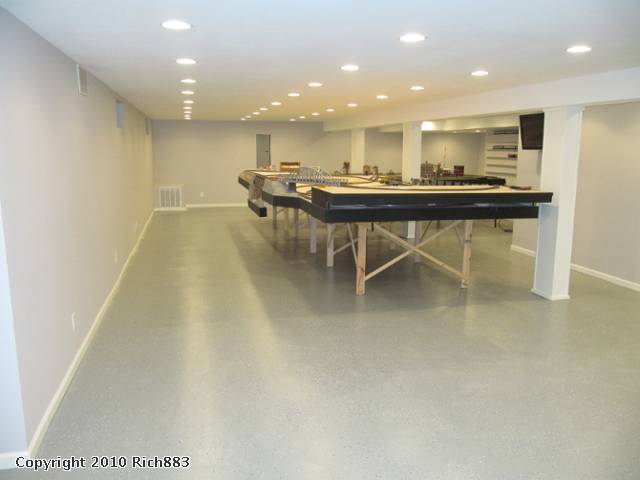
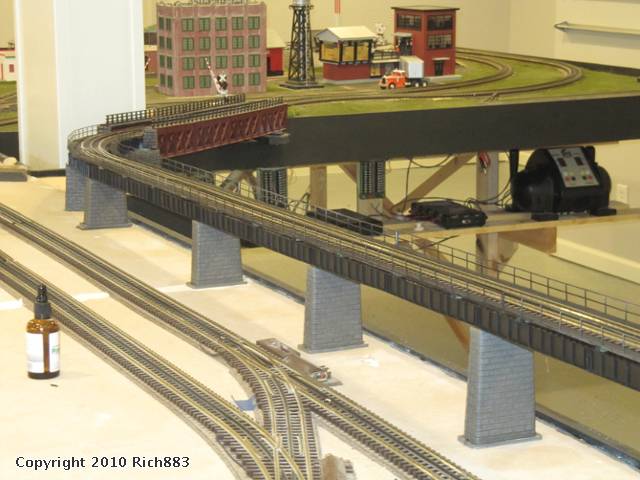
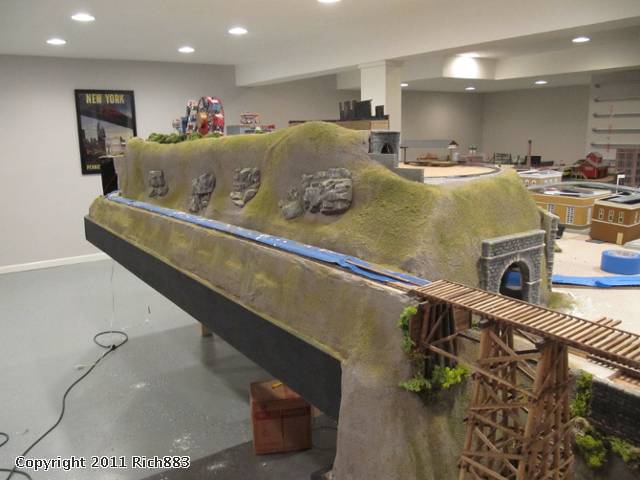
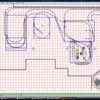
It seemed the sooner I started, the less track I had to rip up (literally in the case)After some thought I looked to move to this track plan, while I expect some changes like adding more sidings for industry, the basic flow will remain the same. I wanted to take advantage of the large wall space I had, and create some peninsulas to break up the viewing angles and set some different scenes. This one is about 43ftx30ft.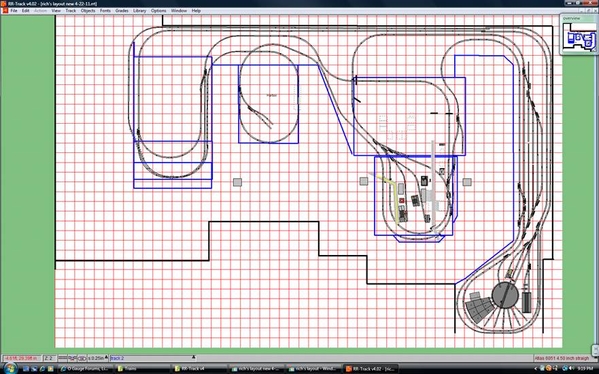
To accomplish this I had to cut the existing bench work apart, and move the two pieces to create two different peninsulas.
The goal was to keep the existing track work and buildings/scenery in place, and move these to a new location, which turned out to be both harder and simpler than I thought. The separate pieces were much too heavy to lift and drag around the room, and while I had leveling feet, I did not build the bench work with wheels. What turned out to be simpler than I thought was to jack up the bench work and place mover’s dollies under it, and once all feet were up, pushing the entire piece into place was not too hard.
Once the existing pieces were in place, I started adding the bench work support structure to tie the pieces together. Construction is with dimensional lumber, mostly 1x4 and 2x4 with a combination of screws and nails to secure it together. I have started covering the frame with ½” OSB, and that will be covered with homasote. The elevated grade at the back will have homasote on it before I lay cork roadbed and track.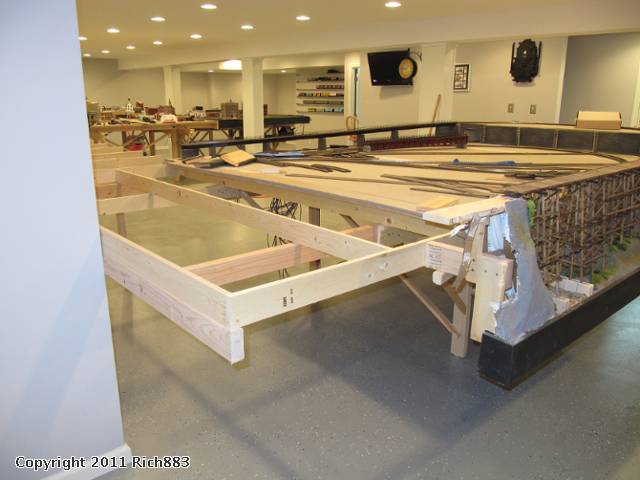
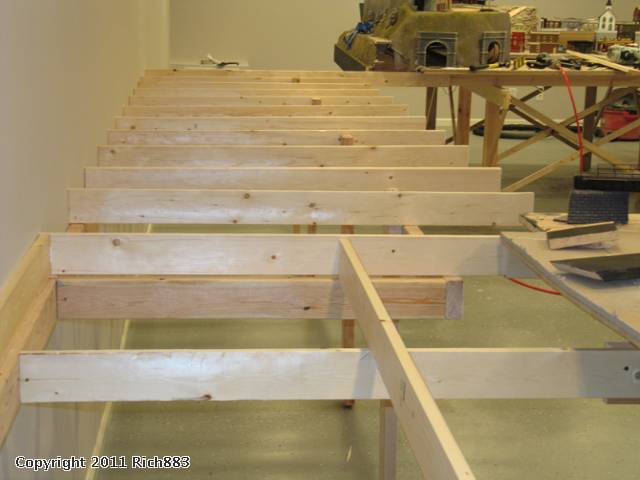
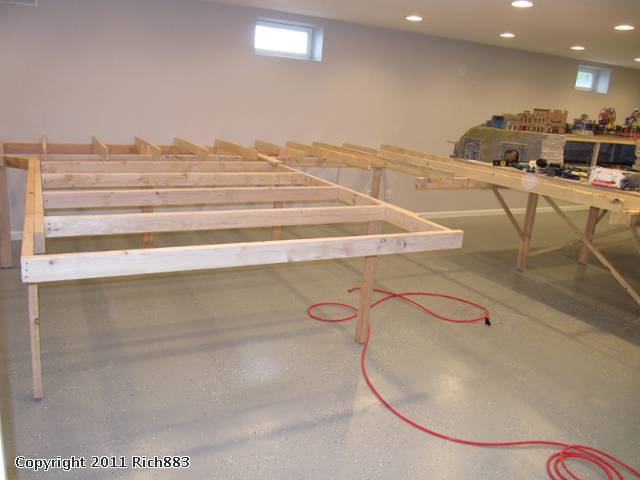
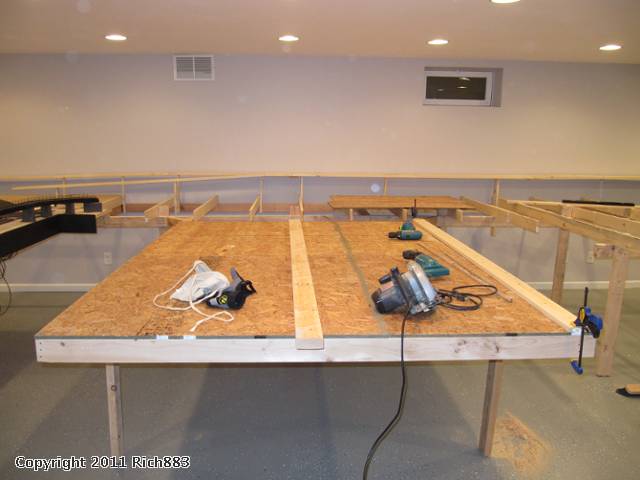
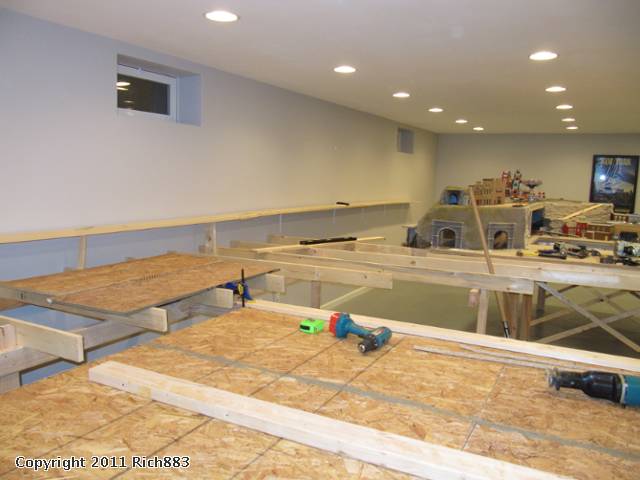
I think I am about half way done with the bench work. I will post more photos as I make some progress, and of course comments welcome.
Replies sorted oldest to newest
I have to Laugh,
How many layouts are you building?LOL
When i first seen your layout in the middle of that big room, I said to myself boy this guy has alot of discipline or a strict wife to stay in that area with so much room to use.
I also pulled that "wheel trick" on the wife.LOL Sections could be wheeled out of the way for when company comes over. Their still under one section of the layout. I know you did it for a different reason.Great idea.
I like the new shape of the layout,
Rich it is looking great, you are gonna have alot of fun when all is operational. Congrats on the approval of more land from the Land Appropriation Commity...(The Mrs.)..
By the way it looks like you have an extra 7-8' left on the left side of your room, you may as well stretch her out while your at it.
I've always admired your work and I kind of wondered why you didn't use the whole space for a perimeter layout, I just figured you had your reasons. Nice work as always and keep us up to speed on your progress.
Your's is a major undertaking, I'm sure you'll be happy in the long run that you made the expansion decision early enough in the process.
Looking forward to your future updates.
REV
The room is pretty neat in these pictures, some more sawdust after cutting some more wood, but thanks to the vac not too bad.
the layout started in the middle of the room before I finished the room, so originally there were no walls.
Pretty lucky, not too hard to get the space, she has space upstairs.
The portion at the far left has some book shelves, couch and chair for lounging, and in the far corner I will add a wine cooler and some wine racks.
In the scheme of things, I'm a sixteen-year-old warehouse sweeper who's saving up for a downpayment on a used Honda Civic, but I'm ogling your Lamborghini.
Your space and your layout are what dreams are made of. Thanks for sharing!
(Enough ogling by me for now. I have to get back to figuring out what I'm going to do with 9.5' x ~6'.)
--Jaddie
Peter
Thanks for all the great feedback guys!
I have been completing more of the construction, here are some additional photos. At this point I have completed the framing, legs, girders, cross braces in the bench work, and covered it with OSB sheeting. Next step is to add the homasote. I intend also to add some additional elevation using dimensional lumber, and foam.
I also found a Lionel lift bridge I intend to use in the harbor area.
The gap you can see in the second to last photo is the access to the breaker panel that is behind the framed poster. This will have some lift out bridges to provide better access with less reach.
Attachments
You are really making great progress and definetly will end up with a great final product.
Bench work Construction complete!
Well back at it again, I have made some more progress completing the bench work construction. The entire layout is now covered with Homasote. I have placed this down as the base on top of the OSB. It is also on the elevated sections at the back of the layout. The grade to and from these elevated areas will be a combination of a trestle extension (I will extend the trestle at the back left of the layout to make a curve to meet he back elevated area) the inside track will ramp up using foam. The same type of approach will be on the back right corner where it comes back down.
The homosote is painted with a flat latex paint, a kind of “sandy – mud - dirt color” I didn’t do this before, and when I saw the results others had here on the forum I tried it out.
After the homasote was installed and painted, I added wood trim boards around the layouts – 1x6 dimensional lumber and then painted flat black to match the existing construction.
View from the bottom of the stairs
Harbor area in the foreground right, look back across the city to the left. The harbor will have 2” foam to elevate the pier, I plan to install that next. I have removed some of the supports from the elevated line on the city peninsula, I am reworking that to have a line run beneath it, and then two sidings for passenger cars for a large passenger terminal.
Harbor in the front left, looking at the smaller town and the “mountain” top “ amusement park on the right.
I have started to stage track and switch’s amongst other things in the yards and service area
Yards to the right, the gap you see is so I can get to the breaker panel behind the framed poster. This will have a few removable bridges for easy access.
Looking back at the service area
I stocked up on some conduit clamps to start installing for wire management, and while at it I will re layout my central wiring area to get better access to the AIU terminal strips.
Things always seem to take longer than I expect, but I think the progress is OK. I am looking forward to putting the saws away and working on track and wiring next. As always comments and suggestions welcome.
Attachments
quote:Things always seem to take longer than I expect, but I think the progress is OK. I am looking forward to putting the saws away and working on track and wiring next.
I think your progress is excellent. I've had a touch of builders block lately, I am following a track plan, but lines on a paper don't always translate to what I am after in the building phase. I have wired on side to test switches and see trains run through the sidings, since I am still cutting roadbed it breaks up the monotony of the same old thing. Nice work, I've enjoyed watching your progress.
Same thing going on in Holland Pa (philly area).
Builders block---I like that term. I'm having a tough time with my track plan????
The minds eye sees one thing, the computer and real world see another.
Rich
Thx for posting progress. It's a pleasure to "watch".
Joe S.
quote:Builders block---I like that term. I'm having a tough time with my track plan????
Joe S.
Sometimes I just find that once you begin 'doing', things evolve and those things you were stumped on begin to work out. I have a hard time working within a set of rigid or confined parameters. My track plan is merely a 24x36 scaled drawing of the room and benchwork with nothing more the pencil lines depicting what I think I want/like. After fretting over a track plan for so long I resolved to get going on it rather than continue in the endless search of the perfect plan and so far I am happy with the progress. Good luck and please share some photos.
I have had some travel for work recently, and been unable to get things done on the layout, but I had some time this week to complete a few things. I have mostly been working on laying track, and installing the cork roadbed under it. I generally layout the track first following my track plan, and slide the cork bed under the track. I secure the cork to the Homasote buy using some HO track spikes a simple nails.
The first thing I did was to construct a curved trestle to join the side with the back of the layout elevated tracks.
While the track plan didn’t change much in the foreground with this elevated areas (to be part of the city) I have been changing out the all curves to O 81 or O 90 where I can fit it, and a minimum of O 72. (I previously had O72 everywhere, but wanted to expand while I could)
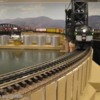
One of the new areas of the layout is to add a harbor area. This is on a peninsula that is about 8.5’ by 6.5’. I built the bench work lower to provide for the depth of the piers. The loop around it has sidings to provide access to some planed oil storage tanks, and a freight house. I built up the piers using some 1.5” and 2” foam. The Lionel lift bridge serves as the entrance to the harbor, and is anchored to some risers of wood attached to the bench work. The back area will have another bridge for the overpass of the track coming from the elevated section on the previous peninsula. This has yet to be fabricated, so I used some MTH bridge supports for the time being.
This view looks back at the small town/city that I had previous stated before I worked on this expansion. This is where the expansion ties into this existing peninsula.
Here is a shot looking back across the layout in the direction of the first peninsula and the stairs.
Next I will be laying the mainlines on the last portion, the new yard and service area on the far wall. Once done with that I will begin wiring.
As always suggestions, comments and critique always welcome. This layout includes lots of ideas I have gotten and skills learned here on the forum, so thanks to all who contribute.
Attachments
Where did you get that gray bowstring truss bridge I keep seeing in these photos?
Thanks,
The Gray bridge is a MTH bridge 30" arch bridge with two 10" extensions The black lift bridge is a Lionel
MTH Bridge
Peter
I am really looking forward to that harbor scene.
If your not sure on the wall in the harbor yet, I have tons of 3-4 inch screenrail pieces from work that is 3/4 wide that ive seen stood up next to each other to make the sea wall.
This layout has really taken off since the last time I looked at your thread.
Awesome work man and I am ridiculously jealous of your basement!
Dave
Looking at your second to last photo of the area in front of the breaker panel I had a thought. What if you put a hinge between the 5th and 6th track counting in from the edge of the layout and had the whole section drop down like an extension on a table? It might be easier than a liftout.
Looking great.
Nice work and progress, and well organized wiring! It will surely make it easier for troubleshooting when (not if) the need arises.
I really like your idea of the ground buss bars – that’s a real money saver! I have been using terminal strips (lots of them) that I had from my previous layouts, so I didn’t have to spend any money; but the use of buss bars sure is a winner.
Thank you for the updates.
Alex
Rick
Peter
Plus the unexpected open circuit breaker.
Had to work around that issue on several jobs.
Some strict inspectors will require complete clear to the wall access. Dealing with that issue on one job right now. Trying to get a different inspector
9-4-11
Thaks for all the great feedback guys!
After completing some more track power wiring, I moved to installing my bowser 32” turntable. I have had this in the closet for about 2 years now (I bought it form a forum member – very nice exchange). When I got it home I realized that I really didn’t have room on my existing layout, so in a way this was a driver for this expansion. In order to complete laying track in the engine service area (just off the yard) I needed to place the turn table and roundhouse, I feel the rest will fall in around that.
I measures and cut a hole in both the homasote level, and the OSB to support the turntable. Additionally I reworked some of the stringers under the table for support.
Once I had the table fitting in the cut out, it went back to my shop to do some quick weathering. I painted the top to match the “sand/mud” color I painted the homasote with, and stated a series of cement colors on the pit. I also added some grimy black, and added some black ballast/coal around the edges as if it fell in over time. I have the detailing kit, and have started assembly and painting the detail parts. I will add that once I get back to the turntable.
I also decided, based on some of the feedback on the forum to purchase a mill house power upgrade, only wanted to do this once. Once that comes in I will update the table and wire it in. The paper template is for a korber 6 stall roundhouse I have to build.
I had also been meaning to install a skirt on the layout, and was unsure of what to do. I had read some posts about using landscaping cloth, so I thought I would give it a try. I have a pretty large area to cover, so although something like table skirting looks great, it would be pretty costly for my room. I did one of the peninsulas in about 30-45 minutes, and I am happy with the results.
As always comments and suggestions welcome.
Attachments
In the past few weeks I knocked off a few projects that don’t show much. I reworked some support brackets to make it simpler to install the backdrops I orders, and re placed some of the last wiring form the old layout that I still had in use.
I completed the skirting around the layout. Given I had such a large area I needed something cost effective. I used the landscaping cloth, and I am happy with the results. I didn’t realize what a different it makes in the look of the layout.
10-9-11
I continue to work on the turntable and engine service area. The first step for me was to install the turntable, and place the template of the roundhouse. With that done I was able to lay the rest of the track for the area. It is accessed from the top of the yard, and has two leads to the turntable, a siding for coal to a tower I plan, and a siding for MOW cars. There is also an area for a two stall diesel engine house I will ad.
On the other side of the layout is a curved trestle area. I spent some time adding more bents, and some cross section supports to the curved part. I placed it with only a few bents to get started, but wanted to make it more realistic with the right amount and spacing of trestle bent supports.
I have removed the turntable bridge, and am adding the detailing kit to it in the work shop. I hope to have that done in a few weeks. I have also started making the base for the roundhouse, and will start to build that.
I am looking forward to making it to York this year. I have work travel, but will be able to get there for Friday and Saturday, especially meeting some at the ORG forum event at the grandstands.
As always suggestions and comments welcome.
Attachments
Expansion looks awesome, thanks for the update. The black landscaping cloth does indeed make an effective skirt, may borrow your idea for my layout when I reach that point. Trestle looks great with the additional bent supports.
Looking forward to seeing the update to the turntable.
-bruce
quote:While I have used the MTH distribution blocks for the lower voltage distribution in my layout, I decided to build some for the track power. I used Ground buss bars from the electrical department of a big box store, cut it in half while my dremel cutting wheal, and super glued to a piece of Plexiglas I also got there. I drilled holes in the corners for mounting screws. And for about $8 I had a nice block
What an awesome idea!!!
Just a couple of quick questions. Please don't mind my ignorance but could you tell me what OSB and ORG are?
Phil osb is oriented strand board ... Compressed wood chips with resin to make a kind of plywood substitute ORG is spellcheck version of OGR, good catch.
10-30-11
Here is some work I did to complete the detailing of the turntable bridge. I picked up both the control house, and the stanchions for the e railing form Al at Millhouse River while at York. He has these new laser cut pieces and new brass castings. Very nice pieces, I think they look much better than the stock parts in the Bowser detailing kit.
Next stop is to build the round house. I have the outer walls together, and I am about ¾ of the way thru the wood supports.
As always suggestions and comments welcome.
Attachments
Very nice work, the turntable is progressing nicely. You really are creating a great layout, the pic's are making my mouth water so keep them coming.
The turntable detailing looks great. The planking around the track rail looks darker in some shots and lighter in the others, guess it's the camera angle and lighting.
The color of the base underneath looks very light, but I guess I'll have to wait to see it in context of the surrounding buildings and scenery.
Look forward to seeing your progress!
-bruce
I did sand the deck in different areas, and do a India ink wash, so the color is not 100% consistent. The pit is painted a cement color with overspary of grimy black, and some random coal pieces. I think once I get the surrounding area further along, I will weather bit more.
Always open for suggestions.
I’ve been delaying working on the detailing of my MRS turntable so I can do other more pressing things, but after seeing the fine job you did, now I feel like working on mine!
Good job!
Alex
While it looks thin, since no light comes from under the cloth, you don't notice the "holes" however when you are under the layout, the light from the room comes in, and you can see to move around.
Good luck, I got this tip here on the forum from others and it worked great.
11-27-11
I have like three projects going, the round house, backdrop and the harbor, all in some portion of completion, I have been alternating between them as I wait for things to dry in some cases.
To start I wanted to have a large roundhouse, I looked at several models, and decided on the Korber. I used the larger of the two kits, the 304, however I was unable to get additional stalls, but I was able to find one of the shorter kits 320. So this is a kitbash of two Korber kits together. I built up addition wood bracing, added a floor, and will add lighting before adding the top.
In another project I have finally started to install a backdrop. I went back and forth on what to do, was I going to paint one, or would I purchase one, and in purchased, from whom. After some research, reflecting on my painting ability, and viewing multiple people layouts and efforts on the web, I selected some from Backdrop Warehouse.
I went for the higher resolution, 12’ by 42” ones with a selection of seven 12’ sections that all match to crease a continuous backdrop around my layout. While these are not the least expensive, so far I am happy with the results.
Laser level on top of paint buckets
The back corner was rounded using 1/8” Masonite sheet.
To align it, I used an inexpensive laser level from HD, and to attach to the wall, I used carpet tape as suggested by Patrick H on the OGR forum, and it worked well for me. I still have more to do, including finalizing the seams, but so far so good. It really transforms the room and layout. I had guests over for thanksgiving, and received a ton of complements.
The third areas I mentioned was the harbor, you can see some of it in the above pictures, including the tank farm. I have some glass to paint and put down for the water.
As always open for comments and suggestions.
Attachments
Thanks,
Alan
Alan, I have not had any issues with the feed wires. These are thin, and near the bottom of the rail. The jumper that you see is a smaller gauge than the track feeders simply to tie the ground together.
How will you set the stop points on your Bowser TT. I've had trouble with their system and the Dallee System.
Stu
Backdrop looks great so far! It adds so much to the overall "feel" of your layout.
Weathering looks awesome on the Korber Roundhouse kit-bash, look forward to seeing it on the layout.
-bruce
Stu, I upgraded to the Millhouse River studios motor kit. This provides a geared drive system with a slow operation DC motor, a geared belt, and a large wooden gear to replaced the drive system that is standard with the Bowser. This makes manual control very easy, I can line them up by eye. I highly recommend anyone look in to this upgrade, I think it was worth the money.
Looking good !! Glad to see it all worked out. You really got one heck of a layout going there!
Thanks Patrick,
I have a long way to go to get to the level you have going. Thanks for the help.
12-5-11
Completed hanging the backdrop, I am really happy about the outcome, looks great, and really adds a lot to the layout. I have a cover flush to the wall for the power panel, I have to trim that out when I get a few minutes. The carpet tape method worked really well for me, and I also used a double back tape for the seams a well. A bit of work to hang, but far better than anything I could paint.
A NYC GP9 in the yard on the way to the engine service area
I spent some time on the harbor area. I completed the glass for the water. I used the method Dennis B covers in his book, the aquatex glass painted on the back side with rustolium camo green paint. I think it looks realistic.
A NYC freight makes its way thru are harbor area.
Still more to do, back to the round house soon, I may add some support to the elevated area I got from bridge boss.
As always open for comments and suggestions.
Attachments
Alan
That looks fantastic! You are doing an excellent job.
To reiterate what Alan said, any details you care to share about the 'aquatex glass' would be greatly appreciated. I certainly am going to look into that method for my bigger lake - (but what am I going to do with the two quarts of EnviroTex I already have?
Thx for sharing!
Alex
Here is a link to the type of glass I used aquatex
I got the ideas for this approach out of Dennis B's book.dennis brennan’s book
I measured the opening I made for the harbor water area, and went to a local glass store. They cut the glass to match the outline I had measured, and beveled and sanded the edges to get rid of any sharp edges. The buildup of the dock area is done using the pink foam, and I put a coat of "muddy sand" paint on it as a base. The back of the glass is painted Rust-Oleum CAMOUFLAGE SPRAYCOLOR: 1919830 - Deep Forest Green. Several light coats on the back to create an even covering. You can also paint the structure under the glass if you want to make sure you don’t have any reflections.
I believe the glass comes in sheets up to 72" x 84". This is used typically on patio type table tops, or shower doors.
I plan to build a sea wall around the harbor, and add some other details.
I am going to see this weekend how available that glasss is around here. Coincidentally, that is the same green I used for the arch structure and stanchions on my turntable (which you already saw - & thx!) Finished Turntable
When you said, "You can also paint the structure under the glass if you want to make sure you don’t have any reflections." Did you mean that it may be possible to see reflections through the painted glass? Just wondering . . .
THX!
Alex
What I meant was that if you have some areas on the glass that have less paint than others, and the table under it is a light color, you will get variations in the color.
If you paint the base the same or a dark color you will not get the same variation.
I hope this helps.
I also used the same Aquatex glass/Dennis B method Rich has on his layout.
I spray painted the underside of the glass and was very happy with the way it turned out.
However---it was a little transparent
I had a quart of ext. flat house paint tinted to match the camo spray and rolled a coat over the spray paint.
This gave the green surface a little more body/solid feel.
Also a little more scratch resistance/protection.
I could not be happier with the way the "water" on my layout looks.
Thx again Dennis B
Joe S
12-14-11
I jumped to another section of the layout to complete a project that has been on my list for a while; the elevated steel line leading to and from the future city hi rise area. This section started on my layout before I embarked on this expansion, and linked to a kitbashed bridge to make an inside curve around a post.
When I cut the layout apart and moved sections to be a portion of the new expanded layout, I ended up needing to run track under this to accommodate both a mainline and several passenger sidings to be part of the large station. It also had to have a curved section added to meet the new bridge in the harbor area. I have been using pieces of MTH stone bridge support and sections from a graduated trestle set that I had started with before which you can see in the following shots.
While this approach looked ok when I didn’t have track under the elevated section as it was before, I didn’t like the look it had now. I searched around to find something that would work and look good, and found several solutions from a few suppliers. I met Jim from Bridge Boss at York, and really liked his approach. We discussed what I was trying to do, and I left to go back and take some measurements and placed an order shortly after for some ELC – 6.0 supports, as you can see form the chart below, there are a lot of support choices.
Now I want to point out this elevated section is a kitbash I did for the steel girders using upside down HO atlas bridge sections, and I simply added the Bridge Boss supports, they do however have a nice system for elevated sections if you are starting with out anything, I think others including Rich Batista have posted pictures on that. These supports come flat packed and require some simple assembly, one was assembled in the box as a sample. I painted them flat black using the rustolium camouflage paint to tie in with the black girders I used before.
I am happy with the outcome; I think it looks much better than before. Still more to do, back to the roundhouse soon, and the harbor, the wall will be next I think.
As always open for comments and suggestions.
Attachments
That looks REALLY good. I think eventually I will look into something along those lines for my “L” train.
You have a long(er) span without supports, about where the lower track exists the elevated supports. Do you plan to add a support there? It appears that you could cut (kitbash) one of the supports and make it narrower so it won’t interfere with the lower track.
I had something similar, but had to make the support wider to straddle the lower track. In my case, I was able to turn this section into a tunnel. But I have another section where I had to have a very long girder span without regular support, so I made up a 'concrete' column, and was able to add it without it interfering with the lower track. (With Big Boys and DD40s the clearance around curves (inside and outside) sometimes is a challenge. (Speaking of which, Santa should be bringing me a 'Challenger'!)
Good work – keep the pictures coming.
Thx!
Alex
12-29-11
Thanks for the nice comments guys.
Alex, yes there is a bit larger gap there for the curved part. While it is not really needed for support, I think I will get back to it from an aesthetics point of view. What I think I need is a bit wider support (these are the narrowest from Bridge Boss)t so I can align the aisle side up with the others, and cross over the lower level track.
The roundhouse is built!
After getting the track down, and turntable installed in my engine service area, I moved on to the main structure that will be there, the Round house. I used two different size Korber kits as additional stalls for the larger one that I started with were not available any longer. I had to build up addition wood bracing at the two kits came with different sized wood.
I built the round house in the shop area for easy access. The kit in built on a ¼ plywood base (it is sitting on saw horses with a piece of scrape OSB as a work table). The interior floor is made of painted foam core. I added LED lights in side, I added some addition wood cross pieces as a way to hold them and run the wires. The wires are consolidated at the front right side of the roundhouse to crease a main feeders for the +12VDC.
Since this was a kit bash of two different sized units, the sections are slightly different widths, this caused for a bit of cutting in the roof windows, and I needed to create a custom roof. I used matt board, and covered it with the fine ballast that came with the kits for the roof cover.
So far so good, now on to installing it on the layout and wiring up the power for the tracks and the lights.
As always open for comments and suggestions.
Attachments
1-8-12
Thanks for the kind words Pops!
Well I have been working on a few projects. I have been meaning to add a drop down door access to the electrical panel area, and while I built the bench work to support this, I didn’t complete the task. Additionally I had installed the backdrop over the panel with the intention of cutting it out and attaching to a removable panel.
Here are some shots of the work in progress, and the completed set up. The door drops down to create the opening.
I have a bit more details to fool with, but for the most part I am happy with the progress.
The second thing I was working on was to get the round house on the layout and the track power wired up. So far so good.
As always open for comments and suggestions.
Attachments
Outstanding!
and your work is professional.
I'm kit bashing a roundhouse also and I need to make my
own roof for it. You said you used matt board, where do
you get it.I never heard of that product.
THANKS ALEX
I really like how the TT and the roundhouse look; you did a fine job!
I can't remember now; what size TT did you get?
Also, does that electrical panel have the breakers for power into the house (or train room), or is it train control stuff?
Thanks for sharing.
Alex
It's never a good idea to totally conceal the panel but if you do it should be marked so that if your not there it can still be found during an emergency.
Great work.
David
Once again your layout is awesome and
keep the photo's coming.
THANKS ALEX
Glad that helped Alex, I really like using that material, it worked really well for the roof.
Based on David’s good suggestion I made up some signs (after a trip to the store for more ink for the printer).
I have started working on the harbor area of the layout. I ordered some plastruct detail parts, and started to add them to the storage tanks. I plan to add some cat walks, ladders and piping.
I have also started on the steel seawall that will line much of the harbor. I started by laying out a piece of duct tape sticky side up, and laying out cut pieces of screen framing. The framing is cut to 2” length complements of Patrick H. I intend to paint and weather it as well.
As always open to suggestions and comments.
Attachments
I feel better Now!!!!
If there was ever a problem and your wife was there and you weren't I'd be darn nice to have that sign.
Anyway buddy, you've put in a lot of nice work there!!
I know you've got more to go but it's lookin good.
Best
David
The UPSIDE Down HO scale bridges for the El line... very nice concept.
I will say those were a professional challenging problems for my Rig directly underneath down the avenue in NYC at times. Some of those posts are offset in places where if you are not paying attention at nighttime, you will run head on into one.
What an excellent idea for the steel sea wall! I'm sure that's going to look great once it's mounted and weathered. Curious to see how this fits in with the rest of the layout.
Cheers.
-bruce
Rich, Just discovered this post and all I can say is Wow! What a great looking layout. The room alone is awesome. Must be a new house with a great basement like that. Seems like you are making great progress too. The backdrops look good, you did a real professional job putting them up. Best of luck as you move on.
Interested how you decided on placement distance of the roundhouse from the turntable so the tracks aligned.
Also what you used for the great trestle piers, etc. Are those from a maker of such parts?
Rich, you are making great progress! Keep up the great work. I'm so pleased to see you and others successfully using many of the ideas presented in my book.
Layout looks awsome! do you have more new Pictures that?
Matthew
Look at my layouts Progress below.
Everything you've done Rich looks Great! Thanks for sharing. ![]()
What I would like to know is, Where in that basement is your wife's space?????????????
Thats one heck of a layout..
I have been making some progress on the layout, especially in the harbor area. In a few of the shots you can also see an Atlas bridge I added to the double track main lien in the back.
First I painted and installed the seawall I had started the construction on before, I capped it off with some painted wood as a top plate.
I additionally dressed up some large tanks I had and did some weathering. I have a bit more to do on the landscape here, but it is a start. I also installed some flashing red lights in the tops of these tanks, but have not connected the power yet. The second tier behind these tanks will be done as well, I started with the front row.
I also added the coaling tower I ordered at York, it finally came in. I have a ash hoist to add next. I am happy with the craftsmanship, it is really nice.
As always comments and suggestions welcome.
Rich
Attachments
Looks fantastic Rich!
I found these pictures when googled "Steel Sea wall" It might help when you caulk where the aluminium meets the glass and put the final touches on it.If i had to do it i might put masking tape along it before i caulked and finished weathering it.
Just an amazing Harbor!!
Attachments
Rich,
Love the water! Question? Can you tell me what the widest dimension of your round house is from the outside radius point to point? And could you also tell me the measurement from the center back radial wall to the TT including the tracks from the TT to the RH is? I am currently laying out my TT/RH area and those dimensions would be very helpful.
Rich that sea wall looks awesome, wow great job.
Looks so real.
Rich,
Wow, now that I can look at the sea wall in context with the water, it came out great! Looking forward to seeing the coaling tower with scenery!
Thanks for the update.
-bruce
How much time do you think you have invested in getting it built to this point, Rich?
Rich,
Your layout is looking fantastic!
I just love the harbor.
Dave
Rich,
Your efforts are surely paying off - everything looks great!
Did you paint the bottom of the Aquatex glass camouflage green? I am about to start on mine, and only hope that it will turn out close to as good as yours did (and make Dennis B. proud)
Thanks for sharing.
Alex
Great work. The harbor scene is a real eye catcher.
Thanks for the nice comments guys,
good call on the caulking Patrick, the gap was larger than I liked.
Alex, yes I used the green camo paint, you need to be careful as it can have some thin spots that only show up when you place it over something light in that the light int he room reflects off the lighter color below. It is critical to get good coverage, also good to paint the table below a similar dark color.
Greg,
I will look on the round house and measure. I used the paper templates with the Korber kit, so the width and depth of the actual roundhouse is about the same. I installed the track on the board I built the round house on, and left them long and moved them into pace and cut at the edge of the turntable. May not be the best way, but worked for me. I will re-post when I get the measurements.
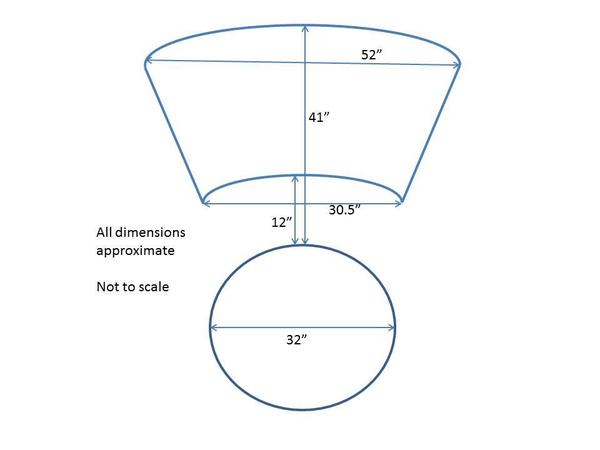
Greg asked about dimensions of the round house placement.
I went downstairs and took some measurements, and this is what I came up with, please note this drawing is not to scale.
When I placed the round house, I did a bit of messing around with the paper template of the round house and the turntable, and that helped me place the turntable. After marking out the rough placement, I installed the turntable, and then built the round house in the shop.
Once built, I again did a bit of moving around to get the final placement of the roundhouse.
I hope this helps Greg.
Looking forward to seeing your progress.
Rich
Attachments
Rich,
Thank you for posting this as this is very helpful to me. I'm going to make some templates to help me get a better visual on my TT placement.
My 32" ROSS turntable is already in place and I'm building the flatwork which surrounds it. The Kobler kit roundhouse will be built to go with it.
Your diagram is very helpful and I think the suggestion to "fit up" the trackwork to a diagram of what the built footprint will be is the only way I'm going to make mine come out correctly.
Thank you!! Very helpful.
Hey, Rich!
Where are you with your fine layout?
Haven't heard for a while, and was just wondering . . . ![]()
Thx -
Alex
Hi Rich, You have made WONDERFUL progress on your layout. I like the Sea wall piling and the Aquaglass look.
Good Luck moving the Korber items and getting the production restarted.
I will be driving out east before too long to bring the Korber Power Plant and office complex, Coal Mine and Grain Silo Complex back to Micigan. Hope to rent a Yukon or Surburbon to haul them back. Alan made them on long base sheets and they will fill a 4'x8' cargo space.
Very nice job on your 6 stall RH.
Rich, Thank you for the reply. The material looks good. I think I will get some and see how it works for me. Thanks again.
It has been a while since i posted an update, partly working on moving and res starting the Korber Models business, partly I hand't taken some pictures of work done.
I was kind of at a stand off on what to do for ground cover in my engine service area, but after some encouragement by some of the high railers here in Cincinnati, and a visit to the spectacular layout of Bill Bramlage's I got motivated to move forward.
Below are some photos of the ground cover-ballast I used, and some photos of the new Weaver water tower.
I have more work to do, but I am happy get some progess.
Attachments
Very nice! Great looking roundhouse. Where is the coaling tower from?
Hi Rich looks beautiful, glad to see your making some progress
on the layout.
Thanks for sharing, Alex
Rich, fantastic progress on the roundhouse scenery, looking great!
-bruce
Very nice! Spent the last hour observing your pictures.
You used Woodland Scenics inclines? How far did you go upgrade or down and how high did you go with them?
Your Oil Tanks are nice with the man ladders on the side with top cages. Did you build or buy the man cages for the tanks?
Rich,
Looks great! Gives me good ideas on what to do around my steam engine facility.
Thanks for sharing -
Alex
Rich, the layout is looking amazing. A question regarding the aquatex:
I believe you said you have a seam in the glass underneath the lift bridge. How visible is this seam when the two pieces are placed together?
That is a nice engine facility, the coloring and ballast work is fantastic. Great job.
Rich, the layout really looks good. Been awhile since you updated. Maybe you have MORE TO SEE ![]()
Thanks for the proding Pops...
I did some small items, and worked a bit on more ballasting. I added a water column near the coaling tower., I will look to get soem of those pictures.
Here is a new structure I an working on. This is something I see all the time in HO, but not as much in O, a shallow relief building. Kind of like a flat, but with some depth.
This is intended to be an apartment type builing that you might see backed up to the tracks. The roof like is the back of the building. I have some down spouts to add, and some fire escapes, and steps, so this is a work in process.
It seems like a lot of times you see a store front as a flat up against the wall with the tracks in front of it, but I think more likely the tracks ran behind the store in my case the apartment.
As always comments and suggestions welcome.
Attachments
Hi Rich very nice building, is it a laser cut kit or a plastic kit.
Anyway nice to see you working on the layout a little.
Thanks, Alex
P.S. Hope to meet you at york
Hello Rich, I have a few questions on your post dated 12-14-11 about your steel elevated line. I like how you used the HO girder bridge upside down.. It looks like you have the track sitting on something that rests on the girder bridge, what is sitting on? And what did you use for the guard rails? Thanks for your help! Your layout is awesome!
Ralph
Thanks guys!
Ralph, I appreciate the comments on the elevated section. lets see if I can help. The upright supports are from bridge boss, I purchased them as a kit, simple glue together, then paint with the rustolium camo flat black, in fact all the parts are painted the same color.
The HO girder bridge sections are placed upside down over a 3/4" x 1 1/2" piece of wood (size is approximate), and the sections are screwed into the wood using track screws (I use atlas).
There is a walkway on both sides of the section for most of the length. This is made by placing a square dowel piece under the track, between the ties. In my case, as I am using Atlas track, this makes a support that is about level with the ties, but stick out a bit more. I use a piece of strip wood glued tot he wood support that is about 12 scale inches wide (just a standard piece of basswood from Hobby Lobby).
The railing is from plastruct, and glued to the side of the strip wood at the bottom. The entire ting is painted the flat black as noted.
Pretty straight forward, the only real attention to detail is to either build it in place, or carefully measure the ties spacing. In order to fit the cross supports under the track, and align to the ties it works best to build in place, then once the glue is dry remove for painting, and re install.
BTW the key to cost on this it to look for sales in walthers when they have a reduced price on the bridges, and measure how many you need. I think they are like 50% off some times.
All that said, I started this project using a different base support, and I was spanning a larger distance between supports. If I had to do this over, I would have purchased the entire set of parts from Bridge Boss. The have some very nice elevated section sets, and you can have them built up, or as a kit.
I hope this helps.
Rich, This helps a lot! Thank you so much for all the information and the tips. This has been what the wife and I have been looking for for our elevated section to our layout. Looks like it's pretty easy to do. Thanks again for your responce and help.
Ralph & Laura
Hello All, Happy new year!
It has been a while since I posted about the layout. Much of my free time has been spent on the Korber Models re-launch. However I have taken a bit of time over the holidays to work on the layout. A combination of seeing some of the great work that Bill Bramlage has been doing on his layout here in town, and a great post I saw by Gustavflyer on stone trestle supports got me motivated to focus on the harbor area.
The goal was to cover the foam supports for the tack with some sort of wall, complete the sea walls in the harbor, and get some ground cover on.
I also started the basic structure for the freight house that will occupy one side of the harbor. This will ultimately be a corrugated tin building, not sure of the roof however, either tin, or tar paper.
As always open for comments and suggestions.
Attachments
Awesome!!! I love stone walls! it look SO real!!!
Hi Rich Happy New year
As soon as I saw your thread I rushed to take a look. I must say WOW WOW WOW
I love your layout and the superb craftsmanship that you're doing. Simply amazing
Please keep the progress photo's coming.![]()
Thanks, Alex![]()
Hi Rich, Happy New Year!! Your layout details are AWESOME. Keep up the great work.
Happy New Year Rich! Looking Great!
Rich...I really like your harbor. It seems that you and I have been working on the same kind of projects!! I had posted some harbor pics just a few days back. I like the stonework....it looks like some of the nice stone kitchen and bath tiles from HD or Lowes...???
Thanks,
Alan
Very nice work! The entire scene is really a work of art, I love the stone work as well...great color and texture.
Thanks for the nice comments guys.
The stone work uses a 12x12 mosaic tile from Lowes. It was covered in a post earlier by others that got me focused on this area. I had been wondering what to use, and didn't really want to use the foam wall pieces this close to the front of the layout.
I thought it was a bit pricey at about $14 for a 12x12 piece until I looked at the foam walls for $12.50 for a 12.5x5 or about double the cost of real stone.
Fabulous, Rich!!!!!
Looking forward to seeing you and you wife again in York.
Peter
Looking great!!!
Very nice!
Rich - when you used the double backed tape to hand your background did you just use it on the top of the mural and let it hang down or did you place the tape in other places?
Paul
Fantastic Rich,
that is really coming together nice!
so that stone on the front face of the picture above is from lowes?? wow. I have a wall im working on and that is a great idea. you have great skill. I just spent time looking at all the pics of this. it must be amazing to stand back and take it all in. great stuff
Rich,
I stumbled upon this post last night and all I can say is, wow. Such a wonderful job. Just getting back into this, I can tell you that your layout gives me a lot of motivation, but at the same time says "you have a long way to go Mike." Anyway, it looks great!!
I missed this the first time around (too busy stuffing myself with New Year's dinner I suppose). It looks fabulous, Rich! I love the stone work!
Hi Guys,
With some of the Korber stuff and a few track changes, I had not had a chance to get back to the layout structures in a while.
I made some good progress on my freight warehouse this weekend.
This is a scratch built structure to look like a "tin" structure.
As always comments and suggestions welcome!
Attachments
Hey, Rich!
That looks great! By opening the pictures in a new window and maximizing the window and then the picture, I was able to plainly see the detail of the 'tin' panels. What did you use for these? And your weathering makes them even better, of course.
Thanks for sharing.
Alex
Hi Rich,
That looks fabulous, very nicely done !!!!!!!!!!! the layout looks awesome too
Thanks, Alex
Thanks Guys,
Alex I used sheets of JT corrugated material (Plastic). I cut these to scale 4x8 ft size (1x2") and glued them to the foam-core structure. So yes there are lots of small parts.
I then painted it with a flat grey primer, them weathered with some powders for rust, over sprayed a mist of flat black, and hit it with dulcote.
Again thanks for the comments.
Rich,
Awesome work! That is a great structure. I also see you paid Lowe's a visit (brick wall)![]()
Cesar
Great looking layout Rich! The starkness of your freight warehouse is fantastic. Please keep posting pictures as you procede with your layout.
Finally got back over here to see your progress and boy does that warehouse look great. You sure cut out a lot of 4 by 8 pieces!! I am enjoying this thread....please keep the updates coming...
Alan
Finally getting back to my engine service area. Since before we purchased Korber, I really wanted to ad the Diesel Shed to the layout. Well now I have, and started to rework the instructions, like many of the kits.
Here are some shots.
Attachments
Nice service facility Rich! Looking good.
Rich, the service area is coming along nicely. Looks great ![]()
Andy
Rich,
You have done an outstanding job with your layout. The Diesel Shed looks great!
Angelo
Looks great, Rich!
Very nicely done!!
Very nice servicing facility.
Chris
Rich, love the progress!!! Thanks for keeping us posted ![]()
Bruce
Very nice Rich!!
Alan
We, I have been a bit slow in progress on the home layout (too much Korber work I guess)
I decided to kit bash a Korber 315 Grain Silo to add to the layout. I added a double set of silos and widened the main structures. I also make a new shed roof to make it wider.
I have had this Yard office sitting on the shelf for years, and decided this was a good are to install it after some weathering. I intend to add some me arround the fire.
This small areas between the edge of the layout and the mainline on an elevation was puzzling to me what to do, and then I decided to have a smalls stretch of road with some company houses on it. I painted and weathered these. I have some more work to do, but ok for now.
I have been planing on adding more of the stacked stone wall to the elevated area at the back of the layout, and finally got to that along with some of these other items. I still have to weather, but now this part is complete.
I stopped by Dixie Union Station yesterday while out running some errands, and saw this sw1 NYC that I have been looking for something like this to runaround my harbor area I "jumped of the shelf" at me, and I had to buy it.
As always comments and suggestions welcome.
Attachments
Hi Rich,
Everything looks great, very well done!!!!
Thanks,
Alex
Rich,
"Bit slow..."? Looks fine by me, and very well done!
I have the yard office too, and added hobos around it. I did not have a good spot next to a track that was close to the edge of the layout, so I had to add a ladder as the make-believe link between the converted caboose and the track. Actually, the idea was Rebecca's (my 15-year old neighbor), and she also added the guy at the top of the ladder for better effect.
Thanks for posting!
Alex
(click on picture for better detail)
Attachments
Rich looking very nice. Keep up the good work and thanks for sharing.
gotta work to play Rich !
Really coming along nicely. Great job on the silos and the company homes.
Great progress Rich. Thanks for the update!!
Thanks guys for the nice comments.
The color on the silo is rustolium camouflage khaki with a lite over spray of camo flat black to give a dirtier look.
Very nice.
Hi Rich. I love that stone block you have used quite extensively. Is that the same material found at Home depot in the kitchen section.
Rich,
Looks good! I bet you have some time in that retaining wall!
Dave
Rich....everything is coming along beautifully!
Alan
Thanks Guys for the nice comments.
Dave, It actually goes together pretty quick since you start with 12" x 12" sheets. I used some construction adhesive to hold it to the walls.
I used a larger brush with the India ink wash to weather the walls.
I got around to adding the scene near the company house areas. I have a bit more work to do, but thought this would be a good place for a road side stand.
Attachments
Hi Rich,
Fabulous scene, very well done. Lots of nice details, like the scale,and the truck.
Thanks,
Alex
Rich very nice. Thanks for sharing with us.
Nice work Rich.
Great craftsmanship.
Hi Rich.
Your photos make everything look so realistic. Great job.
jim r
Great, very cool. Thanks again for the evolution of your layout and great posts!
Very cool...I love the details.
Hi Guys,
I had a chance to place the updated Korber Sand house and tower on the layout today. The kit can be built with the new tower next to the sand drying house, or away from it.
Attachments
This kit has been sitting on my bench half finished for some time, and I decided to push through and complete it.
This is a small town oil company.
Attachments
Rich the addition of the sand drying house and sand box(cats will love it) looks very good. The Bill's Oil Company looks awesome. You have two excelent new products.![]()
Here is another addition to the layout, SAP Bandage Company named for my wife's mom (Bills was for her dad, a former Southern Pacific guy in Oregon)
This is named SAP Bandage Company, but this is a Korber Kit, number 911 Perfect Tool. I needed to build one up for better photos, and it fit int he space I had nicely.
I Installed some lights in side but didn't have it turned on for this shot.
Attachments
Looking good Rich!
While I have been posting some progress on new models, I have not posted much lately about my layout.
I have a "mountain" with a small amusement park on the top that has several main lines pass behind it that needed a view block of sorts.
I was not sure of the best way, but on my last visit to Bill Bramlage's layout I finally had the idea of using some industrial buildings.
Here are some structures I put together that create some adjoining factories.
I have not really decided on the name of all of it yet, and I intend to add something behind and above it for a more complete block, but I think we are off t a good start.
As always suggestions and comments are welcome.
Attachments
Looks really nice Rich!!!
Alan
Hi Rich,
Looking great ![]()
Alex
I just reread this entire post and must say that this is an absolutely beautiful layout. Your craftsmanship is superb. The photos are amazing. I am just wowed.
Rich, this is the first time I have seen this thread. Your layout looks fantastic. Really nice details on the structures.![]() I will have to keep following this post.
I will have to keep following this post.
Thanks for sharing your layout with us all.
Well done, Rich!
Peter
Thanks Guys,
Progress comes in bursts.
Hi Rich!
Nice to see your posts again.
"Here are some structures I put together. . ."
What structures are those? They look very nice.
Alex
Thanks Alex!
The left most is a kitbash I did with parts from the Korber 315 Grain Silo put together, and some other material at the base.
The center building is using parts of corrugated material, on a foam core base.
The building to the right is something new we are working on that would provide a modular flexibility to make industrial structures of various sizes. This one is cement, but it can also be cement and brick.
Let me know if this helps, or I can answer mote questions.
Originally by Korber Models:
The building to the right is something new we are working on that would provide a modular flexibility to make industrial structures of various sizes. This one is cement, but it can also be cement and brick.
Let me know if this helps, or I can answer mote questions.
Awesome! I am looking forward to this in O scale in Both cement and cement & brick facias! MAybe you can offer something in the relm of WS 4 and 1 modular building kits:
http://woodlandscenics.woodlan...ow/Item/35300/page/1
Well, I finally took some photos of two new additions to the layout. These structures work together, one one the left is a factory/ office that goes with the cold storage structure on the right.
The main line goes under the structure, and we will add a icing platform to the yard in front of it.
I have more details to add, but this is a start.
Attachments
She's a brick......house! ![]() Looks good Rich, that's a lot of brick walls!
Looks good Rich, that's a lot of brick walls!
Rich your layout is amazing! I noticed you said you shop at Dixie Union Station...are you near Mason? I live in Columbus but have been to EnterTrainMent Junction a few times and shopped at DUS.
Will
Thanks for the nice comments
Still lots of work to do.
I live in Milford, and work in Mason. When I have time I can go to DUS at lunch.
Entertrainment Junction is a great place to visit as well.
Looking good, Rich.
Great structure!
Peter


