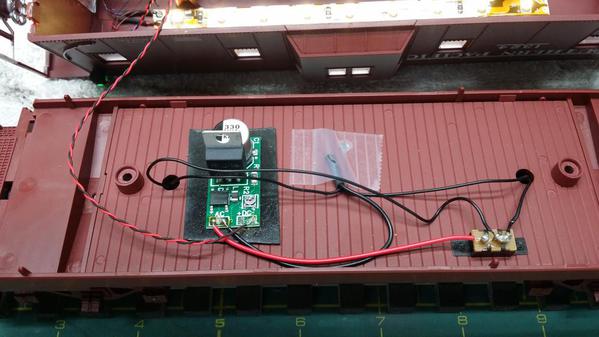
A lot of threads have been posted on this forum regarding the use of LEDs to replace incandescent lighting in passenger cars and cabooses. Threads especially by Gunrunner John have been prolific but scattered about, so I have compiled them into a single file that you can download. Thanks John for letting us share your LED lighting circuit.


Click on "Passenger & Caboose LED Lighting-2.pdf" and save it to your desktop. Enjoy!

Attachments

Last edited by Bobby Ogage
Original Post

Replies sorted oldest to newest

I just completed my first passenger car conversion to LEDs using John's circuit with R1 at 100 Ohms and a strip of 12 3mm LEDs. The passenger car is a Rail King 13 inch 20th Century Limited streamliner.


Although I used warm white LEDs, the light appears to have a pleasant green tint which I would expect for fluorescent lighting. A test run of car in a train was normal with no DCS issues and no flickering.


For heavyweight cars and cabooses, I will try covering the warm white LEDs with one layer of transparent yellow Mylar tape to make the light appear more like incandescent. To eliminate dark spots at the ends of the passenger cars, I am going to separate the LED strip into 2 pieces of 6 LEDs and spread them about 1 inch apart at the middle of the car.


I did not put the circuit on perforated board so I could readily shape the circuit to fit into the car.


I will post photos of the second LED conversion I have just started, so more to follow.


Overall, the circuit meets my expectations and it is fun to assemble. Thanks again John.

Last edited by Bobby Ogage

Subject to the limitations of current and power dissipation of the LM317T, you can use pretty much any load on the outputs.  Note that running 18V track power and 45ma (max output) across some parallel LED's will generate a lot of heat in the LM317T, that would be about 1 watt of power dissipation.  The DC voltage after full-wave rectification and filtering would be around 25 volts, and you'd be dropping 22 volts across the LM317T part, and I'm assuming the full 45ma of current.  That's .99 watts, basically one watt of power.  That would probably require a heatsink on the power module.

There's nothing untoward about dissipating 1 Watt of power in a passenger car.  In most cases you're replacing incandescent bulbs that dissipated 5-10 Watts per car!  Just keep the LM317T (and heatsink if used) away from plastic parts.


If you're willing to work at the component level - soldering individual LEDs and such (vs. using the 12V LED strips) - you might be able to use a mix of parallel and series wiring of LEDs and still obtain "full" brightness at low conventional track voltages.  If you are willing to share what you're trying to do, GRJ's circuit is quite flexible in what it can drive.

I just want to convert my passenger cars and cabooses to LED lights, but I want them to look good in conventional and command as I run both regularly.  And I want to add marker lamps to the cabooses and observation cars.  Instead of buying more stuff for a while, I want to upgrade and spruce up what I have.  At some point I'll convert all my locomotive's lighting to LED as well.  Having LED lights on my VL Big Boy has spoiled me with how wonderfully nice and bright they are in command and conventional that I what all my stuff to be that way.

You may want to consider some of the small switching power supplies for the task if you're going to want to run them parallel, they're a better fit for lower voltage and higher current applications.  My module was primarily designed for command and the 12V strips. 


I'd consider this 80 cent module, a 330uf capacitor, and a bridge rectifier.  For almost any possible track voltage, this will put out at least three volts, so you could run parallel LED's from it and carefully adjust the voltage for brightness.


3A DC-DC Step-adjustable Down Converter


Finished putting John's board in my caboose. It powers the LED strip and the Tomar marker lights. Then everything got a little black paint to disguise it when looking through the windows. These boards are great for the guy with no electrical knowledge, and the guys looking to save some time on a project...... and soldering really isn't that hard


20150224_121732

20150224_121745

20150224_122558

Attachments

Images (3)
  • 20150224_121732
  • 20150224_121745
  • 20150224_122558

Yes, I prefer my stuff weathered...... all of it


Stan the Tomar markers came with a 2200ohm resistor for each marker and a bridge rectifier. I didn't use the BR as it wasn't needed (like I know what I'm talking about), so I just attached a resistor to each marker, and then hooked up the markers to the lead going from the board output to the LED strip, just to keep those marker leads really short. The marker wires are actually soldered to the DC output lead that connects to the LED strip. I guess that's how I would explain it. Track power is at 18 volts, and the regulator was turned down to about 9 volts for my desired light output.


I'm sure you and John would do it better/different, but it works, the wires are hidden, and the markers are bright, but not too bright.

Last edited by Former Member
Originally Posted by Laidoffsick:
I'm sure you and John would do it better/different, but it works, the wires are hidden, and the markers are bright, but not too bright.

I get it now.  The key is inserted the marker at the correct point to take advantage of the DCS signaling inductor and the flicker capacitor on the lighting board.  Well done.

Add Reply

Post

OGR Publishing, Inc., 1310 Eastside Centre Ct, Suite 6, Mountain Home, AR 72653
800-980-OGRR (6477)
www.ogaugerr.com

×
×
×
×
Link copied to your clipboard.
×
×