Was looking to add some shelves on one side of our layout from the floor up to the table height. If anyone would like to show me photos of their's I am hoping to get ideas!
Original Post


|
|
Was looking to add some shelves on one side of our layout from the floor up to the table height. If anyone would like to show me photos of their's I am hoping to get ideas!
Replies sorted oldest to newest
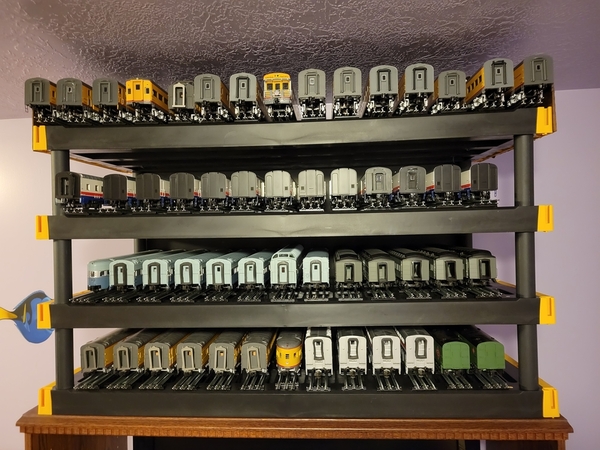
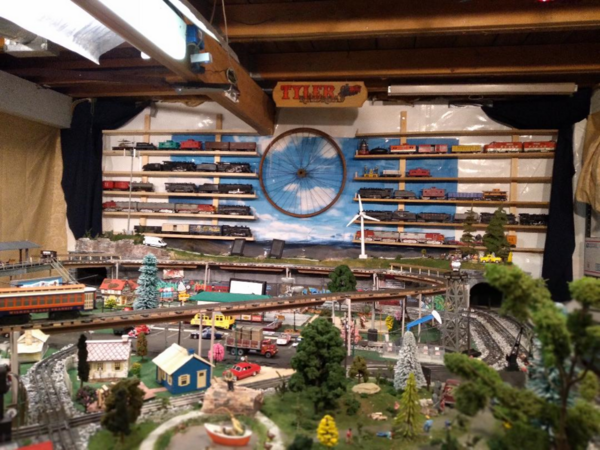
All around the RR.


I had my nephew build these for me after seeing what fellow forum member Alex M. had done with his layout. With wheels on it they can be swung away from layout if work needs to be done under it.


@Captain John posted:I had my nephew build these for me after seeing what fellow forum member Alex M. had done with his layout. With wheels on it they can be swung away from layout if work needs to be done under it.
Those shelves look great, any issues with the two tracks per shelf and reaching the back row?
Also, is that a custom built test track on top? I need to make one of those and curious how that was done?
Here’s mine. Glenn Snyder shelving attached to 1/4 inch plywood recessed between Mianne Benchwork legs:

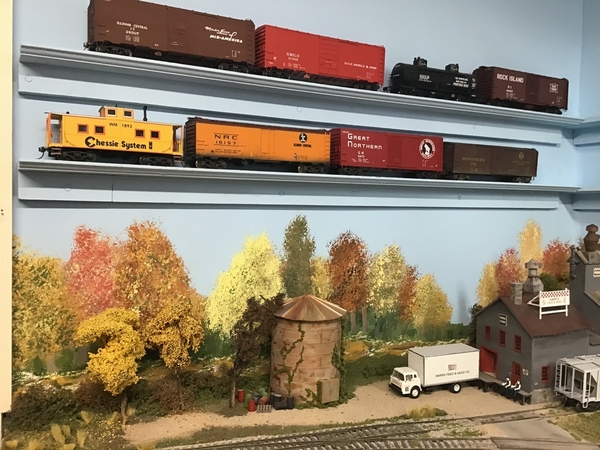
I use the area under my layout for storage so I placed shelves over my backdrop. I painted them my sky blue color and I am happy with them. I made the shelves in my wood shop.


Please keep in mind that I'm just a small operator.


 Some of these pine and poplar shelves are 35 years old.I wouldn’t want to build them today with the price of wood.
I use Glen Snyder shelves. I've run out of wall space for shelves...


18" & 21" Passenger cars were taking up too much wall space. So we recently modified a shelf to hold 54 cars.

Malcolm, I like your idea of painting the shelves themselves the same color as the wall - helps the trains stand out quite a bit!
After looking at all this, I'm too embarrassed to show my lowly aluminum shelves...all I can say is that we are sick, sick people to collect all of these toys...oh my LOL
@Don Beck posted:After looking at all this, I'm too embarrassed to show my lowly aluminum shelves...all I can say is that we are sick, sick people to collect all of these toys...oh my LOL
I am even more embarrassed to show my lowly aluminum shelves, especially since they were used when I bought them. Approximately 1/2 of them were turd brown in color, so I had to repaint them white.
I'm showing these to my wife and saying..."see honey, there are people who have more trains then me..." Ha
@c.sam posted:I've used baseboard molding for years and have only recently acquired some aluminum pieces as a gift from a good friend and Forum member.
Very nice ideas, thanks everyone!
I never thought of using molding, that's a great idea.
About how often do you have supports to prevent much sagging?
My favorite pieces… if not Sunset 3rd Rail, it’s Key or PSC brass.


@Nation Wide Lines posted:I am even more embarrassed to show my lowly aluminum shelves, especially since they were used when I bought them. Approximately 1/2 of them were turd brown in color, so I had to repaint them white.
I see way too much open wall space... ![]()
Uh, gunrunnerjohn, c.sam, and Nation Wide:
Can you say, “Trains to excess?” Geez!
@Yellowstone Special posted:Uh, gunrunnerjohn, c.sam, and Nation Wide:
Can you say, “Trains to excess?” Geez!
All I showed was the train room, you should see the rest of the house!
NWL
Awe cool!
@steam posted:Very nice ideas, thanks everyone!
I never thought of using molding, that's a great idea.
About how often do you have supports to prevent much sagging?
Fairly close as the moulding is quite flexible. I use 'L' brackets with the piece against the wall placed UP so that it is not visible below the shelf - the trains themselves obscure the bracket easily. You could also run some small quarter-round against the wall to add further support and use less brackets.
")
")
@Nation Wide Lines posted:I am even more embarrassed to show my lowly aluminum shelves, especially since they were used when I bought them. Approximately 1/2 of them were turd brown in color, so I had to repaint them white.
Nation WIde Lines - Not to worry, with the vast quantity and quality of beautiful train items here, rest assured that no one is scrutinizing your shelves!!!! No foul smells here either.... :-)
Please note that I did not repost ALL of his photos; just one to reference my comments thus saving everyone useless extra scrolling when viewing this thread!
@Nation Wide Lines posted:All I showed was the train room, you should see the rest of the house!
NWL
OMG!!
Here is review of how I built my train shelves, complete details at OGR link below on post 36. It shows details for shelves under windows too.
https://ogrforum.ogaugerr.com/...ra-027-layout?page=4
Train Shelves - Economical, Wall Friendly and Moveable
Three wall, easy to build, economically, wall friendly and moveable train shelves were made in the 1980's and were installed in a hall ways and/or a spare bedrooms of three prior houses and the current house. Each shelve is made in two sections each to allow moving thru doors and up stairs. They also stand on the floor and are held to the wall by two 1" x 1" angles screwed into a wall stud per section, meaning only two small holes in the wall are required. The shelves are backed with 1/8" Masonite, with some strips of white felt glued to the back, to protect the wall. The shelves have router grooved surfaces to hold the train wheels and keep the cars and engines from rolling off. The design has one wider 1" x 6" wide shelve, one half way up and one wider 1" X 8" top shelf to allow display of wider accessories or other items in addition to the typical train cars and engines.
I filled knot holes and nail holes with DAP Plastic Wood Latex Based Wood Filler, Natural and primed the shelves and backing Masonite with Kilz primer probably oil based but would use latex now. I chose to paint the shelves glossy off white latex paint. I think the light color makes the train engines and cars show up better and makes the room brighter and more cheerful. I use a 3 in x 12 in piece of clear Saran Wrap on the shelf where an engines go to keep the white shelf clean of grease from the wheels.
View of one shelve shown below The 8 inch wide shelf is shown on top and one 6 inch wide shelf is in the middle with the picture framed pictures and milk car and cattle car accessories. There are some powered track to operate the accessories and operating cars on this shelf.

Charlie


My dad custom made my shelves. The shelves are 1x4s that he ran through a dado setup on his radial arm saw to produce slots spaced for the wheels. The backing is bead board and the edge trim is off-the-rack stock from Menards. The colors are standard paint colors from Lowes that match the original green and cream Lionel Hellgate bridge. I have four of these shelves (all of different sizes) on the available wall space in the train room.
@SANTIAGOP23 Your images don't seem to be loading which is a shame because you probably have some beautiful models on display.
Most of my trains are either on the layout or in storage waiting for the next layout expansion. The few trains that I have on shelves are those I want accessible but run only rarely. So my shelves are more for storage than display.

Like most hobbyists, my modest collection includes many more trains than can be accommodated on sidings at my layout for "parking" until called up for service. I allocated the four spur sidings on the layout to the LionChief trains for my great grandkids - THOMAS series trains plus a Dinosaur train.
Now that some of the youngsters have grown older and are less enamored with trains, I intend to "take back" some (maybe all) of those sidings for my trains that can negotiate O42 curves. The "deluxe" O-scale trains that can't travel across O42 curves will remain in place on display shelves -- probably forever, unless I win the lottery and can afford to significantly expand the size of the Train Room.
Photos attached.
Mike Mottler LCCA 12394


Mikey.,
You have a bathroom in your train room? You win!
I dont have enough shelves, but it's a start![]()


@PRRick posted:Mikey.,
You have a bathroom in your train room? You win!
Not so fast, my train room has a powder room as well. ![]()
@PRRick posted:Mikey.,
You have a bathroom in your train room? You win!
@gunrunnerjohn posted:Not so fast, my train room has a powder room as well.
all you need now is a lil' fridge and a sofa/layZboy and you'd make all the choo-choo enthusiast preppers jealous! ![]()
![]()
![]()
How about a big fridge? I don't have a recliner however... ![]()
![]()

Nothing so grand as many of those in this thread, and it's been posted several times before, but there is a recent addition - on the floor -
Cheers,
- Mike
How about a mini fridge and a utility sink instead. A little less classy. 😉
I have a glass front cabinet I use, but I'm out of space. I'm hesitant to install shelving due to dust. Does anyone dust their collection?
These are for my locomotives and other special equipment:


I built this cabinet to fit under the layout for storage of rolling stock:


Tom
I opted for a combination of cases and shelves. Postwar inspired cases for the postwar locos, pre-war display for pre-war locos, Marx case for Marx, and then shelves for everything else.


- Tom
@naresar posted:@SANTIAGOP23 Your images don't seem to be loading which is a shame because you probably have some beautiful models on display.
Weird… let me know if you see them now…


@Brother_Love posted:I use the area under my layout for storage so I placed shelves over my backdrop. I painted them my sky blue color and I am happy with them. I made the shelves in my wood shop.
I've been thinking about doing something like that ... I ran out of wall space years ago ...
All very cool!
@Mike Casatelli posted:Nothing so grand as many of those in this thread, and it's been posted several times before, but there is a recent addition - on the floor -
Cheers,
- Mike
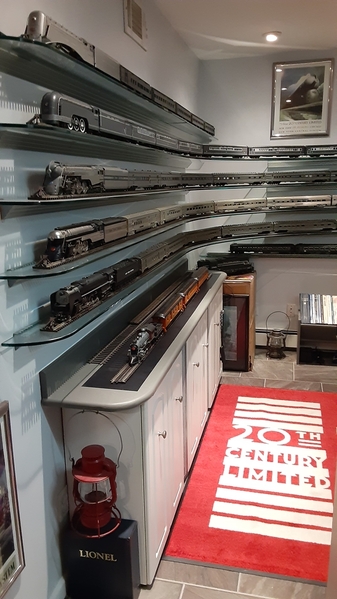
All very cool but this, that’s neat the curved glass shelves for the entire train! NICE 👍 💪
I am a little shy with my collection; rather not post publicly. I do set up some passenger equipment up in the TV room along the ceiling 😁 . Right now my PRB and Key 14 car 1940 Daylight is on display. Wife allows it …fir now 🙄😂

@Mike Casatelli posted:Nothing so grand as many of those in this thread, and it's been posted several times before, but there is a recent addition - on the floor -
Cheers,
- Mike
Mike, Those glass shelves are impressive! I'd love to learn more about how you had those made? How are they mounted?
@SANTIAGOP23 posted:Weird… let me know if you see them now…
Yep, looks great
I get it now ... "Honey, I found a great way to eliminate the cost of having to buy a background for the layout. I just need to simply buy more trains and wall shelving."
Ingenuous ![]()
Well this is a great thread, the pictures of all your collections are super. Mine are more modest and are in two parts. I have a glass front storage case in my office/den for mostly early and pre-war trains + plus a modest collection of clockwork boats (mostly Suitcliff). Then I have train room shelves for much of the rest, but even so a fair amount is packed away in plastic containers...(really of no use to anyone but I do not have the room to display it all)
This is the glass front cabinet downstairs. My wife found this cabinet (no insides) at an antique fair when we lived in Boston for one year. We refinished it and put in glass shelves.

Upstairs in the train room, I have sort of surrounded the layout with shelving. This plain, white pine painted shelving came out of a drug store that was closing in Dayton, Oh...his business was in the basement of the office bldg where my wife worked as a nurse for a pediatric group. She found out he was leaving and asked about the shelving (it was perfect for trains as it was narrow, designed for small boxes and bottles). She negotiated a very small price, given we agreed to remove it from the space before a certain date (which we were going to do anyway)...So it became my train display shelving. We have had it now for over 30 years.

Here is a better view of the main (longest) wall display.

Last year I wanted to display some sets I have acquired and used Snyder shelving on the remaining open wall.

Best wishes and Happy railroading
Don


@PRRick posted:Mikey.,
You have a bathroom in your train room? You win!
LOL! I still recall touring Ed Prendeville's basement during the 2015 TCA Convention tour and seeing the bathroom in the basement. There was a nice display of trains behind glass doors in the bathroom.
One of my fancy shelves:


This entire thread has some absolutely beautiful examples for shelves, cabinets, and drawers! I don’t have anything to share yet as I’m still rebuilding the layout and currently painting the room. I’m getting some great ideas here though. Thank you everyone for sharing!!
One project for this year is to add shelves down the right side of the layout. Ours are about at capacity.


My simple shelves. 8' sections. 1x4 pine and tile edge.
Bob


h
@oldpirate posted:Easy project, rough sawn pine with 3/4" assorted pipe fittings,
Cool look with the pipe fittings, I like it! ![]()
Here's Mine......

@oldpirate posted:Easy project, rough sawn pine with 3/4" assorted pipe fittings,
Love it!!! Thank you for sharing! 👍😎
@gunrunnerjohn posted:Cool look with the pipe fittings, I like it!
Thank You very much,
Good Everning Forumites, I apologize first for the late night or really early morning entry and secondly for the clutter that appears in some of these photos but the layout is still in progress, so excuse me. Nonetheless here are my display and storage shelves


I’m in the process of replacing my basement floor fastrack layout with benchwork. I lost some shelf space. Ran into this at Home Depot and two of them butted back to back give me 24” of depth to get better storage density and use unused space under the benchwork. ClosetMaid 32”x24”x12” cube storage organizer

"I like that. Homemade or kit?"
Jim
Bought it from a vendor in the Orange hall twenty years ago. He has since retired. He was a former shop teacher with a full woodworking shop in his basement. It had to be custom ordered, so I returned to the area to pick it up two months later. Its 6' wide and 3' high with glass doors. Being limited by available space, this was all I could put up in a shared room. Everything else is stored in boxes that are in Iris tubs (as usual). These sets are my "cream of the crop".
Wow, I thought this thread went to sleep awhile ago, fortunately for me I’ve since built 2 out of 4 new display shelves that use to act as the doors to the gas meters. Now they have a new purpose; they’ll help me to justify just a few more trains but not much more.


@marshelangelo posted:Wow, I thought this thread went to sleep awhile ago, fortunately for me I’ve since built 2 out of 4 new display shelves that use to act as the doors to the gas meters. Now they have a new purpose; they’ll help me to justify just a few more trains but not much more.
Those display shelves look fantastic !
very nicely done !
Thanks Taycotrains
@marshelangelo posted:Wow, I thought this thread went to sleep awhile ago, fortunately for me I’ve since built 2 out of 4 new display shelves that use to act as the doors to the gas meters. Now they have a new purpose; they’ll help me to justify just a few more trains but not much more.
Wow, that is some nice work !! Love the ballast touch.
@PRRick posted:I have a glass front cabinet I use, but I'm out of space. I'm hesitant to install shelving due to dust. Does anyone dust their collection?
No photo but I use a Rainbow canister vacuum (Looks like R2-D2) that runs the dust through a water bath. Have a nice circular soft bristle brush that gently dislodges the dust as it's being sucked up. The water bath ensures that unlike most, the return air is clear and dust proof. Great little machine.
I run a couple air cleaners all the time to keep the dust under control and it makes a big difference. I also try and touch everything once a year and manually dust with canned, air or run through my compressed air “train wash” built into my layout that we bought 20 years ago, or I even use a basic super soft duster and wipe things manually with baby wipes if needed. Once you get them clean and keep the air filters going it is not hard to keep the dust under control.
Thank You also, Maddog Steel, I figured if I laid track on my shelving, ballast on the shelf would give it that extra touch. It’s a little costly but produces a nice effect.
Wow, compared to most of the prior posters, my collection is *much* more modest, but I *am* proud of my effort to squeeze much needed storage space into a basement wall alcove behind the drop-down backdrop covering the wall behind my layout, just big enough (barely, for now!) to hold the rolling stock not currently in service on either the main layout, or my test track.
The first shot was during construction and before I rehung the backdrop (the picture visible behind the shelving is a paper mock-up I printed earlier and pieced together while designing the backdrop, which I attached to the wall before installing the shelves):
The second shot is with the backdrop rolled down over the shelving:
Construction of the shelving was very simple -- 1X4 dimension lumber, with two grooves cut into the top of each shelf to fit the rolling stock wheels, and small vertical dowel sections at each shelf end to keep the items on the shelf, with vertical 1X2 strips screwed behind the shelves and secured to the wall. Here's a detail, from before I added the background and relocated the sign:


Pre-layout construction.....Glen Snyder shelves.....


They fill up quickly......


Peter
Here are some cabinets some local companies have made for me. Keeps the dust off and adds to the rustic look of the era. My wife loves them so she ended up getting another one made for me and has it in the basement to show off some of the collection.


Here a write up on how to build train shelves inexpensively and explaining why they were build this way. I have made the shelf spacing ( 4 1/2 inch opening) as close as practical to maximize use of space
Charlie
Train Shelves - Economical, Wall Friendly and Moveable
Three wall, easy to build, economically, wall friendly and moveable train shelves were made in the 1980's and were installed in a hall ways and/or a spare bedrooms of three prior houses and the current house. Each shelve is made in two sections each to allow moving thru doors and up stairs. They also stand on the floor and are held to the wall by two 1" x 1" angles screwed into a wall stud per section, meaning only two small holes in the wall are required. The shelves are backed with 1/8" Masonite, with some strips of white felt glued to the back, to protect the wall. The shelves have router grooved surfaces to hold the train wheels and keep the cars and engines from rolling off. The design has one wider 1" x 6" wide shelve, one half way up and one wider 1" X 8" top shelf to allow display of wider accessories or other items in addition to the typical train cars and engines. Some of my shelves have track sections and are powered to allow lighting of train cars.
I filled knot holes and nail holes with DAP Plastic Wood Latex Based Wood Filler (update- I now seal the knots with 5 min epoxy to better hide them when painting, too), Natural and primed the shelves and backing Masonite with Kilz primer probably oil based but would use latex now. I chose to paint the shelves glossy off white latex paint. I think the light color makes the train engines and cars show up better and makes the room brighter and more cheerful. I use a 3 in x 12 in piece of clear Saran Wrap on the shelf where an engines go to keep the white shelf clean of grease from the wheels.
View of one shelve shown below The 8 inch wide shelf is shown on top and one 6 inch wide shelf is in the middle with the picture framed pictures and milk car and cattle car accessories. There are some powered track to operate the accessories and operating cars on this shelf.
View below shows joint between two half's of shelves. , Holes were drilled in the ends of both side boards and two, 3 inch finish nails, with heads sawed off, were inserted in the holes to allow the two sections to be secured.
Notice the grooves for wheels routed with veining bit on all shelves, a 6 inch wide shelf is one half way up 16 shelves. Also note the picture shows the joint between the two shelve sections that are aligned with cut off finish nail to keep the sections secure.

Some 6 inch wide shelves allow display of extra accessories and figures.


Next picture shows shelf legs setting on floor, showing cut out for base board. Extra, a Boxcar Willie LP record.

Top shelf is 8 inch wide to hold other train items

Over all view of all 3 shelves which were moved to from the house to the new 2010 train/all purpose room over a new two car garage/shop.

The two large shelves on the left and right of the picture above were in the halls and spare bedroom of my present house for many years until the train room was built making the spouse very happy!
Notice in last picture I have added two more small shelves under two windows for more trains. One never has enough trains and thus shelves.Small shelf under window shown below.

All shelves are standing on floor and held to wall with 1in X 1in angle brackets screwed into studs. Shelves come apart to allow removal and moving to another room or house. Build once for life!
Some train storage on the shelve hints are below.
Post war locos with Magna-traction are put on a section of steel track to act as a "magnet keeper" and hopefully help save the magnets.
For engines with traction tires I keep them off the wood or track to protect against flat spots.
I also store all cars and trains with the couplings open to "save the springs".
I use a 3 in x 12 in piece of clear Saran Wrap on the white or light colored shelves where greased engines are stored
I do not know if any of this makes a difference but I feel better.
Update: May 2020 : A fourth shelf section was built and is the last section of trains shelves. I have noticed a couple of knots are showing as slight yellowish through on some of my three original 30 plus years old shelves. I have searched for a cure to hide sappy knots and some Kilz B-I-N shellac based primer is recommended but does not always work. I have purchased my boards at Home Depot and the choice of #2 cheap lumber is of a much lower quality than in days past and this lot had several knots on about one half of the boards. I have decided to not buy the expensive shellac based Kilz for this small job and have decided to use cheap Harbor Freight 5 minute clear epoxy glue, to seal the knots. I applied it thinly with my finger tip. We will see in a few years if it works at keeping the knots from showing thru.
I now have four larger sections plus two short sections under the windows, totaling 425 linear feet and built my last shelf section.
Picture below shows all train shelves, with new in May 2020 longer shelf section the on right

Sorry that my pictures got posted before I could comment. I’ve the advantage of having a friendly neighbor who has lots of top notch woodworking equipment in his shop and knows how to use it! After we built the 16x8 layout, he decided a red oak rail around it would add a finishing touch. So of course when I asked about shelves, we made those out of the same material. The shelves are 110” each, and hung on the wall using industrial rated z-bar (400lb rating). I considered grooving the shelves, but I really wanted to be able to power the locos on the shelves, so we ended up using FastTrack instead, and I’m glad that we did! The look of surprise on folk’s faces when the locos on the shelves start up and light up is priceless! They’re all Legacy, so they stay put, and I don’t move them even an inch! I was also concerned about flat spots on my traction tires, but then realized the shelves are more of a staging area for my locomotives and not a display space. I typically rotate them out every 3-4 weeks, and so far, I’ve had no issues. The next project (we start tomorrow) is to build shadowboxes (6” depth) under the two ends of the display. Each will be 85” long and 28” high, with only 3 shelves. I know that I could have fit 4 in each, but I like to have more room to see the rolling stock (and dust it) so I’m splitting the space between only 3. Will send pictures when those are done. I’m planning to use LED Lightstrips in aluminum channels mounted on the shelf above to illuminate the trains. It will likely take a few weeks to finish, as we’re both pretty meticulous. I’ll end up with another 42 feet of display space though, so it will be worth it! Sorry that this didn’t make it on the same post as the photos.
Looks like the pictures never got posted after all, so here they are!


Keep in mind, I’m just a small operator with a medium size layout that can take only 2 trains at a time. So, I rotate the trains on and off the layout throughout the year. ![]()


Nice layout Yellowstone. Consider sharing more images.
Thank you, SuzieQ. I posted more photos on the recent Christmas/ Winter Trains & Layouts - Let’s See Yours thread. 😊
Santa came early this year! Thanks to the remarkable craftsmanship of my friend and neighbor, I now have 42’ more of display shelves for my O-Gauge collection! Together, we designed 2-7’ wide x 6” deep shadow boxes for each end of my 16’ x 8’ layout (which Ed built in 2021). Along with the 45’ of wall mounted display shelves that Ed built in 2022, I finally have the space to display all of my locomotives and rolling stock that’s not up on the layout! Ed continually improved the design, adding red oak trim along the face of each shelf, and reveals along both sides and the top to create quite literally 2 pieces of fine furniture. We were able to conceal Philips Hue Lightstrips in diffuser channels above each of the shelves, allowing the trains on display to be illuminated with virtually any color desired.


I used 1x 4 wood boards with 1x3 boards behind to hold it all together and those are located where the wall studs are.
There is 2 separate shelving units of 10- 7 foot shelves going floor to the 9 foot ceiling.
This is in the office/TV room. Some engines have been sold and replaced with a few others. The next picture is a similar unit I built on the back wall of the garage and it spilled over to the wooden units on the right that the previous owner built around the garage walls. All my wood was stained before hanging up.
 I am out of shelving space so I selectively buy these days.
@Ted Bertiger posted:I used 1x 4 wood boards with 1x3 boards behind to hold it all together and those are located where the wall studs are.
Interesting -- I came up with essentially the same configuration (1X4 shelves, with grooves cut into the top to fit the wheels and pegs at each shelf end, secured to the wall with vertical 1X2 boards) for my *much* smaller collection. In my case, though, the wall was cinder block covered by a vinyl waterproofing sheet, so I just drilled holes and used lag bolts. Since I usually cover them with a roll-down backdrop when the layout is in use, I just left them unfinished.

Missed this post in January. I needed to hang my display shelves from interior framed walls and decided to use 1x4 medium quality pine. Basic box frame, dados for the shelves and 1x4 supports in the back screwed into the wall studs. Overkill with screws, but considering the $$$ value in engines, did not want to take any chances. This is the latest addition. Bottom unit is roughly 4x4, upper 10x2. Built to fit the constraints of the space. Similar to @Steve Tyler build. Now I only have to consider how to repel dust !!!


@ScoutingDad posted:Now I only have to consider how to repel dust !!!
Well, maybe the roll-down backdrop in front of it helps, but even in a frequently-dusty basement, my rolling stock has stayed fairly clean on the storage shelving. Perhaps a clear vinyl sheet in front, or something similar, might help? Then again, maybe the dust is there, and it's actually just my failing eyesight . . . ![]()
Steve Tyler,
When I moved the price of lumber was cheaper. 1x4 furring wood was about $1.30 each so I bought about 35-8 foot boards and made sure each was not warped. The 1x3 boards were about $1.20 each and they served as the connecting vertical boards. I did use 1x4 on the left side anchored to the side wall and shelves. To the right, I left it open and then put up an 18” shelving unit for a UP passenger set with a ABA set. Mistake was not putting a vertical board there so I put L brackets under each shelf there to stabilize the weight of the engines so the shelves did not sag.
I have some weight on this wall and it has been up for almost 7 years. My issue here is no layout, I put up a dual loop garage layout when the weather gets nice. Comes winter, I’m ready to put both cars in for snow which we have not had much last year.
I run trains at my club which is 4-5 miles away from my house so that serves as my meds and therapy from reality! Lol!
What is nice about the shelving system I built is there is about 9-12 screws into the wall studs inside the house so when we ever move again, there will be minimal damage to the sheetrock.
Those metal rack systems do create a lot of holes in the walls.
@Ted Bertiger posted:When I moved the price of lumber was cheaper. 1x4 furring wood was about $1.30 each so I bought about 35-8 foot boards and made sure each was not warped. The 1x3 boards were about $1.20 each and they served as the connecting vertical boards. I did use 1x4 on the left side anchored to the side wall and shelves. To the right, I left it open and then put up an 18” shelving unit for a UP passenger set with a ABA set. Mistake was not putting a vertical board there so I put L brackets under each shelf there to stabilize the weight of the engines so the shelves did not sag.
What is nice about the shelving system I built is there is about 9-12 screws into the wall studs inside the house so when we ever move again, there will be minimal damage to the sheetrock.
Yeah, for those of us who formed our financial baselines a few years ago, visiting the local Home Depot can bring on sticker shock, for sure! I find running a mental financial calculator in advance helps, if I can figure out when I last bought an item and what I paid for it, so I can prepare myself when I come fact to face with the price tags of today! ![]()
Building with an eye toward eventual removal is almost always a good idea. In our case, though, I think they're going to have to scrape us out of here, since we have no plans to relocate! ![]()
Too many engines and no place to put up shelves. Our home is an 1884 Victorian. The foundation is all stone work and my layout is located in the basement. There is no smooth surface on the walls for shelves. I built frames aroung the outside walls of the layout. It hides the junk underneath and gave me a great way to display my engines and to transfer them to the track when I want a change in operations.
I built the first shelf in 2022. I kept buying more and need another shelf. The first shelf was done using Glen Snyder shelves. I wanted to build the next shelf with the Glen Snyder shelves. Called them but never got a return call. So, I went on the forum and posted a "want to buy" thread. Immediatly I got a response from @ted. He had what I needed gave me a great price and sent the package via UPS the same day. So this is a big shout out to @ted.
Below are picture of both shelves. The first is the new one 9' long with 4 shelves and the second is the orginal shelf 18' long with 4 shelves.


The spare bedroom that serves as my train room lacked sufficient square footage for book case type shelves with my original plan for an around the walls layout and I didn't want to install wall mounted shelves above the layout so the original plan was under the layout display shelves for engines and operating cars to protect the electronics and boxed storage in the garage for rolling stock. Once I had gotten the rolling stock stored to make room for around the walls layout I realized door, window and closet placement would really limit the curve radii at both ends of the layout so a much smaller island layout is where I'm headed. To get the Engine boxes out of the way I had to get them on shelves so the empty boxes could go to the attic. I lost 3 feet of room length plus access to the shelves making the space for the layout that much smaller. I picked up these metal shelves at liquidator type discount store for about half the going rate at the big box DIY stores.


More being built as we speak. I use scraps from building the bench work. I got a little fancier for the large steamers. Stained that one. All led lit and plexiglass doors for less dust.


Nice work!
@LT1Poncho posted:More being built as we speak. I use scraps from building the bench work. I got a little fancier for the large steamers. Stained that one. All led lit and plexiglass doors for less dust.
Well done. They look terrific!
@LT1Poncho- Great work, they look terrific. Glass doors hold down the dust too!
Don
@coach joe- WOW! Joe that is quite a collection for sure. Here is some of mine, mostly bookshelf type display (my wife who at the time was a Dr.'s nurse found out that the drugstore below his office was closing and made a successful bid for all the storage shelving)
Best Wishes
Don


My wife says I am collecting to much !
Access to this requires an OGR Forum Supporting Membership


