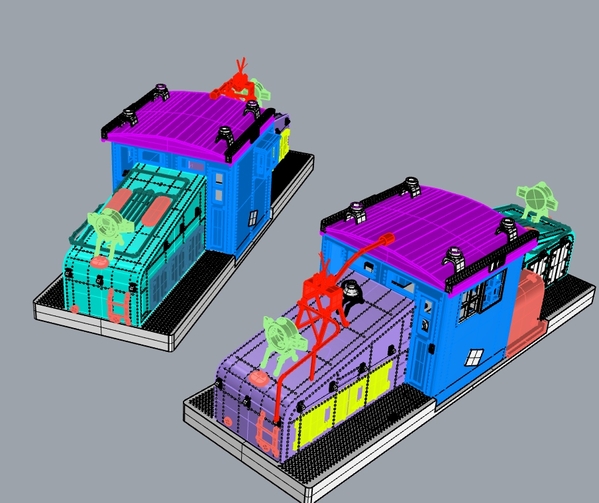

E-82 Milw Rd steeple cab computer model almost ready to 3D laser print
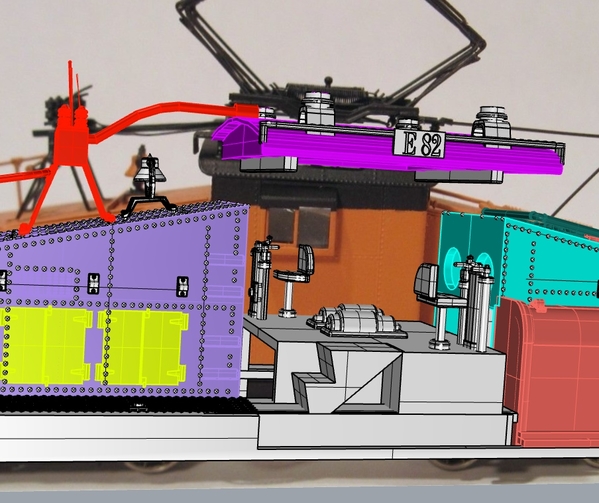
cab frame removed showing interior


|
|
E-82 Milw Rd steeple cab computer model almost ready to 3D laser print
cab frame removed showing interior


I had a Marx 1998 switcher missing the Marx shell. I found a Lionel SW2 shell and cut out about 1 inch of the Lionel shell to shorten to fit the 1998. I painted it black, white and red in the colors of ALCOAs Bauxite and Northern short line railroad from the Bauxite, ARK alumina and chemical plant in Bauxite, ARK to the a major railroads main lines. The Marx1998 is a great running engine and I love to run it. My adult daughter loves to run it very fast and always beats other engines in racing through the oval and figure 8 on my layout.

Charlie
I've created the following two items:
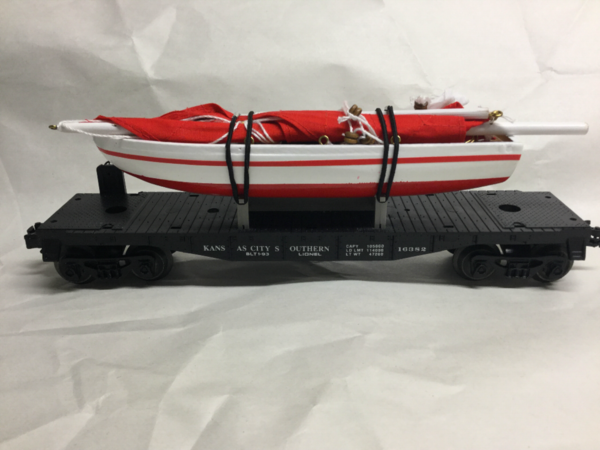
The sailboat, above, I found on eBay and subsequently on Amazon. It fits perfectly on the boat/rocket frame. The mast for the sail can be inserted into the boat. The boat is wood and does float. This is a recent build.
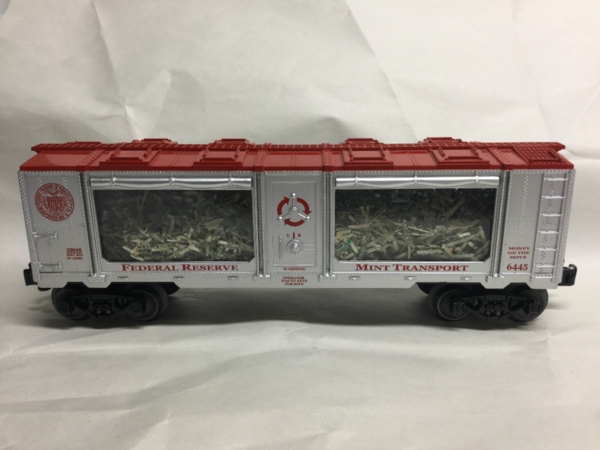
Mint car with shredded money load. The car is the KC Fed Reserve. The attention to detail part: The shredded money is also from the KC Fed Reserve. Car and money found on eBay. I built this earlier this year.
Steve


For the past few years I've been purchasing the rubber tube style diaphragms from Atlas-O and retrofitting them onto other cars to give them a more modern appearance. Here's one end of an Atlas-O California Zephyr car with the rubber tube diaphragm installed..

Thanks,
Mat
 Got the idea from another forum member...


joe krasko posted:Got the idea from another forum member...
Yesssss...Yesssss...Come to the Dark Side of the Force, my son... ![]()
For the benefit of those not following "What did you do on your layout today," I just rolled my own signs for my Plasticville garage...

Mitch
Pingman posted:As part of a year 'round informal train gang that met Wednesday evenings at Richard Sherry's home in Chicago in the late '80s, I'd seen a photo of the "Silver Sky" dome-obs car on the California Zephyr and thought a PW 2531 could make a reasonable facsimile.
Fortunately, one of the guys worked in a machine shop and told me all I needed was to give him the shell and a dome which I did. A week later I had this. It languished in a box through a couple of moves until a few years ago when it made its maiden voyage pictured below.
I didn't physically make it, of course, but it turned out pretty nice. And I have more plans for this resurrected 2531 in 2019.
my late father made one also years ago, however the one he did had a damaged roof, I don't know if its packed away in on of the boxes, or if he sold it off.......
Mitch that's a great collection of automobiles outside Joe's Garage!

The sheet metal worker grandfather I never met made this for my dad.
It is made of sheet copper. We always called it the copper car


I always got a kick out of pulling the Gang car around the track in it.


He also fitted this 248 with copper fenders. I'm told it had postwar knuckles attached at one time.
I rebuild the motor and running gear for my dad this past summer.
This is a quicky to build special interest car. I made it this week.
I have had a couple of HO toy 0-4-4 General locomotives for several years probably from a garage sale (where else?). A plus was they had different style smoke stacks. Picked up a few Lionel flat car bodies at a recent train show and have lots of trucks in a shoe box.
Found a section of HO track and the locos fit perfectly. I glued the track to top of one flat car with Aleene's Tacky glue and strung some fine black elastic cord to hold down the locos.
Now I have a neat looking flat car load of half size 0-4-4 General locomotives that could be used for pulling small real trains at for fairs, large city parks, train museums or used to provide paid rides at other sites.
The car looks good in my giraffe car train and in a 0-4-4 General civil war period train for a change of pace.
Charlie


Hay Nate, Your pics have "Steampunk" written all over it! I like it! Thanks for serving our Country
John J. Giuliano - retired Electrician of 45 yrs.
Coordinator for the Raritan Valley Hi-Railers
Check us out on facebook - Raritan Valley Hi-Railers
I think the "Steampunk" actually belongs to Midnightwrecking John.
Currently making with my brother an "inspection" locomotive using a redwood valley MPC general, the body will be made using a lionel passenger car body. Body will need to be cut and shortened to fit on The loco.
 The loco will need a few changes like the drive rods to be changed out so they work with both wheels, rewiring to run on A.C. track and seperate details fitted. Not sure yet on what color it will be painted or what railroad it will be lettered for
None of my creations hold a candle to the imagination I'm seeing here. All I did was find a way to secure three bulldozers to a three different flats and used store bought jewelry chain on line to fake that they are chained down to the deck. The most creative part was done by a friend of mine who is good with a drill press and had the right sized tap to tap out the hole for a screw. The only part of the custom flats that's me is that I dreamed up the idea, bought the cars, bought the dozers, and then farmed out the critical work. I did however glue the chains to the deck. I really like this thread. It's given me ideas for future projects that I will probably farm out.
By 1910, Northern Pacific Railway still had on their roster a handful of flatcars 28-36' long from the 19th century. I worked with a few railroad historians, a historic-railcar wood kit maker, and several historic-railroad brass & plastic parts makers to create models of these cars.

The consist uses link & pin couplers; trucks with Lionel couplers are used for the loco and caboose.

I never found just the right custom decals to add roadname & numbering; maybe I'll restart that search soon.
got this in Wayne ,N.J.....complete new fabricated frame with PW GG1 parts....no horn...


Blake posted:Currently making with my brother an "inspection" locomotive using a redwood valley MPC general, the body will be made using a lionel passenger car body. Body will need to be cut and shortened to fit on The loco.
The loco will need a few changes like the drive rods to be changed out so they work with both wheels, rewiring to run on A.C. track and seperate details fitted. Not sure yet on what color it will be painted or what railroad it will be lettered for
I can't wait till we get started.
Here ya go

Heres my legacy Akron canton & Youngstown H16-44, painted the trucks & fuel tank black. & put South Brooklyn decals on it SBK, here’s a video of it transferring some New York Subway cars
Mark Diff posted:Thanks for the kind comments. I love doing these kinds of projects. Here is one I did earlier, converting this Weaver reefer...
into a double sheathed box bar...
Here is the prototype used for inspiration...
Very nicely done!


 The GARX car is based on real cars from the past leased to the QA&P Rwy. The silver painted express boxcar is “pretend”.
Big Jim posted:Three Mile Island car
Yellow Submarine Operating Launch Car
Speedy Gonzales Missle Car
I've seen it, but thought the Yellow Sub was an actual release ![]()
The Speedy Rocket Launcher; I want to know everything about it ![]()
Adriatic posted:I've seen it, but thought the Yellow Sub was an actual release
The Speedy Rocket Launcher; I want to know everything about it
The Yellow Submarine started out as a log unloader. I just made a cradle to hold the boat.

Speedy is from a Revell BOMARC kit. I credit "ScaleRail Don" for the inspiration! The launch pad is bolted down to the car from underneath into the jack-stands and the boxes are from Frenchman River, the decals I made. It was nice that the wing tips were separate parts. They are in the retracted position for clearance.

It was awhile before I realized this thread included locomotives, so here is my "Frankenstein" loco,..


THe story goes like this, years ago I bought an early Williams SD-45 with the idea of converting it into an SD-38. When I was ready to start the project, I opened the box and immediately noticed those Trainmaster trucks. Ugh! no way I can use those for an SD-38, so I decided to make a trainmaster. The shell is an MTH version, with Precision scale details, Scale coat paint, Shell scale decals, ERR sound commander and Evans designs LED Head light.
BTW I did eventually acquire another Williams SD-45 with the proper 6 wheel trucks, so that project will be done one day.
Rob Leese posted:

Rob, How did you make the modified Bettendorf trucks with roller bearings? I remember seeing these back in the '70s on the Penn Central. I would like to model this feature on some of my rolling stock.
Tom
I might as well throw my hat into the ring. I have modified/kitbashed several cars over the past few years. This was mostly out of necessity as models of these cars are not commercially available in 3 rail.

The first is a Penn Central N9 transfer caboose. I started with a Lionel PS-1 boxcar. Stripped it down to the frame and built everything on top. My model represents an earlier version that used propane for heat. Later units used fuel oil for heat. The propane tanks were replaced by a rectangular tank that fuel oil could be pumped into.

This is a Penn Central N8A cabin I kitbashed. Penn Central inherited NE6 cabooses from the New Haven. Most were in poor condition and relegated to transfer duties. The best ones were modified for road service by sealing off the copula windows and adding bay windows. Toilet facilities were added, with water supply tanks installed in the copulas. Roller bearing trucks were also installed for road service. My model is based on an Atlas O NE6 which I modified by adding bay windows and sealing several other windows. The picture shows the car with friction bearing trucks, but these have since been replaced by roller bearing trucks.

This is a MTH Railking crane car right out of the box. I felt the cab sat too high and the ride was too high.

I lowered the cab by modifying the pivot. The ride was lowered by modifying the bolsters. Bettendorf trucks replaced the factory roller bearing trucks. The smoke stack was cut down. A heavy dose of weathering completed project. I was originally considering adding smoke and work lights, but the smoke unit would have required extensive modifications to the cab mounting. Wisdom told me that was a can of worms I didn't want to open.

The modifications took away the toy-like appearance and made a respectable model of a 150 ton crane.
Tom
Tom those are some intriguing kit bashes. The transfer caboose looks cool, and I like the historic detail on the propane tanks.
That 150 ton crane looks like a real nice piece of "Hi-rail scale" to me now. The lowering really takes it out of toyland; the weathering looks spot on.
Terry, how did you do it?
Here's an easy one to build.
After I sold my crane car, I converted my work caboose into a flatcar.


tcripe posted:This began as Lionel's Union Pacific 19121 smooth side dome car. With the help of some Plastruct, it is now D&RGW's California dome lounge, used for special occasions and the Ski train.
Terry
Plastruct makes several sizes of corrugated siding. I used "N" gauge for the roof fluting and "O" gauge for the side fluting. Both applied with epoxy. The roof sections were then wrapped tightly with thick rubber bands every 1/2" or so until the epoxy had set. I used clothes pins to do the same for the sides. Small pieces of Plastruct were used to blank out window areas per photos of the car, also held in place with epoxy. I made some decals of screening and applied them over small pieces of Plastruct and glued to the roof to simulate the air vents along the sides.
Terry
Terry, thank you for that comprehensive reply--that was quite an undertaking.
And using the UP smooth-sided offset dome car, 6-19121 as the donor is close to home since I'm using one to make a dome car for my NP North Coast Limited train.
Nice work Coach!![]()
custom reefers....


Alco HH660. I use Lionel Alco S2 trucks, cab and a some another parts. S.B.R. -transfer caboose was earlier a MTH -crane tender.


Wow, you guys have some great ideas for cars and do great building work. I am enjoying see all your cars and love that others enjoy this section of the hobby too.
Santa Sled and Reindeer Flat cars for my Christmas Train
I know this is a week late for Christmas but I find after Christmas and New Years, with the lousy winter weather, a great time to build train cars and stuff.
I added a Santa, sled and 8 reindeers plus Rudolph the red nosed reindeer to my Christmas train. I made the reindeer cars from three junker scout sized flat cars and figures and reindeer from a Hallmark Cards Santa, Sled and Reindeer set. I painted the flat cars white as reindeer like snow and will show up better with a light color.
One car carried the Santa sled and two reindeer, a second car carried four reindeer and third car carried two reindeer and Rudolph the red nosed reindeer. The reindeer were simply glued to the flat cars with 5 min epoxy glue.

The original Hallmark Cards Santa sled was too big so a smaller one was made from balsa wood and sized for Hallmark Cards Santa.

A blinking red light was installed in Rudolf’s nose and a power pick up was added to the car.

The Christmas Train is usually stationed on the hidden track behind the background and comes out by surprise for the kids after watching the trains run for a few minutes. The train has a Christmas candy in a gondola also and is one train always used at Christmas time.
Charlie
I did not build this unit but i thought i would post this home built E-unit.
This locomotive started life as two Postwar Canadian pacific F-3's and a postwar Trainmaster .
Found this at my local shop in a collection they had acquired. I enjoy collecting some of the period custom built units as it turns the clock back on our Hobby. This locomotive shows us a time in our hobby when building was the only way to ever get a locomotive that would never be produced.
The creativity and the skill of the people that created models like this out of what was available is fun to study.


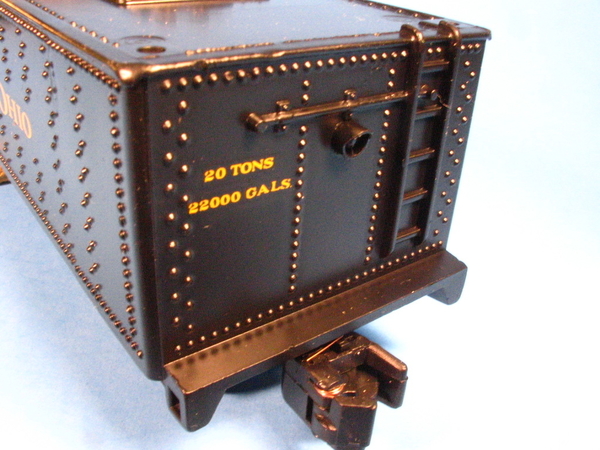
Here is a modified sloped back coal tender I made years ago and just found it on the train shelves. Seems Lionelville coal tenders are always full of coal. This one is empty and the switcher was heading for the coal tower when the tender derailed. I just cut out the coal load added walls and a floor. Being empty will make it easier to put the lead trucks back on the tracks!
I love coal tenders. I picked up a box of 30 or so junked coal tenders years ago so hacking up one is no big deal.

Charlie

You better throw a few shovels full in there before you start loosing pressure and foul a line Charlie ![]()
Here's my contribution to the thread.
My heavily detailed Chessie Steam Special. This is an LTI 6-18011 with a 6-18064 Mohawk Tender. There is work that still needs to be done. Up grades include AC Commander, Super Chuffer, Fan Driven Smoke Unit, Large Steam Rail Sounds, Electro Couplers on the tenders plus all the detailing on the front of the engine and the painting of course.


Here's our take on a yellow submarine car. Built/assembled the model kit and mounted it (with magnets) to a well car:

Scooby-Doo, painted for my daughter when she was in the middle of a Scooby phase:

A dragon transport car I made to go with our Hogwarts Express:

P-51 transport car. This one was actually my first ever "kitbash" attempt... Lots I would do different today, but still a fun piece:

McQueen and Mater... this one was for my kids' "Cars" phase while running trains at the club:

Coyote and Roadrunner:

...and speaking of Acme, here is my high-powered magnet car. Works really, really well for clearing the tracks of small metal debris:

The magnet lifts out from the top, allowing all the accumulated debris (clinging to the underside of the car) to fall into a trash can:


...and, of course, on our layout Thomas blew-off his responsibilities one too many times. He now stands as a reminder to other engines to be really useful:

Frizzenbee you are one very creative fellow.
I designed and made this Bell Car for my Polar Express Bell a few years ago. This is the bell that came with the set and wasn't doing anything setting in the box. 

coach joe posted:Frizzenbee you are one very creative fellow.
I bow to his superior Weird-Fu. ![]()
Mitch
Firewood posted:...and, of course, on our layout Thomas blew-off his responsibilities one too many times. He now stands as a reminder to other engines to be really useful:
ROFLMAO!
Mitch
This is my entry into this thread. This is my built-from-scratch EMD F3 diesel unit. Downloaded a parts diagram from Lionel and began assembling the various parts from a number of different sources. Took about 3 months to get everything. Custom paint and decals by me. Full TMCC electronics, LED lighting and rear electro coupler.

Erica Ann I would have never guessed you assembled that whole F3 from pieces. Well done!
Diverging Clear posted:Great work by you Erica Ann! I will need some custom decals done in the future, so, I'll check out your website!
Seconded! I plan to drop NIMW a line about painting a trolley... ![]()
Mitch
Mitch, what no Razorback red rattlecan this time? Does Fortesque approve?
coach joe posted:Mitch, what no Razorback red rattlecan this time? Does Fortesque approve?
This time, the paint scheme is a bit beyond my talents...


I know when I'm in over my head... ![]()
Mitch
Frizzenbee
My favorite of your many cars is the P 51 plane in crates on a flat car. Great job.

Charlie
Choo Choo Charlie posted:Frizzenbee
My favorite of your many cars is the P 51 plane in crates on a flat car. Great job.
Charlie
Thanks! Even though that's one of my early ones, that's a favorite of mine as well. My number one favorite, though, is probably the passenger cars in my daughter's train set. Back when she was ~3, we put pictures of all her favorite stuffed animals in the windows. I could do a better job of this today... but for nostalgia reasons I like it the way it is:


 Almost done with this one have to add decals and a Piggyback Hitch
These will be for sale along with 40+ other items at the upcoming Lonestar Hi-Railers Train-a-Palooza on March 2019 in Grapevine, TX.


They are Atlas autoparts boxcars repainted for Quanah, Acme & Pacific Rwy. In reality these cars never existed although the QA&P hauled lots of autos “back in the day”. The Frisco-QA&P-ATSF scheme cars commemorate the joint symbol freights: QLA, QSF, and CTB which ran from coast to coast. After these photos were taken, I later applied lube plates, ACI badges, and matte finish.
I have always liked the way these cars turned out, but I have GOT to reduce my collection.
This Alaska GP7 started out all blue on a black frame in a '90s Lionel set. It became my second airbrush project after a Grumman F4C plane model. I masked it off I went to town with yellow to match the prototypical ARR paint scheme and added a winterization hatch.  Some time later I picked up the GP9 from a Titanic set break up and swapped out the bodies so now my ARR GP7 has a yellow frame and basic Railsounds.
This USAF switcher stared out as a K-line SP Black Widow S2. Shaved off cast in grab handles and used staples for add-on grab handles, re-painted and cut off stamped steel steps and added better pilots.


I picked up An early MTH RK N&W Y6B and wanted an auxiliary tender to go with it. I just couldn't justify the going rate for such items so I tried my hand at making one.

 Years back I picked up a couple of the Lionel separate sale whistling tenders, swapped out the frames for some starter set tenders so one was a perfect candidate. I cut out the coal load, laid in some styrene sheet trimmed to fit inside the sides and around the water hatch. The treads are actually cut from sanding sheets, added a ladder and acostume crystal for the back up light lens.


This is an MTH coach with the added modifications of tail gate and marker.
This is an MTH caboose modified with clear LEDs to simulate the way an ATSF waycar is supposed to look:


I am really enjoying seeing all the great ideas and construction-bashing jobs by so many. This type of stuff gives me more pleasure than most parts of the our great model train hobby.
Coach Joe: Great work on your GP9 and auxiliary tender. The tender job encouraged me to keep rounding up parts for my planed Vanderbilt tender. Got most of them now and I have reviewed pictures of them and just need to "get round to it".
The GP 9 turned out super. What did you use or what did you do to get the great letters and numbers on the repaint job?
Charlie
Rob Leese posted:
This is an MTH coach with the added modifications of tail gate and marker.
Where did you get the gate material?


 Finished another custom pola Max AHM flat car that I converted into a piggyback car
Charlie the letters and numbers on the GP were original to the Lionel body. I masked them off with the rest of the blue while panting the yellow ends. I have since picked up a set of decals for that paint scheme from ebay in case I want to do another repaint.
lee drennen posted:
Finished another custom pola Max AHM flat car that I converted into a piggyback car
Great job on the piggy back Lee. Where did you get the decals?
Lee, Pola Max? O gauge? Kit?
Here's another two: If you look closely at the car numbers they're all 510. The 510 came in a MTH RK set of full vista domes with an F40PH. Long before MTH came out with that set, I picked up a set of RK Santa Fe streamliners with the red stripe and 2 additional vista domes that i intended to re-paint into Alaska RR colors. That project morphed into converting them into NYC Empire State Express cars. Before that happened I picked up both the ARR full dome set and some ESE cars and the Santa Fes languished for a while. I then won an ebay auction for 3 of the 510 bodies, end doors and diaphragms. So far the 2 additional vista domes have contributed frames, trucks interiors and vista domes so now my ARR passenger train is 5 cars long instead of 3 and I have the K-line Denali business/observation car to bring up the rear. RK passenger car mounting to frame has changed over the years so the bolster in the body had to be removed and holes drilled in the bottom of the body to allow screws to mount to the roof bolsters. Still have 1 more 510 to finish up. Not sure if I'll sacrifice the vista dome from the set or the coach. A couple of close ups of one:

Lou1985 posted:Rob Leese posted:
This is an MTH coach with the added modifications of tail gate and marker.
Where did you get the gate material?
After some digging I found the 2014 thread that lead me to the parts I used:
https://ogrforum.ogaugerr.com/topic/atsf-marker
Rob Leese posted:Lou1985 posted:Rob Leese posted:
This is an MTH coach with the added modifications of tail gate and marker.
Where did you get the gate material?
After some digging I found the 2014 thread that lead me to the parts I used:
https://ogrforum.ogaugerr.com/topic/atsf-marker
I looked through it but didn't see a part number for the gate you ended up using. Perhaps I missed it?
Lou1985 posted:Rob Leese posted:Lou1985 posted:Rob Leese posted:
This is an MTH coach with the added modifications of tail gate and marker.
Where did you get the gate material?
After some digging I found the 2014 thread that lead me to the parts I used:
https://ogrforum.ogaugerr.com/topic/atsf-marker
I looked through it but didn't see a part number for the gate you ended up using. Perhaps I missed it?
Here is a link to download Keil Lines O gauge parts list. The item is called a vestibule gate.
When I was first got back into the hobby and started going to local train shows I picked up 3 flat car shells real cheap. One brown, one navy and one a very pale blue. I added some plastic K-line trucks and added loads. Here's the brown one, wearing UP HO decals, and the navy one with Alaska with individual dry transfer letters. 


Mark thank you I appreciate the compliment
Joe. Pola Max I think was a part of AHM these came ready to roll in some of my pictures you can see where I put styrene on the sides and convert them into piggyback cars
Steamer
Great jobs especially on the the remake of the 600 cars and the making of the B6 from a 0-4-0. That was a neat trick. You guys amaze me.
Charlie
Wow! Does that B6 have the chassis from a Lionel 227, or ???
2031 frames, LTI shells,Len Carparelli paint...


Rob Leese posted:Lou1985 posted:Rob Leese posted:Lou1985 posted:Rob Leese posted:
This is an MTH coach with the added modifications of tail gate and marker.
Where did you get the gate material?
After some digging I found the 2014 thread that lead me to the parts I used:
https://ogrforum.ogaugerr.com/topic/atsf-marker
I looked through it but didn't see a part number for the gate you ended up using. Perhaps I missed it?
Here is a link to download Keil Lines O gauge parts list. The item is called a vestibule gate.
The part is now sold by Scale City Designs here is the link :
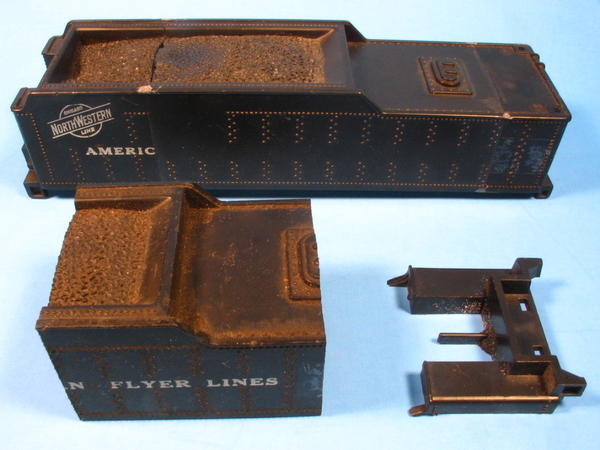
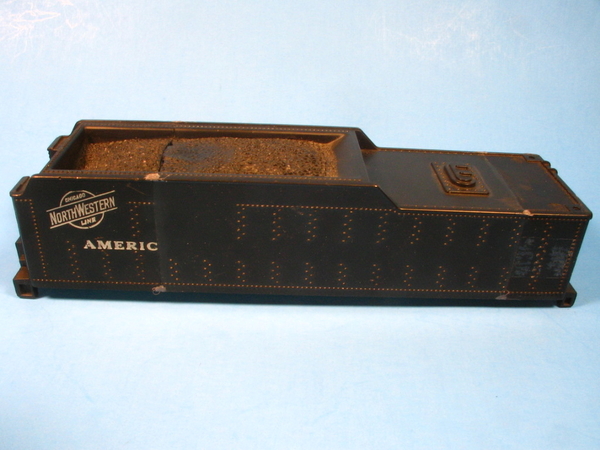
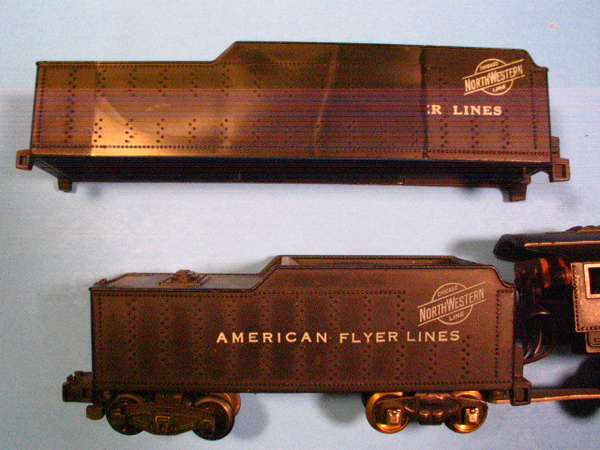
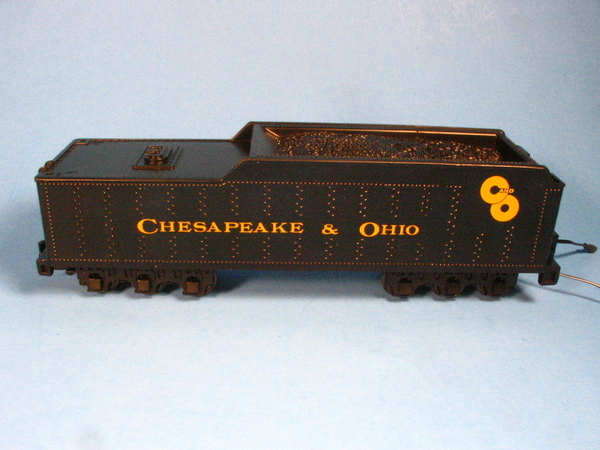
While not exactly home made, I modified an American Flyer tender to give an American Models S gauge 4-8-4 a longer tender. The original one was great for Santa Fe, but C&O used coal tenders. I retained the AM electronics and made a brass frame for the tender too.Here's the process.


Got this as a Christmas gift from my friends Jim & Dorette that I play with in the acoustic rock group Strumburgh. Total surprise for me, made my Christmas celebration very special last year. Our friend Matt did the work on the car, he specializes in painting brass engines.
-Bruce
Steamer
I believe the motor with 6 wheels you used make the neat 0-6-0 switcher is from a Marx 333, a 4-6-2 steamer, the largest Marx made in the late 40s and 50s. I have the three major steamers Marx made, the 333, 666 and 999, the later two have four driving wheels.
Charlie
CSX Al posted:Rob Leese posted:Lou1985 posted:Rob Leese posted:Lou1985 posted:Rob Leese posted:
This is an MTH coach with the added modifications of tail gate and marker.
Where did you get the gate material?
After some digging I found the 2014 thread that lead me to the parts I used:
https://ogrforum.ogaugerr.com/topic/atsf-marker
I looked through it but didn't see a part number for the gate you ended up using. Perhaps I missed it?
Here is a link to download Keil Lines O gauge parts list. The item is called a vestibule gate.
The part is now sold by Scale City Designs here is the link :
Thanks for the link.
Mark Diff posted:lee drennen posted:
Great job on the piggy back Lee. Where did you get the decals?
Mark sorry for the late reply the decals are for a HO scale Western Pacific caboose. thank you for the compliment
HO scale decals work well for O gauge flats.
This isn't home made but I modified it.


 First picture is how it comes out of the box. i fabricated pilots, added windows, engineer, fireman and hand rails to the door. Safety stripes on pilot were individually applied.


 These are prelim photos of a current project.
As an adaptation from childrens’ literature: “who will help me obtain a Frisco MO/W F unit? ‘Not I said said Lionel. Not I said said Atlas. Not I said MTH.’ Then I will do it myself said the old Frisco switchman.” And he did.
The trouble is, nobody makes O gauge decals for this Frisco paint scheme. It may be a while finishing this one.
Mike Condren photo included.
The Bungling Brothers Circus train.


coach joe posted:HO scale decals work well for O gauge flats.
This isn't home made but I modified it.
First picture is how it comes out of the box. i fabricated pilots, added windows, engineer, fireman and hand rails to the door. Safety stripes on pilot were individually applied.
Nice job! Joe, I like those air tanks up on the hood
 Here is my piggyback car on the layout
Lee according to another thread Lionel put those air tanks on only 3 switchers, this Alaska 8154, it's predecessor, Alaska 614, and orange tanks on a DT&I switcher. they do give this switcher a different look.
Good job on the flat. i knew I wasn't the only one using HO decals on O equipment.
Rob Leese posted:
These are prelim photos of a current project.
As an adaptation from childrens’ literature: “who will help me obtain a Frisco MO/W F unit? ‘Not I said said Lionel. Not I said said Atlas. Not I said MTH.’ Then I will do it myself said the old Frisco switchman.” And he did.
The trouble is, nobody makes O gauge decals for this Frisco paint scheme. It may be a while finishing this one.
Mike Condren photo included.
The on
Rob,
Great start! As far as decals go, try making your own printing them on clear decal paper (or even on white decal paper in your case). I use a series of fonts from "railfonts(dot)com" to make my own. "Frisco" font looks a LOT like Great Northern's lettering, which they have (and which I downloaded for a project). They also have a font called "heralds" which will give you with one keystroke a herald of almost any American railroad (Frisco included). You download their program and install it in your word processing program, and type away. Complete instructions are on their site. I highly recommend it. The only trouble is, printing ink isn't completely opaque and lighter colors may need two decals to bring out the color. The Frisco red is nice and vibrant but still may need one decal on top of another to bring out the color. But it's red lettering and herald on a white background, so try it. I used that technique on a yellow decal over dark blue and the results weren't bad. So red over white will turn out even better. The signature below was made using the Chesapeake and Ohio font. Good luck and let us know if your mission (should you decide to accept it) is successful!
I couldn't find a photo of the yellow on dark blue that I did, but here's dark blue on yellow. The boxcar is made in S, but not in C&O colors, so I copied the O gauge and prototype placement using the railfonts program:


coach joe posted:Lee according to another thread Lionel put those air tanks on only 3 switchers, this Alaska 8154, it's predecessor, Alaska 614, and orange tanks on a DT&I switcher. they do give this switcher a different look.
Good job on the flat. i knew I wasn't the only one using HO decals on O equipment.
Thanks for the information on those. I use HO decals a lot on O scale stuff
Access to this requires an OGR Forum Supporting Membership

")


")

")
")

")
")


")

