


I think (opinion only) you should change the heading to something with "Scratchbuilt or Kitbashed cars "
"resurrected junk,rebuilds,etc"
coach joe posted:Lee according to another thread Lionel put those air tanks on only 3 switchers, this Alaska 8154, it's predecessor, Alaska 614, and orange tanks on a DT&I switcher. they do give this switcher a different look.
Good job on the flat. i knew I wasn't the only one using HO decals on O equipment.
Okay Joe, Lee, and whoever else, the new guy needs some help, Lionel put air tanks on top of three Alaska switchers. What for? And did actual Alaska switchers have them?
I think they done that to engines for more room for bigger fuel tanks I'm not sure
Vincent Massi posted:Okay Joe, Lee, and whoever else, the new guy needs some help, Lionel put air tanks on top of three Alaska switchers. What for? And did actual Alaska switchers have them?
A) IIRC, to keep the air tanks heated with engine heat.
B) Yes, they did.
Mitch
Thank you, Mitch.
Just checking in on this site to see if anyone has modified a Lionel Legacy scale Southern Railway Ps-4 Pacific by replacing the 2 wheel trailing truck with a 4 wheel truck to convert this from a Pacific to a Hudson. If so, I would be interested in knowing the details.
Thanks,
RAY
This Christmas I found a 6-21955 Rio Grande passenger set under the tree. This set comes with a powered F3 A and a dummy A. I rebuilt the dummy as a powered A using the set shell and front truck. I also used an on-hand MPC single-motor F3 frame (was black so I rattle-canned it silver), a TMCC electronic E unit, and a GP power truck and motor. I also used a GP silver colored power truck frame from which I cut the pilot and steps. If you look closely the gap between the engine and first car is wider than normal because of the long GP coupler shank. Some day I'll pick up a proper silver F3 rear power truck frame to address that fault. Meanwhile I added an excellent running Rio Grande F3 to the Plywood Empire Route's iron horse stable.![]()
Lew

BTW, the pic on the wall is of the prototype Royal Gorge c.1962.
That day power was a pair of PA-1s.
Dad took that pic from the Dome.
Attachments
Images (1)
Here is a car I made inspired by the LGB Cement Mixer Car.
The first two photos show the actual car that was and is possibly still on display at the Toy Train Museum in Lancaster, P.A.
The third photo is the final result, made from a variety of Lionel and mixed parts.


Attachments
Images (3)


John T that's one crazy build. You've got a one of kind MOW car.
Terry nice work on changes the windows.


 Here’s a old AHM Boxcar I converted into a 3 rail. There was a little Dremel work involved I used Lionel trucks with the bolster made in the truck. It was a fun project that lasted maybe 1hr.
Attachments
Images (5)
Lew,
I have to admit that the Rio Grande of the fifties would provide a lot more passenger modeling possibilities. I like the looks of that Royal Gorge car.
Terry
Pan Am Railways?
Yes, indeed. It is a holding company for some railroads in New England and New York. The New England railroads were hurt by the fact that manufacturers had fled the NE, so freight traffic had decreased. Add in the fact that most hauls were only for short distances. The new holding company struggled along, adding a bad reputation as it went, so it bought the name and logo of the defunct Pan Am Airlines, which it has no connection with.
with.
Attachments
Images (1)
Yup. If you click the pic of the grille bar and enlarge it you can see napkins with the old Pan Am Airways logo on them.
It may look like a tear down for service, but this actually all parts from the bins. The motor is a brand new OEM unit I’ve had for years. I have locked the reverse unit in reverse. This will be the back end of a ABA with both A’s being powered. Total of 4 traction tires. I also added a wire between the front and rear trucks for better continuity.
Steve


Attachments
Images (2)
From an MPC D&H 9400 box car; custom done by my brother as a 70th birthday present.
Attachments
Images (1)
Happy Birthday, Coal Cracker! And that is a beautiful boxcar.
I finally got around to making a Vanderbilt tender. The Vanderbilt tenders have a cylinder shaped water tank which was lighter and cheaper to build that a rectangular shape water tank that had to have more internal bracing and more rivets and time and material to make. I used a junk Lionel New York Central coal tender, a hard shell mailing tube, the bottom of a hair spray can, a piece of junk metal roofing and some popsicle sticks. All junk stuff, all free or slight cost for the junk coal tender, and paint and decals I had.
I cut up an old coal tender that is shown below. I cut the angle at the coal pile with a band saw and the bottom cuts with Dremel saw blade and Xacto razor saw. Note the crack in the section cut out in the LI NES letters, thusly earning the title 'junk coal tender'.

Coal tender section, frame from sheet metal, and Vanderbilt water tank from mailing tube and hair spay bottom (dia. 2 1/8 inch, a bottom of a Pam cooking spray can will also fit my mailing tube) with decking from popsicle sticks. I added internal wood braces and bottom sticks to popsicle the mail tube. I had to cut about 1/16 inch from bottom of tube make smaller diameter to fit in between top of coal pile and bottom frame.

Assembled ready for painting with Krylon semi gloss black paint. I added a back up light.


Pictured with new to me Lionel 3435 engine from the old Marx 333 mold


I have enough material to make another Vanderbilt tender but with a longer body better for use with longer 2020 and 2046 engines.
Charlie
Attachments
Images (8)


One of these is OEM and one is bashed from parts on-hand.

5521 is OEM and I assembled 5524 using the shell from the dummy A unit that came with 5521.
Lew
Attachments
Images (1)
Lionel 3472 and 6472 reefers......

Attachments
Images (2)

 These are my only two custom thingies. Weaver flatcar with MTH trucks and K line crane with Lionel trucks
Attachments
Images (2)
Choo Choo Charlie posted:I finally got around to making a Vanderbilt tender. I used a junk Lionel New Central coal tender, a hard shell mailing tube, the bottom of a hair spray can, a piece of junk metal roofing and some pop sickle sticks. All junk stuff, all free or slight cost for the junk coal tender, and paint and decals I had.
Cut up old coal tender, I cut the angle at the coal pile with a band saw and the bottom cuts with Dremel saw blade and Xacto razor saw.
Coal tender section, frame from sheet metal, and Vanderbilt water tank from mailing tube and hair spay bottom with decking from pop sickle sticks. I added internal wood braces and bottom pop sickle sticks to the mail tube. I had to cut about 1/16 inch from bottom of tube make smaller diameter to fit in between top of coal pile and bottom frame.
Assembled ready for painting with Krylon semi gloss black paint
Pictured with new to me Lionel 3435 engine from old Marx 333 mold
I have enough material to make another Vanderbilt tender but with a longer body better for use with longer 2020 and 2046 engines.
Charlie
Charlie that turned out great!
Charlie I agree with Dave. Fine job.
")
")
Choo Choo Charlie posted:I finally got around to making a Vanderbilt tender. I used a junk Lionel New York Central coal tender, a hard shell mailing tube, the bottom of a hair spray can, a piece of junk metal roofing and some pop sickle sticks. All junk stuff, all free or slight cost for the junk coal tender, and paint and decals I had.
Cut up old coal tender, I cut the angle at the coal pile with a band saw and the bottom cuts with Dremel saw blade and Xacto razor saw.
Coal tender section, frame from sheet metal, and Vanderbilt water tank from mailing tube and hair spay bottom with decking from pop sickle sticks. I added internal wood braces and bottom pop sickle sticks to the mail tube. I had to cut about 1/16 inch from bottom of tube make smaller diameter to fit in between top of coal pile and bottom frame.
Assembled ready for painting with Krylon semi gloss black paint. I added a back up light.
Pictured with new to me Lionel 3435 engine from old Marx 333 mold
I have enough material to make another Vanderbilt tender but with a longer body better for use with longer 2020 and 2046 engines.
Charlie
Now that’s some good scratch Charlie!


 I’ve been working on some all nations cars here is the latest one I have almost complete I also cut down some Lionel Trucks to lower it
Attachments
Images (7)
 Here’s some that’s on the workbench
Attachments
Images (1)
Just a quick bash, this one:
")
I substituted MTH trucks on this old Standard O gondola. This has the effect of lowering the car making it's appearance more prototypical.

I have standardized on this style MTH truck. Notice the hole in the car floor just above the bottom axle. That is the original truck mounting hole because Lionel built these cars with that odd off-center truck pivot. So I drilled new holes in order that the trucks and coupler knuckles are correctly positioned.
Lew
Attachments
Images (2)
")


 Here’s a MTH Railking I repaint. It was Union Pacific thought I would make it more Proto typical and awesome one of my favorite railroads
Attachments
Images (9)
Lee nice work on the All Nations kit and that Hudson looks much better now that it's wearing the right road name.


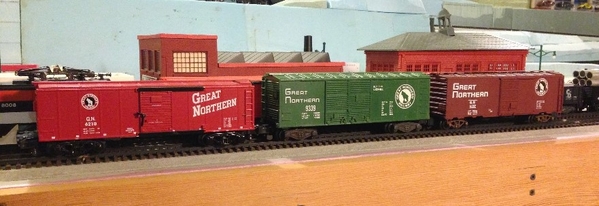
 These are 2 old AHM Boxcars I re paint and decaled
Attachments
Images (5)
You have to be old to remember these being shipped to power plants around the country.
Attachments
Images (1)
Paul very ingenious load. Where did you get tubes in this day and age?
tubes are pretty easily found in antique shops.
Then there was the order to the Tesla plant, he always thought that DC was the better way to go.
Attachments
Images (1)
choochoopaul posted:Then there was the order to the Tesla plant, he always thought that DC was the better way to go.
Paul, that is a fine example of what you can do with a flatcar and a little imagination.
scale rail posted:Thanks Charlie, they are fun to build. It made me feel like I was in the 1950's again. I love building kits but there are so few of them anymore. LaBelle is one of the last. I have a small stack of them now, but not a lot of time. Don


Really Cool! You got me motivated. I just ordered 2 kits from LaBelle.
Any recommendations on brand of glue and paint would be appreciated.
Thanks,
Jeff
choochoopaul posted:Then there was the order to the Tesla plant, he always thought that DC was the better way to go.
One high voltage rectifier and two horizontal output tubes. Nice. I'm an old TV man, too.
choochoopaul posted:Then there was the order to the Tesla plant, he always thought that DC was the better way to go.
I hate to pick nits, but Nikola Tesla was a firm proponent of alternating current. It was Thomas Edison who believed in direct current. In any case, the cars are VERY cool! Got to find some small enough for S use!
Jerry Poniatowski Historic Presenter, The Henry Ford Museum Dearborn, Michigan


 I re-decaled this Lionel REA Boxcar today
Attachments
Images (4)
not a very good picture but you can get was I was trying to make. scale rail posted:
Thanks Charlie, they are fun to build. It made me feel like I was in the 1950's again. I love building kits but there are so few of them anymore. LaBelle is one of the last. I have a small stack of them now, but not a lot of time. Don
Really Cool! You got me motivated. I just ordered 2 kits from LaBelle.
Any recommendations on brand of glue and paint would be appreciated.
Thanks,
Jeff

Well, I'm not much help but I used thick super glue and the last of my Floquil paint. Haven't switched over to water base yet. Don

Attachments
Images (3)


I hope you O gauge guys can forgive me for this one. I assure you that the shell was from a junk box which cost me the grand sum of $3. S guys have known for years that O27 rolling stock is close to 1:64 scale. The "Baby Ruth" style double door car is withing scale inches of being a perfect fit. So this one became what you see in the last photo. Scalecoat paint and dry transfers came into play and a frame from my parts box plus a couple of trucks finished off the car. With the car rolling down the track at train shows, nobody can tell its origin.

Attachments
Images (4)


As a PS to the above post, here's another O27 conversion, but this time a direct frame swap. In the photo you see (left to right): an American Flyer car (which is based on a small prototype PRR car), the O27 car, and an American models true to scale boxcar. The O27 car fits in quite nicely, and in this case with a minimum of fuss.
Attachments
Images (1)

Argh. I love Baby Ruth cars 😨 But that looks good too😬
I keep thinking I've met you at lunch a long time ago Jerry. Maybe at Miller's or Kiernan's, Andiamo's, or the Market? ...🤔 early day Skeeball at the "Mouse house" off Graph on Miave ?! 😶 🤔
JDS repainted the Halloween loco for me last year.
Lets hope for a better year this year.

Attachments
Images (2)
Using Marx 3152 and second hand Lionel cars previously painted, the Seattle Sounder seemed a good inspiration to create a conversion consist.

Attachments
Images (1)


I made some "Trailers" for my Burro crane.

I started out with a Lionel 4 wheel gondola (6-9030) from the Kickapoo Valley & Northern starter set (ca:1970) These cars can be found for a few dollars at train shows. They were made in red, yellow and green. Lionel may have used them in other sets, also.

I separated the body from the base by gently prying the sides of the body until the molded in latches released.

The sides of the car were painted Reefer Yellow. The deck was painted RR Tie Brown. The running gear, wheels and couplers were lightly painted with Rust.

I left one gondola intact. After painting and weathering, I added a ballast load. Extruded foam insulation was cut to size and shaped to the proper contour. I sprayed gray primer on the foam, which reacted causing a rough surface. While the primer was still wet, I covered the surface with ballast. A Woodlands Scenics figure was added.


When hooked up to a Burro crane they make a respectable MOW train for the section gang.
Tom
Attachments
Images (7)
Can someone please recommend a source for military miniatures in or close to O Scale?
Thanks, Jeff
Up grading and making a Cheap Lionel General 4-4-0 dc Locomotive more Functional and Beautiful
A cheap Lionel General 4-4-0, 8005 dc powered set with coal tender and Lionel 9541 Santa Fe Railway Agency Express Passenger car was obtained to have two 4-4-0s like the Great Locomotive Chase of the Civil war.

I added a full wave rectifier and changed the Lionel 8005 to ac operation although in one direction. 
A forward/reverse selector switch was added for manual reversal. 
The Lionel 8005 was painted, along with the red and silver front wheels and painted domes. The body and stack were painted Black. Gold stripping was added to dress up. Much more beautiful !

Here is picture of the smoke stack spark screen I made from a piece of fiberglass window shade screen I had laying around.

The forward/reverse switch was mounted by the door in the rear of the cab.


The Generals getting ready for The Great Locomotive Chase.
A fun and easy project to improve a cheapo General 4-4-0 loco.
Charlie
Attachments
Images (5)


Choo Choo Charlie, that Vanderbilt tender is just a super idea. I wish I had thought of that one, but that's okay... You did.
And I love Gandydancer's reefers made from the short 027 box cars. I asked him about it at one time, and if I recall correctly, they're printed paper sides on modified sides to the car. In his photos, they look so good. The car ladders and door hinges look so 3-dimensional. There's a project I really want to get to myself.
I've repainted the normal Lionel traditional reefers, and have lowered the truck mount so that the cars ride lower, with their overall height now closer to the shorter Lionel, MARX and K-Line box cars. But I still like the shorter length of Gandydancer's versions.

And here's a couple more little projects of mine. I wanted some modern looking tank cars, so using the Lionel 027 body, I built a new frame to mimic the appearance of the newer unibody tank cars. And of course, Procor is a common name seen on tank cars. The bright green ones caused a sensation in the HO world when they first appeared on the real rails. Although black tank cars are certainly more common on the rails, the bright green appealed to the toy train guy inside me.
Below that is a MOW crane flat that I made using a crane from a kid's toy truck. The flat car was an old beat up MARX one. The crane boom goes up and down, and also rotates around, but the crane hook is stationary. For me, it's mostly the appearance of having a MOW crane car on a train.
The red painted fuel tank came from some dollar store kid's farm tractor toy. I added a figure to inside the cab of the crane also. The smoke coming out of the tractor smoke stack is from the fiber used inside pillows, which I think looks way better than the cotton so many have used in the past.


Attachments
Images (3)


brianel_k-lineguy posted:Choo Choo Charlie, that Vanderbilt tender is just a super idea. I wish I had thought of that one, but that's okay... You did.
And I love Gandydancer's reefers made from the short 027 box cars. I asked him about it at one time, and if I recall correctly, they're printed paper sides on modified sides to the car. In his photos, they look so good. The car ladders and door hinges look so 3-dimensional. There's a project I really want to get to myself.
I've repainted the normal Lionel traditional reefers, and have lowered the truck mount so that the cars ride lower, with their overall height now closer to the shorter Lionel, MARX and K-Line box cars. But I still like the shorter length of Gandydancer's versions.
And here's a couple more little projects of mine. I wanted some modern looking tank cars, so using the Lionel 027 body, I built a new frame to mimic the appearance of the newer unibody tank cars. And of course, Procor is a common name seen on tank cars. The bright green ones caused a sensation in the HO world when they first appeared on the real rails. Although black tank cars are certainly more common on the rails, the bright green appealed to the toy train guy inside me.
Below that is a MOW crane flat that I made using a crane from a kid's toy truck. The flat car was an old beat up MARX one. The crane boom goes up and down, and also rotates around, but the crane hook is stationary. For me, it's mostly the appearance of having a MOW crane car on a train.
The red painted fuel tank came from some dollar store kid's farm tractor toy. I added a figure to inside the cab of the crane also. The smoke coming out of the tractor smoke stack is from the fiber used inside pillows, which I think looks way better than the cotton so many have used in the past.
Brianel, I hate Conrail. But that's the first Conrail vehicle ever that I didn't hate. It looks pretty sharp.
Nice work on the crane Brian


 Here’s a Lionel Standard O Boxcar I repainted and decaling in NYC
Attachments
Images (3)
choochoopaul posted:You have to be old to remember these being shipped to power plants around the country.
Those look like preamp tubes for my Marshall amp. 😎
Guitarmike posted:choochoopaul posted:You have to be old to remember these being shipped to power plants around the country.
Those look like preamp tubes for my Marshall amp. 😎
Another fine example of what you can do by combining a flatcar with imagination.


Since at least the 1960's boxcar catwalks have been prohibited. I decided to try removing them on several boxcars. Since they are not add-ons but are molded into the plastic, I used a Dremel tool to get the job done, along with a hobby file to cut down the recessed areas. I also shortened the ladders on the ends and sides. Final picture is one with the roof weathered.
Terry
Attachments
Images (7)


We had need to haul flamingos on our layout, so we modified an MTH Premier stock car for dedicated flamingo transport:


Attachments
Images (3)


I made the CN boom car from an MTH TOFC car with compartments and toolboxes underneath. Atlas trucks were used instead of MTH to lower the car.
Attachments
Images (2)
This storage mail car began life as a Williams 72’ REA Mail/Express car. It was Pullman green, but it had gold pin striping (which I did not like). I tried to sell it cheap at a train show, and I tried to sell it on eBay but nobody wanted it. So I decided to keep it, but change it into something more appealing to me.
I always liked the look of an old silver painted, grimey baggage car. It would look at home in a cut of ATSF outfit cars, too.
My opinion of Williams stuff has never been favorable except for this type of car. It is well constructed, easy to disassemble, and seems to have accurate dimensions. 


If I stumble onto some realistic diaphragms they will be added.
Attachments
Images (3)


 Flared spark arrestors, ala Frisco:
Attachments
Images (2)
Not a Lionel car or engine, but...…. thought this might be of interest to some one.
A few yrs ago and recently I bought several Lionel 455-23 oil drums, decided to drill them out.
Center punch the center where you want to drill the barrel out. If you want a barrel to look rusted out, offset the center punch approx. 1/16" off center, the drill bit will cut slightly along the outer edge.
Approx 1/8" drill bit for pilot hole, 13/32" drill bit for finished hole.
I used 2 strip's of luan to hold the barrels in the vice clamp to help secure and prevent the barrel from rotating while drilling.
 barrels (1)")
 barrels (2)")
 barrels (3)")
 barrels (4) jpg")
 barrels (5)")
Attachments
Images (5)
 barrels (1)")
 barrels (2)")
 barrels (3)")
 barrels (4) jpg")
 barrels (5)")
Track cleaning car made out of a MTH test weight car.


Tom
Attachments
Images (8)
Okay, Trussman, I understand that you drilled out some of the barrels to make them "rusted out." But why did you drill out the other ones?
Trussman,
I did this same thing a few weeks ago because I needed an empty barrel. I was pleasantly surprised at how easily it drilled out!
Vincent Massi posted:Okay, Trussman, I understand that you drilled out some of the barrels to make them "rusted out." But why did you drill out the other ones?
To put things in like shovels, pipes, trash barrels, burn barrels and stacked on their sides as empty barrels, just to names a few.


JB, that is one realistic-looking old gondola.
Vincent Massi posted:JB, that is one realistic-looking old gondola.
I learned the glue technique from a Lionel.com blog 2 or 3 years ago. Doesn’t really show well in the photos, but it is amazing what some blobs of white glue can do to create that bulge effect.


Here is a New York Ontario & Western R.R Inspection locomotive that me and my brother made It was the locomotive from the 8410 Redwood Valley set. I got on eBay for $38. It still needs handrails and decals. 
Here is a better view of the modified tender with real coal. Tool boxes are also custom.
Here is what the locomotive looked before it was modified.
Attachments
Images (4)
You fellows really amaze me with the clever ideas and super construction. Great work. After more than 30 years in model railroading there are several things I have never seen before.
I really like that New York Ontario & Western R.R Inspection locomotive by Porter09. A very unique car and an operating engine to boot. I bet no one else has one of these !
Charlie


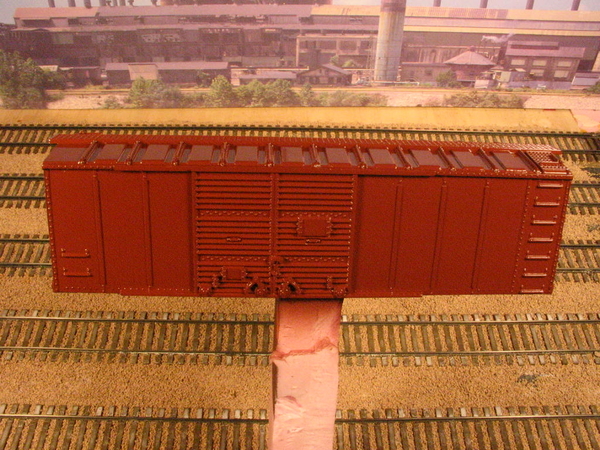
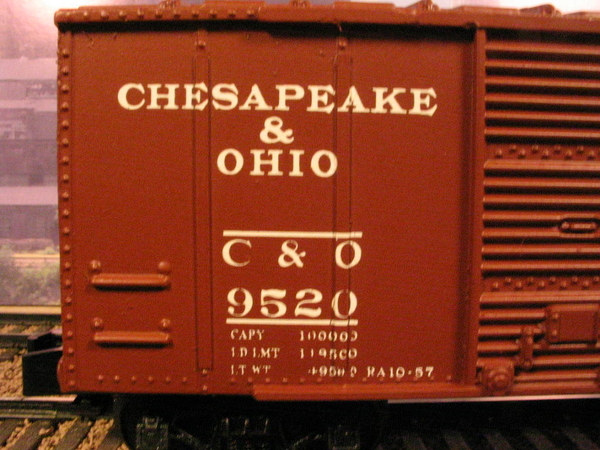
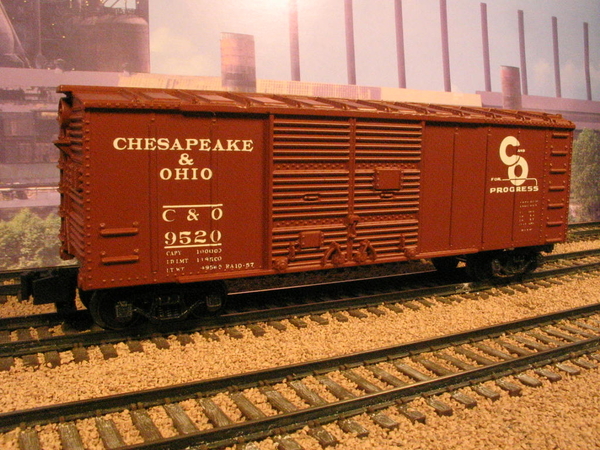
This weaver boxcar doesn't possess the realism of an Atlas Trainman or Masterline car, but I couldn't pass on it since it is C & S. You just don't see a lot of C & S / F W & D cars for sale. So, I added lube plates and ACI badges, weathered it with Chihuahua desert dust, and dull-coated it. Because of the wheelsets, it still looks somewhat like a 2 year old wearing his father's work boots, but I thought it looks better.


Attachments
Images (4)

I got 2 - A&WP #290 (Now Lionel makes one - but I like my K-Line more) and Frisco #4018 with a matching caboose. Not a lot of options for us Southerners - especially in the steam era! But nice to see Lionel trying, but much cheaper to get on the secondary market and re-letter! I'd like to find another K-Line Pacific undecorated and letter for Western Railway of Alabama.


Attachments
Images (3)


lee drennen posted:
I’ve been working on some all nations cars here is the latest one I have almost complete I also cut down some Lionel Trucks to lower it
Nice work Lee', I love the All Nations kits'. Questione for you, What size and type screws are you using to install MTH trucks the cars? Thanks in advance Lee for your help'.. 
Memories from when my son was little.
Attachments
Images (1)

")
")
")
")
Hi everyone', here's a scratch built ,"Payroll Car" from a half of an "All Nations ", diner car. The red side is pieces of balsa wood. It is based on a kit of an actual wood payroll car. [not sure of the brand] . The trucks are old school "Walthers, cast white metal, with old plastic and metal wheels from various scrap parts. The actual kit was in a million pieces of small 1 x 1.5" sheets of basswood. No hint of instructions, I couldn't figure out how to put it together, so I designed and built my own version. Complete with the pay master and RR uniformed police, for security, and the gang foreman...![]()
In case you are wondering why I write in bold'? It helps me see the print'..![]() poor eyesight'
poor eyesight'


Actual 'Payroll Car'


Attachments
Images (9)


Quarter Gauger, that is an interesting-looking railcar.


 Did a little more work today on one of my Williams Brass K4s. So far have cut out 1/8” in the frame between the cylinders and drivers and maybe 3/16” from the nose of the frame. Also cut 1/8”ish from the front of the second course just behind the smokebox. Temp 36” dia freightcar wheels for the pilot and shortened the pilot by abot 3/8”. Today I got around to soldering the boiler back together, not done but in solid and seemingly straight but still a lot of fiddling to go. Looks like it will take my 0-42 curves as is. Its getting there slow but sure.
Attachments
Images (3)


A minor alteration when my orange cable reels got lost. Just a couple of YoYos.
Charlie

Attachments
Images (1)

A MTH NE style caboose converted to two rail, repainted, weathered and has the trucks pushed outward for a prototypical spacing.
Attachments
Images (1)
Glad to see this thread still going. I'll have to see if I have pics of some more homegrown cars.
I see Porter09 and another have done inspection engines ...l was planning one, but has seen a photo of a similar, but longer steam coach, and built and posted it. Think l used a Walthers combine kit. I have a number of "critters", some I'd forgotten, such as an 0-8-0 switcher with Elesco and flying pumps. Others are a steam dummy, a Lionel 0-8-0 bashed into a Great Western consolidation, pickle plant factory branch cars, etc. Will have to post photos.

I also really enjoy this thread,it's a reminder of model railroader ingenuity at it's finest.
Please keep posting the pictures,it really shows the creative side of the hobby that makes it more than just cookie cutter train running .
Hey Porter09, The Excelsior looks just like the 'executive inspection' cars for the big railways of the steam erra... Nice job'....![]()
![]()
I have posted these railcars before, with the steam coach centerpiece. I will build a Walthers gas electric and maybe an inspection engine to join them. I have a Mack rail bus and a very rare Sykes rail bus, in brass, 3 railed, l can't quickly find. Both need reverse installed.
Photos:
Attachments
Images (1)

Now photo of steam coach, also previously posted:
Attachments
Images (1)

Now will add photos of steam coach, #60 Consol. on the Great Western, with a stand-in tender, built from a Lionel 0-8-0, a switcher maybe built from same source, for my free-lance road, with Elesco, flying pumps, and Vanderbilt tender (as l want all equipped), and a Marx #1829 bashed into a Mikado. All need better tenders...#60 a scale one, all others good models of varying lengths of coal Vanderbilts.
Attachments
Images (3)

")

And the free lance Lionel 0-8-0.
Attachments
Images (1)

Lionel Standard Gauge 339 cars converted to M.U. cars that actually run off a live catenary .

Attachments
Images (2)
Added a cover to one of my 512 Standard Gauge gondola cars.


Attachments
Images (6)
Here is another standard gauge car I worked on . I took a 513 cattle car and converted it to a lighted poultry car.


Attachments
Images (7)


Homemade Longer Vanderbilt Tender
Got around to making a second longer Vanderbilt Coal Tender, marked up as a Rock Island. It is identical to the shorter Vanderbilt Coal Tender except it is 1 inch longer. 
I cut up an old coal tender with the band saw.
Added 1 inch to the side bottom rails from the plastic from the not needed part of the CT and added pieces of tin to strengthen with J B Weld.

A bottom was made from a piece of sheet metal roofing bending the folds in a wood working 4 x 10 inch Columbia vise.

The water tank section was made from part of a 2 inch dia. mailing tube and decking and reinforcing was make from popsicle sticks. Dark red sealing was from 60 year old model airplane dope.

The crack between the coal pile and water tank was filled in with balsa wood. A pair of six wheel Williams trucks, one with a coupling, were purchased years ago at a train show just for a large Vanderbilt coal tender. The tank domed back is from a hair spay can bottom, ground off with a grinder. See the back up light and hand grab ready for the ladder to come.

A back up light and ladder (made from N gauge track with every other tie cut out) and hand hold were added to give more detail. The first shorter Vanderbilt CT also got new ladder and hand hold. The CT was painted with Krylon semi gloss black spray can paint.

Decals were applied and sealed with clear spray paint. The 50 year old decals had to be sprayed with clear before applying as they disintegrated in the water.

The new, longer Vanderbilt Coal tender is only one inch longer than the first one and the same length of the longer Lionel 6 wheel CT sold with longer engines. The big boy CT sure makes the shorter one look stubbier. The longer CT and the longer Lionel 2065 will not quit fit on my turntable so the get to stay on the layout cruising.


Charlie
Nice work Charlie, good use of on hand materials and tools'... very clever'..![]() The tenders look great'..
The tenders look great'..


Made this BN F3B unit from an MTH B&M B unit. Scalecoat paint and Microscale decals.
Attachments
Images (3)


 This F7 is an unpowered unit that became my second attempt at painting Frisco mandarin orange/white. The “two foot rule” definitely applies here. To make it more authentic to SLSF I added flared smoke arrestors, a yellow beacon, and a forward facing 5 chime horn. The decals are from K4. This will look right at home hauling the QLA, QSF, or CTB from Birmingham to Floydada, TX.
When I get better skills at painting, I may start taking better photos. For now, I will just weather it Heavily with road grime and blame the Springfield diesel shop for the appearance.
Attachments
Images (5)
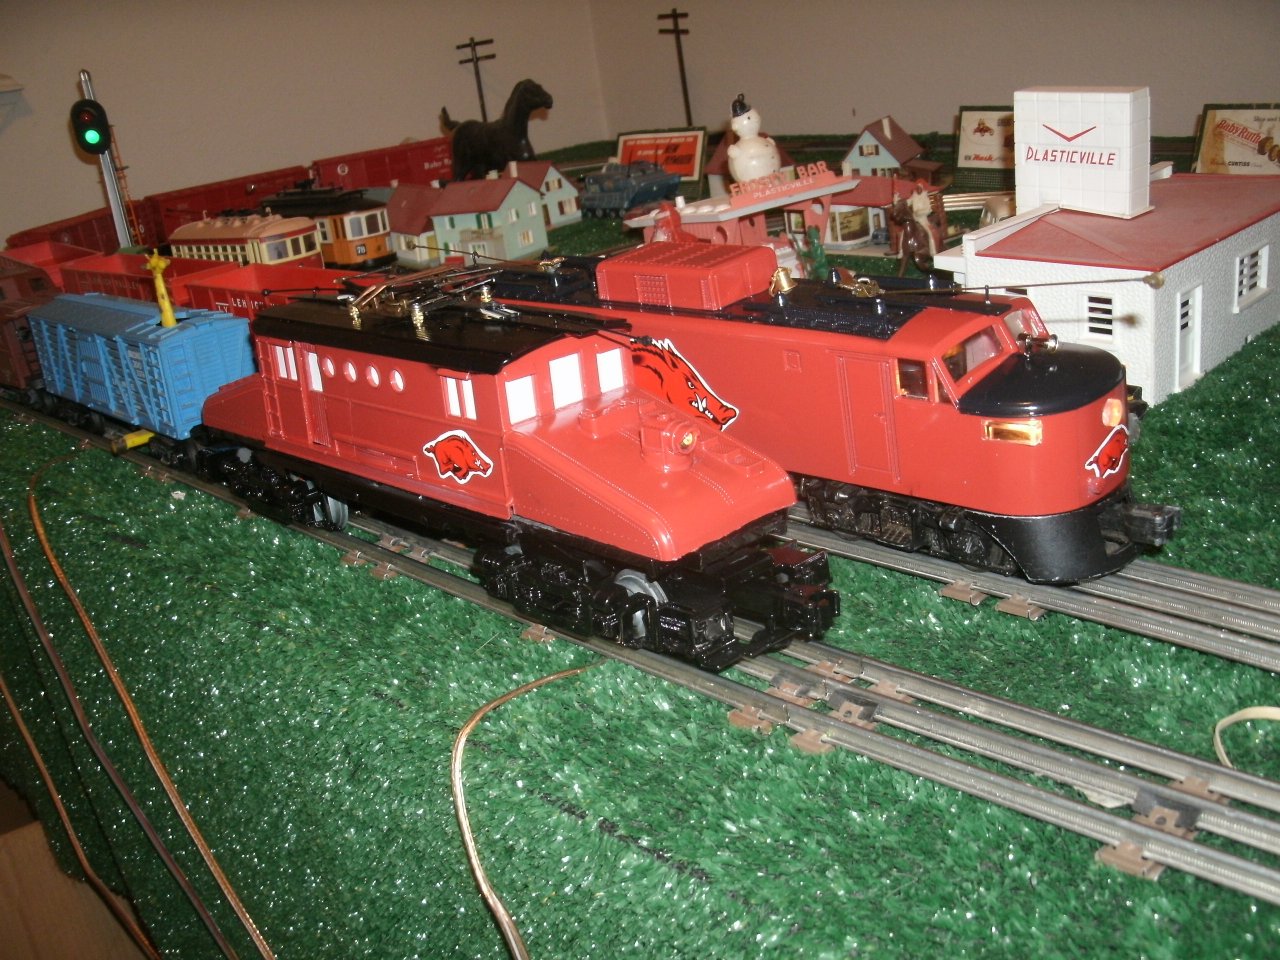
I didn't know where to begin, so here's a view of the Razorback Traction Co. empire, where pretty much every bit of rolling stock has been tweaked or outright fabricated in one way or another...

With the sometimes dubious assistance of the staff, of course...

Mitch
Attachments
Images (2)
Did this one 10 yrs ago this mouth..


At the July Greenberg train show in Monroeville, PA, I purchased a 2-rail U.S. Navy Helium car that needed some work. It had one panel missing on the top by one ladder, but was otherwise intact. It was missing some handrail and door lock details which were never installed by the original builder, and the original decals had been incorrectly applied. It appeared to have been made some time in the 1930s or 1940s due to the now yellowed lacquer that was used to seal the car.
I started working on it to repair it, add the missing details, and convert it to 3-rail for regular operation. I made the missing panel out of bass wood and installed Lionel LionScale trucks to the metal Westbrook frame. The end sills had to be ground down a bit to allow clearance for the couplers. Also, I am not sure if it is a Westbrook kit, as it appears that the original builder updated a few details like the end sills, side steps, ladders, and frame. I added the missing brake details to the bottom of the car as well. I started painting the car silver with a black undercarriage. I used Tichy Train Group decals for the U.S. Navy Helium car. The decals are for the 3rd generation Helium cars and the model is of the 2nd generation cars, so I had to take a little liberty with them. I had to create the eagle decal from a picture of the original on the car. I took a clear photo of it and edited the photo with Microsoft Paint to create an outline of the eagle that I could print on decal paper. I finished applying the decals last week and put the final clear coat on Friday morning. Please see the attached photos.
Here is the car the day I got it.

Here is the car after I made the missing roof panel and converted it to LionScale trucks.


Here is the final product after working on it over the last four months.


Attachments
Images (7)
Here are my custom painted, by CJB painting, Lionel 2243's done up for Autism Awareness. She painted these two F units for me a few years ago back when I was not working. Both F units were given to me for the purpose of this project. Times are much better now and its time to dust these off and run them again. I wish I still had the 2333 NYC's. Mike the Aspie

Attachments
Images (1)
Howdy, I have shamelessly posted these elsewhere on the site but as they show the only railroad construction project completed in 2019 I will bother you again.  This is a kit-bashed Labelle traction motor. It was a hoot to get done in general.
Jim K


Attachments
Images (4)
Jim,
Very nice & unique.
Tom


Attachments
Images (6)


Past and current endeavors for my military consists.....
Jesse TCA


Attachments
Images (5)


wbg pete posted:
Pete, I really like that. I've had the very same idea of shortening a 4-bay quad hopper for quite some time, but couldn't visualize how it would look. Now I know thanks to you. Super!
I prefer the Industrial Rail and MTH Rugged Rails versions of the quad hopper as they are smaller than the Lionel one. Seeing this photo gives me cause to reconsider that thinking.
@Nick R. I'm not a fan of the Polar Express, though I am appreciative of what it has done for the hobby as a whole. That said, I really like the project you have going there.
Beats me, why Lionel didn't try the same idea, other than it wouldn't be representative of the style of engine and cars in the movie. Therefore maybe also a licensing issue.
Still that engine and cars would look right at home on 027 curves. Which is why I do the projects that I undertake. Nice idea. Post some more photos as you progress with the project. I like what I'm seeing so far!
Here are some of mine....


Attachments
Images (3)


midnightwrecking posted:Canadian National Hudson tank engine, commuter service to Montreal. I had to have one first time I saw a picture of one!


")


Came across this and just wanted to say, wonderful job!! Is that PS1? I have the Pennsy 1014 from MTH with PS1 (same engine besides the decals)
NS6770Fan posted:midnightwrecking posted:Canadian National Hudson tank engine, commuter service to Montreal. I had to have one first time I saw a picture of one!
Came across this and just wanted to say, wonderful job!! Is that PS1? I have the Pennsy 1014 from MTH with PS1 (same engine besides the decals)
![]() This is absolutely outstanding and an incredible customization!!!! I've seen plenty of scratch built and modification engines, in all scales. This is one of the best. Congratulations on your excellent modeling skills. You have also given me an idea of using wire to make piping'. Thank you" I never thought of that until I saw your work'... And impressive work it is indeed'!!!!
This is absolutely outstanding and an incredible customization!!!! I've seen plenty of scratch built and modification engines, in all scales. This is one of the best. Congratulations on your excellent modeling skills. You have also given me an idea of using wire to make piping'. Thank you" I never thought of that until I saw your work'... And impressive work it is indeed'!!!!
Wanted a newer steel caboose to go along with my CNJ plywood one (posted earlier in the thread). Started with an MTH C&NW Northeastern caboose (looked great in the green and gold, but I have no other C&NW equipment, and it was available for $15), filled in the end windows and the side window by the stove (this window had the frame removed and was welded over on the prototypes), removed whatever that little thing MTH had sticking out of the roof was, and painted her up for CNJ. Left the handrails by the filled in windows on the end rather than pull them out and replace each one with 2 as on the prototype. Still have to add the hoop handrails to the roof, and eventually weather her up some (as "maintenance" was often a dirty word on the CNJ)...


Attachments
Images (5)


 Here is a very easy mod with good results. My prewar AF Comet came equipped with
steam type wheels and a finicky AF reversing unit. Neither satisfactory.
Solution? I removed the motor from a Marx SP 6000 tin diesel. One screw.
Then I removed the motor from the Comet. One screw. Installed Marx motor
in Comet. One screw.
Result? Disc wheels and a modern e unit.
This should work on the tin Zephyr with no problem.
Attachments
Images (3)


I need one of those, but it might end up in the garage next to my road runner
Steamer posted:I need one of those, but it might end up in the garage next to my road runner
Maybe I just missed them, but why haven't I heard any Road Runner/Coyote jokes since Ford brought out their Coyote V-8 for the Mustang? I guess most new Mustang drivers are too young to remember the Plymouth Road Runner. Beep Beep. (Loved the cars; never liked the horn.)
Now we return you to your trains.
Nick R. posted:Working on my own version of the Diesel Polar Express. Not sure if I'll leave the trucks silver or paint them black. This is the first train related project in awhile, but it's fun to get back into it!
Nick
Got the silhouettes back in and decided on a simple strip for the loco. Now to add some LEDs and it's going on the Christmas village as a static display.
- Nick


Attachments
Images (3)
In my make-believe world, these "steam era classic" 40' boxcars were purchased from AT&SF and repainted for QA&P revenue service. These decals were created in MS Word, saved as .pdf files, and printed on laser waterslide decal paper. I also did a Weaver made boxcar that I have decided to sell at the next Lone Star Hi-Railers train show, March 2020.


The ACF cylindrical hopper was painted and lettered in similar fashion to a Frisco offering by Atlas. It will be put in service hauling raw gypsum from the Acme Plaster Company a few miles NW of Quanah, TX. on the QA&P mainline.


(heavy sigh) What might have been...
Attachments
Images (7)
Rob Leese posted:In my make-believe world, these "steam era classic" 40' boxcars were purchased from AT&SF and repainted for QA&P revenue service. These decals were created in MS Word, saved as .pdf files, and printed on laser waterslide decal paper. I also did a Weaver made boxcar that I have decided to sell at the next Lone Star Hi-Railers train show, March 2020.
The ACF cylindrical hopper was painted and lettered in similar fashion to a Frisco offering by Atlas. It will be put in service hauling raw gypsum from the Acme Plaster Company a few miles NE of Quanah, TX. on the QA&P mainline.
(heavy sigh) What might have been...
The WHAT Railroad?!? But, the QA&P RR really did exist. Located completely in Texas, it was founded in 1902 and lasted 79 years. Still successful, it was merged into Burlington Northern. BN has abandoned some of its trackage, but the QA&P still operates as part of Burlington Northern.
Attachments
Images (1)
Rob, for what it's worth, the QA&P was a successful railroad. Your contributions as an employee are part of the reason.


 This K-Line baggage car got a new paint job and lettering to become QA&P baggage / express car #927. Although there never really was a #927, I have always thought there should be one and this is what it would look like.
Attachments
Images (4)
Homemade Lionel 9278 Life Savers Tank Car
After looking for a reasonable or inexpensive Lionel 9278 Life Savers Tank Car (they are rather hard to find and I have never seen one at a train show) I decided to make one. They are whimsical and very colorful and always caught my attention. I do not know what Mars- Wrigley Co., the present maker of Life Savers five flavors hard candy, would transport in a Tank Car.
Lionel Lifesaver Single Dome Tank Car you can purchase

I had three double dome tank car bodies and frames, unmarked and looks exactly like the Lionel two dome tank cars. I know Lionel used a single dome tank car for their Life Savers car, so I figured a double dome car would work. If they transported the makings for the five flavors, perhaps they needed five dome tank cars !
I chose a tank car body that had a sizable chip missing on one side walkway. I decided to remove the two side walkways as this would make adding the multiple colored strips, by paint or colored tape, much easier. I ground the walkways off with a Dremel grinding bit, small file and knife and puttied it smooth. The center hand rail bracket was also removed as this spot is where the “Life Savers” name label would go.


The ends of the car and domes were spray painted with aluminum paint.

The colored stripes can be masked off and painted or colored vinyl tape can be used. I thought the colored vinyl tape would be easier to do but either way will be a chore. The colors of the stripes should represent five Life Savers flavors which are currently Cherry, Raspberry, Watermelon, Orange and Pineapple. I purchased a couple of rolls of Life Savers, 5 flavors, finally finding them at a Cracker Barrel restaurant and planned on using the package label for my car "Life Savers" logo label. I had problems figuring out which flavors represent which colors on the package so I chose the colors as red, green, yellow, orange and cherry or grape. I had colored tape from a package of six colors of tape, which included red, green, yellow and white. I had some acrylic orange paint and made a purple or maroon color from red and a little blue paint and painted strips of white tape to make orange and purple stripes.
I decided strips of 5/16 inch width would look good and give four sets or so of five colors. I saw the Lionel 9278 Life Saver single dome tank car started with the same order of colored strips from each end and then had to repeat a color or two to make them meet in the middle. The single dome car has a substantial railing and ladders at the middle of the car. My double dome tank car will have an open visible middle and walk way and ladders at the domes, nearer the ends of the car. I decided to start the color sequence at one end and repeat it in order to the other end. I was two colors short of finishing the last two colors on the last sequence. I arranged the colors sequence to use more of the pre-colored tape and less of the two tape painted colors. Cutting the tape around the domes was tedious and the tape was old and had to be glued on in some cases. I found E 6000 clear glue would melt the vinyl tape and I had to use some old auto vinyl trim glue I had to glue it on.
The picture below shows the painted and other colored vinyl tape on the right and the car partially striped. I removed these strips to allow removal of the hand rail anchor as it was in the way of the "Life Savers" logo label to be attached and decided to start the striping from the end.

The "Life Savers" wrapper from the "Life Savers" tubular package was removed and sprayed with clear spray paint on both sides twice to keep glue from affecting them. The logo labels were cut out and glued on with auto vinyl trim glue.
I decided to make one short walkway at each dome and install them on opposite sides and use one ladder for each side to allow access from both sides of the car. I made the walkways out of Popsicle sticks and glued them on with J B Weld. I made a walkway between the two domes so that an operator can climb one ladder and reach both domes. I added plastic window screen on the top of the Popsicle walk ways to simulate walkway grading.

I made two ladders out of N scale plastic track ties and cut out every other tie to give one foot distant between each rung. The ladders and walkways were painted aluminum.
I added a pair of Lionel trucks to the car frame and screwed the tank car shell to the car frame. I then glued the ladders on between the short walk ways and the car frame with a little auto vinyl trim glue as they will have to be removed if the car tank body has to be removed from the frame in the future.


This picture shows several of my homemade cars: my homemade large Vanderbilt coal tender, Lionel 6413 Mercury Capsule transporting car, flat car with two small General engines, Aquarium Car and the Lionel Life Savers Tank Car

My new homemade Life Savers Double Dome Tank Car is my most favorite car. I always say that about my latest homemade car or latest train meet find. I do know this Life Savers tank car is the car that really stands out on any train consist it is in.
You can see how I built my O27, 50s style, 27 switch layout over the past 40 years including many more homemade cars like this and round house with a scratch built turntable for $10 at the OGR link below.
https://ogrforum.ogaugerr.com/...ra-027-layout?page=1
Charlie
Attachments
Images (10)


 These began life as Atlas Steam Era Classics unpainted 8000 gallon tank cars. Cars similar to these actually existed in QA&P revenue service hauling water out of Roaring Springs, TX.
Attachments
Images (3)
Here is the caboose for my circus train in the making. It was made using plastic, Kusan Kanonball caboose.The final touch will be the addition of Marker lanterns.


Attachments
Images (3)
The locomotive received new paint and K4 decals. Every car behind the engine (except Tom’s Shamrock tanker) was repainted and finished with custom made QA&P decals. The double plug boxcar and the silver tank car are based on actual revenue cars that once existed...just not exact.
Attachments
Videos (1)

Randy Harrison: Years back, I once saw an H0 Circus train that I think was actual production named "Burn'em And Bailout, Bungling Bros. Circus". I thought it was pretty funny. Your caboose looks good.
artyoung posted:Randy Harrison: Years back, I once saw an H0 Circus train that I think was actual production named "Burn'em And Bailout, Bungling Bros. Circus". I thought it was pretty funny. Your caboose looks good.
Art:
Thanks for the heads-up on the HO train. I had not known about that and thought Bungling Brothers was my own, twisted creation. I will make sure the Great Northeastern Railways crack Legal division is alerted in case Bungling Bros. Burn'em And Bailout, Circus sues us for Trademark infringement.
My dad and I started making Big Boys back in 1982. We cut up two 736 boilers and used the running gear. The tenders are made out of two 1666 plastic tenders. The trucks are made out of Lionel scout trucks.
The other engines are modified similar. We made about 20 engines all together.
Attachments
Images (7)


gary mack posted:My dad and I started making Big Boys back in 1982. We cut up two 736 boilers and used the running gear. The tenders are made out of two 1666 plastic tenders. The trucks are made out of Lionel scout trucks.
The other engines are modified similar. We made about 20 engines all together.
That's pretty darn cool. Had to make your own stuff before it was available.
On a technical note how are they set up? Are both sets of drivers powered? Are just the front drivers articulated or do both turn? Do they run on 072 track? I'm curious how the mechanism works.


Lou1985 posted:gary mack posted:My dad and I started making Big Boys back in 1982. We cut up two 736 boilers and used the running gear. The tenders are made out of two 1666 plastic tenders. The trucks are made out of Lionel scout trucks.
The other engines are modified similar. We made about 20 engines all together.
That's pretty darn cool. Had to make your own stuff before it was available.
On a technical note how are they set up? Are both sets of drivers powered? Are just the front drivers articulated or do both turn? Do they run on 072 track? I'm curious how the mechanism works.
Just the rear drivers are powered. Front drivers are dummy they articulate and do run on 072 track.
Thanks for asking!
gary mack posted:My dad and I started making Big Boys back in 1982. We cut up two 736 boilers and used the running gear. The tenders are made out of two 1666 plastic tenders. The trucks are made out of Lionel scout trucks.
The other engines are modified similar. We made about 20 engines all together.
Gary,
Fantastic. And I thought my making center cupola cabeese from 2 SP cabeese was something special - I am humbled
Dang, so much talent here, I love this thread
gary mack posted:Lou1985 posted:gary mack posted:My dad and I started making Big Boys back in 1982. We cut up two 736 boilers and used the running gear. The tenders are made out of two 1666 plastic tenders. The trucks are made out of Lionel scout trucks.
The other engines are modified similar. We made about 20 engines all together.
That's pretty darn cool. Had to make your own stuff before it was available.
On a technical note how are they set up? Are both sets of drivers powered? Are just the front drivers articulated or do both turn? Do they run on 072 track? I'm curious how the mechanism works.
Just the rear drivers are powered. Front drivers are dummy they articulate and do run on 072 track.
Thanks for asking!
That's still pretty cool. Would have needed a u joint to get the front drivers powered, plus reengineering the front gearbox. Overall they are way beyond anything I could hope to build.
Keep those post and comments on Homemade cars coming. Great work by all.
Charlie
here’s a little something i’ve been working on, it’s a marx ge 70 ton on a lionel caboose frame, running a heavily modified motor assembly from a 18430 crew car for power.


Attachments
Images (2)
Rob, Charlie, Randy, Gary, Signalwoman great work all. This is one of my favorite threads. I'm glad it's still going.


Rob Leese posted:QA&P 546 was a disappointment to me. 564 is turning out much nicer.
The unit numbers under the cab side windows are still the main problem...they simply do not match the prototype. The remainder of the K4 decal work seems alright.
Bob, if you post the clearest, largest photo of the prototype's cab number you have, a friend of mine may be able to help you get the correct font style and size to supply the artwork for a decal maker. Of course, if you know that information already, the issue is with the decal maker.


 I received this from one of our OGR member so I decided to restore it. I did some scratch building on it like the wheel brake and grab handles I also add some details from Scale City Designs like the Ice hatches, ladders and stirrups
Attachments
Images (16)


 I’ve had two more type of trains I would like to build one is a Millitary and a Circus Train so I decided to start on my Millitary train. This one will have a UH-34D Helicopter in a Gondola. I have to order the decals for Gondola it will be the Nickel Plate Road I Hope the decals work I will also be adding more details to this Atlas O Scale gondola like tie down rings and Kadees. Sorry I will not post the Helicopter build here if you would like to see the build of the Helicopter go to www.scale-models.co.uk/whats-new/ You will find me there in the Millitary section. But you will see the Helicopter on there in some test shots
Attachments
Images (7)

 Decals, weathering, and flat finish are complete. One last step is to remove the truck sideframes and spray them heavily with aerosol graphite (a strange technique I invented). It leaves an ultra-flat black finish that appears grimy and slightly dusty. The graphite also works well simulating rooftop exhaust buildup...and if the results do not look good, it can be removed with a cloth dampened with paint thinner.
Attachments
Images (2)
my attempt at making a cheap lionel 8313 look and run decent, black smokestack, metal side rods, nos ac motor, i added a headlight lens from an 8300, and drilled out the original boiler front to fit it.
i painted the boiler front black, then sanded back the paint on the number to bring out the gold.


the leading truck is just a mock up at the moment, but i’ll find a way. it looks much nicer with it. i can’t remember what the tender came with, but it matches the lines of the locomotive a lot better that the slope back that came with it originally.
Attachments
Images (2)


 Got some decals for my AHM custom Piggyback flat car
Attachments
Images (3)
Rob Leese posted:QA&P 546 was a disappointment to me. 564 is turning out much nicer. There are still several steps to go.

The unit numbers under the cab side windows are still the main problem...they simply do not match the prototype. The remainder of the K4 decal work seems alright.
All done. Mostly...

 Still looking for the correct spark arrestors.
Must admit I did some poor research: of the three GP7’s that Frisco lettered for QA&P only 564 had a steam generator, and this Lionel model has none.
Question: the roof of the short hood is held magnetically and can be easily removed...can a short hood roof with steam stacks be purchased separately? I am really not that picky but this could be an easy fix.
Attachments
Images (2)
Not Super exciting, but I shortened a broken Lionel switcher shell and mounted on K-line chassis. I think I got the grey close enough. Not finished yet, I think it will be L&N if I can find decals. Maybe some yellow handrails. Felt like a decent accomplishment...Jeff


Attachments
Images (3)
Looks great and still like a NW-2.
I cut an inch or so out of a junk Lionel NW-2 switcher shell and added it a Marx 1998 bottom way back in 1983. With that 1998 Marx bottom, it is real fast runner through a O27 oval and figure 8. It is lots of fun converting junk train parts into some thing neat.
Charlie
Thanks Charlie, I find myself looking for more usable junk at train shows. Possibilities are endless if you have the courage to attempt it. Proof is all the great kitbashing from members on this site!
Thanks again,
Jeff
Not mine, but BENZ TRAINZ has come up with something clever.
Mitch


 Still cranking out QA&P rolling stock.
Attachments
Images (5)
 Early stages on this bh flatcar project. When finished it will be loaded with lifts of sheetrock.
Attachments
Images (1)
A work in progress: Using leftover bits to make a trolley sprinkler car.

Attachments
Images (1)
Rob Leese posted:
Still cranking out QA&P rolling stock.
Nice work sir!
Although I thought QA&P stood for Quarantined, Atlantic and Pacific!
jhz563 posted:Rob Leese posted:
Nice work sir!
Although I thought QA&P stood for Quarantined, Atlantic and Pacific!
Historically, it was known as “quit arguing and PUSH !”
Great Job Rob. Super details
Charlie


Attachments
Images (2)

@Nick R. posted:Got the silhouettes back in and decided on a simple strip for the loco. Now to add some LEDs and it's going on the Christmas village as a static display.
- Nick
Nice work, Nick! That’s one fine set.
Truck changes on 2 Marx city service cars..Jeff


Attachments
Images (4)

Alumina Covered Hopper Car
I worked for ALCOA in plants that made alumina, or aluminum oxide from bauxite. Therefore I was interested in having covered hopper cars with their locos on. Lionel made two, one for ALCOA and another for Reynolds Aluminum that ALCOA purchased in 2000. Before I found an Lionel ALCOA car to buy, I made an ALCOA covered hopper car from an open hopper car by making a cover from sheet balsa wood and adding an ALCOA sticker.

Then a Lionel ALCOA covered hopper car was found.

Charlie
Scratch built, freelance Garratt. Except for the running gear (Industrial Rail PRR E6 4-4-2's) and the Weaver scale 40' flat car as the "girder" for the boiler, it's all basswood and styrene and bits.
Man, if you think a typical Mallet has joints and connectors and swiveling parts, you should build one of these!
I was always surprised that MTH never offered a big modern Garratt while they were offering their non-North American steamers. Maybe because most of them were less-than-standard gauge locos. 3.5 feet was common, as in S. Africa, so O-gauge track would have been wrong. I would have bought it anyway.

Attachments
Images (1)
This was an idea my father and I had about 20 years ago. Modify a tender--a cheap one!--by removing the imitation coal pile and creating a bin that can be filled by a Lionel Coal Loader or Prewar Coal House. More than a few pieces of coal miss their mark, but that's just the Lionel way. My father decided to make the bin removable for easier refilling of the Coal House. The bin is fashioned from thin sheet metal--in addition to being a master plumber, my dad was skilled at fashioning ductwork.


Attachments
Images (3)
@D500 posted:Scratch built, freelance Garratt. Except for the running gear (Industrial Rail PRR E6 4-4-2's) and the Weaver scale 40' flat car as the "girder" for the boiler, it's all basswood and styrene and bits.
Man, if you think a typical Mallet has joints and connectors and swiveling parts, you should build one of these!
I was always surprised that MTH never offered a big modern Garratt while they were offering their non-North American steamers. Maybe because most of them were less-than-standard gauge locos. 3.5 feet was common, as in S. Africa, so O-gauge track would have been wrong. I would have bought it anyway.
I forwarded this to a friend of mine who's a fan of Garratts, and he said:
Love it! That's a killer!
I will point out to you that New South Wales had plenty of Garretts that ran on standard gauge.
Also, a lot of South African models are sold to run on standard gauge HO track, also some offer a choice of that or standard TT gauge, which equates to South Africa's 3'6" in HO scale.
Mitch
Fellows Great work on the Garrett and Lionel coal tender with removable coal bin. I need to make a coal tender mod with removable bin.
I will have to find out more about that Garrett engine, sure looks different than normal.
Charlie


The Beyer Garratt is absolutely amazing!! It has long been on my wish list to see it made in O by either Lionel or MTH. I have often thought of building one myself in a fashion similar to the method you used. Thanks for showing it to us.
corsair29
Very neat and attractive locomotive. Like the Garrett, above yours, I am not familiar with your #78, please tell me what type it is.
Charlie
Great-looking Garratt! Nice job!
@Choo Choo Charlie posted:corsair29
I am not familiar with your #78, please tell me what type it is.

Attachments
Images (1)

Admittedly, not a glitzy modification, but I wanted to improve two lowly Lionel 520 Boxcabs. I drilled out the headlight nacelles and installed lamps and lenses, added a rooftop horn to both, and installed a Lionel sound circuit board and speaker in the non-powered 520. I use this pair to pull a track cleaning car around my layout. Photo attached.
Mike Mottler LCCA 12394
Attachments
Images (1)

@Mike H Mottler posted:Admittedly, not a glitzy modification, but I wanted to improve two lowly Lionel 520 Boxcabs. I drilled out the headlight nacelles and installed lamps and lenses, added a rooftop horn to both, and installed a Lionel sound circuit board and speaker in the non-powered 520. I use this pair to pull a track cleaning car around my layout. Photo attached.
Nice job! I used a 520 shell as the basis for the Crocodile...
Mitch
@M. Mitchell Marmel posted:I forwarded this to a friend of mine who's a fan of Garratts, and he said:
Love it! That's a killer!I will point out to you that New South Wales had plenty of Garretts that ran on standard gauge.Also, a lot of South African models are sold to run on standard gauge HO track, also some offer a choice of that or standard TT gauge, which equates to South Africa's 3'6" in HO scale.Mitch
All the kind words are appreciated. I did not know/had forgotten that there were some Standard Gauge Garratts in Australia. I got a book on Garratts years ago, lots of color photos, and I just had to have one, even though "mine " never existed. I was actually inspired at first by a French 4-6-2+2-6-4 - streamlined, no less (of course it was - it was French).
I suppose I should have said "2-3-1+1-3-2". It was beyond me, but I did what I could.
Mike
Great job dressing up the Lionel 520s, they need lots of help in the looks department.
I saved your picture as a references as I want to dress up my boxy 520 too. Mine does not even have a wire pick up on the roof. It is mostly a wall flower now.
Charlie
Just to plant another idea with you, look up Kitson-Meyer locomotives - interesting beasts. This is from David Argent's YouTube channel, showing several of his unique projects.

Does G Scale count?
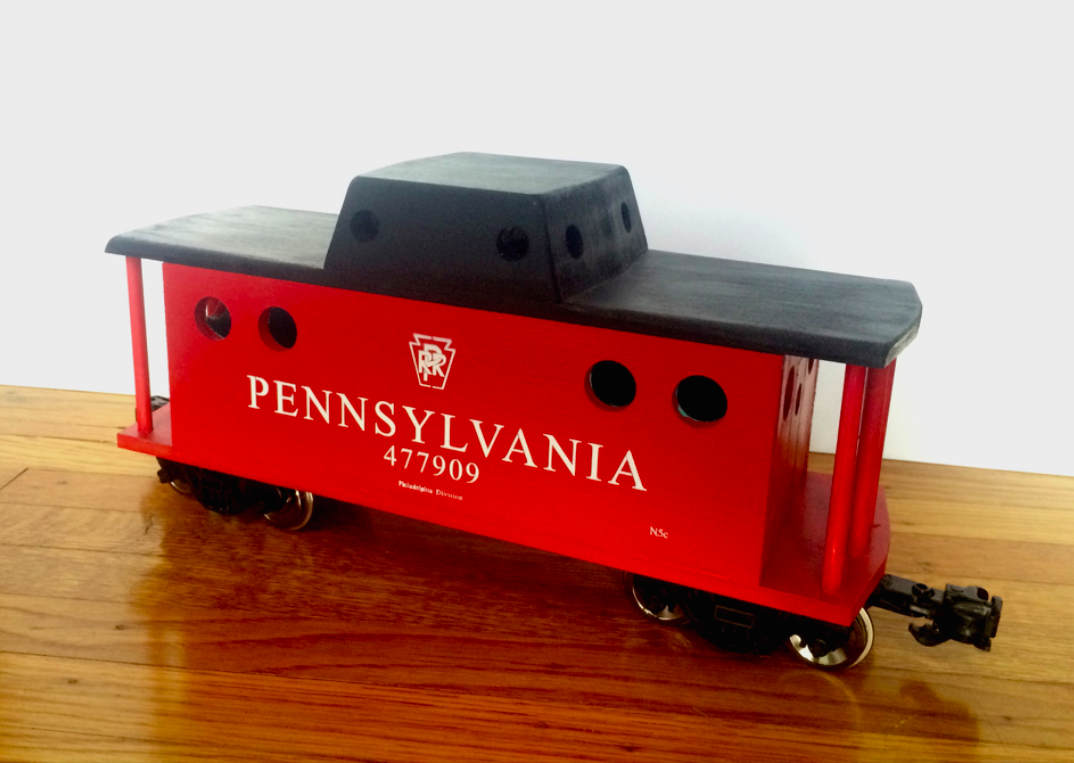
Not the greatest picture but here is a PRR N5c cabin car I build during high school. The trucks are aristocraft but everything else is build from MDF. We had a laser cutter which I used to create the stencils for the lettering on the sides. My one regret was not squaring the windows on the cupola like the prototype has; I wasn't the best at chiseling at the time. I may correct this at somepoint and add steps but don't want to ruin what I already built.
First pic is a window reconfigured Williams Madison which started out like the original shown in the second photo. The arched window treatments follow the prototype and were free-handed styrene inserts. On the next 3 cars I do, I will be using laser cut pieces instead! This was a trial-and-error work.
Terry
Attachments
Images (2)


It would make more sense to call it "Scratchbuilt" or "Kit-bashed" in my opinion. It would just sound more model railroady ![]()
My current rusty scrapyard gondola project. Basic flat spray paints--black, brown, some camo green, red primer. White or wood glue for the bulges. I will touch it up with Dr. Ben's Scale Consortium weathering paints to give it a less "uniform" rusted look.


Attachments
Images (3)
I think most slugs, if not all, were converted from complete diesels. A lot of I have seen did not have cabs. I lived near Conway yards on the old Pennsy when I was a bit younger, and there were a number of slugs, sometimes 2, paired with a mother unit working the hump. These looked like cut down RSD12s, or maybe RSD7/15. They had no cab, but obvously Alco hood units with the hoods cut down to about 4 feet. I understand they would have large concrete ballast in the hoods.
On the other hand, since I have lived in Ohio, and near Northwestern Ohio, I have seen a lot of CSX slugs on local trains. These were generally ex-GP30 or GP35 units paired with a GP40. These slugs all had cabs and I understand they had all controls too. I was told the crews liked to run the set from the slug because it was much quieter than the diesel unit. All these slugs had all the vents for radiators, dynamic brakes, or whatever closed off. Also I think fans on roofs were mostly gone, but not sure. But they still looked like what they started as. It was nice to a GP30 body (slug) on the front end of a short local train trundling along just like when it was a mainline loco.
@CBS072 posted:CBS Railroads new slug..
Using the U-boat chassis and such left over from my steeplecab project, unless I'm mistaken... ![]()
https://ogrforum.ogaugerr.com/...cab-for-only-pennies
Mitch


I have three locos that are bashed/converted Lionel Lionchief Plus locos. The two in the photo below were both Lionchief Plus traditional size (semi-scale) steamers. I converted them to models of scale steamers by: a) measuring their drivers, wheelbase, etc., and then finding an ATSF steamer in the steamlocomotive.com database with the same number of drivers that matched those dimensions at 1:48 scale, then b) removing the body and building a new body, adding or deleted pilot wheels and such, as needed, at a scale 1:48 of that prticular loco. Similarly rebuilt a new tender body for each. The most obvious change on each is a bigger cab on both (its about 3/8 inch taller in both cases). I particularly like 1856, but 3158 is a good runner and a nice size little loco for my layout.

The top loco in the photo below is a stock-as-a-stone Vision 2-10-10-2 ATSF 3000, just included for size purposes. The bottom loco, 1171, has the chassis from two Lionchief Plus steamers (both with the same road # so they respond to the same remote), and a scratchbuilt 1:48 scale body for ATSF 1171. A bit before 3000 was built, ATSF built 1171 and a few other bendable boiler articulated locos. Santa Fe experimented with two different ways to make a long boiler on an articulated loco bend. Both types of locos ran well but the flexible boiler joint was a monstrous maintenance headache. 1171 was eventually disassembled and rebuilt as two 2-6-2s.

Attachments
Images (2)


@Mike23 posted:I know you're looking for high quality, air brushed and perfectly detailed trains, but here's mt Mt. Dew car. been drinking that stuff for about 50 years so my friends get a laugh from it.
Do the Dew! ![]() How did you Dew the little cans?
How did you Dew the little cans? ![]()
Mitch
As with the Dew decal/logo, I got them on ESTY I think. Anyway, I just googled Mt. Dew gifts. (there were tons of stuff)!
@dkdkrd posted:As clever and well thought out as the tender modification is, the very best part of this is having your dad be an active part of the hobby and a creative contributor. I would easily consider that tender falling into the "Priceless" category.
You are VERY blessed, indeed!!
KD
KD,
Thanks for the kind comment! You hit it right on the head--this hobby has connected me and my father for more than 40 years. Lionel was spot on its marketing about the power of hobbies like this to bring fathers and sons together. On that note, it is terrible how COVID-19 has "stolen" train shows from us, because that has been another great source for creating social connections with others for myself and my father.
All the best!
John
@Lee Willis posted:The top loco in the photo below is a stock-as-a-stone Vision 2-10-10-2 ATSF 3000, just included for size purposes. The bottom loco, 1171, has the chassis from two Lionchief Plus steamers (both with the same road # so they respond to the same remote), and a scratchbuilt 1:48 scale body for ATSF 1171. A bit before 3000 was built, ATSF built 1171 and a few other bendable boiler articulated locos. Santa Fe experimented with two different ways to make a long boiler on an articulated loco bend. Both types of locos ran well but the flexible boiler joint was a monstrous maintenance headache. 1171 was eventually disassembled and rebuilt as two 2-6-2s.
Oh, thank goodness - now I don't have to build a "jointed boiler" ATSF articulated. You have. It looks sharp. ATSF articulateds are on a planet of their own, anyway. In a good way.
How about a thread on your loco with up-close photos. I want to see the joint, especially.
(For those who are unfamiliar, the ATSF jointed "boiler" wasn't really quite that, though that is the common term for it. The actual boiler was the rear section, and the front was a large feed water heater/re-heater. I forget the exact arrangement; I need to get out one of my Santa Fe books.)
@M. Mitchell Marmel posted:Using the U-boat chassis and such left over from my steeplecab project, unless I'm mistaken...

https://ogrforum.ogaugerr.com/...cab-for-only-pennies
Mitch
Yes, Mitch that is the trucks and fuel tank from the U-boat but not the frame.

The U-boat frame was too short, So I built a frame from 2" x 1/4" aluminum and styrene.

The body is styrene and a cab from a K-line KCC MP15.
I plan to have the slug at the club's first meeting in a few months for "show and tell".
Attachments
Images (2)
@D500 posted:Oh, thank goodness - now I don't have to build a "jointed boiler" ATSF articulated. You have. It looks sharp. ATSF articulateds are on a planet of their own, anyway. In a good way.
How about a thread on your loco with up-close photos. I want to see the joint, especially.
(For those who are unfamiliar, the ATSF jointed "boiler" wasn't really quite that, though that is the common term for it. The actual boiler was the rear section, and the front was a large feed water heater/re-heater. I forget the exact arrangement; I need to get out one of my Santa Fe books.)
I'm pretty sure Lee articulated that build. heh heh. This forum or another.
Add Reply
Sign In To Reply
