@obxtrainman posted:Here’s a couple OGR buildings.
Wow, great interior details, well done!


|
|
@obxtrainman posted:Here’s a couple OGR buildings.
Wow, great interior details, well done!
A faux-tinplate station made from non-strategic materials:

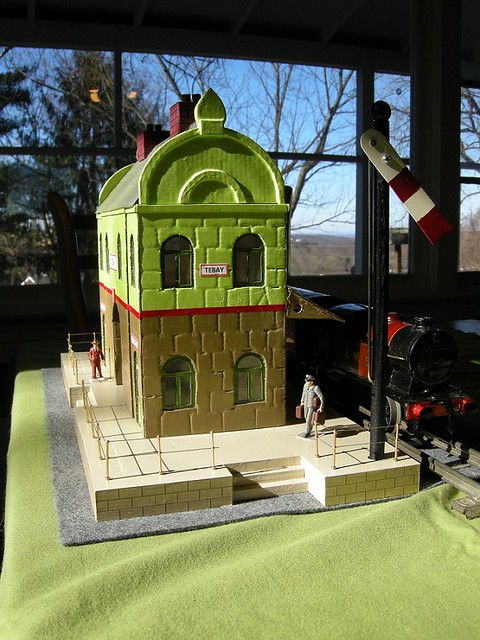
Started as an experiment to see if one could replicate embossed tin using thin corrugated. Worked mostly...
pd, I really like that station. Would you tell us how you built it?
Took a $1 crane from a Marx crane car I bought at the Wheaton train show. Was orange, repainted it flat black, added a plastic floor, doors and a seat and operator. Then I cut a 2 &1/2" section of 3 inch plastic tubing I had lying around, super glued some vinyl Christmas brick roadway to it. Added 2 plastic concentric circles one glued to the tube the other to the crane base. Drilled a center hole & glued in a dowel. Now I have a pillar crane for my steel coil yard.

I came across a Lionel smoke fluid loader that was stripped of the electronics. So I modified it to represent a fuel storage facility for my layout.
RAY

@Forty Rod posted:pd, I really like that station. Would you tell us how you built it?
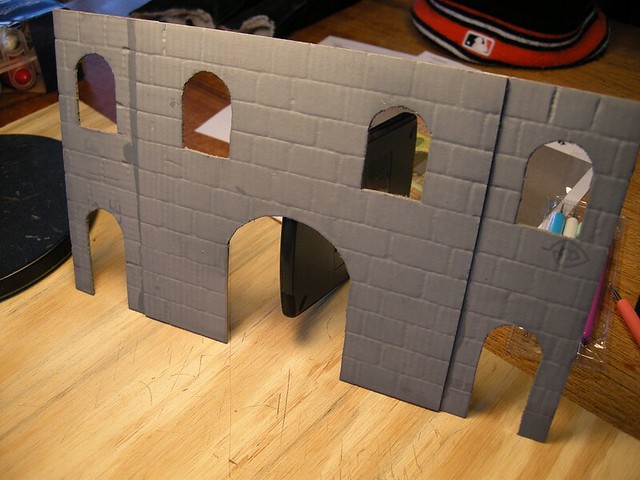
Unfortunately, I didn't take too many pictures along the way, but here are a few. I started off with USPS corrugated, cut to shape, built up in layers with window/door openings drawn in:

After cutting out the four sides and the openings, I used some embossers I bought at Michael's in the scrapbooking section. I carefully embossed stonework onto the corrugated, than gave each section a primer coat:
This was done with each side, than a two-tone paint scheme was provided using gloss spray-paint:
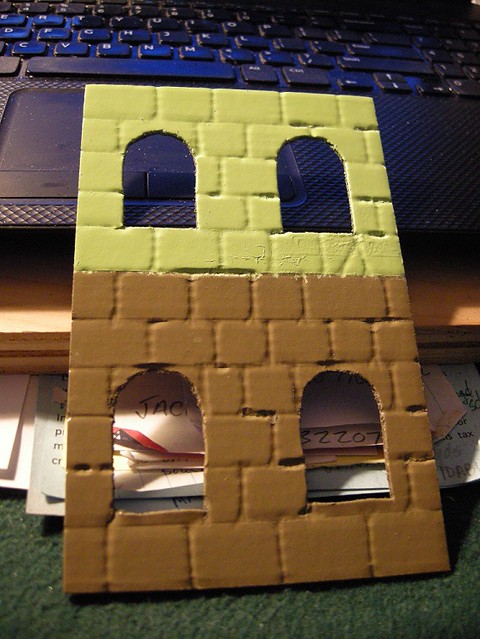
In a few spots you can see I pressed a bit too hard and poked through the top layer of paper on the corrugated. It added to the texture a bit, and in some places was covered by striping (automobile detailing tape) and/or signage. Window/door frames were cut from cardstock, painted, then cemented in. Signage was printed using Excel and the Inkjet printer:

The original Marklin station had no sidewalls in the "tunnel" bit, but I made a pair (seen at the top), including doors for a book-stall and a parcel office. For the book-stall, I scanned some lithography on an old Hornby station, printed it, than used it in the window. It's hard to see looking into the tunnel, but I'm hoping that it will be more visible when the internal lights are turned on.
I used a couple sheets of acetate to make window glazing, shot on one side with flat matte to give it a frosted appearance. This I cemented in using some Loctite GO2 cement, a personal favorite for many projects.
I went on to cut a couple of gable-ends to form the end bits for a lift-off roof using basswood for stringers. I then assembled the whole structure bit with basswood and Titebond at the corners and more corrugated at the center to keep everything square (and forming the ceiling of the tunnel bit in which I cut two holes for the internal light to shine through and illuminate it):
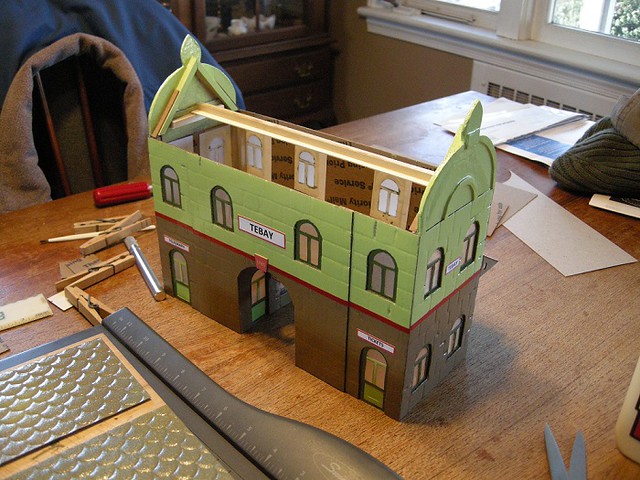
I made a couple of roof panels using some cereal box card-board and a piece of embossed paper purchased at Michael's that looked a bit like scalloped shingles (seen in the picture above lying on the paper cutter). The embossed paper had some sort of glitter applied to it...I lightly sanded this to remove as much as possible, than gave it a mottled paint job using gray paint, along with a dusting of the green and brown from the sides, all topped with an overspray of clear gloss.
For the platform roof, I made a rudimentary structure which I covered with one-sided corrugated I got from my good friend Howard Lamey. This stuff is brilliant, replicating the look of corrugated roofing perfectly. I gave that a shot of "steel" paint, washed it with some diluted black acrylic paint, a shot of clear gloss lacquer, than cemented the whole thing to the back of the station using more Titebond and a couple of straight pins for temporary fasteners.
The chimneys were fashioned from some matt-board cut to shape, covered with some hand-drawn brick paper, and tops made from a piece of matt board and a couple pieces of dowel (painted terracotta using some decent craft paint). They were each give a blast of clear-gloss spray lacquer (although it didn't dry with much luster).
That done, I moved on to the base/platform. This was cobbled together using scraps from the shop. I made it a bit too big, I think, but it worked:
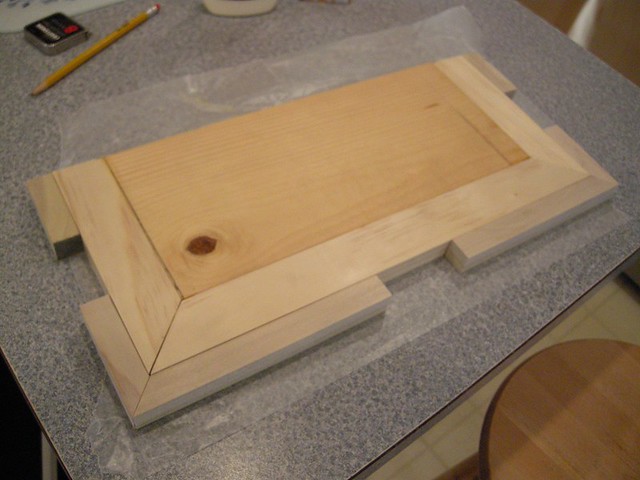
I used 1/4-inch basswood to build up some steps, than gave the whole thing a coat of acrylic paint (Howard Hues "concrete", no. 1106). For the edges, I printed some gray stone paper on cardstock, gave it a dusting overspray of some light brown, than cut it to length and height and cemented it on. Once dry, I gave the whole thing an overspray of clear satin lacquer:

Stanchions were from my model ship bit box. I had some brass rod I was going to use for railing, but it seemed too malleable (little hands were going to have it all bent up), so I opted for an old favorite, carbon-steel guitar "string". No one's going to bend that, at least not easily. I glued the stanchions in with more GO2, than strung the wire railing. Base done, I moved on to making a little manual semaphore signal for the end of the platform.
The signal is made from a short length of dowel, a sliver of aluminum cut from an old foot-plate for a door, a bicycle spoke cut to length (with a 90-degree bend at the bottom), and a small bolt, nut, and washer to hold the whole thing together. Three holes were drilled in the dowel so that the semaphore could be positioned for stop, slow down for train orders, or proceed without stopping. The inspiration for this came from an old JEP signal I have seen. Here are some of the bits I used to make a mock-up:

I glued a wood bead on the top for a bit of ornamentation, painted the pole black and the semaphore a combination of gloss dark red and off-white. I then glued the signal in a pre-drilled hole at the end of the platform.
That's about it. Took freakin' forever, but it was a fun project for what I hope/pray is the tail-end of Covid:
There are a number of flaws that manifest using corrugated, one being how to hide the exposed edges. Then again, the tin original had a few "engineering" issues as well. For my purposes, it was a good first attempt; learned a lot and have a few ideas on how to improve it, should I attempt another.
It's nice to see folks here actually making stuff.
@pd posted:Unfortunately, I didn't take too many pictures along the way, but here are a few. I started off with USPS corrugated, cut to shape, built up in layers with window/door openings drawn in:
After cutting out the four sides and the openings, I used some embossers I bought at Michael's in the scrapbooking section. I carefully embossed stonework onto the corrugated, than gave each section a primer coat:
This was done with each side, than a two-tone paint scheme was provided using gloss spray-paint:
In a few spots you can see I pressed a bit too hard and poked through the top layer of paper on the corrugated. It added to the texture a bit, and in some places was covered by striping (automobile detailing tape) and/or signage. Window/door frames were cut from cardstock, painted, then cemented in. Signage was printed using Excel and the Inkjet printer:
The original Marklin station had no sidewalls in the "tunnel" bit, but I made a pair (seen at the top), including doors for a book-stall and a parcel office. For the book-stall, I scanned some lithography on an old Hornby station, printed it, than used it in the window. It's hard to see looking into the tunnel, but I'm hoping that it will be more visible when the internal lights are turned on.
I used a couple sheets of acetate to make window glazing, shot on one side with flat matte to give it a frosted appearance. This I cemented in using some Loctite GO2 cement, a personal favorite for many projects.
I went on to cut a couple of gable-ends to form the end bits for a lift-off roof using basswood for stringers. I then assembled the whole structure bit with basswood and Titebond at the corners and more corrugated at the center to keep everything square (and forming the ceiling of the tunnel bit in which I cut two holes for the internal light to shine through and illuminate it):
I made a couple of roof panels using some cereal box card-board and a piece of embossed paper purchased at Michael's that looked a bit like scalloped shingles (seen in the picture above lying on the paper cutter). The embossed paper had some sort of glitter applied to it...I lightly sanded this to remove as much as possible, than gave it a mottled paint job using gray paint, along with a dusting of the green and brown from the sides, all topped with an overspray of clear gloss.
For the platform roof, I made a rudimentary structure which I covered with one-sided corrugated I got from my good friend Howard Lamey. This stuff is brilliant, replicating the look of corrugated roofing perfectly. I gave that a shot of "steel" paint, washed it with some diluted black acrylic paint, a shot of clear gloss lacquer, than cemented the whole thing to the back of the station using more Titebond and a couple of straight pins for temporary fasteners.
The chimneys were fashioned from some matt-board cut to shape, covered with some hand-drawn brick paper, and tops made from a piece of matt board and a couple pieces of dowel (painted terracotta using some decent craft paint). They were each give a blast of clear-gloss spray lacquer (although it didn't dry with much luster).
That done, I moved on to the base/platform. This was cobbled together using scraps from the shop. I made it a bit too big, I think, but it worked:
I used 1/4-inch basswood to build up some steps, than gave the whole thing a coat of acrylic paint (Howard Hues "concrete", no. 1106). For the edges, I printed some gray stone paper on cardstock, gave it a dusting overspray of some light brown, than cut it to length and height and cemented it on. Once dry, I gave the whole thing an overspray of clear satin lacquer:
Stanchions were from my model ship bit box. I had some brass rod I was going to use for railing, but it seemed too malleable (little hands were going to have it all bent up), so I opted for an old favorite, carbon-steel guitar "string". No one's going to bend that, at least not easily. I glued the stanchions in with more GO2, than strung the wire railing. Base done, I moved on to making a little manual semaphore signal for the end of the platform.
The signal is made from a short length of dowel, a sliver of aluminum cut from an old foot-plate for a door, a bicycle spoke cut to length (with a 90-degree bend at the bottom), and a small bolt, nut, and washer to hold the whole thing together. Three holes were drilled in the dowel so that the semaphore could be positioned for stop, slow down for train orders, or proceed without stopping. The inspiration for this came from an old JEP signal I have seen. Here are some of the bits I used to make a mock-up:
I glued a wood bead on the top for a bit of ornamentation, painted the pole black and the semaphore a combination of gloss dark red and off-white. I then glued the signal in a pre-drilled hole at the end of the platform.
That's about it. Took freakin' forever, but it was a fun project for what I hope/pray is the tail-end of Covid:
There are a number of flaws that manifest using corrugated, one being how to hide the exposed edges. Then again, the tin original had a few "engineering" issues as well. For my purposes, it was a good first attempt; learned a lot and have a few ideas on how to improve it, should I attempt another.
It's nice to see folks here actually making stuff.
pd,
You absolutely have to win the "Most Creative" prize!
Fantastic - reminds me of European tin
Thanks for sharing
Love all of the projects shared here.
For my contributions check out my 2/14 blog post entitled "From Plasticville "junk" Comes Unique Buildings" on www.warrenvillerailroad.com
Thanks fellows for posting the neat projects, the Marx crane on pedestal by third rail. the Lionel smoke fluid station (I did not know they made one) Ray of sunshine and Pds great building out a corrugated car board box and lots of stuff from the scrape pile, super creativity.
Charlie
@coach joe posted:I scream you scream we all scream for Ice Cream!
Is that white caulking Coach Joe?
Very creative - I may "borrow" your idea!
Thanks, John; paper projects are the best. Here's the Parlor Flats depot "cut-out" from the November 1952 issue of Toy Trains magazine, scanned, edited, printed, and assembled:

The semaphore is another homemade. I renamed it Pembroke, the Georgia town a friend of mine lived in.
It was a long winter, lol.
Thanks, Tom. I definitely dumbed it down from the original I used for inspiration, seen here:
https://www.worthpoint.com/wor...n-station-1811103755
I have a fistful of repro ceramic insulators, so I might take a crack at making the telegraph "tower" on top of the original...or not.
Paul
John, thank you very much. The ice cream is backer rod used to caulk larger openings. It comes in various diameters. I don't remember which diameter I used because I had two different rolls laying around. I made smaller concentric circles and used hot glue as I stacked them. The top two or three layers is spiraled backer rod. I couldn't quite get that soft serve peak just right but it gave me a good base for the cherry. Be my guest and copy away. After checking out your Plasticville junk box post I'm sure you've got plenty of imagination and creativity to make one your own.
Here are some photos of a kit-bash of the Atlas Two Stall Engine House. I have seen a lot of photos of this structure in different configurations on layouts. I needed something to cover or at least distract viewers from an access area visible from the front of the layout. I based the configuration on buildings that used to be in town for an old furniture factory. That saw tooth roof line was an homage to them. I didn't have enough wall panels for a total building perimeter but since one side is close to the wall I went with foam core and brick paper on that side. You can see from that one photo that the interior is pretty rough but the painted out windows sort of hide things........... and the place is only FOR RENT! I have roof sections that can be put in to cover the entire opening but usually I leave sections open so I can crawl and arise if needed. Not a good plan for access but workable.......so far!


Another "cut-out" from Toy Trains magazine, the yard office and telephone shack:

Scanned, edited, printed, assembled. Good fun for a cold winter's evening.
PD
...and another, the oil storage shed:


I got a good deal on a wooden water tank that had been built but never stained, and then damaged in storage. I rebuilt the damaged parts, reworked it a bit, and stained it. I believe it was scratch built, but if anybody recognizes a kit I'd like to know. Either way, it's a faithful model of a 50,000 gallon tank.

Similar to mine which I did scratch build with the help of a friend


I just finished construction on my scratch built coaling tower. Set it on the bench to check out my math. I am pretty happy with the dimensions. I will sand and coat with concrete finish and install the ladders and chutes next. 
Coaling tower is cool Fred M, I have been thinking about one but I have never seen one in person……same with grain elevators….seeing model gets me started
Thank you, I can post materials and sizes if anyone would like them.
The following are a couple of buildings that have been kit-bashed. The first is a hotel that was made from two BTS building kits. It has a fully detailed interior with four guest rooms, ladies and men's bath rooms, a small lunch counter, front office, and rooms for the owner. The owners rooms include a parlor, bathroom, and bedroom.
The second is an old Lionel coaling tower. The interior is fully detailed on both floors. 


 The incline for hoisting the coal is operational as is the coal chute.


Thanks for sharing Paul, the car unloader is very nice
@Bogart posted:Here are some photos of a kit-bash of the Atlas Two Stall Engine House. I have seen a lot of photos of this structure in different configurations on layouts. I needed something to cover or at least distract viewers from an access area visible from the front of the layout. I based the configuration on buildings that used to be in town for an old furniture factory. That saw tooth roof line was an homage to them. I didn't have enough wall panels for a total building perimeter but since one side is close to the wall I went with foam core and brick paper on that side. You can see from that one photo that the interior is pretty rough but the painted out windows sort of hide things........... and the place is only FOR RENT! I have roof sections that can be put in to cover the entire opening but usually I leave sections open so I can crawl and arise if needed. Not a good plan for access but workable.......so far!
NICE! I never seen this kit in this type of configuration. IF you have photos of other types on configurations, PLEASE post them!
A couple more photos of the inn and the coaling tower.

This is a kitbash factory made from Ameritowne parts, plus some scratchbuilt details and concrete platform below.
Atlantic Ice & Cold Storage to the left is scratchbuilt, the icing platform was scratchbuilt by someone else and purchased years ago...
")
")
")

")

")
")
")
")
I love that industrial detail of "bricking out" the former windows. I think it adds character to an otherwise a typical industrial building.
Two Plasticville coaling towers into one.....


Have a great and safe weekend, folks.
Peter
A few of my buildings and accessories...
Grain elevator

Warehouse with pop up


COOP office with scale


Cement block plant..


Main street...

City water tower..

Large grain elevator with flour making plant.

Tank farm. large tank is a 10" plastic pipe cap.

Fantastic modeling! JohnA
Automating the Manual Lionel 6-12774 Lumber Log Loader Building
Lionel Log Dumping car, a 9303 or 3451 are too low to be used to discharge logs to my Lionel 464 Saw Mill log feeding platform. Both 027 track and Saw Mill are at grade. I have found a Lionel Coal Dumping car, 9304 or 16600 are high enough and can be used to dump logs to the 464 Lionel Saw Mill loading deck. Maybe not realistic but workable on my layout!

The fact I can now discharge logs from a coal car to the 464 Lionel Saw Mill makes me more interested in automating my manual Lionel 6-12774 Lumber /Log Loader. This will allow loading logs in a car and unloading the logs on to the feed platform of the 464 Lionel Saw Mill and then sawing the logs into lumber with the saw mill for double action tasks.
The small, cheap Lionel 6-12774 Log Loader Building fits well adjacent to my mountain, next to my automated coal mine. I think the loggers on my mountain drag, roll or haul the logs to the Log Loader from the mountain so space is not needed to transport the logs from grade to be loaded into a car like the fancier Lionel 164 and 364 Log Loaders.
The first task was to glue the Log Loader Building kit building together and reinforce the building shell with corner braces and more plastic on the flimsy front where the logs are stored. I will use the small wooden logs from the Lionel 464 Saw Mill instead of the cheap hollow plastic logs that came with the log loader kit.
Next I added some reinforcing beams on the legs holing the log loader building to take the wobble out. The building will be heavier now with an automation mechanism. I used hard balsa wood and 5 min epoxy glue.

I had a Radio Shack 12 VDC solenoid on hand from a long time ago. I added a Radio Shack 4 amp full wave bridge rectifier to change it to 12 VAC operation. I doubt if RS has them anymore but junk O gauge switches have two 12 VAC solenoids that one could possibly use for this purpose and eBay has similar solenoids from China.
The next issue to figure out is how to make the solenoid dump the logs. The original tilted the bottom of the building to let the log roll out. I lost the device that came with the kit to make the logs dump. All that is needed is a way to knock out a prop that keep the floor and logs from rolling out. The prop is used to flatten the tilt of the log table to hold the logs. The prop must be knocked out to let the bottom tilt. I decided to make a tilting prop mechanism from a small hinge. Since I did not have one, I made a hinge out of two small pieces of pipe strap.
Picture of the homemade hinge
The hinge will be straightened out with a pull on a short piece of string and the logs will be loaded by removing the roof.
The solenoid would just pull another string, on the top half of the hinge, when activated. That will jerk out the top half of the hinge to the dump logs.
Picture showing solenoid and hinge in up position, J B Weld was used to hold the solenoid and hinge in the building; the white cord is keep solenoid piston from coming out. 
The roof was glued together and bracing added to hold the roof angle as it will be removed and reinstalled often.

Picture shows cord to reset the hinge prop to UP position
Picture: Note braces in corners and 1/2 inch black base foundation added to bottom feet due car being too high to dump into.

I added flood lights to the corners of the log loader building to illuminate the car being loaded and the inside of the building. Mini Christmas tree lights and sockets were used with aluminum flashing for reflectors. I used two 7 v bulbs in series to lengthen bulb life with 12 v lighting transformer. Adjusting the amount of bulb sticking in the building allows some light to stay in building. 
I added some light weight card board to the log tilting rack to keep light from going to bottom of the bottom exposed log loader building. 
Video of operation is above or or go to the Youtube link below as my videos sometimes do not work on OGR Forum !
https://www.youtube.com/watch?...amp;feature=youtu.be
Converting the manual Log Loader Building to automatic and remotely operated is an easy job, and the Log Loader Building is easy to reset and load and works every time.
This is a much cheaper and less space consuming log loader than the Lionel 164 or 364 log loaders but these two will take logs after being dumped from a log dumping car at grade and raising they via chain lift or up a ramp by belt to be dumped.
Charlie
@CBS072 posted:A few of my buildings and accessories...
Grain elevator
Warehouse with pop up
COOP office with scale
Cement block plant..
Main street...
City water tower..
Large grain elevator with flour making plant.
Tank farm. large tank is a 10" plastic pipe cap.
Those are some great structures


REA Transfer Building. Foam core, separate docks, wood pilasters. Pecos River large windows.


DPM modules, corregated paper for the roof.

Plywood with trim. Roof top tall hut is a painted Spam can. Grandson Sam makes furniture by hand. John


This is my attempt at a Howe truss bridge. I am pleased with the final results. 


@Dave Koehler posted:Those are some great structures
Here is a updated picture of the load out building for the large grain elevator.


During the last four months I have been busy making 12 buildings for the Chippewa County Historical Society layout in Sault Ste Marie MI. Attached are some photos. All of the buildings are representations of the actual buildings that existed or still exist. The first is Soo Woolen Mill and the second is St Marys Traction Barn. All buildings have fully detailed interiors. Soo Woolen is a kit bash of two Korber power building kits. First floor has a sales area, an office area, carding machines, and combing machines. Second floor has combing machines and spinning machines. The third floor has a winding machine, a weaving machine, sewing machines, and a rest room. All of the wool processing machines are handmade. The third building is a replica of Bishop Baraga's house. He was known as the Snow Shoe Priest. His house is one of the four historic homes that are managed by the historical society and are open for tours in the summer. The house is scratch built. If anyone wishes to see the other buildings say so and I will post more photos.


Access to this requires an OGR Forum Supporting Membership


