
first, let me start off by saying how I got this 203 b6. Went to a flea market to a booth of a guy who usually doesn’t sell trains. This was there, caught my eye, asked to look at it  and for $25 I thought why not. Upon further inspection it really got my eye, it’s pretty darn big and HEAVY. Really cool, except, The issue, as always- the sucker won’t run.

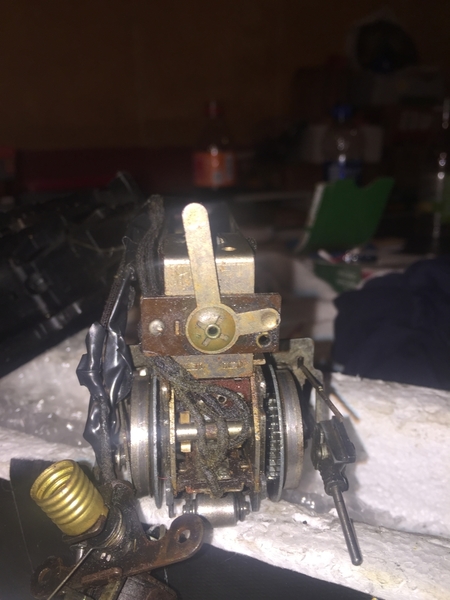
There always been a hum since I put it on the tracks. after my first clean, I put a light bulb in which blew up 3 seconds after I turned on the transformers. Cleaned the brushes, the brush plate, axles, side rods, rollers, pretty much everything. One of the wires going from the back to the front is original with that cloth insulation but it’s holding. The other wire had ZERO insulation so nTurally I thought that there was a short. I tried using electric tape- no dice. I’d really like to run this guy! Any help is appreciated! Pics below 

DB0C1DD7-BA82-4C2E-AA89-C91D4B0C6197AA8CDCDF-6AA7-4B8C-879E-88A2F040700608DF3B71-D474-428C-8583-7A3572D74E3AF02EE0C3-C714-4DBB-8E2C-4290D005955B

EC0F5885-EAE1-44FC-B40D-87B69C0DB214F347F85D-2880-42B2-B914-0DDF8DDF11A7049C56F4-DE9E-420C-9478-A5C96A7FF8B6

Attachments

Images (8)
  • DB0C1DD7-BA82-4C2E-AA89-C91D4B0C6197
  • AA8CDCDF-6AA7-4B8C-879E-88A2F0407006
  • 08DF3B71-D474-428C-8583-7A3572D74E3A
  • F02EE0C3-C714-4DBB-8E2C-4290D005955B
  • 46423E3C-300A-44CA-8B49-45E28963A535
  • 049C56F4-DE9E-420C-9478-A5C96A7FF8B6
  • EC0F5885-EAE1-44FC-B40D-87B69C0DB214
  • F347F85D-2880-42B2-B914-0DDF8DDF11A7
Original Post

Replies sorted oldest to newest

David Johnston posted:

If you turn the e unit on, does it cycle?

David, e- unit doesn’t cycle from what I can hear, anymore. Originally, when I first got it, when it was turned to one side you could hear the e-unit. Upon my first disassembly and ressembly- you could also hear the e-unit.

i think all that electric tape in there may be messing with things as well. Instead of cutting the wires I did that as I thought it’d be less risky and it’s easier. However, now, as you can see, the e-unit lever barely protrudes from the top of the engine but it is NOT touching the frame so that rules out the lever causing a short. Like I said, I cleaned everything- even gave the e-unit a shot of CRC contact cleaner but a very small, brief one because I’m not experienced in cleaning e-units.


I believe the 203 is wired very similarly to the postwar 1656 locomotive.


The e-unit depends upon gravity and so it will only operate upright. For the e-unit to be engaged, the shorter side of the "L" must be covering (and in direct contact with) the metal eyelet.

Your picture here shows it in a position that may just barely touch the eyelet causing erratic operation.

08DF3B71-D474-428C-8583-7A3572D74E3A


P.S. $25 for a 203 in even this non-operating condition is a STEAL!

Attachments

Images (1)
  • mceclip0
Last edited by bmoran4

@bmoran4 thanks for the schematics and advice! I’m going to hit it with some contact cleaner on both sides, shoot it with some compressed air, head to Lowe’s and come back and put her back together(again!) anyway. More pictures since it’s apart again now that I know what we might be looking for. All e- unit centric except the last one is a shot of the motor:

finger with wires in front of them

image

Moved wires for a better shot, put them back into placeimage

Fingers of the E-unit againimage

”left” side of e-unit( if loco is facing forward)image

right side of e-unit, same side the motor is onimage

motot- dude the best I could to clean the face of the armature- not very scratched. Also cleaned the brushes and gently sanded-with fine grit sand paper- the brushes.image

hope these shots or more useful! If I could get this guy working I’d be so happy!

Attachments

Images (6)
  • image
  • image
  • image
  • image
  • image
  • image

First, change all wiring that is not completely intact - forget the tape. Use 20 or 22 gauge wire.

Replace the brushes and springs if necessary.

The 'E' unit looks like it is in desperate need of a good overhaul. Watch these 2 videos for a good tutorial on servicing 'E' units,  Part 1 and Part 2.  Replace the drum and contacts as needed.

Here is the service literature for your locomotive.

Parts are available from online dealers, such as The Train Tender.  Give Jeff a call if you need assistance.

Use Naphtha to clean everything, including the wheels and pickup rollers, then use a ScotchBrite pad to finish polishing up the wheels and pickup rollers.

After all this is done, you should have a nice addition to your pike.


Larry


TrainLarry posted:

First, change all wiring that is not completely intact - forget the tape. Use 20 or 22 gauge wire.

Replace the brushes and springs if necessary.

The 'E' unit looks like it is in desperate need of a good overhaul. Watch these 2 videos for a good tutorial on servicing 'E' units,  Part 1 and Part 2.  Replace the drum and contacts as needed.

Here is the service literature for your locomotive.

Parts are available from online dealers, such as The Train Tender.  Give Jeff a call if you need assistance.

Use Naphtha to clean everything, including the wheels and pickup rollers, then use a ScotchBrite pad to finish polishing up the wheels and pickup rollers.

After all this is done, you should have a nice addition to your pike.


Larry


The wire I can do, I was thinking of doing that anyway. I’m gonna give the contact cleaner some time, replace the wires- then hope it works. After that- I’ll have to look to replace the e-unit. The thing was- the wires aren’t taped because they weren’t intact- the one wire to the motor and the solonoid and e-unit was just totally not insulated. The other wire still had the original insulation- broke in one spot but I soldered it back. Just doesn’t make sense why someone would go through the trouble of putting in new wire that had no insulation. Totally tangential and irrelevant but still has me baffled a bit lol.

thank you for the video and schematics. Hopefully I don’t have to replace the e-unit but if it comes to that well so be it.

StevefromPA posted:

@bmoran4 thanks for the schematics and advice! I’m going to hit it with some contact cleaner on both sides, shoot it with some compressed air, head to Lowe’s and come back and put her back together(again!) anyway. More pictures since it’s apart again now that I know what we might be looking for. All e- unit centric except the last one is a shot of the motor:

finger with wires in front of them

image

image

dude the best I could to clean the face of the armature- not very scratched. Also cleaned the brushes and gently sanded-with fine grit sand paper- the brushes.image

In the top two pictures, it's really looks like the two left-most finger contacts are out of position - it appears they are pulled/bent toward the viewer - which means one or both are most likely not touching the drum. Same appearance in both pics. This would most certainly cause a non-running engine, even if you can hear the buzz of the e-unit.

Grab a magnifier and a nice bright LED flashlight and see if you can determine if both fingers have contact with the drum. If you really can't tell, then use a pair of jumper wires to apply power to the engine and gently bend/push the fingers back to make contact with the drum. My favorite tool for this job is a Q-Tip, where I cut one of the ends off, leaving as much of the stick portion as I can. The stick portion is a non-conductor, so it allows you to push the finger contacts inward, toward the drum, with no risk of shorting anything - do this with the power on, and use two "sticks" to push on both contacts at the same time. If she suddenly comes to life, you'll know you're on the right track and can proceed accordingly. This isn't the right way to make this repair, but it may just get it working again long enough to prove that you have found the actual problem.

In the third picture, your commutator looks quite bad indeed - in what should be a nice, flat surface, it appears there are dimples at the two o'clock and 8 o'clock positions. If those dimples are as deep as they look, they will eat brushes like there's no tomorrow, and be pretty rough running to boot. 

@GeoPeg thank you for the the advice. I just got home after a break of working onengines all day, don’t know if I halve it in me to do this project tonight. But thanks for your pointing out about those left fingers! The 2nd finger from the right- I tapped it with a toothpick ever so slightly and it moved back to the drum and made a ”click” after I sprayed on the contact cleaner and waited it out. Hopefully your method works with those other fingers which are clearly much more egregious 

Well ladies and gentlemen, called my LHS today to check on the status. The repairman finished up the job and I’ll be picking the 203 up this afternoon or early evening!

Thank you, ALL of you, who commented in this thread. The knowledge provided in terms of history, resources, help, positive support and advice really assisted in guiding me. This sentence is gonna sound mushy or wishy-washy, but your comments show this forum at its best- fellow train enthusiast who are willing to help each other. I put a lot of time into trying to fix it myself, but my skill level isn’t there yet, I know limits, hence why I went with my pro repairman.

Both my LHS owner, especially after talking to the repairman, realized that this switcher is considered special to some people so he reached out- I didn’t even have to ask- to his supplier/parts guy who could get a 2203T or 2203B tender! if I want it.

That said, remember I’m not too familiar with steam locos, are there any other tenders with a bar and round hole that I can attach to the rod on the back of the loco?? Currently, don’t have any tenders that have a round hole. Perused the internet and the 255E tender, 0224T, 238T, 265T and 258T appear they’d be compatible and I’m pretty sure I know a place I can get a tender similar to a 265T- square/rectangle shape, possibly a modified postwar scout with a rear knuckle coupler, for cheap.

Again, thanks to everyone for their help! can’t wait to pick this loco up and run it! Will def post pictures, and videos if I can that out, as well!

Sincerely, with gratitude,

Steve

Ok, so here it is! Got one video where the 203 going forward, one in reverse(sorry I hit slow-mo at the wrong time), and one going forwad by itself . I was limited in what I could have it carry  as that front coupler is STIFF, I really gotta work it to move it. Hence why It’s carrying to 1690 Ives Passenger cars as there’s more lee way in turn . Without a tender, Hope you all enjoy:


When I firsy ran it after repairs, it ran fine and functioned fine(don’t think the e-unit licking mechanism worked though). I’d have to wait to hear the e-unit ‘click’  sometimes but it always did click eventually. Then, i don’t know what happened, but it wouldn’t run.

1.) If the lever was turned to a certain side It’d light up and it’d Hum(this side is the one that allows for F-N-R).

2.)If lever was turned to the side that locked directional control- it’d light up but wouldn’t run.

Then I turned attention to this wire by the e-unit lever. 

522C654E-5FAC-477A-888A-2CFF2A18B607

When I have the lever turned to that side, it will run only after I adjust the position of that wire. If I turn power off, whether it goes forwards or backwards or runs at all upon resumption of power is a coin toss. 

Personally, I can live with it. it’s definitely the wire causing an issue with the e-unit functioning. But I don’t want to be using tweezers to move it around all the time.

Again- suggestions appreciated!

despite some continued issues, I still really like(almost said Love, uh-oh) this steamer!

Attachments

Images (1)
  • 522C654E-5FAC-477A-888A-2CFF2A18B607
Videos (3)
1183A39F-C65C-4BD0-9105-87C415576D75
F166E084-4D05-46C3-9D53-2271FCF8AF71
40E213A3-A676-4C58-B1AD-307A8F4184BE

Well, I don't know who your repair guy is, but not impressed. When my customers get their engines back, the body is washed and paint chips touched up. He should have taken care of that wire by the reverse slot. When adjusted properly, the coupler should swing with a gentle breeze. And red jewels in the marker lights. It would be fairly easy to make a 1615 tender to work, less the back-up headlight. I noticed he didn't even replace the handrail with the correct one.

Just my .02 worth.

Last edited by Chuck Sartor

@Chuck Sartor for any prewar engines or locos I only want them to run, even then I don’t want any parts replaced unless totally necessary. Now, if the engine looks like total garbage, then I’d restore it. Regardless, still this request hasn’t been met.

Heres the status of this loco: it runs more  often than not. Works when the wire(the one that appears to interfere with the e-unit) is pulled up. The stiff front coupler, sometimes when the engine won’t move, it will if I move the coupler a bit to the right of left. It’s not causing a short or else the light in the engine and on the tracks wouldn’t work. Also, the coupler(its teledyne) isn’t wired to connect to the assay so that eliminates that being a possible issue.

I really really don’t want to open this back up it’s such a pain to assemble and reassemble. If I took it back to the shop he’d fix it for free as it’s clearly not my fault. Just gonna sleep on it.


Absolutely agree, John. I’m just thinking out loud a way that I might be able to easily fix it without having to take it back in and part with it again and wait to get it back but if it’s not working in a consistent fashion by 10am EST, I’m taking it in to the shop and saying it hasn’t really been repaired. Also, thank you for the compliment on the loco, very different from the other steamers I own.

I’ve been going back and forth between keeping or seeking it. I don’t sell on ebay and planned to have it on hand at the PA Hamburg Dutch Train meet this weekend to do a swap. But if it’s not up to par operationally, I wouldn’t sell it unless the person absolutely knew what they were getting into.

Well, cest la vie. Hopefully it gets resolved soon.

Add Reply

Post

OGR Publishing, Inc., 1310 Eastside Centre Ct, Suite 6, Mountain Home, AR 72653
800-980-OGRR (6477)
www.ogaugerr.com

×
×
×
×
Link copied to your clipboard.
×
×