Just installed, or am trying to install, the lift bridge.  Problem is the lift will not shut off, if power is to the track the motor is running raising it, can't shut if off.  If I put the lift controller to the lower position it stops but will not lower, let off of the lower switch and it raises again.  The track works as it should if the bridge is down the train can go thru the insulated section, if the bridge is up the train stops past the insulated section.

I wired the controller like the manual said.  As far as the bridge there is one section of track on either side of the bridge then isolation pins in the center rail on the outside of these sections.  I put lockons on the outside of the pin section, then ran a wire from the hot rail to the single post on the back of the bridge.  On the double post side I put a lockon on the outside of the insulated section then ran a hot wire and common wire to these 2 posts.

What am I doing wrong?  Thanks


Original Post

Replies sorted oldest to newest

Obviously I got ripped off on ebay, the seller won't respond and I can't find anyone locally who will try to repair.

Since it won't shut off I used a toggle switch, from the transformer, to turn it on and off, (the lift motor won't shut off) but it won't lower.  Is there anyway to add something that will reverse the motor?  I could toggle the reverse on/off also.

It is in perfect condition cosmetically and I paid a lot for it, sure would like to get it raise/lower from my control panel.

Thanks Frank

Larry, Although I don't have the instructions in front of me I took a look at them online earlier today and I believe they do mention that lock on. Steps 1 & 2 of the wiring instructions mention the center rail/power and the outside/common connections from that lock to the two speed nut connections on that side.  The connection for the other side with one speed nut is mentioned at the end of the wiring instructions. So I don't think that's necessarily the issue.

I'm wondering if the controller is faulty or if it is not the original. Then again it could be something else.

Frank, do you know if it's the original controller? It shouldn't have any bulbs. It's the same controller that came with the modern O27 switches. 

Hope this helps. 

Mike

Having read through the instructions, I believe that your wiring is okay. There are no limit switches to stop the motor when it reaches the top so you have to disengage the up lever on the controller to make the motor stop. It should act like a spring loaded momentary push button that you release and the motor should stop. The lower position of the lever should act in a similar manner to lower the bridge and then stop when you release it. Your controller is not doing this.

Fortunately, a new controller is all that you need to fix the problem. The bridge itself seems to be working just fine. If you can't find a controller, 2 momentary push buttons could probably do the job.

Good luck!

Consolidated Leo posted:

If you disconnect your controller and then use a wire to connect the center post of the connections on the bridge to the left or right posts, you should be able to test the up and down action of the motor. This would help to verify if you have a controller problem or not.

Again thanks, unfortunately this did not work, it still does the same thing like it did with the controller connected.  If power is on to the bridge it constantly raises, lift motor won't shut off.  If I push the lower on the controller or connect a wire from the center and left connection it stops lifting but won't lower.  If I connect a wire to the center and the right connection it just continues to raise.

He claims it was new, only took it out of the box to test it, and I paid a new price.  He was 2 weeks late shipping it, claimed to have health problems.  I bought it in May but didn't even open the box until August and found it in the condition it is in.  Valuable lesson was learned.  The screws in the top of the side of the tower that have the motor are missing, a very poor wire splice with black tape on the bottom.  He ripped me off and I will not let it go. 

Frank, your best recourse is filing a complaint through eBay, and hopefully force him to return your purchase fee. How good was his Feedback rating, and number of successful sales.  From reading your responses, he sold it with describing it as NEW, which it definitely isn't with a tape splice.  Your worst problem is the long gap from May until now.  You really learned a big lesson.  Good luck anyway.

FrankM posted:
 

...Even with it disconnected the lift motor runs continuously. 

I think this is where you need to focus.  With the controller disconnected and power applied you need to find what I'd think is a shorted wire/connection that constantly applies lift power to the motor. 

As I understand it, the motor in the modern 213 is a DC type.  So what I'm thinking is there might be two diodes near the connector which apply one or the other polarity to the DC motor to control direction.  This means that when you press the lower button, the motor sees alternating lift and lower voltages and effectively just sits there.

Is this just sitting out on a test bench or whatever?  Is it practical to turn it over to inspect the wiring near the connector where the controller and track power is applied?  Can we see a photo of this?

Last edited by stan2004

Removing the controls narrows it down to the control or the unit.

You should be able to test the switch with a low volt source and matching bulb used at your load or ohm/volt meter. I'm guessing 3 wires, 1 in, 2 outputs, if centered no connections get made. Lighted sw.track controls usally use 4; the fouth being the second power leg for the controller's lamp(s).

  If you don't have a meter, note the directions the diodes face to figure out which to swap, or if one ended up in backwards at the factory too.

 Other points could be argued, but his case falls flat with the splice if that wasnt revealed somehow, your delay is the only argument he has. Ebay policy is your only chance.

TrainLarry posted:

If you have the Lionel #6-14167 (#213 Lift Bridge), the instructions make no mention of putting a second lockon on the "double post side". See page 6 of the instructions for the wiring.

Where did you get the info about this other lockon?

Larry

The dual post's side is "power in", he is feeding the lift motor there with #2L.O. and constant track power.

#1 L.O. with single wire is feeding the center rails of the unit only.

You could increase the length of the locomotive "saftey zone" before.the bridge, by moving the L.Ons further away, moving all insulation points further away by ? sections of track, and using normal pins where the plastic pins are presently at. The same can be done to increase the saftey distance on the anti derail features of turnouts.

Ahh.  The diagram Leo found peels several layers of the onion.

213

Is poking around the wiring and using a meter in your comfort zone?  I still think the first order of business is to track down why the motor runs in the lift direction when the controller isn't even attached.  As several guys have pointed out, the motor lifts or lowers when the center controller connection is shorted to one or the other controller connection.  Obviously nothing should happen if the controller is disconnected.  So first inspect for a short in the vicinity of the 3 controller connections.

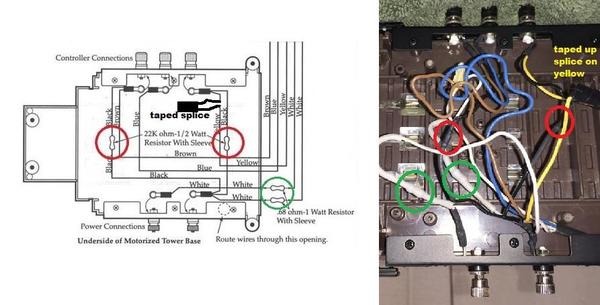
Additionally, note the 2 red circles indicating resistors.  If the wiring or connection to one of these resistors is broken, or if the component itself is cracked, I suspect the corresponding motor direction will activate even with no controller connection.  Then follow the wiring to the "Mother Board".   You'd need to be somewhat handy with a meter to troubleshoot the mother board - if you get this far take some close up photos of the board and one of us can suggest what measurements to make.

In this thread https://ogrforum.ogaugerr.com/...-help-finding-a-part

the circuit board is apparently not available for purchase.  The diagram of item 26 above looks like it's a fairly simple board with maybe a half dozen components so I'd think it repairable if that's the last resort.  The replacement component cost would be minimal (a few dollars at most) but of course soldering and working with small components is not in everyone's comfort zone.  Or, as suggested in the thread, if the mother board is the issue another approach is to bypass the board and directly wire to the motor with a polarity reversing switch.

If you can post photos of the above areas one of us might be able to see something.  I'm also curious about the wire splice with black tape in this supposedly New unit.

Attachments

Images (1)
  • 213
Last edited by stan2004

not to be a Debbie downer,but I had one new out of the box,stopped working after a couple of months,took months to get it repaired,they said bad  board,got it back couple of months ,same thing this time sol,,,,no boards,the great repairman at bradys in Greensburg came up with the idea that it would work,,the motor with a dc input and worked it with a toggle switch,but the led worked  !

If the board is as simple as the line drawing suggests (half a dozen components or so), it would be useful to put the matter to rest and get to the bottom of it.  Is it not available because it's failure-prone, or because it's too hard to replace (I count 9 wires going to it), or who knows.  To that end, if someone posts close-up photos of the board (top and bottom) I'm pretty sure I can extract a schematic of it. 

The board appears to also supply power to the tower LEDs so in Terry's case I suspect the repairman left the board in place to perform that function.  Just the part of the circuit that drives the motor was bypassed and replaced with the toggle switch that reverses the DC voltage to the motor.

Last edited by stan2004

Guys, great stuff, can't thank you enough.  I will take pictures of the splice job, a real hack job but I checked the connection and its okay.  You really can't see anything on the underneath side of the bridge, just the wire leads are exposed and they all go up into the tower, to the motor.  I really appreciate all the efforts taken to help me fix it and I will try to do what was suggested.  I will take photos and post what I find, thanks for all the great ideas.  I am electrically challenged and literally know nothing about wiring or components.  

The Leds do not work also.

I really think my best route is to bypass the mother board and just run it manually, this would be perfectly okay by me.  Although when I do disassemble the tower I will look for problems and post what I find.  Sounds like if the board isn't already bad it has a high likelihood of failing quickly. 

What would I need to just reverse the polarity of the motor and use toggle switches to raise/lower it?

As far as the dirtbag who sold me this.  I sent him an email in August and he never replied until last night after I threatened him.  Seems his sense of time is almost as good as his grammar, it was less than 3 months from the time I purchased until I tried to contact him.   I was simply asking him how he wired it to make it work since it wouldn't work for me.  I think his response is a little defensive.

My email on Aug 12 th

Frank here, I purchased the lionel 213 lift bridge off of you in May, there is a screw missing in the tower at the top like it was dismantled at some point. You told me you ran it up and down and it worked fine. I installed it today and the drive lift motor will not stop running and the controller won't lower it, it constantly raises. How did you wire it when you checked it and said it worked fine?

His response:

 responding to you about the Lionel lift bridge No.213. First of all I am one of the few sellers that offer a 14 day full money back return if you are not 100% happy with the purchase for any reason, and you wait till Aug 14 to contact me with a problem four months latter. Second you say a screw was missing on top and you think some one top of the lift bridge hum ? got news for you, as I said that that lift bridge was purchase brand new and on tested it went up perfectly fine and went down perfectly fine with that controller and there was no problems! You ask me how did I hook up the wiring it was easy " I Read The Instructions " which were easy. it say right on the box for ages 14 to adult. I can tell you this that it is controlled by what they call a momentary switch for raising and lowering the bridge, so commonsense would tell you you hook it up wrong! I am over here and your over there with the easy instructions! what can I do I dont no what your doing wrong. And if you were running it to the top with out stopping the power you might of damage the bridge! This is a perfect example why I can't do this any more on ebay! And how do I know you were not running that bridge up and down for four months until it give out. To say that I am disappointed over this transaction is a huge understatement! coming from a four year ebay member with 100% and all five stars across the board on ebay sales 

Hmm, no comment on the seller's reply because it doesn't help you in the least. With the missing parts, although we all know this could happen, and wire splicing it doesn't sound NIB to me. You can try eBay's resolution options but you might not get anywhere because of his 14-day return policy but crazier things have happened.

The LEDs that plug in to the sockets can be tricky since there really isn't any positive catch to hold them in place since fingers on the bottom do not actually catch on to anything. I know because mine was also missing one and the controller (I knew this when I bought it) but the lights are available, I bought 4, and the controller is the same as the modern O27 switch controller. I also needed one of the black screws for the tower, they are not available from Lionel. Off the top of my head I do not recall the size but I sent one to the screw and fastener dealer that attends York and the Big E and he was able to match it up. Unfortunately he doesn't carry them in black or with the same head, Philips or slotted I don't remember which, but since the purchase quantity is more than I would need for the whole bridge I replaced them all. 

Stan2004 and Adriatic are for more knowledgeable about wiring and such then I am so I will leave the repair possibilities to them.

Good luck!

Mike

Last edited by ezmike
FrankM posted:

Guys, great stuff, can't thank you enough.  I will take pictures of the splice job, a real hack job but I checked the connection and its okay.  You really can't see anything on the underneath side of the bridge, just the wire leads are exposed and they all go up into the tower, to the motor.  I really appreciate all the efforts taken to help me fix it and I will try to do what was suggested.  I will take photos and post what I find, thanks for all the great ideas.  I am electrically challenged and literally know nothing about wiring or components.  

The Leds do not work also.

I really think my best route is to bypass the mother board and just run it manually, this would be perfectly okay by me.  Although when I do disassemble the tower I will look for problems and post what I find.  Sounds like if the board isn't already bad it has a high likelihood of failing quickly. 

What would I need to just reverse the polarity of the motor and use toggle switches to raise/lower it?

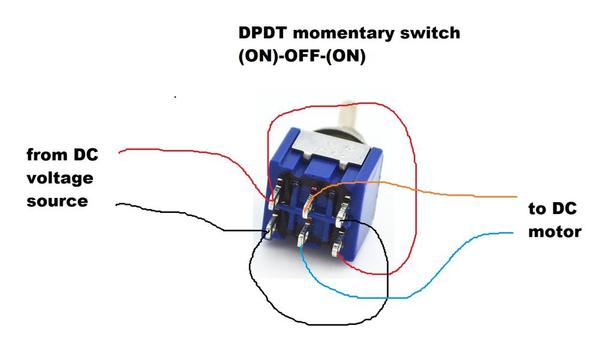
The standard method for controlling up/down DC motor is a so-called DPDT momentary toggle switch.  DPDT means double-pole-double-throw which is geeky language but that's the way the ball bounces!  They also might be called DPDT (ON)-OFF-(ON) 3-position or "center-off" which adds to the confusion!  I'm sure you're familiar with such switches as on power-windows in a vehicle.  Normally the rocker/toggle is in the center or off position.  You rock the switch one way and the window goes up with a spring-loaded return to the center-off if you release pressure.  Your rock the switch the other way and the window goes down also with a spring-loaded return to the center-off.  There is a DC gearmotor doing the work and of course DC power is coming from the 12V battery.  Some example on eBay - note the first example even has its key labeled with up and down icons!

dpdt momentary toggles ebay

These switches will have 6 contacts which need to be wired up:

dpdt momentary wiring 

We can explore further as to what makes sense for you depending on whether you are willing/able to solder, if you are comfortable cutting/stripping wires making connections with screw-terminals, none of the above, etc. 

In any case you need a source of DC voltage.  Note that if you want your tower LED light(s) to operate you also need a source of DC voltage.  That your motor runs (albeit up only) but your LEDs do not light is a bit troublesome but should be solve-able with, say, $1 in parts depending on if soldering connections is in the cards and if we can see some clear photos of the existing wiring and boards.  You can derive DC voltage from your AC track voltage using a $1 component but does require making electrical connections.  Or you can buy a $1-2 wall-wart power supply that you just plug-in the wall outlet and out comes DC voltage.  I appreciate your admitting to being electrically challenged but I think it comes down to what that means!  Given the $400 MSRP, I don't think it's time to throw in the towel!

Attachments

Images (2)
  • dpdt momentary toggles ebay
  • dpdt momentary wiring
terry hudon posted:

not to be a Debbie downer,but I had one new out of the box,stopped working after a couple of months,took months to get it repaired,they said bad  board,got it back couple of months ,same thing this time sol,,,,no boards,the great repairman at bradys in Greensburg came up with the idea that it would work,,the motor with a dc input and worked it with a toggle switch,but the led worked  !

Had the same thing worked find for a while then smoked the board.  I love the bridge and I need to get off my lazy but and modify it to bypass that board.  Should not be a problem.  I'd be more worried about stripping the teeth on some of the internal gears.  Don't forget, it has two other drawbacks, both of which can be overcome with some rework.  1)The inner tie spikes are too tall and deep flanges rumble over them so people cut them down. 2) The inner height does not allow tall stuff through.  This could be fixed by making and installing spacers between the bases and the towers/span.  The last one would be reversible if that is important.

IMG_0035

Attachments

Images (1)
  • IMG_0035

i am sorry about your wiring issues however, my issue with both the Lionel Bascule Bridge and the 213 Lift Bridge was height clearance....They are both show pieces, but for running scale cars, no clearance. I would like to see Lionel bring them back with actual Scale Versions....I think there would be a market for them....Good Luck.... I feel sure your problems will be solved by folks on this forum...

Thank you taking clear focused photos - really helps!

213 a

I spun your photo around to match the orientation of the wiring drawing.  There are 4 resistors which all seem present and accounted for.  The red-circled resistors are under the black shrink, the green-circled resistors are under the white shrink.

I agree the wiring appears OK. 

But the taped splice on the yellow wire is a real head-scratcher!  The splice serves no purpose - presumably if you unwrap the tape you will just see a break in the yellow wire re-joined?  I cannot believe it would come from the manufacturer like this.  Since this is on a control wire (not on a power input wire) one might speculate someone tried to modify the wiring to change how the motor is controlled - then changed their mind or gave up after blowing it up - and then tried to cover it up.  

If by some slim chance, the yellow wire under the black-tape is NOT connected, then reconnect it.  Per my earlier musing, if one of the red-circled resistors is broken or not making a connection, this might cause the motor to run.  Likewise, if the yellow wire is broken, it would have the same effect as a broken resistor - causing the motor to run in the direction corresponding to the whichever direction the yellow wire controls.

This still doesn't explain why you don't have tower red LEDs since power is making it up to the motor board (for the motor to run at all).

I anxiously await as many photos as you can muster of the control box holding the mother-board.  Again, if practical I'd like to see both sides of the mother-board.

Are we having fun yet?


Attachments

Images (1)
  • 213 a

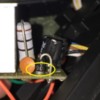
Almost done with schematic.  For sake of completeness, could you squint at the 4 components where the arrows are and read the markings.  Don't need more photos, just the numbers.

IMG_0877

Left one probably 4001 or 4002 or 4003...looking for the digit after the 400.

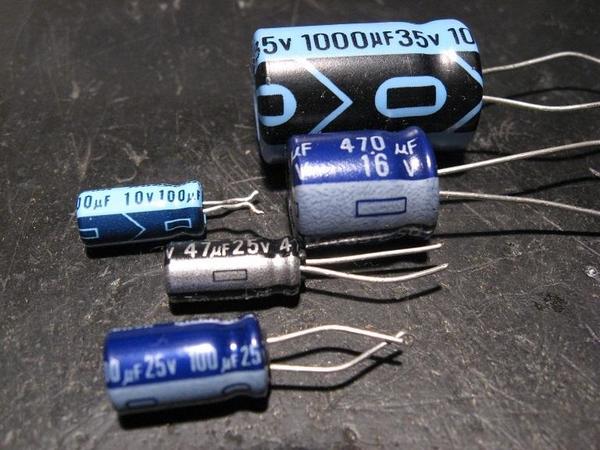
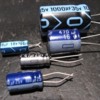
Center two will probably be something between 10 uF and 470 uF...looking for the 2 or 3 digit value before the "uF" marking.

Right one probably 103 or 104...looking for the digit after the 10.

I'll update (note: schematic updated 9/24/2017) the following with the values but here's what you have.  I realize this means little to you but this tells us what the man-behind-the-curtain is doing...and hence what we need to do to get your railroad back in business!

213 schematic final

Did you confirm that the yellow wire in the base under the black tape makes the connection?  I assume there was no change in behavior.

The circuit that drives the LED is so trivial that I don't understand why the towers don't light up.  I think someone made a comment about loose sockets that the LEDs plug in to?  Maybe worth "wiggling" or prodding with a toothpick or popsicle stick or whatever.

Do you have a meter handy?  Nothing fancy required - the "freebie" meter you get from Harbor Freight Tools is all you need here.

And jumping ahead a bit. 

How far do you want to place the control switch from the bridge?

I looks like your panel has the a neatly arranged set of traditional lever style controls.  Would you prefer to keep that style?  I don't think you will find the proposed momentary DPDT bypass switch in this style.  If you want to use the existing lever switch, you have options.  I know you want to keep things simple but after all this is a discussion forum.


Attachments

Images (3)
  • 213 schematic preliminary
  • IMG_0877
  • 213 schematic final
Last edited by stan2004

You may have to gently bend an adjacent component to peek to the backside but you do need bright light and if inaccessible no worries as it doesn't change your options.  Anyway, here are examples of what the markings on the two center components might look like on the hidden backside.  u in uF is the greek symbol that looks like u.   In this case there is a 47, two different 100's, a 470 and a 1000.

capacitor marking numbers followed by uF

For the left component, the marking is upside down and I can make out the 00 but I'm 99.9% sure it's 400 and one more digit.

diode marking

Attachments

Images (2)
  • diode marking
  • capacitor marking numbers followed by uF

So in the first picture, the part with the 00 is a diode, unlikely that it is bad, but I'd just find a 4 amp 100V diode or better (if you want to go higher amps or voltage, it will still work). I wouldn't worry too much about what it says. You figure out the capacitors yet? For the capacitor, if it says 400, probably 400 uF, at least 50v rating. That part of the circuit is converting AC to half wave DC and then using the cap to do some filtering. A larger value than that would work fine. A sloppy way of AC to DC conversion (I always use a full bridge rectifier, which is has 4 diodes in one package, and turns over the negative side of the AC pulse as well as the positive side. A single diode just sends through the positive pulse).  The LM 7809 is bringing the DC voltage down to 9 volts. It may run hot, as they 'voltage regulator chips' basically burn off the excess power.


Jim

If you have a multimeter, check the out put of the board with the heat sink to see you are getting 9V out. This board is just your power supply, and powers the lights and feeds the motor circuit.

The real bugger is probably that EMD811 'bug' on the other board. It's a low current part for switching direction and made for 'toys'. Sometimes these devices get 'stuck' on when they burn out.

http://www.elite-ent.com.hk/up...11_&_812_v02.pdf

This part will only handle .6 amp - maybe.

I notice that they make a higher power part (EMD812), but soldering a surface mount component is harrowing.

Too much info? I'd go ahead a hack with a DC power supply and the double pole switch discussed earlier.


Jim

Jim Waterman posted:

So in the first picture, the part with the 00 is a diode, unlikely that it is bad, but I'd just find a 4 amp 100V diode or better (if you want to go higher amps or voltage, it will still work).

They're running a couple of LED's off that supply, so a 4A diode would be hopeless overkill!  That's doubtless a 1A 1N400x diode, and anything at the x from 1 through 7 would work fine.  However, I think the chances of the diode being bad are very small in any case.  That diode is not involved in the motor movement at all according to Stan's excellent diagram.

Thank You

Still very hard to see, got out the magnifying glass and a strong LED flashlight , but I think this is correct, the left component is N4001, the large component is 50V100, the rest is cut off, and the small component is 25V 10uf.

I checked for continuity from the base to the board and all the wires are good from the base up to the board.  The red and black wires, going to the LED from the board, are good also.

You nailed it.  Those values look "correct" for the circuit at hand and I've updated the schematic.  This schematic ought to be useful for guys who take a crack at repairing or modifying the circuit board.

I'm assuming you would like the tower LEDs to work.

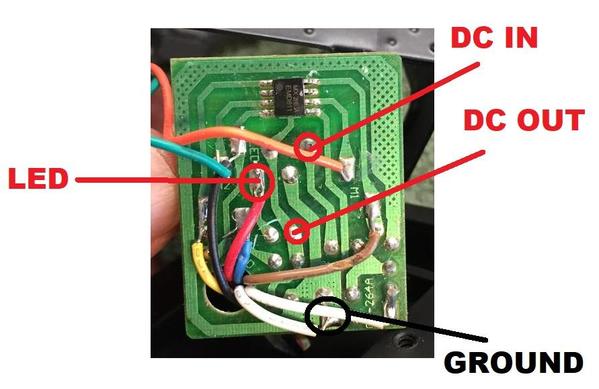
I'm thinking you can use some portion of the existing circuit board for both the LED and motor control.  To that end, can you make the following 3 DC voltage measurements.  Obviously the circuit needs to be powered.  The black test lead on the meter connects to the "GROUND" point in all cases.  I realize the motor lifts as soon as you apply power - but since you can only go up or stop, I figure you must have come up with a way to dis-engage the gearbox or transmission while the motor runs?  The measurement for LED voltage should be made with the LEDs connected (I realize they are not lighting up).

If all's working you should probably get something like:

DC IN - between 15-20V

DC OUT - about 9V

LED - about 2V

213 voltage test


Attachments

Images (1)
  • 213 voltage test
Jim Waterman posted:

The real bugger is probably that EMD811 'bug' on the other board. It's a low current part for switching direction and made for 'toys'. Sometimes these devices get 'stuck' on when they burn out.

http://www.elite-ent.com.hk/up...11_&_812_v02.pdf

Right.  The 8-legged black component on the back of the board is essentially a solid-state (as in no-moving-parts) DPDT switch.  It has 3 "positions" or states.  It either (1) blocks the incoming DC voltage from reaching the motor (center-off of the DPDT switch), (2) passes the DC voltage in the forward polarity (DPDT switch flipped one way), or (3) passes the DC voltage in the reverse polarity (DPDT switch flipped the other way).

Problem is the EMD811 is apparently obsolete or at least is very difficult to find based on a web-search.  That's probably why you can't get a replacement board from Lionel.  The 213 manual is dated 2002 which should be a clue!

For DIY'ers who enjoy whiffing solder fumes and messing with components, there are similar IC chips that are widely available.  The generic name would be an "H-bridge motor driver".  One that appears to have taken the Arduino community by storm is the L9110s if eBay is any indication - hundreds of listings for L9110s modules for about $1.  And for that you even get two motor driver chips on the module.

L9110s h bridge module

There's some homework to be done to splice this or similar module into the 213 so it's not a slam dunk.  But it would allow use of the existing spring lever switch...or as someone suggested perhaps two momentary push-button switches - press one button to lift, press other button to lower.

We now return you to your regularly scheduled program...

Attachments

Images (1)
  • L9110s h bridge module
FrankM posted:

What do I set the meter on to take these readings?


Turn it 4 notches counterclockwise from where it is in the picture. 

That would be 20 Volts DC (the DC ranges are represented by the solid line over the dashed line, the AC ranges are represented by the  squigly line, meant to look like a sine wave).  V= Voltage in volts, A = Current in amps or some fraction of Amps (u=microamps(1/1,000,000 of an amp), m=milliamps(1/1,000 of an amp)). 

Note that if you were measuring amps(not relevant here, but good general info), the meter would need to have the red probe hooked up differently.  For what you are doing here with DC volts, you are fine if you just rotate the knob over to the 20 VDC range.

-Dave

Last edited by Dave45681
FrankM posted:

I'll get these readings when I get home from work. As a side note when I connected the led lights, to take the readings, they worked, just had to jiggle them around a bit. 

Yep, as I said, they do not catch on to anything. The legs were made too narrow for the catch to catch. I wedge a small piece of foam slightly wider than the slot between the legs to spread the legs a little and viola!

Mike

ezmike posted:

Yep, as I said, they do not catch on to anything. The legs were made too narrow for the catch to catch. I wedge a small piece of foam slightly wider than the slot between the legs to spread the legs a little and viola!

Mike

I seem to recall mine might have an intermittent contact problem for the lights too.  Thanks for the tip!

-Dave

It sounds like the little 8 leg motor driver chip is the only non-working item in Stan's circuit diagram(Excellent work there Stan). Even if there were a replacement part, surface mount is prone to drive most folks nuts; me included.

I'm thinking that a couple of relays attached to the controller runs (the outermost runs on the circuit board) might work. They are 9 volts run down to the hand controller and returned via the yellow and brown wires. Tap into those with the relays to route the motor current one way or the other.

Where to put the relays? As long as we can get wires to the controller connections, it doesn't matter where.

Just some ideas.

Apparently your meter displays "1" to indicate a measurement exceeds the range.  That is, the leftmost digit on your display is a "1" so for the 20 range, the max value it can display is 19.99.  For the 200 range, the max value is 199.9.  BTW, I think it may be time to change the meter's battery.

battery icon

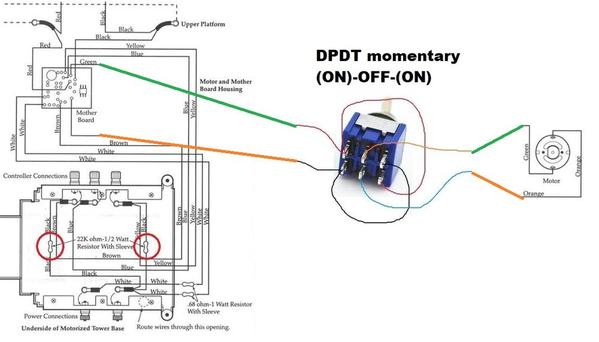
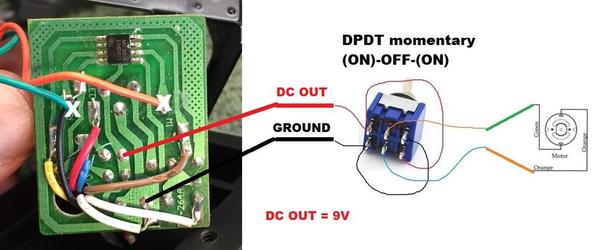
Anyway, given your measurements I concur with Leo that it's just the motor drive chip that has failed.  Again, I don't think you can find the chip and given the apparently high failure rate based on other reports, I don't think you want to bother.  But the board can be used as is to drive the tower LEDs.  And you can use the regulated 9V DC voltage from the board to feed the DPDT bypass switch and drive the motor.  So one approach might be:

213 use existing board but add external dpdt

This requires NO additional components other than the DPDT switch.  As drawn, once could simply cut the green and orange wires that go to the motor**.  Then run these 4 wires (2 out, 2 back) to the DPDT switch.  It's hard for me to appreciate the tight quarters since I obviously don't have the bridge in front of me.  I figure running those 4 wires from the tower control box down to the base might be a problem?  The wire gauge just needs to be similar to whatever the green and orange wires are - they look like maybe #22 or #24 gauge? 

I suppose you could physically relocate the board in the base...then only 4 wires (2 to the motor, 2 to the tower LEDs) run from base to tower box.  Again, this would require no additional components but there would be more soldering, splicing and re-routing of wires.  Hard to say which way to go.

I suppose any method that runs additional wires between base and tower could use black insulation wiring to disguise them since the tower structure is apparently black.  Maybe one of the guys that has actually made the DPDT modification can solve the wiring conundrum.

As for DPDT switches for this application, 99.9% (there's always some odd-ball!) have terminals in the 2 by 3 matrix configuration as shown.  The corner terminals are connected in the criss-cross fashion - this effects the polarity reversal.

**Added note.  This only "works" for FrankM's special case because apparently the board is stuck in the motor "on" condition even when the lever switch is in the center-off position (or even completely disconnected).  For the more general case, one approach is to tap the 9V DC OUT voltage from the board - this does require some soldering of wires to the back of the board. 

213 use existing board general case


Attachments

Images (3)
  • battery icon
  • 213 use existing board but add external dpdt
  • 213 use existing board general case
Last edited by stan2004
Consolidated Leo posted:

...

I'm thinking that a couple of relays attached to the controller runs (the outermost runs on the circuit board) might work. They are 9 volts run down to the hand controller and returned via the yellow and brown wires. Tap into those with the relays to route the motor current one way or the other.

Where to put the relays? As long as we can get wires to the controller connections, it doesn't matter where.

Just some ideas.

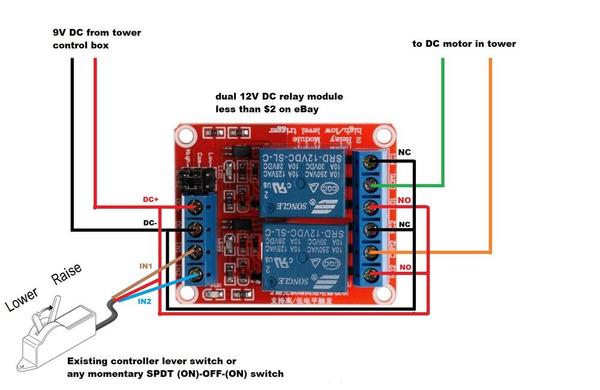
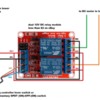
Of course the rub is while you can find DPDT relays, I can't recall every seeing a DPDT relay that has a "center-off" position.  That is, the relay has only two "active" positions without a 3rd "idle" mode.  There are of course countless ways to effect the idle condition with more relays or what not.  Here's one relay alternative using an inexpensive dual-channel module from eBay.  This method allows use of the existing controller lever switch or any SPDT momentary (ON)-OFF-(ON) style toggle switch.

12v dual relay module

213 motor control with dual external spdt relays

Notes.

> 9V is sufficient to operate the 12V relays used in these modules. 

> A discerning observer will note that when in the idle position, this configuration actually shorts the motor windings.  This brakes the motor which is something to keep in mind when using relays (that don't have a center-off position) to control DC motor polarity.  The reason it works in this specific application is the motor is heavily geared with the mechanism moving very slows - taking many seconds to travel from one end to the other.  Braking the motor to stop it on a dime is not a problem.

> In a previous post the H-bridge motor drive module for around $1 is the solid-state equivalent of this electro-mechanical dual-relay module.  As in the above configuration 9V DC would come from the tower control box (2-wires), and the motor drive (2-wires) would return to the DC motor.  Again, the existing controller lever switch or equivalent could be used.

> Command-control users might find the relay module or H-bridge module approach useful since I am not aware of any Accessory Controllers (e.g., Lionel ASC, MTH AIU) that offer "DPDT center-off" functionality.  Instead you could use two momentary accessory outputs to remotely control the bridge lift or lower motion.


Attachments

Images (2)
  • 12v dual relay module
  • 213 motor control with dual external spdt relays
Last edited by stan2004

Never trust a meter with a low battery.  I've had some stupid reations out of a few trying to avoid a trip for one. Reads fine one second, off value the next.

I LOVE chip sockets for repair. If it died once, it may die again. No soldering in the later repairs, just pop, plunk, press then go eat lunch. Always money well spent imo.

If you had a 4a diode handy, it should work, but is overkill. I have a few 6a running with single LEDs because they were here and free, salvaged from "something or other". The 4000s are plenty though, and twice as common. I just didn't want to trash the boards that had them yet.

  They won't be cheap, normally a high amp rating, but many machine controls use the sprung,  temp on/off/temp on, dpdt for jogging purposes. Grainger would be my first stop, but after that, Im stuck......

( Thank you Mike, but) ....  I realized about a year ago after noticing a lot of my favorite chips were " obsolete", that I was "out of date" and unable to really keep up with helping in depth anymore. Too many new parts, and not enough reference compared to what I had fast access to at one time.  I'm still going to stick my nose in and help till cavalry arrives, but I concede to those deeper in the game today for the same reason as you might. I have no design from scratch experience.  I repaired, and focused on changes of specific areas of weak design in a few fields. There are just more folks posting on OGRF now that know more modern parts available than I do, or will ever know about from here on in, than there was a few years back. 

FYI everyone, just know its not apathy that keeps me quietly lurking this section. It's all those mystery chip numbers and poor reference ability. I never ran into that before train electronics, except in some automotive applications. Mostly, once you asked, the manufacturer came through with anything you asked for. I ran up against this for the first time ever with Lionels TMCC intro decades ago and commited myself to used items only by them from there on in. (commited? E.g. I've only bought about 6 Whoppers since "the Burger Wars", and only because I have low blood sugar. It's my fav., but...well I have my reasons)

Besides, I do prefer PW. This repair is one example of why. IMO, the whole thing was electronic design ovekill. A couple of common transistors and/or relays were avoided in favor of an unproven or weak chip. I feel like it is an unwinnable battle for me with "proprietary secrecy" and not at least having a board around. I miss when I could contact a mfg, get info fast, make changes, send a fax, possibly see a revision done to save others the hassle..

....and still go to lunch on time

shawn posted:

The way that circuit board is payed out. You might be able to solder a dip socket to the board. Then, see if you can find a emu 812 chip. The ratings are a bit higher on the dip chip. Plus, you could replace it.

Yup.  The EMD812 in DIP seems more available than the EMD811 in surface mount.  Might be a challenge finding a place to mount a socket since I get the impression it's pretty tight quarters in the tower control box. 

Separately, I'm not convinced the more "powerful" EMD812 (vs. EMD811) is the issue.  What I find interesting about the 213 design is the controller inputs run right to the EMD811 IC chip.  In looking at the technical description of the part, I believe the part will be damaged if you apply AC accessory or track voltage to a controller input.  It is widely written that the controller uses the same lever switch as other track-side accessories.  So in my way of thinking, a typical user might (in)advertently do so since so most accessories work that way.  Then poof - maybe no magic smoke - but chip is damaged.

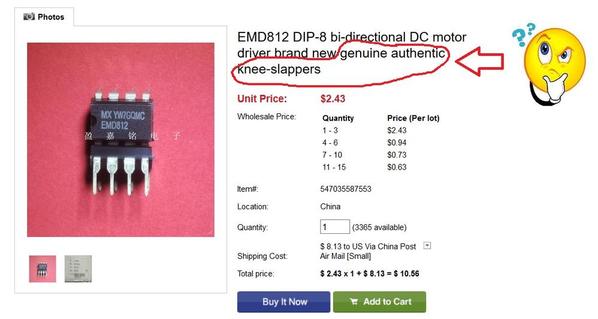
Here's an amusing EMD812 seller.  Obviously some kind of translation program.  I'll award a gold star to whomever can figure out what it's meant to say!

EMD812 DIP

Attachments

Images (1)
  • EMD812 DIP

Okay I appreciate all the explanations, I do understand this drawing. 

Will the already existing blue and yellow wires going from the base to the motor case be used for anything wiring it this way?  I don't think so.  I could use them as a pair of wires going from the board back to the switch.  Then I only need to run 1 pair of wires from the switch back up to the base and then up to the  motor. 

Where can you buy a switch like this?  Looks like something an auto parts store would carry.


I was afraid you were going to ask that question!  You can co-opt the BLUE wire for sure.  But I can't say for sure whether you can co-opt BROWN and/or YELLOW.  BROWN and YELLOW have those red-circled resistors hooked to them in the base.  The way it's designed, these resistors are meant to insure the motor is OFF when the controller switch is idle.  Yes, I realize the motor electronics is essentially ignoring what's going on with YELLOW and BROWN since the motor runs when it should be OFF.  In fact we are turning lemons into lemonade taking advantage of the fault condition of the motor chip apparently ignoring what's happening on the YELLOW and BROWN.  Hope my reasoning makes sense.  

So.  BLUE for sure.  You can disconnect from the back of the board and from the base terminal and steal the BLUE wire. 

You can try disconnecting YELLOW and/or BROWN from the back of the board and see if the motor still runs as soon as you apply power.  If so, then disconnect it from the base side and co-opt one or both.

As for where to get a DPDT momentary switch.  The first part that came up on a Google search was this on Amazon.  Somewhat spendy but shows that you might indeed find such at a local auto parts store.  Note this style mounts in a square/rectangular cut-out which can be a nuisance depending on what tools you have....

dpdt momentary window switch on amazon

Attachments

Images (1)
  • dpdt momentary window switch on amazon

Thanks Stan, I'll just run 4 new wires to be safe, just hope I can find a way to get them in the motor/board case, its really tight but should be doable.

gunrunnerjohn, I sent you an email

Pat from Pat's trains has a thread about the train show in Wheeling WV on 1/14/18 at the Kruger museum.  If you guys can make it I will buy anyone and everyone, that contributed to this thread, lunch.  Should be a fun show.  I live about 10 minutes from Wheeling.

AlanRail posted:

I POSTED the modification but it may have been lost. i have had many computer and phone changes since then so  i may not even have progress photos.

Are these the final product pictures?  I remembered a photo log of this process from years ago, but wouldn't have remembered who posted it.

With Alan in the web address, I figured it might be a good chance this was your work.

-Dave

Last edited by Dave45681

I finally had a few hours to work on this last Sunday.  As my luck would have it as soon as I tried splicing into the orange and green wires they just pulled off the board.  The wires are very light, couldn't be but 4 or 5 strands of wire.  I ended up just soldering the extra wires directly to the board  I also soldered the 2 wires directly to the motor also.  I got everything back in the motor/board case and got it bolted back to the bridge.  I ran out of time so I didn't get it all put back together yet.  Hopefully this weekend.
Add Reply

Post

OGR Publishing, Inc., 1310 Eastside Centre Ct, Suite 6, Mountain Home, AR 72653
800-980-OGRR (6477)
www.ogaugerr.com

×
×
×
×
Link copied to your clipboard.
×
×