
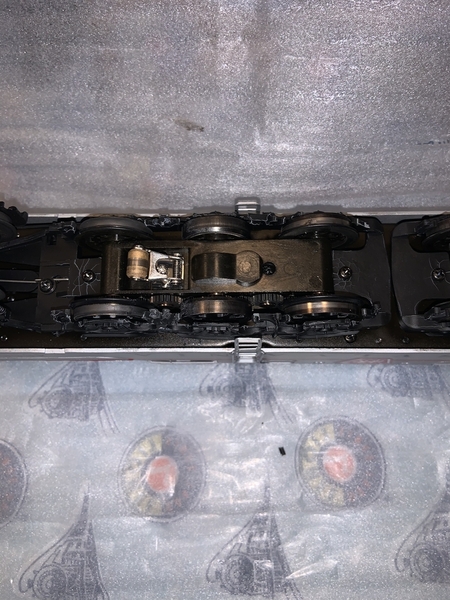
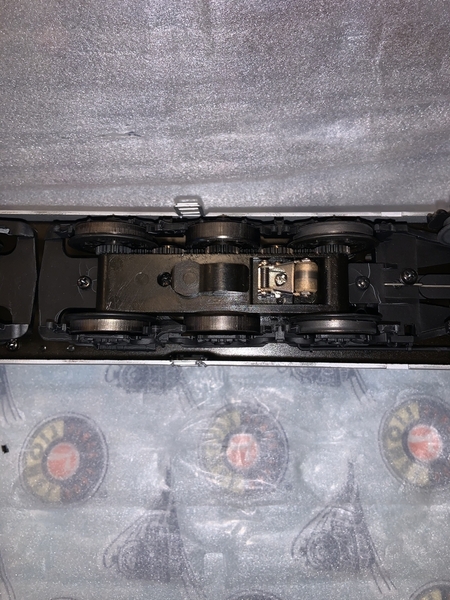
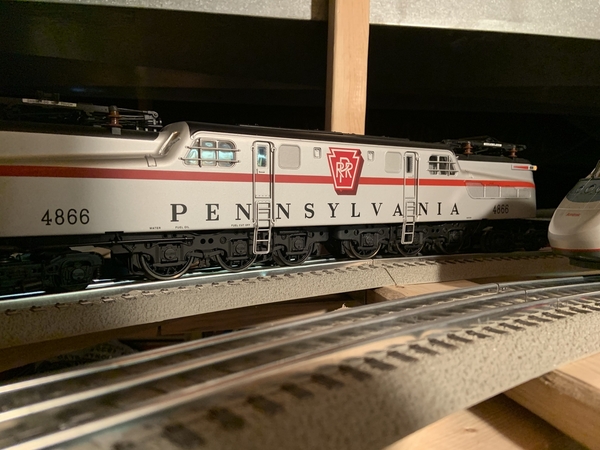
I could outline the problem, but you can see it in all its glory on the O-27 forum under GG1 zinc pest.

I am moving the discussion here for two reasons - one, we are discussing a scale model, and two, I need to be able to quickly find this thread for updates.

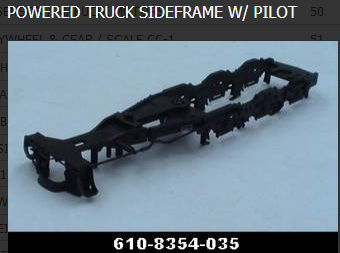
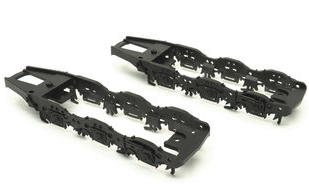
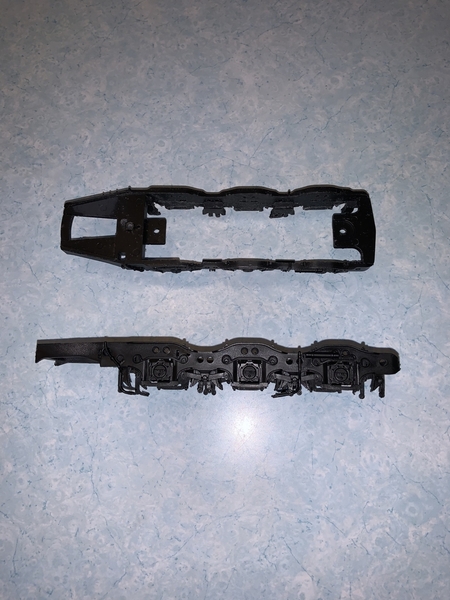
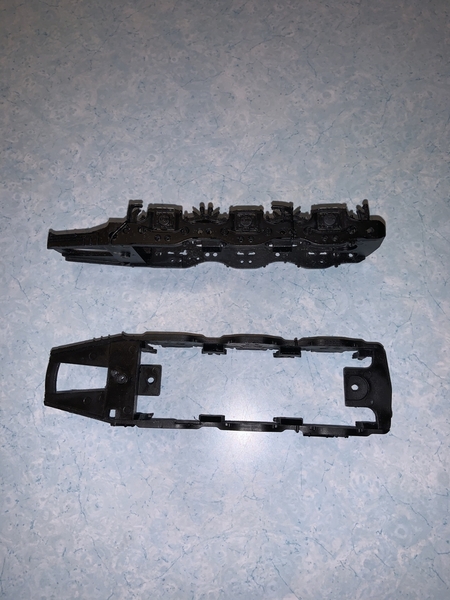
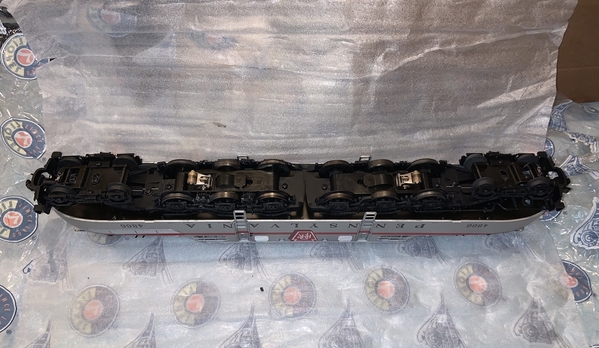
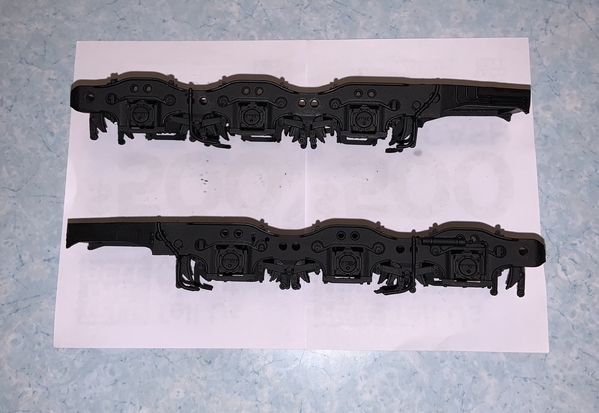
I have in my possession a pristine, uncorroded part.  Photos will be forthcoming.  The problem is twofold - one, a lot of these parts are falling apart, and two - Lionel says the mold has been modified and it is no longer possible to reproduce the part.

Dean Brasseur, of Lionel, has told me that it would be ok to reproduce this part.  The way that is done is by making "no-shrink" flexible molds out of something like RTV, then popping wax parts out of the molds, and finally "investing" these wax parts in plaster.  Then the wax is melted out and molten brass is poured in.

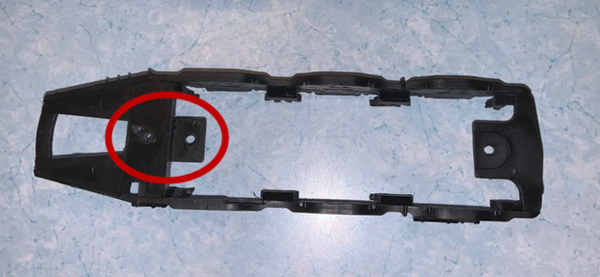
But there is another way - we can use the Wolfer/Duddy patterns with some changes in the tongue area, and have an equally scale part.  The only problem there is making the "tongue" masters, and I can do that easily.

Decision time - give me a month.  Cost?  Not sure - my time will be free, and I have committed a hundred bucks to the effort, which does not have to be reimbursed (and remember, I already have enough brass/bronze GG1s; this is just an intriguing project).

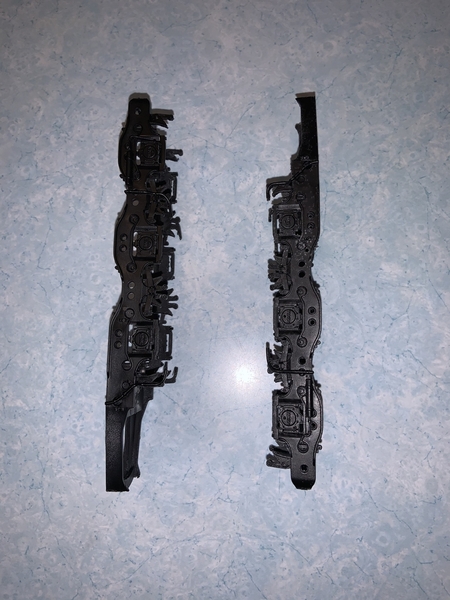
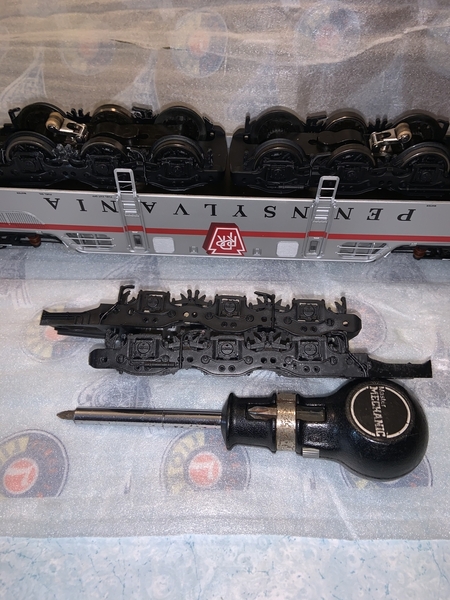
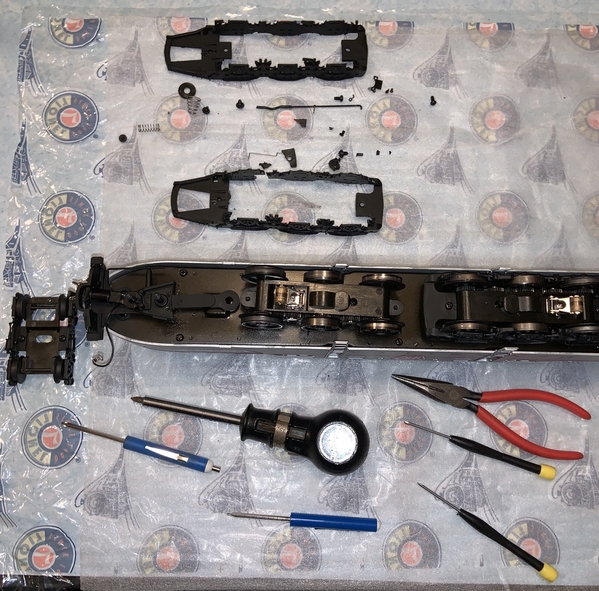
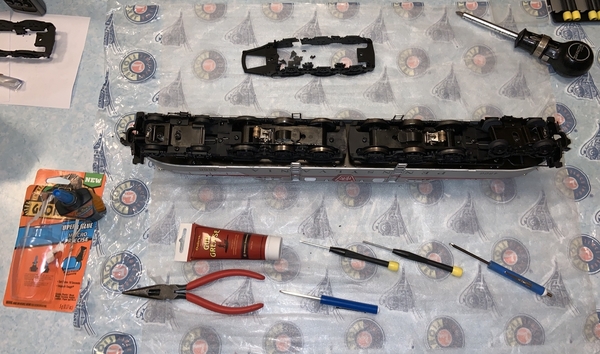
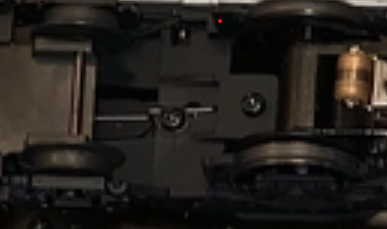
If we do go with pulling molds off the Lionel part, I would need to do it in four pieces.  Bob  C.  (I have his permission to use his forum name, but not sure what it is) has lent me a pristine part.  I cannot cut this one.  And I have an offer of another hundred bucks to get started.  So if the decision is to cut before making exact molds, I will need some further arrangements.

Tomorrow I will take some tripod photos so you can see what is what.  Then perhaps we can vote on which way to go.  The Wolfer/Duddy castings have separate journals and brake shoes, so more assembly will be required, driving up the cost for those not handy with such finicky assembly.

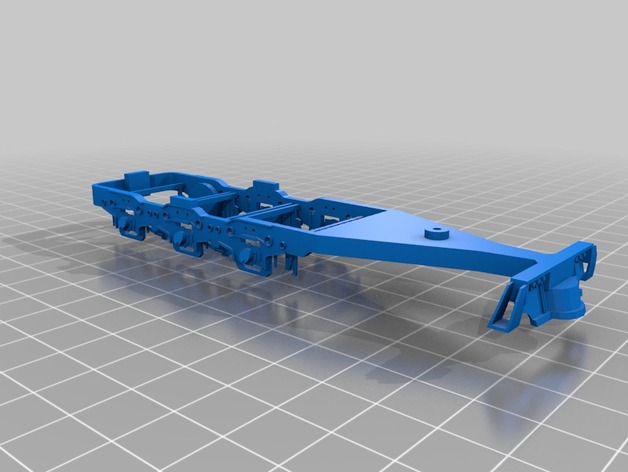
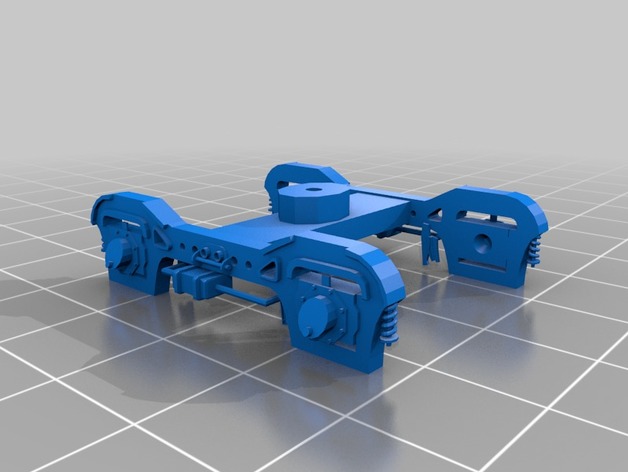
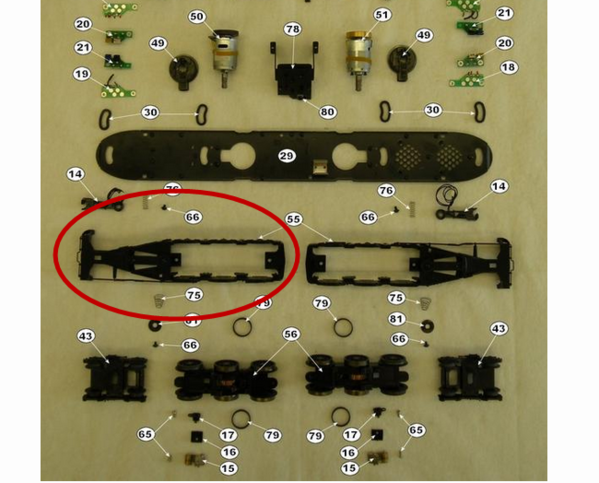
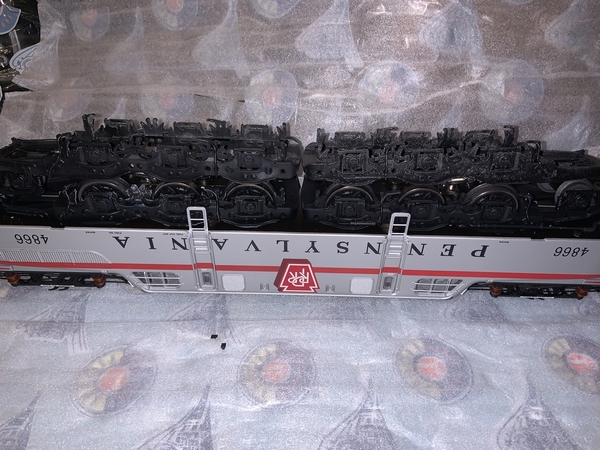
I think that is enough info to start.  Please, if you have time, count up how many of these we really need due to part failure.  Each "locomotive set" would be two Lionel castings, or four sideframes, two tongues, and a rear spacer.

Please tell me the screwed-on pilot/coupler part is not falling apart? Please?

Last edited by bob2
Original Post

Replies sorted oldest to newest

Here is a link to the original thread in O-27:

https://ogrforum.ogaugerr.com/...-sideframes-zinc-rot

I note that we are talking about JLC GG1s, not "Legacy" GG1s.  I will try to change the title.

Dean Brasseur says that the JLC mold was modified for the "Legacy" and that is why there will be no more castings.  That may put this problem in an entirely new light.  Suppose the Legacy casting actually fits?  I will ask.

When I got stuck with two $450 paperweights, I contacted Mike Reagan to see if he knew of any sources.  He confirmed that the castings were changed and he learned the hard way that the Legacy truck frames are not interchangeable with the TMCC ones.  I'm not sure how far off they might be, but I was able to locate a couple from a forum member and never looked into it any further.

While mine are currently in good shape thanks to the new parts, I'm not fully convinced that they won't fall apart at some point in the future also, so I'd be interested in this project if it makes its way to completion just to have some spares.  I don't like the idea of being stuck with two beautiful but useless locomotives should the trucks fall apart again.

We will figure this out.  Bob Stevenson has a preliminary guess at $270 per locomotive, based on new molds.  But the molds themselves will be expensive; it will take 1/2 gallon of liquid rubber,and that stuff is $230 per gallon!

I am trying to get my hands on a Legacy part.  I will know more on that early next week - or if you have a connection with Mike, see if he could send a casting?  If they modified it, perhaps we could modify it back?

Let me get a few photos posted - one idea is to use Wolfer truck sides and the Lionel tongue and bolster. For that, all I would need is a "bowed, but not crumbling" casting.

And photos.  Note the interface of castings on the Wolfer part.  Also note that the wheelbase and overall lengths are identical, although the Wolfer casting seems beefier.  The interior space is identical, which says to me that one can simply put Wolfer trucks under a JLC GG1 and be done with it.  The  reduced flexibility will be negligible, I think, but at least you would have a display model.

I am trying not to repeat myself - Bob's idea is to split the casting down the middle, cast the brass in two parts, and then solder and paint(!).  He would need to do one set to really nail down the price.  My thought is that the Wolfer sides could be mated to the Lionel ends - I think I am repeating myself - to reduce initial mold costs.

Herewith (and wow! to the programmers who set up the enhancement routines):DSC02769DSC02770DSC02771DSC02772DSC02773

Attachments

Images (5)
  • DSC02769
  • DSC02770
  • DSC02771
  • DSC02772
  • DSC02773

Bob, I know curiosity killed the cat, .....it looks like as you mentioned, the Wolfer castings could be used almost as is with a couple of brackets made from sheet metal to mount it to the power truck, then it’s just a matter of mounting the pilot truck to the Wolfer casting....and figuring out the  couplers .....being that the Wolfer casting already exists,  what might the cost be to just produce the Wolfer casting and just adapt to the Lionel .......thanks for looking into all of this! .....you’ve done a lot already!............Pat

Last edited by harmonyards

Heard from Dean Brasseur again.  I had asked to buy a Legacy part to see if it could be modified back.  Here is his response:

I am sorry, the Vision truck sides will not fit on these.

So, Lionel is not your solution.  They have in effect washed their hands of this, but have no heartburn with us copying the JLC part.

Next step: I need to get my mitts on one of these castings that can be cut.  One that is warping slightly but not crumbling would be best.  Bob Stevenson is ready to make molds and do a "proof of concept" cast.

bob2 posted:

Nobody volunteered a bowed casting for a trial run.  I will be returning Robert's perfect casting this week.  I still stand ready to help - I suppose Summer barbeque and boating have stolen our enthusiasm?

You know where I can be found.

I’ve tried to stir up one for you Bob.....I couldn’t get my hands on one...🙄......did you ever find out about the cost of the existing Wolfer/ Duddy castings ?........thanks ...................Pat

gunrunnerjohn posted:

I only have a perfect one, and both of the people that I know that we'd like to get them for have castings that are already in pieces, I figured that wasn't going to solve the problem.  I don't have any interest in taking apart my perfect one to have castings cut up for molding, so unless another one surfaces for me, I don't know how I can help.

About 2 weeks ago I sent a pristine part for bob2 to use for a mold to make the new Power Truck Side Frame with Pilot but he decided that the part was too perfect to be cut up for a mold to be made.  I was willing to sacrifice a perfectly good part so that new parts could be made that would benefit a whole bunch of people.  Surely someone has a bowed but complete part that they can send to move this project forward.  Someone else needs to "step-up" as I did or there's gonna be more "shelf queens" in the future!

Chief Bob (Retired)  

I know this would be a silly question........ but in this day and age would a 3-D cad drawing not exist on Lionel's engineering Dept. Server....... If so they could easily create a STL file and upload it to a 3-D printing service like Shapeways and sell outdated parts in that manor, But what do I know I am only a tool & die designer by trade and have been working with 3-D cad software or almost 20 years.

Mike - you are way out of my league.  I only know lost wax, and even then only enough to get somebody else to do the investment and pour metal.  Cutting Bob's perfect casting was not even discussed - we agreed I would return it intact.  It would kill me to cut it, then find out that the entire process would be too expensive to be viable.  I have not yet packed it for shipment - I will wait until next week.

No word on the cost of the complete Wolfer truck cost.  I don't want to become a pest.  Bob Stevenson is ready to make molds and cast the first set of the Lionel part.  We have not finished our discussion on two piece vs. four piece.  He is the expert, but I foresee problems with the two piece approach.

But hey - if the state of the art is such that a 3D printer can duplicate this casting in wax, that is a non-destructive approach, and we can surely cast that in one piece in brass or bronze, with very little shrinkage.  If Mike can stick a good casting in the bowels of such a printer and deliver a wax or plastic copy for, say, $50 each, we are still in the ballpark.

The 3D printing option that Mike is stating is very interesting.  BOB2, since you have had direct contact with Dean Brasseur, could you ask him about Lionel sharing the CAD drawing of the truck?  Even flat black, replacement plastic trucks from more than a few feet away may look and work just fine.

bob2 posted:

Mike - you are way out of my league.  I only know lost wax, and even then only enough to get somebody else to do the investment and pour metal.  Cutting Bob's perfect casting was not even discussed - we agreed I would return it intact.  It would kill me to cut it, then find out that the entire process would be too expensive to be viable.  I have not yet packed it for shipment - I will wait until next week.

No word on the cost of the complete Wolfer truck cost.  I don't want to become a pest.  Bob Stevenson is ready to make molds and cast the first set of the Lionel part.  We have not finished our discussion on two piece vs. four piece.  He is the expert, but I foresee problems with the two piece approach.

But hey - if the state of the art is such that a 3D printer can duplicate this casting in wax, that is a non-destructive approach, and we can surely cast that in one piece in brass or bronze, with very little shrinkage.  If Mike can stick a good casting in the bowels of such a printer and deliver a wax or plastic copy for, say, $50 each, we are still in the ballpark.

If you can get someone to make a 3D scan of your good truck, then there's no reason why you cant get it 3D printed. 

I have bought brass parts from the Ways of Shape. They print it in wax then cast it in brass. The natural finish is quite good, without any printing lines/waves.

The big step is going to be getting the high quality scan of the part into a computer. 

Last edited by Boilermaker1

Again, I am not an expert in lost wax.  I have limited pleasant experience getting such things done.  True experts have told me it is better to do this in pieces.

I have zero expertise in 3D printing.  If you go that way, I simply cannot help.

As far as Mr. Brasseur is concerned, I have had two contacts with him.  One, he gave me implicit permission to duplicate this casting, and two, he unequivocally indicated that Lionel does not want the Legacy part evaluated for modification.  I have no working relationship with him - he seems like a nice guy, so if and when you decide to go the 3D printer route, have someone who knows the topic contact him.  If you do print a one-piece wax, I am sure I can help get it cast in brass or bronze.  Have the printer increase the size by one half of one percent, to account for metal shrinkage upon cooling.

So, question?  Assuming someone can get this thing coded in some machine language for printing in a 3D printer, what is a good guess for cost each part in wax?

Foundry was just asking about you guys.  He is ready to do the first set at his expense!  All he needs is that cuttable casting - the one that is slightly bowed, but not crumbling?

I told him your ardor may have cooled a bit.  I was ready to invest, as was one other of your fellow forumites.  This makes it a no risk deal!  He of course would recover his initial cost on the subsequent sales.

Still no price on the Wolfer casting sets.  That would be your fallback if all else fails.

I wonder why we have not heard from a hobbyist with a JLC and a Legacy model?  Could it possibly be that one could just completely replace the mechanism?  Or is Lionel not interested in that either?

My question is that the section that is the pilot and holds the truck on can be unscrewed from the truck side frame. Does the zinc pest effect the whole unit has shown in the picture or just the big side frame section?  If we need the front pilot section also, I can probably cast this also. The airline ? up to the pilot I can not do in one piece attached to the truck side frame. This is a 12" mold just to do the truck side section. Harry 

I'd take a look at Walt's JLC GG-1 sideframes, you can see first hand what is failing.  I just looked at my JLC GG-1, and that entire piece in the pictures is a single casting.  I don't think the small pilot truck mount is affected, but since mine isn't falling apart, I can't be sure.  I'm not sure what the "airline" is.

Last edited by gunrunnerjohn

I was this close to "signing out" on this project, due to a lack of enthusiasm.  Robert and I now have a collective investment of thirty bucks (shipping is no longer cheap) and I have no personal interest in that the only way I will ever own a JLC GG1 is if one arrives free.

But I see there is still life here.  If Harry wants to do the molds and cast these things, that would be ok - nobody will get rich on this project.  But we really should coordinate!  

Robert may have a bowed casting.  If so, we will saw it carefully into two or four pieces, and then get Harry and Bob Stevenson on the same page so we only do this once.

Yes, it is my impression that only the main casting is failing.  The "air line" as I recall is a separate piece, and will need to be moved to the new casting when the pilot casting is attached.

Harry Henning posted:

The mold is in progress to make the big side frame section for the motor truck. I will see how this works out . I had 2 complete units to make the molds from. I will not need anymore ( I hope ). I will keep everybody posted here on progress.  Harry 

Harry,

 It’s great to hear that you’re going forward with this project.  I’m the guy who originally sent the “pristine” part to Bob2 because I have a JLC GG1 that is infested with zinc pest and I was at the point that I believed that this project needed to get done because there was no other alternative at the time.  I’m sure there are many folks with JLC GG1’s that don’t know about this issue and when they finally discover they have a crumbling truck frame and there are no parts available, they certainly will not be happy.

 I’m confident that you have this project well under control, however if there is anything can do to help bring this much needed part to completion, please let me know!  Again, thank you for your involvement.

 Chief Bob (Retired)  

Harry Henning posted:

Is the zinc pest problem only the motor truck section or is it also the pilot assembly, which is screwed onto the motor truck section. Is the lead truck zinc pest infected too?  Harry 

When my parts failed, it seemed to just be the main part of the side frames that failed.  The pivoting pilot part mounted to the front of it was sold as part of the whole assembly, so I changed everything.  I don't believe the pilot itself had issues though.  I did re-use the pilot trucks as well since they still looked fine.

Yesterday, I contacted a friend who has two JLCs and told him about this problem. He has 4916 and 4925; upon being removed from the box, he told me that both seem to be nice and straight with no apparent problems. One is brunswick green/broad stripe, the other is tuscan/broad stripe, I just do not remember which one is what number. Good for him, I hope that they stay that way.

Jake,

        That is the same info. that I have been receiving from other owners. I am sitting tight waiting to hear from my  "SCIENCE PROFESSOR".

On another note, we just finished the mold for McCoy standard gauge steam chests. A sample has been cast from a zinc pest casting which we ground, filled w/ epoxy and reshaped. I need to drill, tap, mount the new cylinders & see how it all fits. I just realized that the cylinder mounting plate is also suffering from zinc pest. It was a casting, nickel plated. I can make out of steel and get plated as I go.  We are not the fastest train, but we eventually " arrive at the station "   Harry 

Harry Henning posted:

Jake,

        That is the same info. that I have been receiving from other owners. I am sitting tight waiting to hear from my  "SCIENCE PROFESSOR".

On another note, we just finished the mold for McCoy standard gauge steam chests. A sample has been cast from a zinc pest casting which we ground, filled w/ epoxy and reshaped. I need to drill, tap, mount the new cylinders & see how it all fits. I just realized that the cylinder mounting plate is also suffering from zinc pest. It was a casting, nickel plated. I can make out of steel and get plated as I go.  We are not the fastest train, but we eventually " arrive at the station "   Harry 

I look forward to hopefully positive results.  I'm not 100% confident in my replacement parts that I was able to acquire at a premium, so new pieces would bring some peace of mind about owning two of the locomotives that have had the problem.

BOB2,

         We have our parts  nickel plated where needed,  generally in lots as a fixed price for the lot. We use a method known as 'barrel plating'.  I normally wait for a batch of wheel rim stampings, grab rails couplers etc. to run as a unit to keep the piece price down. This limits me to 2 - 3 batches a year.  I do NOT do this myself. Nickel plating a loco. is a different job, A LOT more expensive I would believe. I had contacted several plating shops in NJ for prices on plating our wheel rims. They all averaged between $1.80 - $2.00 a rim if I had 1000 pieces or more individually plated.  So you can see a loco. would be super expensive. Price ?. I guess $200 - $300     Harry 

DSC04502

Harry, go back to the original thread.

Here is a link to the original thread in O-27:

https://ogrforum.ogaugerr.com/...-sideframes-zinc-rot

I posted pictures of the only part that needs replacing.  All the other parts are attached to the failing part.  No need to try and make everything.  A one-piece casting of the failing part, on the right above, should be all that's required.

Attachments

Images (1)
  • DSC04502
Last edited by Johnsgg1
PRRMP54 posted:

Yesterday, I contacted a friend who has two JLCs and told him about this problem. He has 4916 and 4925; upon being removed from the box, he told me that both seem to be nice and straight with no apparent problems. One is brunswick green/broad stripe, the other is tuscan/broad stripe, I just do not remember which one is what number. Good for him, I hope that they stay that way.

I have the green 4925, so far I see no sign of any issues.  I actually put it in the foam cradle and poked and prodded everywhere after the inspection, but so far those castings seems solid.  I hope it remains that way!

gunrunnerjohn posted:
PRRMP54 posted:

Yesterday, I contacted a friend who has two JLCs and told him about this problem. He has 4916 and 4925; upon being removed from the box, he told me that both seem to be nice and straight with no apparent problems. One is brunswick green/broad stripe, the other is tuscan/broad stripe, I just do not remember which one is what number. Good for him, I hope that they stay that way.

I have the green 4925, so far I see no sign of any issues.  I actually put it in the foam cradle and poked and prodded everywhere after the inspection, but so far those castings seems solid.  I hope it remains that way!

I'd be careful with the 4925 model.  That's the same one I have that had the issue.  When my NIB 4866 silver model showed up with destroyed trucks due to the zinc rot, I checked my 4925 on the shelf and it was cracking badly around the screw holes as well which is something I hadn't noticed previously.  If the new parts work out, you guys may want to buy a spare set to keep around just in case.

If the new brass sideframes for the GG1 come to fruition, is there any way the same process could be done for a sideframe replacement for the Williams/Bachmann O scale Peter Witt car? On the surface at least, it looks like these suffered almost complete sideframe failure as well, perhaps even to a worse extent than the Lionel GG1, although they were not nearly as expensive. A shame, because they were quite a nice model otherwise.

Bill in FtL

Bill Nielsen posted:

If the new brass sideframes for the GG1 come to fruition, is there any way the same process could be done for a sideframe replacement for the Williams/Bachmann O scale Peter Witt car? On the surface at least, it looks like these suffered almost complete sideframe failure as well, perhaps even to a worse extent than the Lionel GG1, although they were not nearly as expensive. A shame, because they were quite a nice model otherwise.

Bill in FtL

It could, but last I checked the truck frames for the Peter Witt cars are still available and its probably more cost effective to just buy replacements from Bachmann.  They would likely be easier to reproduce though.

Bill Nielsen posted:

If the new brass sideframes for the GG1 come to fruition, is there any way the same process could be done for a sideframe replacement for the Williams/Bachmann O scale Peter Witt car? On the surface at least, it looks like these suffered almost complete sideframe failure as well, perhaps even to a worse extent than the Lionel GG1, although they were not nearly as expensive. A shame, because they were quite a nice model otherwise.

Bill in FtL

I would contact QCar Co, they deal in trucks and sideframes.

SantaFe158 posted:
Bill Nielsen posted:

If the new brass sideframes for the GG1 come to fruition, is there any way the same process could be done for a sideframe replacement for the Williams/Bachmann O scale Peter Witt car? On the surface at least, it looks like these suffered almost complete sideframe failure as well, perhaps even to a worse extent than the Lionel GG1, although they were not nearly as expensive. A shame, because they were quite a nice model otherwise.

Bill in FtL

It could, but last I checked the truck frames for the Peter Witt cars are still available and its probably more cost effective to just buy replacements from Bachmann.  They would likely be easier to reproduce though.

The sideframes for the Williams Peter Witt are an assembly consisting of the two sideframes cast together with the bottom half of the truck, and Bachmann doesn’t list them in their parts list, they only show complete trucks which are listed as “sold out”. Besides, replacing them with like parts would only mean that the factory replacements will also crumble from “zinc pest” as well. Someone here mentioned Q-car, but their sideframes are separate pieces, not cast as a unit together with the bottom half of the truck in one piece.

Bill in FtL

The GG-1 truck frames:

We have re-visited the truck frame production logistics. 1st. I do  have a set cast in  plastic ,  in a  resin mold by my 'science' worker.  We have trimmed out and mounted on a GG-1 and lo & behold it appears to be working smoothly. The trucks are mounted , but have NOT pulled a string of cars yet. I expect to put thru that job this weekend.  My problem is, and I want your in-put on this, good or bad!!  Would you guys accept a plastic type frame?  What would be $ practical.   I already have over $1K into this w/ the original Pewter castings & mold. Now we have another  new mold, vacumn chamber, pump etc. tied up into the plastic production.   I am thinking realistically about $100.00 a pair.     My 'science' employee works part time, 1 day a week, &  we are able to pour and trim only one pr. in the course of a day.  That is only 4 pair a month.    Your thoughts please.  Harry 

And I know a retailer who has two or three affected JLC GG-1's in for repair where zinc rot is one problem to sort. I don't know what they might pay and I certainly don't speak on their behalf, but I suspect if they can offer a solution to their customers they may order enough to fix the ones currently in house and pass along the cost.

While my 2 engines currently seem OK (knock wood!), I'd probably be interested in a pair (maybe even 2 pair to cover the bases for both engines) as a backup in case one of them decides to start crumbling one day.  (you know, buy the part when it's available, not look for it after it's not available when you are more desperate for it )

Of course with the limited production numbers described, I would not try to buy one before all the folks with truly crumbled trucks get a chance to buy theirs.  At 4 sets per month, I'm assuming there is enough demand that could take years to fill.  While I personally seem lucky so far with mine, there seem to be far more people who have not been when they opened their boxes after years of storage.

But if the production can be ramped up, I'd go for at least one set at $100.  From the picture, those look really good.  Hopefully if it is established that there is enough interest the processes can be learned by more than just that one science person to make these.

-Dave

Last edited by Dave45681

My thought's?  Not on price or material... I had known of the problem from the first report, and possibly that a group was working on a solution.  Then for forgotten reasons, I'd concentrated on other things.  Now, less than a week ago, I made a rare foray into "3-rail Scale" looking to find any concern about curve easements-- I had discovered that 21" Lionel passenger cars (O-54" capable so labelled) could actually be towed around the 39+" diameter of 0-27 style 42" curves.  By towed, I refer the fixed coupler on the rear of a postwar F3A-B set, and proved it on the family room rug with a few pieces of track and a B-unit.  (Watch this forum...)

So I saw the set of posts here ending in a great silence in June of 2018, and realized whatever else had happened (new thread?) I must have surely missed the boat.  Tonight, I noticed the old thread title in the sidebar-- turned out the boat had not left and I was only 12 hours in learning that.  As we used to say in the engineering office-- if you can't be good, it sure helps to be lucky.

So, it is easy to say that $100 for a pair, for my one engine, looks like a really good solution to me.  It's been run, just to make sure it did. and one pantograph locked in a position just not touching (5-1/8"?) at the generally agreed best pantograph height of 5-1/4" (21 scale feet).  The PRR usual height is 22 feet.  Since then it has been under its display cover (compresses the pantograph slightly, there being about 1/4" spring  play below locked position) about 7 feet off the 1st floor of the house.  Here the thermostat is set for 78-degrees cooling, 68 degrees heating, less of both at night.  Humidity is higher in summer-- don't recall the figures, but cellar temps were about 5 degrees less, and 2d floor at least 5 degrees more, which would modify the humidity accordingly.  Right now, AC not run today (but yesterday) indoor !st floor is 70F and humidity 60%. My TMCC GG1 (tuscan) is not showing any disintegration, but it is hard to get a close look at it for lesser damage.

This GG1 has been my favorite among the several choices, because of its correct scale length, height, and correct shape of the shell.  I was actually able to see that its overhangs on curves required only 1/2" added clearance per degree of curvature, rather than the usual 1".  The model does require the usual 1", but that is because the frame being replaced carries the pivot point of the drivers, while in the model the pivot point is of necessity located at the maintenance-free motor. 

I would be interested in the test of how the new frame works pulling cars, but since I am beginning to see that my compressed PRR mainline layout could use compression of train length, I would get your frame regardless.  (I'm going to compress the 4-track main line to two tracks-- there is actually a long stretch of this on the NYC-DC route.)  Finally, thanks for all the effort you put into this.  --Frank M

My son Harry !!! ran the GG-1 w/ 30 freight cars Sunday w/ no problems.  Tonight he will be pulling a string of Freedom Train cars , about 17 cars.  My science teacher is going ahead w/ making a 2nd. mold. A new vacumn chamber & pump has been ordered, and should be able to pour, cast and trim about 4-8 pieces a week.   Harry  

Harry,

Thanks for your efforts!  I also have the JLC GG1 (green 5 stripe).

As a mechanical Engineer, I would like to point out that plastic may only be a temporary fix.  Some quick info that's written about plastics:

"Plastics age by a combination of things, such as temperature, exposure to ultraviolet light, visible light, atmospheric components, humidity, or liquids/chemicals/oils. The polymer aging processes can be further separated into physical aging, chemical aging, thermal aging, etc.  Most polymers are amorphous and undergo physical relaxation and other structural changes with time. Generally speaking, the softer a polymer is, the more flexible its polymer chains will be, and the more prone it will be to time-related changes. The chemical composition of the polymer, the presence and concentration of oxidation-prone groups, and the amount of plasticizers or additives can also have a strong effect on the process."

Then, when you consider that oil will get on these trucks however plastic friendly, consider how heavy the GG1 model is (as well as the load path thru the trucks), we may still get trucks that bow or crack over time.  If you remember the Weaver boxcars with plastic trucks, they were also very lightly weighted. Many of us converted them to metal especially since the coupling forces went thru them.  Can you imagine how the coupling load and towing load affects the plastic trucks on the GG1?  Imagine looking forward to that nice solid thunk sound when you go to couple it to your Congressional cars only to watch the rear truck drop it's wheels and break free of the coupler.

Sorry if this is not what you want to hear.  I am only pointing it out to prevent another disappointment later in the hopes that we decide to go with a metal truck instead.  I prefer metal trucks for all of these reasons.

Thanks!

-Matt

Sorry if this is not what you want to hear.  I am only pointing it out to prevent another disappointment later in the hopes that we decide to go with a metal truck instead.  I prefer metal trucks for all of these reasons.

However, as has been discussed, the cost for a small run of metal sideframes is considerably more, probably price prohibitive for many of the folks that would like to get their GG1 back on the rails.  If a set in metal was $250-300 vs $100 for the plastic, how many people here would still be interested in getting the parts? 


Plastic vs metal - no doubt factually correct points raised. 

But I'd prefer to have a solution than not.

Because my GG1 currently has no truck frames at all. They turned to dust. So much for metal.

And who's to say, though subject to aging, etc, as pointed out, plastic frames might not last years?

Anyway, that this effort is all volunteer and yet produced a reasonable solution shows dedication and deserves more applause than second guessing.

I'll happily write a check for new frames regardless of the material they're made from. 

Please don't be a buzzkill!

But would you be willing to spend another $150-200 on them?  Tooling for metal seems lot more expensive than for the plastic, and I suspect Harry is not willing to spend that much money up front.  Several were cast in metal, and the shrinkage was too much to use them, though they looked great.  There comes a point of diminishing returns on something like this. 

While I have no doubt that the proper metal could be more robust, remember that we're replacing metal sideframes that didn't make the grade!  While it's possible that plastic will degrade over time, that's by no means a foregone conclusion.  It really depends on the composition of the plastic.

Hard to say, but my read is that was very difficult.  The issue is, how do you start?  You either fire up your CAD controlled CNC machine and create the mold from a block of steel or make a mold from an existing piece.  The CNC route is very expensive, and clearly Harry opted for the create the mold from an existing piece.  The question is, how do you size up the mold a couple percent without a pattern?

Well, while I'm not an expert, it will depend on the type of (co-) polymer system used.  Any thermoplastic will fail over time. Some epoxy resins (cross linked) systems are very brittle and others not so much.  Some examples; epoxy resins are being used for "welding" metal (automobile car frame) or used in carbon fiber applications.  Not sure what type of system is being used here.  There are also additives that can be added to enhance the desired effect, carbon black for example could be added for strength.

Couple of other examples where plastics are successfully used under stress conditions -

Overhead valve cover on car/truck motors (high temp and oil contact)
Transmission pan/filter combo units

All that said, there are protocols that could be used to stress or age the plastic at an accelerated rate.  For example a UV light box, high sustained temperatures (oven), etc. Testing then could be completed. I am sure this solution  could work, but the "right" cross-linked system should/has to be used.

Last edited by DaveGG

All die-cast will eventually turn to dust.  But some plastics will remain in landfills for thousands of years!  Major shout-out to Harry Henning, whose efforts have probably put more crumbling toy trains in O and Standard Gauge back on the rails than anyone I know!!

That being said, has anyone reached out to Dennis Mashburn (KD Castings, Abilene, TX) ?  He's a 2-rail O Scaler and does small-run brass castings with a foundry on his property.  I've been to his house and he told us all about shrinkage, lost wax and plastic masters, etc.  If you have a good part, even if it's plastic, he might be a guy who can do it in brass.  And in multiples! (I've seen some of his stuff fresh on the sprues.)  Brass is very permanent.  It doesn't disintegrate like die-cast so you won't have a repeat of this problem.  Of course it would have to be painted.

I can't speak for Dennis, I don't know what his current workload is like or what he would charge.  Just trying to take some of the repetitive production load off of Harry and give people a metal option if they really want one.

Last edited by Ted S

Dennis sold to Bob Stevenson, and Bob was getting ready to do a test shot in brass.  When Mr. Hemmings said "I got this" we stopped.  This is not a good place for two different folks doing molds at the same time.

You can follow all that in the first couple pages of this thread.

We also proposed converting to Wolfer trucks, which are extremely accurate, but I wasn't willing to invest a grand in a crumbled Lionel model to see how to do it.  I believe photos of the Wolfer truck are on page 1.  Bob Stevenson has those molds ready to go.

I already have five bronze GG1s - I was going to help here because I like GG1s.

@bob2 posted:

Dennis sold to Bob Stevenson, and Bob was getting ready to do a test shot in brass.  When Mr. Hemmings said "I got this" we stopped.  This is not a good place for two different folks doing molds at the same time.

You can follow all that in the first couple pages of this thread.

We also proposed converting to Wolfer trucks, which are extremely accurate, but I wasn't willing to invest a grand in a crumbled Lionel model to see how to do it.  I believe photos of the Wolfer truck are on page 1.  Bob Stevenson has those molds ready to go.

I already have five bronze GG1s - I was going to help here because I like GG1s.

If you really have to have them in metal castings, I don't see the problem with someone doing them.  The metal casting was actually attempted, but the mold shrinkage was enough that the casting came out close to 1/4" too short.  Needless to say, it didn't work, but it was very nice looking.

I just bolted one of the plastic sideframes to my GG1 as a test and moved the pilot over, it didn't have any problems running, and looked just like the original.  It was also a good chance to look even closer at my sideframes to make sure they're still intact.

To answer a few questions:

The material used is a "ureathane plastic', It is a very tough material.

There is .01" shrinkage per inch of mold. (negligible).

The 6:32 screw holes will be 'tapped'.

You will re-use your original Lionel screws.

The castings are done in 'black' color.

We will be listing on our web site most likely by this weekend. Orders will be sold and shipped as received. I do not want to offend or cut short anybody on order placement, as I think this is the fairest way to accept orders.   Harry 


@Bryan posted:

I can’t wait to get ahold of these.  Will this be on the Henning store web site?  I’ll be getting 2 at least maybe 4.  Just waiting to know when and where to send the money!   Y’all are awesome for everything you are doing in the hobby thank you.

Looks like they already are on the site.

Henning's Trains - GG1055 Powered Truck Side Frame for Lionel GG1

John beat me to it by a minute.  LOL!

Last edited by MartyE
@bmoran4 posted:
@MartyE posted:

Looks like they already are on the site.

Henning's Trains - GG1055 Powered Truck Side Frame for Lionel GG1

John beat me to it by a minute.  LOL!

@DaveGG posted:

Bryan, 

Yes, there on the Henning website. 


Not sure if @Bryan got the message or not 

NOTE: We are temporarily putting a hold on taking orders until we get caught up with the current orders. Check back soon for ordering. (should be within the next two weeks)
Production is slow on these, we make one at a time, but we will ship them in the order that we receive orders. Can be anywhere from a week to several weeks. We will start shipping the first couple orders Monday. We appreciate everyone's patience. 

GG1055 Powered Truck Side Frame for Lionel GG1

A pair of reproduction powered truck side frames for the Lionel TMCC Scale GG1 to replace the original metal side frames that has unfortunately often come to zinc pest (deteriorated).

Urethane plastic (72 Shore D Hardness)

Made to fit Lionel:

  • 6-18354  Pennsylvania TMCC Scale GG1 – Tuscan Solid Stripe #4916
  • 6-18355  Pennsylvania TMCC Scale GG1 – Green 5 Stripe #4876
  • 6-18356  Penn Central TMCC Scale GG1 – Green 5 Stripe #4901
  • 6-18371  Pennsylvania TMCC Scale GG1 – Tuscan 5 Stripe #4912
  • 6-18372  Pennsylvania TMCC Scale GG1 – Green Solid Stripe #4925
  • 6-18374  Pennsylvania TMCC Scale GG1 – Silver #4866

My replacement pair of plastic frames have arrived today from Henning's Trains!  My thanks to them for the fast filling and shipping of my order!

I am impressed with the detail that is molded into the frames.  Overall, they are a little more pliable than I had expected.

I will dig out my silver JLC GG1 in a little bit, and upload a few pics of its current zinc rot frames.

Attachments

Images (5)
  • mceclip0
  • mceclip1
  • mceclip2
  • mceclip3
  • mceclip4
Last edited by Tony D.

Remember, the only significant load on these is right at the circled point, that's where the pilot truck attaches and of course, the coupler for the rest of the train is attached to the pilot truck.  The sides that seem pliable are strictly cosmetic as were the originals.  Although my GG1 didn't have any sideframe issues, I did take one of these and install it for a test.  It dropped right in and functioned just like the original.  The nice thing is, you don't have to even take the shell off, you can do this all from the outside.

Attachments

Images (1)
  • mceclip0

Here are pics of my scale GG1, ending with some pics showing the plastic frames for comparison. 

One of the replacements does have some light speckling to its finish.  I am debating on hitting the replacement pair with a light coat of flat black spray paint.  I'm just not sure if the paint will have an adverse effect on the pliable plastic sides.


Attachments

Images (6)
  • mceclip0
  • mceclip1
  • mceclip2
  • mceclip3
  • mceclip4
  • mceclip5

Thank you for all your in-put so far. We have shipped 13 sets as of today.  My 'science worker' took all the mold making, production items home so he could continue casting during the week, while his wife was visiting her 'momma'. We will be accepting more orders most likely by next weekend. Bill has made up an additional flyer on converting our units. I will get him to add to our site for down loading.  Thank you again, please be safe.   Harry 

So, I hit both replacement frames with a light coat of flat black paint:

After 30 minutes of drying time in my wife's empty outdoor planter, they looked pretty good:

Here's the kitchen table work area:

I accidentally snapped the bend on both little brass stanchions to get the pipe off the original front frame, so I used super glue to hold them in place on the replacement:


I only replaced the front frame (left truck in the next 2 pics), as the back frame is still holding its overall shape fairly well (I greased all of the gears, too):

I think semi-gloss black might have been a better paint color choice instead of flat black, but from a few feet away it isn't very noticeable:

I will get some run time on my PRR 4866 tomorrow to see how it fares.  Stay tuned.

Also, I can't thank Henning's Trains enough for tackling this project!

Attachments

Images (6)
  • mceclip0
  • mceclip1
  • mceclip2
  • mceclip3
  • mceclip4
  • mceclip5

Tony,

      The 'speckled' truck frame is I believe one of the 1st castings . It was sent to you in error.  We since adjusted the color portion of the mixture. That is the difference between the two. Bill was looking for that casting so it would not get sent out. Somehow I shipped. I will gladly replace if you want w/ another from the next batch.  Adjusting the color also changes the flexibility ( more ridged ) piece.  Harry 

Thanks for that info, Harry!  

No rush on sending me the replacement, but when you get a chance, please do.  I know my original rear frame will eventually need replaced, too.

I can send you back the speckled one at that time, if you would like me to, but it does have a light coat of flat black paint on it!

You'd have to have a good eye to see any difference.  I obviously don't have a good eye.

I see a very minor difference in detail level near the center where the axle is directly behind the truck.  The detail is slightly less defined on the replacement on the left.

But that also could quite probably be because Tony did a spray of flat black over it due to the speckled finish on the prototype that was accidentally sent.  And this is just a sample of looking at these two trucks.  I could possibly note the same looking at a series of originals.  I have never looked at a large number of them side by side before this exercise.

In any event, this is still GREAT, since the alternatives before this quite involved project by Harry was NOTHINGSo great job, Henning's Trains!!

I guess technically once we replace these trucks an "R" should end up on the truck somewhere underneath to show it's not an original part for those of us trying to stick to TCA standards.  But the alternative was obviously worse for the units with the problem!

-Dave

Attachments

Images (1)
  • mceclip1
Last edited by Dave45681

I think anyone finding a plastic sideframe on a JLC GG1 will realize they're not original.

Obviously.  I don't have the benefit of having seen one in person though, so I don't know what senses/examination would be needed for one to observe that.

Imagine asking a seller of one that does have original trucks that are not crumbling if you can squeeze the sides to see if it flexes any.  I'm sure that would be an entertaining conversation to watch.

It was just a passing thought, I'm not trying to derail the topic with that comment.

-Dave

Last edited by Dave45681

The install went well, just a few snags.   To get my old frame out, I did have to remove a small clip held by 2 smaller screws.  This wasn’t too clear in any previous comments.  

Also, the 1 1/2” long shiny metal L pin held down by a larger head screw; Henning’s instructions show a spring on it.  If there was a small spring under mine, it is gone now.  I thought something flew past my nose when I pulled up on the pin with my needle nose pliers, but I could not find a small spring anywhere.   I am not really sure of the small spring’s purpose, as I don’t have any operational issues running without it.

Also, as I stated before, to get the pipe off of the frame, I did snap off the ends of the 2 brass stanchions and had to super glue them in place on the replacement frame.  

Finally, the 2 tiny GG1 plaques are now in a baggie in the original GG1 box.  They fell off of my original frames and I didn’t want to risk losing them if they would fall off the replacement frames. 

Thanks for the information.  I'll let you know how it goes.  Should post by weeks end.  I am so glad this finally happened, I thought my favorite engine was a hanger queen.  I'm a little ticked at Lionel, since they turned their back on us.  And these were not starter sets, they were fairly expensive engines, bought by some of there best costumers.

Last edited by Reading RR
@Tony D. posted:

The install went well, just a few snags.   To get my old frame out, I did have to remove a small clip held by 2 smaller screws.  This wasn’t too clear in any previous comments.  

The small "clip" is to keep the pilot from swiveling up too much, it "contains" it.

Also, the 1 1/2” long shiny metal L pin held down by a larger head screw; Henning’s instructions show a spring on it.  If there was a small spring under mine, it is gone now.  I thought something flew past my nose when I pulled up on the pin with my needle nose pliers, but I could not find a small spring anywhere.   I am not really sure of the small spring’s purpose, as I don’t have any operational issues running without it.

The rod is the spring, it's the centering spring for the coupler on the pilot.  There is no spring on it, at least there wasn't one on mine and it was "factory fresh" and never apart.

Thanks for that info, John!  I might have imagined something zinging by my nose, considering I was doing this near midnight!

In the Henning's instructions, here is what I was calling the L piece that I tugged on with my needle nose pliers to remove:


I thought the darker thing on it to the right in the above screen snip was a loose spring, as mine does not have this; it is just a bare-steel pin:

Attachments

Images (2)
  • mceclip0
  • mceclip1

Mod for the worst one is done, won't do the other till I need to.  Install went fairly well, took about 30 min., hardest part was keeping track of all the little screws.  Tony I used some semi-gloss and that was a little to shinny, so I hit it with a little flat after it dried.  The combo of the two looks very good and a very close color match.  See picture.  New truck on right.  Harry it was worth every penny, test run at the train club this weekend.  Have not attached piping yet as you all can see in the foreground.GG-1 mod

Attachments

Images (1)
  • GG-1 mod
Last edited by Reading RR

P.S. for my above note.  Save the removing of the truck piping for last, since the old cast truck may not survive. Mine broke into 3 pieces while trying to pry off the piping.  After that I just broke the cast where the piping went through it.  I will trim it up and do like Tony and just glue it to the replacement truck.  Also be very careful with the 2 very tiny screws, I can see them falling inside the engine, luckily none of mine did.  Just a word of caution, you'll see the 2 screws I'm talking about.

Nice update, David! 

The paint combo looks good on your plastic replacement, and the super glue on the 2 pipe stanchions is the way to go.  As I mentioned before, the brass bend snapped on both of my stanchions as I was unbending them.  So, they were too short to bend in place on the replacement frame.   

Hi Tony D,

The centering spring that keeps the pilot wheels straight had a small piece of plastic on it. It looked like shrink wrap that was shrunk snug onto the wire. It's not a spring.

I didn't disassemble the pieces we used for the mold. But when I reassembled the parts I assumed the shrink wrap piece would go under the hold down screw. This would keep the spring wire from rattling around in the metal truck cover's channel. Of course with the part being plastic you wouldn't have the rattle!

Glad to see your liking the part!

Anthony has produced I think 8 sets so far. He is working on 'winterizing' a direlet house  he just bought and  will be moving to next year. He was planning on pouring the parts in between working on his house, but there was no water available and water is needed to cool the mold. He has just this week been connected back up w/ water, so I hope some production will resume. This 'TRUCK ' story is like writing another chapter of an interesting book on home manufacturing in the U.S.A.  Years ago I dabbled into 'TRUSCALE" "O"  wooden ready track w/ nickel silver rail, hand spiked and ballasted, also turnouts.  Next we had an "O" scale kit line, and later the "RAIL LOGIC" bi-directional signal system for HO & "O". Enough for now.  Next week I hope to ship some more backorders of the truck frames.  Harry 

.............  Years ago I dabbled into 'TRUSCALE" "O"  wooden ready track w/ nickel silver rail, hand spiked and ballasted, also turnouts.  .........

Not to derail the truck topic too much, but are you saying that the Tru-Scale line of products was your brand, or that you made something similar to it to match to the Tru-Scale product line?

I have a bunch of those turnouts, but in HO.  They are not with me, so I can't look at the box to see if they have a company address that may match up to Henning's Trains.

-Dave

Add Reply

Post

OGR Publishing, Inc., 1310 Eastside Centre Ct, Suite 6, Mountain Home, AR 72653
800-980-OGRR (6477)
www.ogaugerr.com

×
×
×
×
Link copied to your clipboard.
×
×