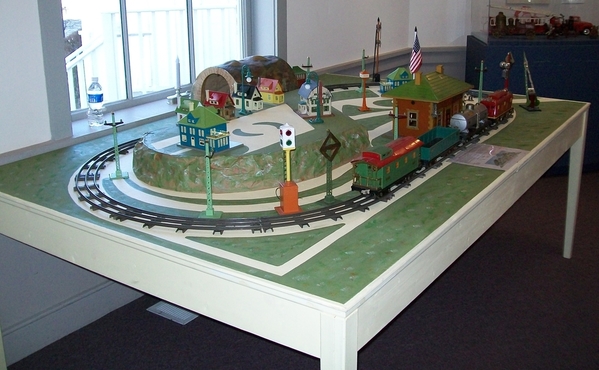
I first discovered this forum as a result of my love for Lionel factory displays and layouts. While I'm a Standard Gauge collector I enjoy seeing the old factory displays in all scales. The post war O Guage layouts were really interesting with all their remote control accessories and Lionel packed a lot of action into a small space. I've spent hours on here looking at and studying them and I would love to find one someday .

The Pre-War Scenic Displays and Plots are my favorite though. Something about the old sawdust grass, the "mud trees" and hedgerows, the tin bunglaows and villas that I find fascinating. The people that created them had to be both artist and  artisan, machinist and mechanic. I've often wished I could go back in time and watch them hand hammering a 130 or 140 tunnel or a sheet metal elevation piece.

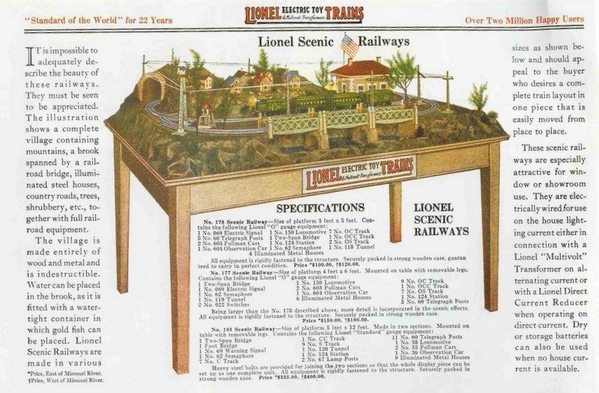
Examples of  Pre-War layouts are quite scarce as is the information pertaining to them. I am fortunate to own one of the No. 199 Scenic Railways as shown on the inside cover of the 1925 catalog. It's mostly complete and has virtually all of it's original accessories except  for the metal corner grass plot and a 3 piece metal grass plot.

199

The 199 Scenic Railway as described inside the back cover of Lionel's 1925 catalog

Due to space limitations in my current home, my layout will be confined to the loft area. Not a lot of headroom up there so the plan is to build a coffee table height stand for the original layout to rest upon. That will allow me to operate the trains comfortably from a chair while allowing me to slide underneath to address the wiring.

As a way of giving back to the forum I thought I would document the project here and describe in detail some of the construction techniques, materials, dimensions , etc that the factory used to build them. Would be great if I find others out there who can add info or history to the thread, make suggestions,  or simply enjoy reading about it. Maybe it will serve as a guide for future hobbyists and collectors. I will do my best.

Here's a few photos of some of the parts and pieces to get things started. The layout requires almost 50 accessory pieces including bungalows, villas,  switching tower, station, street lamps, telegraph poles,  tunnel, crossing gate, semaphor , trees, etc.


IMG_0448IMG_0452IMG_0453

IMG_0449IMG_0063

3 mountains

Gerry C.

Normandy Beach, NJ

Attachments

Images (7)
  • 199
  • IMG_0448
  • IMG_0452
  • IMG_0453
  • IMG_0449
  • IMG_0063
  • 3 mountains
Last edited by G-Man24
Original Post

Replies sorted oldest to newest

Thank you all for the compliments and encouragement. I'm a known procrastinator so  I'm hoping this thread will provide the necessary impetus to see it through to completion. 

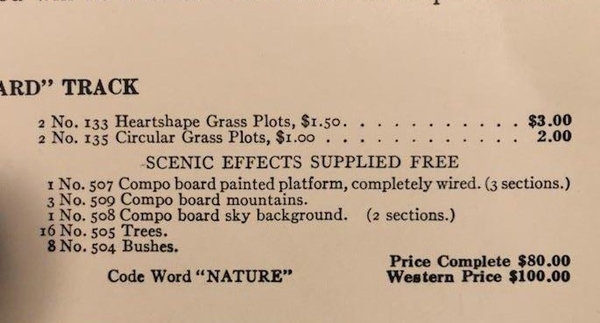
A few interesting notes about the display. In 1925 the retail price was $80-$100 depending on delivery point. That's roughly $1200-$1500 in today's money and it came with no trains, track or transformer. Minimum wage laws at that time were set at 16 cents per hour so that was a pretty hefty sum for the average Joe. I think it would be safe to say that the displays were primarily targeted to retail stores and dealers unless you were a kid whose parents were well-to-do. 

TCW [14)

In another example of Joshua Cowen's brilliant marketing skills , the catalog points out that the Price Complete of the display is equal to the sum total of all the accessories included. That is, you are essentially getting the scenic layout for "free" ... provided you purchase all the accessories at one time. This must have been irresistible to the dealer who realized that when he was done with the display he could put the all the accessories back into their boxes and sell them to recoup his money.

IMG_0573

IMG_0575

This is only a guess on my part, but I would say that in most cases that is exactly what happened. At some point the dealer would sell off all of the accessories to recover his investment, and the large cumbersome displays were broken up and discarded . If in fact a lot of these were sold as the catalog indicates "The demand is already tremendous"..this would account for the small number of displays which have survived. The Great Depression and WWII lie just ahead, where the preservation of a toy train board would seem rather unimportant. 


Attachments

Images (3)
  • IMG_0573
  • IMG_0575
  • TCW (14)
Last edited by G-Man24

I will state up front I am a bit of a purist and I will attempt to keep things as original as possible. I don’t mind seeing a battle scar or age-worn spot here and there as long as it does not significantly detract from the overall appearance.  The patina for me is a glimpse into its past, the places it’s been and the people who cared for it and operated it. I want to see it exactly as the kid standing in front of the hardware store window in 1925 saw it.  It is my intent to restore the layout to running condition without any re-paint, touch-ups, or component replacement except where it may be absolutely necessary.  

Starting from the bottom up. The scenic layout is made up of three individual layout boards and their accompanying frame sections, laid side by side. Each frame section measures approximately 49” x 30” for an overall size of 49” x 90”.

IMG_0347

The frames are made of wooden rails approx. 1-1/4” wide with both a step and groove milled into them. The corners are mitered lap joints. 

lapjoint

groove

The cross braces are attached using corrugated nails which allows them to lay flush with the base of the side rails while supporting the panels from underneath. The panels then slide down inside the groove in the frame creating three separate units which are sturdy and rigid.

corrugated

IMG_0585

The display is almost 100 years old now and the wood frames were loose so I disassembled all the corner joints and rebuilt them using fresh glue & wire brads as original. I experimented first with Gorilla Glue but settled on regular Titebond wood glue. Once the glue is set, a wire nail is driven into the corner from both directions. The result is a surprisingly strong joint. 

glued

Attachments

Images (6)
  • IMG_0347
  • groove
  • lapjoint
  • corrugated
  • IMG_0585
  • glued
Last edited by G-Man24

With the frames tightened up I turned my focus to the layout panels. Hard to tell from this picture but a couple of them had slightly bowed or warped over time.

Boards

The weight of the track and accessories would probably help straighten them out but I wanted to try and get them as flat a possible before sliding them into the frames for the last time. Honestly I don't know why they were ever removed  since the frames would have helped to keep them straight and there's really no good reason I can think of for doing it .  It doesn't make it any easier to store them.  Bending the bow out of them "dry" is both futile and dodgy as they spring right back and there's a chance of cracking the board. I decided to try applying some steam to the backside and then pressing them flat while they dry using some heavy panels of tempered glass I had. 

IMG_0613

I'd say they're 90% flat now with just a little more tweaking to go. Maybe one more steam and press session.

IMG_0354


Attachments

Images (3)
  • Boards
  • IMG_0613
  • IMG_0354
Last edited by G-Man24

Thanks again guys. MATTR the story behind how I found the layout is not as exciting as you might imagine. I got it from a longtime collector and friend who had it stored away for years. He had not gotten around to putting it all together and trusted me to give it a good home. I wish I knew more of it's history it would be really interesting to know where it originated.


OK a little more about the train layout panels themselves...Lionel describes them as "Compo" board.

This Composition board is sort of an early version of Masonite. The panels are approx 1/4" thick. The grass and foliage looks like it was painted by dipping a sponge into various colors of oil paint and dabbing it on. There are holes punched or drilled in for wiring.

IMG_0691

Interestingly, the location of each accessory is factory labeled with the corresponding catalog number. Seems Lionel was intent on having all the displays set up in a consistent configuration rather than having people use their own imagination. You can be sure the marketing wizards at Lionel helped designed the layout in a way that would best show off their line of accessories and thus maximize sales. As an example there are three different styles of street lights along with a variety of villas and bungalows.

IMG_0067

77

IMG_0696IMG_0064IMG_0066

Attachments

Images (6)
  • IMG_0691
  • IMG_0696
  • IMG_0064
  • IMG_0066
  • IMG_0067
  • 77
Last edited by G-Man24

Got to work on the table last week. Being a retired machinist I’m way more comfortable working with metal than wood so I enlisted the help of my friend and neighbor Roger who is experienced in cabinet making.  As stated earlier I wanted a “coffee table height” display stand since it’s going up in my loft and headroom is a consideration. These layouts were designed to sit on a floor or large table or on a store window platform so I’m not attempting to replicate or reproduce an original Lionel piece per se but rather create a unique display stand that will show the layout well while providing a comfortable height from which to operate it from a chair (I’m getting too old to play with trains on the floor). In designing it however, I did try to borrow some of the styling cues (fully skirted perimeter, tapered legs, moldings, etc.)  that Lionel used on their Pre-War standing displays. In other words, I tried to style in a way that I think Lionel would have had they produced such a table.

SCAN0087.0 [1)

The table is constructed entirely of Hard Maple and spans almost 8 feet without the need for a center support leg. The interlocking cross bracing prevents it from racking while the open grid design allows easy access to all the wiring. The new framework follows the factory framework, supporting it just the same as if it were placed on a floor. Wooden cleats will be added to the inside of the frame which will register against the inside of the 3 factory frames keeping them centered and preventing them from shifting. 

IMG_0733


Table [8)Table [3)Table [9)Table [12)Table [13)

Table [11)

The best part of all is the entire table can be knocked down into a stack of wood and re-assembled again using a single tool, a 1/8” square drive screwdriver. This is a huge benefit for getting it up into the loft or in the event it ever needs to be stored away (heaven forbid!) 

Hard to get a good picture of it right now since I'm essentially building a 32 sq/ft frame within 50 sq/ft of shop space.  A few more hours of work and I can disassemble for stain and varnish.

More to come…

Gerry C.

Attachments

Images (9)
  • Table (16)
  • Table (8)
  • Table (3)
  • Table (9)
  • Table (12)
  • Table (13)
  • Table (11)
  • SCAN0087.0 (1)
  • IMG_0733
Last edited by G-Man24

I built a clone based photos I had of an original display, sans the backdrop, about 10 years ago for a local museum display.  Ran a #8 outfitted with a Williams Std gauge motor for 8 hours a day for a week.  I had most of the accessories, but took some liberties on others to fill the spaces.  I set it up for about 3 years every holiday season.  No longer used, if anyone is interested.100_0387

Attachments

Images (1)
  • 100_0387

Got some stain on the finished frame this weekend. After letting it dry for a day I partially disassembled it to carry it up into the loft:

IMG_0774

IMG_E0775

Yes that's water outside the window. Our home is perched right on the edge of the Barnegat Bay and the loft overlooks a cove that runs behind the house. I was going to lay claim to the "model railroad built closest to the water" but there's probably some rich guy out there that has a layout on his yacht. Anyway it makes for a cozy little clubhouse with a nice view. 

Before disassembly I stamped some witness marks into the frame so it always goes back together the same way . My neighbor Roger said it's starting to look like it came from Ikea so I stopped.

IMG_0778

A handful of screws and it was back together... 

IMG_0782

My objective was to make a stand that looks like it belongs with it ..something that would enhance the way it is displayed but not be so fancy and "furniture-like" that it detracted from it or looked fake.  I wrestled for days over which color to use staining small samples of maple but it's very hard to get the full picture off a 4" piece of scrap. I finally decided on a color called "Gunstock" and I'm really happy with the results. I think it plays well against the original dark green on the frame which overhangs it all the way around like a crown. It also looks good against the muted colors found on the board and the old accessories like the tunnel, station,  and bungalows. 

IMG_0787

I was thinking of adding a coat of poly over it but I think I'll leave it as-is. 

Here's one of the mountain backdrops propped up against it for color contrast,  just to get an idea of how it will all tie together...

IMG_E0807

Gerry C.


Attachments

Images (6)
  • IMG_0774
  • IMG_E0775
  • IMG_0778
  • IMG_0782
  • IMG_0787
  • IMG_E0807

It looks very nice- you and your friend did a great job on the construction. I'm an old Manhattan cabinetmaker myself. I am slightly concerned about that 8' span with no center leg, but if it starts to sag, you can always add one. I do have to admit being a little sorry you didn't just clear coat that beautiful maple which would have more closely matched the cream color Lionel used. But your finish looks sharp, I have to say.

I an making a Christmas table layout loosely based on these prewar table layouts which I have always loved.

By the way, where are you on the bay? My grandparents had a house on the Bay in Mantoloking.

Add Reply

Post

OGR Publishing, Inc., 1310 Eastside Centre Ct, Suite 6, Mountain Home, AR 72653
800-980-OGRR (6477)
www.ogaugerr.com

×
×
×
×
Link copied to your clipboard.
×
×