
Okay... I'm still kickin' around this hair brained idea. I've mentioned it here before (PW traditional sized steam and traditional sized diesels in an early 1950s urban setting), but I do have some questions that may help or hurt the idea. Either way will be fine. Here they are:

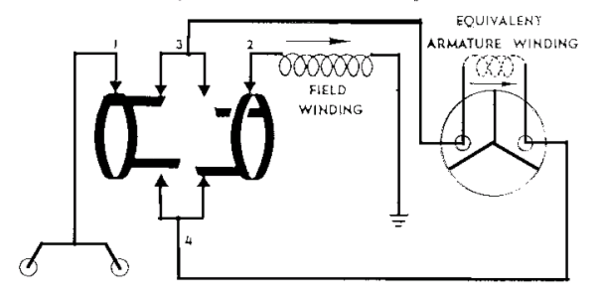
* What type of modern transformer would be good for better control of the PW stuff? (My old ZW came on at something like 6-8 volts, however the increased voltage during whistle/horn use was helpful.)

* I understand there will be limitations concerning the PW mechanisms, but will there be any improvement in the start-speeds and better overall performance using a modern transformer?

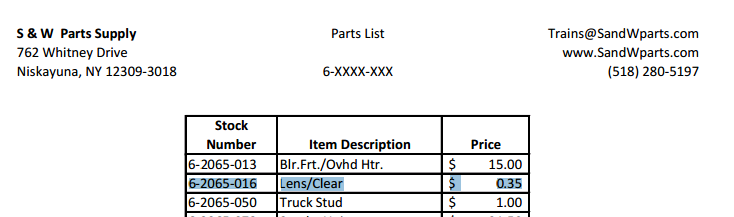
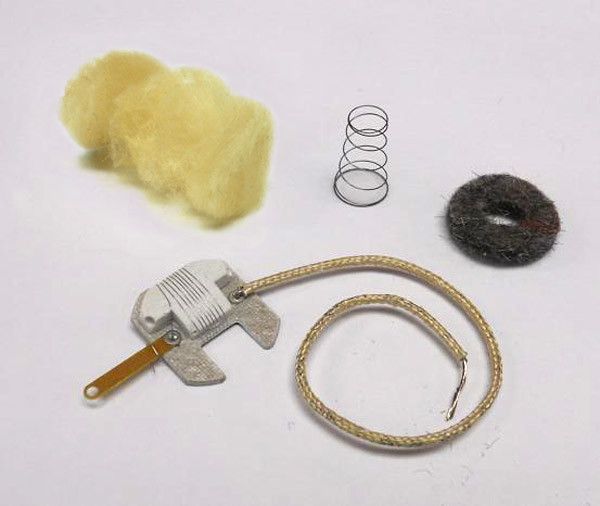
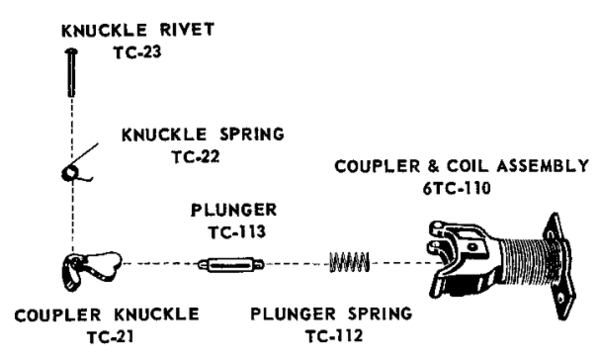
* Are repro parts still readily available for such things as Alco FA decals, windows, horns, etc, or steam engine boiler fronts, class light lenses, etc? Likewise mechanism parts?

The bench work from my previous small layout effort(s) is still in place here in my computer/hobby room. I have the HO equipment and track on hand to start a small urban type early 1960s layout thereon when the mood hits. I also have a dedicated out building that's ready to have a medium sized 1880s Colorado theme layout built in it once the weather is too cold (for me) to ride motorcycles. However, now I'm beginning to have my doubts about the small HO diesel layout in this computer room idea. I'm wondering if I would be better served to go with PW in the room such as I had started decades ago (see picture), but evolved away from it for several reasons. (Which reasons I have defined for myself and may be able to circumvent.)

Any input would be appreciated.

Thanks.

Andre

12thStYd


Attachments

Images (1)
  • 12thStYd
Original Post

Replies sorted oldest to newest

I'm certainly no expert, but FWIW; my MRC O27 is capable of running my (few) PW locos at a much lower starting speed than the PW transformers I have. It (the MRC) actually starts at "0", as opposed to the 5 volts or so my PWs kick in at. I especially notice an improvement with PW American Flyer...

I can only assume that other MRC items for AC would work (at least) as well...

Hope that helps (a little)

Mark in Oregon

I find classic transformers that I have gone through and serviced are just fine for my postwar equipment. I have something like 8 ZWs,1 VW, 4 KWs, 8 V & Z transformers and many smaller ones for use with my empires. I have not seen the need for modern transformers, especially for classic trains using conventional control.

As for parts availability, many parts can be found through traditional parts suppliers. Some that I know of and use (in no order of preference)

Olesns Toy Trains

Smitty's Toy Train Parts

Just Trains

Hennings Trains

Brasseur Electric Trains

Jeff Kane at The Train Tender

Trainz


Last edited by bmoran4

The reason that postwar transformers start at 6 volts is because the e-unit operates at start up. If a loco starts nice and slow from zero volts, as soon as the voltage gets high enough to operate the e-unit, it goes into neutral.  The post war equipment and transformers are designed for the e-unit to operate as soon as the voltage hits the loco and then the loco starts to move. If you want your locos to start nice and slow you have to either turn the postwar e-unit off or change to an electronic e-unit. 

This sketch has come in handy at least once a day since I made it.

If all you want is a 0v or just lower volt "start"  you can have it, and cheaply, but you will loose an equal amount off max voltage at full throttle. Every bump across the windings remains proportional the same.

It does not effect low power tourqe patterns of a motor. That would take skillful rewinding, varying counts by a few wraps here and there & or different wire gauge. There are folks that will perform the service. OR re-gearing, a lost art more or less.

It does not affect your whistle, but could be set up as a second "no boost"(maybe a slight slowdown) light boost (maybe no change) or big boost, etc. for whistle or bell controller for use on railsounds and later as well. Remove a diode or two of a single direction from the circuit and it will become an offset voltage and trigger boards and some mechanical relays as well. One direction of diode(s) removed it is whistle, if the other it is bell.

10amp is for the LW, yours may differ if larger. If the transformer is smaller than 10a max output your fine at 10amp. 3 or 4 of these total should get you close enough to zero to have trouble with a lone low power l.e.d. You're looking at a deck of cards size on 4-6 of them. They WILL get hot if closely rated so maybe cover them, enclose them, heatsink if you want to, etc.

Some creative switch wiring or tapping could possible get some DC power . I haven't looked.

th-15th-14th-48


sketch-1539477491275


Attachments

Images (4)
  • sketch-1539477491275
  • th-15
  • th-14
  • th-48

Thank you all for injecting some sanity into my dream world.

I suspect my biggest concern is that I would grow weary with having had to give up the ability for slow starts and nice steady cruising speeds, which are the elements that "modern" technology brings to the table... but then I lose the neat things about PW that I like. (Smell, sounds, simplicity, etc, etc.)

Sigh.

It's never cut and dried, is it?

Andre

Just saw this thread @laming  I would try a ZW-L (ZW-Legacy) or K-Line "power chief" transformer.  These put out a "chopped" waveform that looks like a shark's fin when viewed on an oscilloscope.  The resulting inductive "kick" will coax a little more out of those old 3-pole motors.  Brighter lights and better smoke too if that matters to you.  The trade-off is more buzzing and more noise.  The K-Line transformers start at less than 4 volts, but pretty much any postwar loco needs at least 5 volts to get moving so not a big deal.

Because the gears are back-drivable, two motors or two locos can actually "help" each other, giving a reasonable number of power pulses per inch.   A dual-motored diesel, or even two single-motored diesels in a consist will give near-scale speeds, at least when pulling a load.  My first MTH can-motored diesel (no speed control) was quickly relegated to the shelf because vintage Postwar power actually gave more realistic performance on our sharp curves.

Last edited by Ted S

For a modern transformer, I like simplicity and the CW-80 works perfectly for me on all of my engines and most of my whistles. However, the problem with many of my PW whistles is that, if I'm diagnosing this correctly, the solenoid's trigger voltage increases as the component ages, and the whistle button can't trigger those whistles. That's where my postwar KW comes out on top, since it has a whistle lever that allows me to control how much power the whistle gets, while also peaking at a higher voltage, and those stubborn whistles that were growly with the cw-80 now sing with the KW. So I find pros and cons to both. CW-80 has the adjustable accessory voltage. KW has better whistle control. Both can provide more than plenty of power to run my PW TRAINS.


If anyone has a better explanation as to why my whistles do what they do please correct me, I'm still learning.

Thank you very much Ted for your input. It is genuinely appreciated.

When tossing this return to 3-rail idea around, my hope was to avail myself of more contemporary control.

Read: Some form of tethered walk around (or better yet, radio), but NOT command control. (I'm fine with utilizing block wiring.)  The reason for wanting walk-around ability would be my desire to be able to walk about the layout as mood/situation inclines. (Such as switching/etc.)

Do you (or anyone) know if I would have options for walk-around conventional control of some type?

Andre

Sure!  MTH Z4000 remote, Lionel Powermaster, or the ZW-L I mentioned previously, controlled remotely with a Cab-2.  In each of these applications you would be varying the track voltage (as opposed to true "command control" which is  constant voltage on the track modulated by a decoder in the loco.)

This will blow your mind, but there's an absolutely bomb-proof, low tech way to control two Postwar locos independently by using different polarity.  It involves the use of diodes and rheostats, or optionally, silicon-controlled rectifiers.  If you can find a rheostat built into some kind of belt pack, that would give you robust walk around simultaneous control of two (but not more than two) postwar locomotives by means of easily reversible modifications.

Hi again Ted!

We're getting into a realm of 3-rail I've never explored before: Contemporary control.  My previous 3-rail exploits were always built around the PW ZW. Looks like the MTH Z4000 Remote might be a good route IF I'm understanding it correctly:

* The MTH Z4000  utilizes a power source, BUT, it doesn't HAVE to have the MZ 4000 transformer as that source, correct?  If that's correct, that would be a very cost effective way to get walk-around capability: Two Z4000 hand sets, and an adequate power source.

As for the Lionel ZW-L:

* Looks like it is a command control platform that CAN operate in the conventional realm. However, am I to assume it would need some form of additional hand held units attached for walk around capability? And boy, they are PROUD of that ZW-L! ($$$!)

Diodes/etc:

I would likely want to stay with good old power blocks (insulated track sections controlled by toggles or rotaries), and conventional walk-arounds. (I have boxes of toggles and rotaries.)

Thanks again. I appreciate you taking your time to help me understand control options.

Andre

   A power master is the older tmcc way to use conventional power with a remote (cab 1) .  The power master varies voltage on the rails. Two trains need blocks; just like pure conventional.  DCS tui and remote can run conventional the same way as a P.Master  (idont know if either does two blocks alone, I'd put my money on dcs having two line capability over a P.Master though.) A TUI can use any transformer (except maybe the MRC or CWs(?)).

Another remote option is MTH #??? ... An infrared control I think uses external power, but not 100% sure... search infrared mth & I bet you'll find out It's lesser known because it is limited on controlling new train features.

The use of rectification as control for two engines on one line means no whistle/bell in the train.  (Whistle shack? Whistle billboard?)

.(way way back , Walthers(or Thomas) used a.c., dc, and half wave together to control various things in O (motors used the a.c., the rest I never looked into. TCA guide/list of MFGs makes a reference to it under Walthers(or Thomas)... I think it's prewar too fyi Before Lionel sued AF over O whistle relays anyhow.)

Another way is to run two throttles and isolated outside rails, one throttle for each rail and isolated drivers on the left or right of each engine. But now you need to find isolated wheels, lol.  Another prewar production method lost to time.

  I never stopped riding till my glasses frosted over at speed

bmoran4 posted:

I find classic transformers that I have gone through and serviced are just fine for my postwar equipment. I have something like 8 ZWs,1 VW, 4 KWs, 8 V & Z transformers and many smaller ones for use with my empires. I have not seen the need for modern transformers, especially for classic trains using conventional control.

As for parts availability, many parts can be found through traditional parts suppliers. Some that I know of and use (in no order of preference)

Olesns Toy Trains

Smitty's Toy Train Parts

Just Trains

Hennings Trains

Brasseur Electric Trains

Jeff Kane at The Train Tender

Trainz


Any list like this should include drtinkertrains.com.  There is almost nothing postwar that he doesn't have and he can fill most  of my prewar requests.  Owner Dave Laughridge knows just about anything their is to know about repaiting Lionel from any time between 1920 and 1969, but be sure you do your best to find part numbers first.  If you have a lot of items you're going to want to repair be sure to geta  copy of Greenber's Repair & Operating Manual for Lionel Trains.  There's nothing parts sellers hate more than an ambiguous description and no part number.

Hi All:

Just an update.

I have decided to return to 3-rail. I think I can do what I want to do with model trains using traditional sized equipment and walk around control.  It's my feeling that by taking this approach, I'm confident it can take me to the DnD* stage of life.

* Drool n' Diapers

After the DnD stage... well, all bets are off. 

I haven't decided whether to continue this thread, or start a new one that can be used as an ongoing blog for my ramblings about my 3-rail future. Lots of decisions await me. Plus, a lot of menial work (like the massive selling off of my HO holdings) lies immediately in front of me before I can start to seriously indulge in 3-rail. I have much to relearn, and learn anew, about traditional sized 3-rail. All in good time, I suppose.

But hey, I'm NOT starting from scratch in my 3-rail adventure. No sirree... I already have a great start on a fantastic traditional collection:

MyCollection


All fer now.

Andre

Attachments

Images (1)
  • MyCollection
Last edited by laming

Hi CBS072!

Thanks for the welcome. I am essentially investing my future with model trains into 3-rail. SO... it better pan out!

Farmington is just a skip hop and a jump from here. Cool.  Sounds like there's a small 3-rail "fraternity" of sorts in NW AR!

What would be a help is if you can advise me about any upcoming train meets in the our region. I would like to start hitting some meets to look for items of interest. I've got a long ways to go in that front. (i.e. Amassing trains to run.)

All fer now!

Andre

Two boxcars is better than no boxcars There's nothing written you can't fill the room with ozone and run command a half hour later. Save your most prized ho, one loop, enough straight for a shelf display; "a big shoebox full" (even I have about that much HO...but its a small shoe box 🤔😕) Just in case you regret; just incase you want to see one... save some, please

Hi Adriatic!

Nothing wrong with command control!

It's just that for 3-rail I'm not wanting to go there at this point. (Like the simplicity/dependability of good old fashion block wiring/etc.) However, I will make sure the bus wires are heavy enough to allow for any future change along that line.

Yes, I fully intend to save my most prized HO. Those would be:

* My small fleet of freelanced Kansas City & Gulf diesels/cars.

kcg136cSm

* My contest winners. (IF I can find the rest of them.)

* My vintage Lindberg Lines collection.

The above HO will be displayed here in my computer/library room once it's all said and done.

Lands I didn't realize what all I had amassed in HO. I'll be selling this stuff forever.

All fer now!

EDIT: Thought I'd pitch in a picture of one of my KC&G diesels!

Andre

Attachments

Images (1)
  • kcg136cSm
Last edited by laming

Another thought Andre (that may sort-of been covered a bit earlier), but Gun Runner John (still a moderator here?) a couple of years ago put together at least one, maybe two articles with pics and great description, of how to convert typical postwar or newer O gauge engines (Lionel, Williams, MTH, etc) to run slower using diodes across the motor leads. Perhaps you can google or get those articles here by fishing...


WELL...

I may not be able to have my cake and eat it, too... but I just might have figured out a way to at least have a piece of that cake. 

Goes like this...

Wife has been talking maybe we ought to put up our tree and decorations next year to help us feel in the mood a bit more.  (Our daughter has long out grown the Christmas tree/present experience and now the grand daughter is entering adulthood... so Christmas ain't what it used to be for us.)

I explained that our Christmas display we used to make with some of my Lionel trains was always a "warm fuzzy" for us... perhaps we need to include that, too?

I think she's in.

SOOO... after the Season's over... and once the summer slump hits for train sales... I might pick me up enough PW stuff to have a Christmas train. Of course, as we ALL know. THAT'S where closets/shelves full of stuff starts. Let's see, I would want a set of 2032's... some freight cars... a good PW Baby Hudson... OOOoo... a Berk!... some lighted Baby Madison's in Pullman green... some...

Merry Christmas!!

Andre

Last edited by laming

Laming a postwar 2046 baby hudson is my favorite of the baby hudson about 1/2 inch to an inch longer than the others 2055/2065/665 etc.

All post and prewar lionel,williams ,marx and some modern mth ran on small 2 loop track layout with 2 pw ZW transformers since 2002 with a dcs setup with remote in conv or command and sometimes without remote just using handles of ZW for the older trains but run fine with remote as well.


laming posted:

SOOO... after the Season's over... and once the summer slump hits for train sales... I might pick me up enough PW stuff to have a Christmas train. Of course, as we ALL know. THAT'S where closets/shelves full of stuff starts. Let's see, I would want a set of 2032's... some freight cars... a good PW Baby Hudson... OOOoo... a Berk!... some lighted Baby Madison's in Pullman green... some...

Merry Christmas!!

Andre

Summer is the best time to find deals on the internet auction sites. May-September is when I've always gotten the best deals. The winter months are the worst time to buy.

Works the opposite way with my other hobby (old Ford Thunderbirds). Now is the best time to buy parts. May-September are the worst times, as everyone is driving and breaking their cars. It's always best to buy hobby stuff off season, especially if you are patient and don't "need" it right now.

Lou1985 posted:

Summer is the best time to find deals on the internet auction sites. May-September is when I've always gotten the best deals. The winter months are the worst time to buy.

Works the opposite way with my other hobby (old Ford Thunderbirds). Now is the best time to buy parts. May-September are the worst times, as everyone is driving and breaking their cars. It's always best to buy hobby stuff off season, especially if you are patient and don't "need" it right now.

Hi Louis!

Well, I certainly don't NEED any PW right now... but I sure do WANT some of it.

I fully intend to wait until after the sellers market is over. I will readily admit, though, that I'm anxious to feel the heft and smell the aroma of PW again... but I'm going to try to not allow myself to be in too much of a hurry.

Having said that: I also confess I'm watching a listing or two on eBay.

Andre

All:

Well, I dood it: I just purchased a package deal and awaiting delivery of a 2055 engine, 2065 engine, and a 2046W-50 whistle tender.

This brings up a question about Postwar Whistle tenders. By virtue of the above purchase, I'm now aware the 2046W-50, but I'm wondering, what other postwar whistling tenders were offered by Lionel?

I can recognize a couple that came with whistles by their shape, but I don't know the numbers/etc. Looks like I'll need to be shopping for a tender for one of the Hudson's I have on the way, and it would be nice to be schooled on PW whistle tenders so I know what to look for for it, as well as whatever's to come. My Greenberg PW book doesn't go into much detail about the whistle tenders, so therein I see the pictures of them with engines, but no notation as to what tender is what.

Any assist t'would be much appreciated!

Andre

Last edited by laming

There are a few web sites ,like this Tandem Associates one that give pretty good information and indexes

Tenders: https://www.tandem-associates....el/lioneltenders.htm

Main Index: https://www.tandem-associates....onel/lionelident.htm

However, I find these as other valuable resources of great PW information:

*Greenberg Guides (not the price guides)

*A membership to the LCCA to get the access to the digital copies of the Lionel Catalogs from the pre, post, and modern years (along with the Postwar Service Documents)

*Olsen's Toy Train Library (Freely Hosts copies of the Lionel Service Documents in hopes you will order parts from them)

@laming posted:

All:

Well, I dood it: I just purchased a package deal and awaiting delivery of a 2055 engine, 2065 engine, and a 2046W-50 whistle tender.

This brings up a question about Postwar Whistle tenders. By virtue of the above purchase, I'm now aware the 2046W-50, but I'm wondering, what other postwar whistling tenders were offered by Lionel?

I can recognize a couple that came with whistles by their shape, but I don't know the numbers/etc. Looks like I'll need to be shopping for a tender for one of the Hudson's I have on the way, and it would be nice to be schooled on PW whistle tenders so I know what to look for for it, as well as whatever's to come. My Greenberg PW book doesn't go into much detail about the whistle tenders, so therein I see the pictures of them with engines, but no notation as to what tender is what.

Any assist t'would be much appreciated!

Andre

This might help if you're looking for the tender that came with your loco. Since you (will) have the 2046W, you could look to pick up a 6026W.

https://www.tandem-associates....trains_2055_loco.htm

https://www.tandem-associates....trains_2065_loco.htm

Note, if a can motor belongs anywhere, it's in a tender.  I've used a few and they are good at it.

Standard whistle relays and board triggers alike got made for can motor powered air whistles. A lighter assembly is nice on stub axles. These use less power and let more of the 5v boost get to the engine for a speed up vs slow down. (Works nicer on heavy pulls at loco or transformer  limits)   Same chime housing; offhand.  Might be good for a bash onto a plain one. Most "T" shells have the ports opened or at least marked.

The early cast ones have beautifu detailing, esp. in the grabs and stantions. Even the slopebacks. Only a good valve train impresses me as much. My fav was actually a cast link & pin tender (# forgotten)


Hi All:

Just yesterday I received my 2055, 2065 and 2046W items from the USPS.

Two questions:

1. The headlight bulb is burned out on the 2065. The bulb that was installed was a "GE 57". Using Google, I learned those are available but I also learned they're 12v bulbs. Seems to me that isn't enough volts in view of the 16+ volts typical transformers can crank out? What bulb is called for and where to find?

2. One of the clear "Class Light" lenses is missing on the 2065. What is the part number for it so I can find it on the parts lists I've downloaded from S&W (forum sponsor)?

Any input would be appreciated. Thanks.

Andre

The 2065 bulb is indeed a #57 bulb available from any auto parts store (see below). They are nominally 12V, but are actually rated for 14V. They can be run at higher voltages that our trains use at a cost of a somewhat shorter life (stock life is about 500 hours rated). You will be just fine replacing with another #57.

As for what you are calling the class light, Lionel refers to it as the running light and is part number 2065-16 which @S AND W lists:

If you are looking to one stop shop, @S AND W also has the #57 lamp you need:

Automotive listings for the #57:

https://shop.advanceautoparts....2-57llbp2/10030922-P

https://www.autozone.com/elect...bulb-57ll/964974_0_0

https://www.napaonline.com/en/p/LMA57


Attachments

Images (2)
  • mceclip0
  • mceclip1

The 12v bulb is a good choice. I would not use anything higher than a 14 v. At 16v your engine will be running 120 mph and derailing at the curves. 

Those engines came with green "marker" (sic) light jewels. I doubt Lionel ever referred to them as class lights. Search the auction sites for them and get many hits. Some may list the correct Lionel part number if you prefer to order from a sponsor.

700E-166

Pete

edit I believe the clear lens referenced above is for the headlight. Lionel used only green and red (switchers) jewels in their post war engines.

Last edited by Norton

Thank you all for your knowledgeable input.

Looks like I will try to source the GE 57 bulb locally, and will start compiling a list of parts over the coming weeks/months for S&W. (I am going to try to support our advertisers as much as practical).  I'm sure S&W would NOT make enough profit on a $1.85 parts sale to make it worth their while. Seems a bundle order would be best, and I don't have a "parts needed" list containing enough parts as yet. For now, the 2065 will be fine missing one lens.

I have had the Greenberg's "Guide To Repairing Lionel Trains" book suggested as a "go to" for parts #'s and specs/etc.  Is that the book I need to in order to have parts diagrams, exploded views, and specs for working on Lionel Postwar so I can be more self-sufficient as the months go by?

Andre

That Greenberg book is the ticket! I believe it is titled "Greenberg's Repair And Operating Manual For Lionel Trains, 1945-1969". There have been a few selling quite inexpensively on the for sale forum here in recent months.

You may also be interested in the companion book "Greenberg's Lionel Postwar Operating Instructions With Layout Plans" which has all of the postwar instruction sheets.

All:

Found 57 series bulbs at Auto Zone. These Sylvania's are rated for 14v. Have an extra on hand now. The headlight on my 2065 is now shining again.

bmoran:

Thanks for concurring on the Greenberg book as well as the clarification. I shall start watching for the one.

Art said:

"I still prefer them for nostalgia reasons! But that's me! :-) "

Oh yeah! AND... it ain't just you!

When it comes to Lionel's air whistle, I think their R&D dept came up with the equivalent of the renown "Siren call". Irresistible, it 'tis.

Andre

@laming posted:

All:

Found 57 series bulbs at Auto Zone. These Sylvania's are rated for 14v. Have an extra on hand now. The headlight on my 2065 is now shining again.

bmoran:

Thanks for concurring on the Greenberg book as well as the clarification. I shall start watching for the one.

Art said:

"I still prefer them for nostalgia reasons! But that's me! :-) "

Oh yeah! AND... it ain't just you!

When it comes to Lionel's air whistle, I think their R&D dept came up with the equivalent of the renown "Siren call". Irresistible, it 'tis.

Andre


I'm trying to sell a few of the Geenburg repair manuals for a repair guy who wants $20 each.  With media mail shipping, that would be $23.33 and I can have it in the mail on Monday.

Got me some bargain AA 2023's. Yes-siree, lil' doozies, they are. They were supposed to "run excellent". Well...

Setting them on the rails and puttin' some joy juice to them results in no joy. Only buzzing, but no movin'. Off to the workbench...

Here's what I've learned so far, as well as what I've tried:

* I can visibly see the E-unit plunger works. It engages the pawl and rotates the drum. (Sometimes the plunger is a bit slow falling back to the bottom.) The headlight works when power is applied.

* All four drum contact fingers are present. I can't feel or see any slop when I lightly press them with a tiny jewelers screwdriver, but that doesn't mean all of them are actually touching the drum contacts.

* Removed the screw holding the motor to the truck and removed the motor. All rotational parts in the truck assembly rotate freely. (Though they will still be cleaned/lubed.) For now, I've set the truck aside.

* Tried running with current clipped to the truck collector and touching the other current lead to the E-unit frame. E-unit cycles, nothing happens at the motor. The motor shaft spins fine when twirled with my fingers.

Question:

If I touch the power leads from the transformer directly to the brush brass, shouldn't the motor spin? In other words, if I touch power where the blue wire and the yellow wire is attached to the brush brass in the photo below, should the motor spin? (It will with a DC motor... but this motor runs on AC.)

2023_Motor

Input appreciated!

Andre

Attachments

Images (1)
  • 2023_Motor
Last edited by laming

@laming, these open frame AC PulMor motors do have what appear to be two leads on the brush plate, but contrary to what one may think, these are not identical to the connectors of a DC motor. In these, the field and armature are in series, and the order of such determines the direction of rotation, and that is what the e-unit switches around with the various drum positions.

This is seen here:

And described in the service documents here:

http://www.olsenstoy.com/searchcd31.htm?itm=615

To bench test the motor sans the e-unit, you will need to jumper a field winding to one of the brushes, supply ground to the frame, and hot to the other brush.

Attachments

Images (1)
  • mceclip0
Last edited by bmoran4
@laming posted:

Got me some bargain AA 2023's. Yes-siree, lil' doozies, they are. They were supposed to "run excellent". Well...

Setting them on the rails and puttin' some joy juice to them results in no joy. Only buzzing, but no movin'. Off to the workbench...

Here's what I've learned so far, as well as what I've tried:

* I can visibly see the E-unit plunger works. It engages the pawl and rotates the drum. (Sometimes the plunger is a bit slow falling back to the bottom.) The headlight works when power is applied.

* All four drum contact fingers are present. I can't feel or see any slop when I lightly press them with a tiny jewelers screwdriver, but that doesn't mean all of them are actually touching the drum contacts.

* Removed the screw holding the motor to the truck and removed the motor. All rotational parts in the truck assembly rotate freely. (Though they will still be cleaned/lubed.) For now, I've set the truck aside.

* Tried running with current clipped to the truck collector and touching the other current lead to the E-unit frame. E-unit cycles, nothing happens at the motor. The motor shaft spins fine when twirled with my fingers.

Question:

If I touch the power leads from the transformer directly to the brush brass, shouldn't the motor spin? In other words, if I touch power where the blue wire and the yellow wire is attached to the brush brass in the photo below, should the motor spin? (It will with a DC motor... but this motor runs on AC.)

2023_Motor

Input appreciated!

Andre

Taking a quick look at your photo, I don't see anything attached to the middle terminal, which is one side of the field.  It takes three test leads to check that motor.

- from transformer to one brush

- from the other brush to the field (middle terminal)

- from the frame of the motor to the other side of the transformer.

Flipping those two brush connections will reverse the motor.


bmoran:

Okay, I don't think I'm understanding you correctly in regards to "field winding". That is not the same as the armature winding, is it?

Here's what I did:

2023_Motor2

Note the red wire (jumper) that grounds to the frame.

And the gator clipped to the other brush for illustrative purposes.

(During testing, I didn't clip it, I just touched it to the brush holder.)

The above resulted in the armature vibrating back/forth. No rotation. I would only touch the lead to the brush momentarily, for I'm sure I'm not connecting it correctly.

I don't think I'm understanding the "field winding", nor am I understanding where to find it so as to jump it to one of the brushes.

I downloaded the first page of the above links and have read it. Reading the info, and looking at the other schematic supplied that's on the first page, I now ask:

Is the "field winding" the coil that sits on the outside of the motor toward the back? i.e. The tab with wire soldered to it indicated by the yellow arrow below:

2023_FieldWinding

I'm certainly learning... but I don't seem to be very good at it just yet!.

Andre

Attachments

Images (2)
  • 2023_Motor2
  • 2023_FieldWinding

mlaughlinnyc:

That helps, too. After supper I will go back out and wire from the yellow arrowed tab, to a brush.

EDIT: Got interrupted and hit the "Post" button too quick. Edit follows...

Also will ground to the side of the motor and touch the hot wire to the open brush.

Thanks.

Andre

P.S. Offer accepted for the Greenberg book. Already paid for it, hope it will be shipped Monday.

Last edited by laming

Yes, the coil sticking out of the back is the field winding.  This is not a permanent magnet motor as you might find on 1950s HO scale trains or even 2-rail O scale from that era.  The field is energized by current flowing through it, in series with the armature.  The motor will run on AC or DC.  Most postwar operators use a Lionel transformer designed for 50-60Hz AC.

For test purposes, you could attach one transformer lead to one brush, and the other transformer lead to one side of the field.  But in order to make it run you also need a third connection between the other brush and other side of the field.  So you will need 3 leads with alligator clips to test it.

To recap, the series circuit goes:  Transformer -> Brush 1 -> through the armature (one winding at a time depending on commutator phase) -> Brush 2 -> Field 1 -> through the field -> Field 2 -> back to transformer.  It doesn't matter which brush or which side of the field is '1' or '2'.

To use the loco for operations,  you'll probably want to add the mysterious "E-unit" into the circuit.  This is a cyclical sequencing switch that changes the polarity of the brushes relative to the field.  This causes the motor to rotate in the opposite direction.  Hope this clears things up, can't wait to see it run!

Last edited by Ted S

Okay, now that I understand the jumper/etc, the motor powers freely either direction. It will even roll up a shop towel onto the pinion, wedging it to a stall. (Don't ask me how I know that.)

In the handling of the motor, tab wires started breaking off, one by one. (Fix one... then another breaks, fix it... then the last one breaks.) Anyway, I stripped and cleaned the wire ends, tinned 'em and re-soldered as needed. Testing indicates all wires made good solder connections.

I reassembled all of it and placed it on the track. Same deal: E-unit plunger works, engages the pawl and rotates the drum... but nothing gets to the motor.

Bypassing the E-unit with all components reassembled resulted in the motor and power truck running just fine, either direction.

SO... the current is not getting through the E-unit. Doesn't matter what drum position, no power ever gets to the motor, either direction.

I think it's time to dig out the multi-meter to see if the current is getting to where it should. Suspect the field coil isn't getting current. If it was one of the other circuits, wouldn't it run in one direction but not the other?

Done for tonight. Getting ready to shut down the layout building and call it good fer now.

Thanks for all the input. Progress was made, and for sure, I've begun the process of learning Lionel wiring circuits. Learned a lot tonight.

Andre

Just read the above and was thinking that a easy check with your meter would be to see if the brushes are getting current. If not, check the short black wire on the E-unit for power where it's soldered to the 4 fingered contact. If there is power there, then somehow the power isn't flowing to the drum, and the cause could be either a dirty drum or contact finger. The solution is to carefully clean the the drum without bending the contact fingers out of their position and see if power is restored. Another possibility is the pin that the drum rotates on has become worn and the drum is moving out of position when the plunger pulls up and rotates the drum, breaking electrical contact. The pivot points on the drum should be fairly tight in the holes punched for them in the e-unit side frames. I've found that any noticeable up or sideways movement means excessive drum pivot wear and drum replacement is needed because those narrow contact fingers are fairly unforgiving and only make good contact with the drum when the drum isn't moving around excessively in the side frames of the E-unit. Usually, the pivot on side of the drum that the black power wire is will be the side that's worn the worst. A lot of heat can be generated there if the commutator is dirty or the motor is pulling more current than normal for whatever reason, and I think all of that heat actually melts the pin some and reduces the pivot's diameter, making it loose in it's mounting hole and moving out of position when the plunger goes up.  I'm making a assumption (yeah, I know how that goes, lol.) that the e-unit coil is functioning the way it's supposed to, which means power is being delivered to the lug where the coil lead and what I call the power lead (short black wire ) is soldered. I've had to change out the E-unit drums on most of my engines that I've acquired over the last 10 yrs because of worn pivot points. That will mean taking the E-unit apart. There's some good videos around on how to do that. Be warned, it's a process that takes patience to get all the pieces lined up to snap the unit back together, but if I can do it with my shaky hands, I'm sure you'll get it done.  Once it's back together and working properly, you shouldn't have to go back into it for another 60 yrs. Good Luck!

P.S. another good indication that E-unit drum is faulty is that it will work some of time. If you have to cycle it ( turning the engine on and off) more than 3 times to get it to move, the drum is worn and needs to replaced and clean the brush holders and commutators as well as checking the soldered joints for good connections. There's no sense in putting a new drum in the E-unit if the cause of the overheating isn't found.

Last edited by Ed Horan

UPDATE...

Well, I didn't do anything... merely touching terminals here n' there with the volt meter probe... but it moved! It then started working intermittently, forward only. After cycling the power many times, it started moving forward/neutral/backward more often... and now it's reversing somewhat reliably.

Before it started running, it showed voltage at the E-unit solder tab where multiple wires are soldered, and it read voltage at the solder tab that sits just to the side of the multiple wire solder tab.

Reckon the drum has rotated enough that the contacts and fingers have cleaned themselves enough to function?

Back out to the hobby hut to see if it still works!

Andre

Last edited by laming

Nice!  Quiet too.  Three-position E-units are just about the most finicky aspect of postwar trains.  Electronic replacements are available, and they are a definite improvement, even if they lack that nostalgic "buzz." 

A trick I learned a long time ago that comes in handy for steam locos whose e-units may be contaminated with smoke residue... If you obtain some plastic-compatible contact cleaner-  what used to be called "color TV tuner cleaner"- you can spray the e-unit contacts with it, and sometimes that will improve operation.  Of course if the nubs are worn or something is bent from an inexpert prior "repair" this won't help.   But the spray is a non-invasive technique that's unlikely to do any harm.  It works for gunked-up motor brush wells too, but it's not a substitute for a careful disassembly and cleaning.

Make sure you get one of the spray cans with the long plastic "straw."  On most steam locos, you can reach the E-unit even without removing the shell.  For safety's sake, spray it outside or in a well-ventilated area away from sparks and flames.  GIVE IT SOME TIME TO EVAPORATE FULLY before applying power.

Glad you got your Alcos running.  Look forward to more updates as your Postwar roster grows!

Last edited by Ted S
@Ted S posted:

A trick I learned a long time ago that comes in handy for steam locos whose e-units may be contaminated with smoke residue... If you obtain some plastic-compatible contact cleaner-  what used to be called "color TV tuner cleaner"- you can spray the e-unit contacts with it, and sometimes that will improve operation. 

CRC 2-26 is what I use and would recommend for cleaning contacts such as those on the e-unit drum/fingers.

Thanks Ted and bmoran for the tips!

CRC 2-26:

Might that be available at a True-Value Hardware?  Or would I need to source it online?

All:

Well, as of a few minutes ago, I've got all the latest arrivals up and running...

FA's:

The powered FA works flawless now, lights work on both powered n' dummy, and also the horn works.

6466W:

You know, the one with a lazy whistle relay. (Mentioned in my "Scent Of Ozone" thread.) I shimmed up the flopper thingie and now the weak solenoid can pull it on up to the contacts. Thar she blows! SO... I'm one whistle tender ahead.

(Gee... reckon that means I ought to find a 736 engine to purchase?? )

Andre

SSSSSSSSMO-kin!

So I have a 2055 and 2065, both with original (I think) smoke units. I have a partial bottle of SP's and I dropped one in each to see how they smoked with genuine SP tablets. So-so. Neither are really big smokers (for PW engines). 

This brings up a couple questions about smoke and these engines:

* Can I use smoke fluid "as is" and not harm the smoke units?

* If okay to do so, then what is your favorite smoke fluid for using in PW steam engines with OEM, or like original, smoke units therein?

EDIT: Forgot to ask... can smoke fluid be had that smells like SP smoke?

Thanks for any input!

Andre

Last edited by laming
@laming posted:

* Can I use smoke fluid "as is" and not harm the smoke units?

 Yes.

@laming posted:

* If okay to do so, then what is your favorite smoke fluid for using in PW steam engines with OEM, or like original, smoke units therein?

 I think MTH fluid, and Crest fluid, smoke best. Any will work, and it depends on the loco smoke unit performance as well.

@laming posted:

EDIT: Forgot to ask... can smoke fluid be had that smells like SP smoke?

 You're in luck...  JT Megasteam makes that fluid... "Smoke Pellet- (magic smell of model trains of the past with the scent of "the good 'ole days)".

@ADCX Rob answered your direct questions, but I would also suggest you look at servicing your smoke units.

Service documents are kindly hosted by Olsen's here: http://www.olsenstoy.com/searchcd31.htm?itm=629

Of special interest is adding the 2026-44 spring to all piston based smoke units. The service documents notes that it decreases noise, but I also find that it helps prevent the piston return so that it is able to travel the entire cylinder boosting smoke disbursement. Additionally, these smoke unit shave been around for a while and may be gummed up with gook. A good cleaning couldn't hurt as well as replacing the batting (referred to as smoke unit lining).

Also, some of the initial smoke unit heating elements had 9 turns of nichrome wire. Lionel revised this to 8 turns. You can either adapt or replace yours.

Some parts suppliers offer "liquid conversion kits" but I avoid those as unlike the original style, they  can burn out easily if not constantly soaked with smoke fluid. The original units can run pellets or liquid as is just fine, or be run empty with no similar concern.

Thanks Rob!

Found a bottle of JT108... bought it.. it should be on its way tomorrow!

bmoran:

Thanks for your helpful info, too. I've downloaded all the pdf's from that page you linked and will file them in my PW "Tech" folder and read them prior to attacking my smoke units tomorrow.

Working on smoke units...

I recall working on PW smoke units way back during my "Hey-Day Years" of 3-railing, but that was some 25 years ago. I will have to re-learn all over again. I do remember unwinding 1 turn of the heater coil, but before I gleefully unwind a turn on these smoke units, I'll double check to make sure there are NINE rounds before unwinding down to EIGHT. I think I recall the top part of the unit is press fit into the bowl, no? (Can't remember how I separated the bowl parts.) What can I use for the little fibrous gasket that fits between the smoke unit and the body? (Clean the existing gasket as best I can and reuse?)

Batting...

I think I recall using some fiberglass insulation for batting. However, I don't have ready access to a small amount of that. What I can access is the "blown in" type batting that's up in our attic. Will that work? Or, do you recommend a supplier that offers superior stuff to either of my materials?

Questions seem to be multiplistic: 2 questions answered results in 4 more questions asked, etc.

All fer now!

Andre

Thanks again, bmoran!

I've already read the tech docs you linked. Some of it jogged some memories, but I still will need some type of batting, for I'm thinking about using part of tomorrow disassembling, cleaning, and checking the windings on the existing smoke units.

However, even if I do the above, I may go ahead and order a couple/three of those rebuild sets from Hennings or, I might even decide to simply hold off working on these engines until the rebuild kits arrive. (No need in going in twice.)

Andre

My Postwar has always been able to have nice smooth starts, both with ZW, RW and LW transformers.  I have thru the years had a few different engines, but mostly 2343 Santa Fe F3's and 2035 PRR K4 style steamers.  Both need power to run their E unit and in the case of the Santa Fe, its dual motors.  A smooth starting 2343 requires a complete and total tear down, clean and relubrication.  This lowers the motors starting Amps and allows them to start more smoothly and in unison. You have to remember that most of the better PW Lionel is pushing 70 to nearly 80 years old, and many have not been properly serviced in many years.   Same for the transformers.  I love my PW stuff and buy nothing but PW or very late Prewar.  The ozone, hot oil and smoke pellet smells are priceless and the reason I run them.  They are also simple, easy to service and repair at home, and parts are available from many sources.  I use The Train Tender or Olsens for the most part.      AD


I don't know if this is ok or not but instead of batting I used shredded up smoke wick in the bottom of the smoke unit. My feeling is if it is ok as smoke wick for liquid smoke why not in the postwar smoke unit. I have heard that some people leave out the batting altogether.

The most important part when fixing a burned out smoke element is the new element. I actually prefer the original Lionel elements as to me they look more robust than most current replacement elements. Finding originals is not always easy and I have purchased used ones in the past.

This is just my 2 cents worth. 

Last edited by N5CJonny

@N5CJonny, the 2026-44 has been discussed above already:

@bmoran4 posted:

Service documents are kindly hosted by Olsen's here: http://www.olsenstoy.com/searchcd31.htm?itm=629

Of special interest is adding the 2026-44 spring to all piston based smoke units. The service documents notes that it decreases noise, but I also find that it helps prevent the piston return so that it is able to travel the entire cylinder boosting smoke disbursement.

As for batting, it comes in the kit, why look for a substitute? Yes, there are those who reinvent the wheel, or scrounge like MacGyver with some success - YMMV.

I wouldn't recommend running with out batting at all. It serves a purpose to wick up the liquid (the smoke pellets melt to a liquid first) and prevent it from leaking out the hole into the piston chamber and making a mess. Be sure when installing the batting that you don't block the pinhole, otherwise, you will experience diminished smoke distribution.

AD:

I too, feel the early 50s products were definitely the cream of the Postwar offerings. I love the look and quality feel of the early 50s Berkshires, for example.

However, having said that, and recognizing that the stamped frame FA's were cheapened, as well as recognizing that the Baldwin Boiler Hudson's don't come up to the standards of say, the early Berkshire's... I also have some appreciation for later models, too. I already have the 2055 and 2065 engines, and intend to "someday" have the 665 and 685 versions, too. Same with the 646, 2046, 2056, Berk-boiler Hudson's. PLUS, I wouldn't mind having select examples of the stamped-frame FA's.

"The ozone, hot oil and smoke pellet smells are priceless and the reason I run them."

Boy, I hear 'ya, AD!  Though I will have to be satisfied with JT Megasteam's 108 "Smoke Pellet" fluid as an ersatz smoke pellet. I have about a 1/3 bottle of orange label SP's... but I'm not in a hurry to stuff 'em down the stack. I kind of like having them around. After I service and clean the smoke units in my two PW steam engines, I will likely only use the smoke fluid therein.

N5CJonny:

I can see value in the spring as an aid to reduce "lag" in the piston falling back down by gravity when at moderate speeds. Sort of like "valve float" in a high-revving push-rod engine. I will probably use the springs when I get the kits.

Don't know about foregoing the batting though. Seems like that helps suspend the fluid closer to the heat source? (Who knows?)

I also think one of the important things is keeping that vent hole cleared so there's no obstruction for the incoming puff of air, as well as helping the piston fall back down by reducing back-pressure suction. (That's probably another area that spring comes in handy, I suppose.)

I think the residue and chalking is a downside to using SP's. Seems they produce a LOT of residue and chalking. My insides of the stacks on the 2055 and 2065 are noticeably whiter after only one pill in each.

BTW: Haven't worked on the smoke units yet today. I've had a couple errands to run and had some work to be done out in the garage on a motorcycle. May just go ahead and order a couple smoker kits from Hennings and wait for them to arrive.

All fer now.

Andre

Just ordered some kits from Hennings.

Along with kind of feeling good to be supporting an OGR sponsor, you end up paying far less than the typical shipping shenanigans that goes on over at The Bay.

As for my pair of engines: I think I'll just wait until the Hennings kits arrive before I tackle the smoke units on 'em.

(OH... and watching a couple more steam engines on The Bay as I type, though I've probably spent enough for a while, for I need to start saving up for a train meet coming up in early Sept!)

EDIT:

bmoran:

Yes, gotta' keep that vent hole at the bottom open. AND, I will be using the batting that will come with the Hennings kits. I like the "one stop shopping" for the kit. Haven't a clue where I would find 1' square piece of fiberglass insulation to use over the coming years!

Andre

Last edited by laming

N5CJonny:

Repro smoke pellets?

LOL! I should'a known!

That's great. I hesitate to use up my little bottle of originals. (It's a "warm fuzzy" thing to see them. Non-PW Lionel types will not understand.)

I would assume, what with the repro-pills being much fresher, they're more apt to perform well. The catalog listing I found for them at the Trainz site didn't indicate a count on how many pills... but still... it's cool to know repro-pills are available.

Not so sure I want the bother of needing to periodically clean chalk residue from inside the smoke unit, though.

Andre

Andre, the Originals do not seem to change much with age, although it is common for many to turn to powder (still usable as powder). The Trainz product like the originals come 50 pills to the bottle. The product looks, acts and smells like original. Price when I bought them a few years back was around $15.00 a bottle of 50 pills.  Because I like the original bottle look, I also have six original Lionel full bottles with different label styles that were available in the 40’s and 50’s. I guess we (most of us) have our spending vices.

I just did this repair (and other work) for @windhund42 on their 2023. If it is just the front coil coupler, you can get a whole coil coupler replacement for $8-10 and use a punch to set it (the specialist dies make it easier and safer, but are quite an investment). @laming, Forum sponsor @Harry Henning of Henning's Trains has what you need: https://hennings-trains.shopli...il-coupler-head.html


Attachments

Images (1)
  • mceclip0
Last edited by bmoran4

Add Reply

Post

OGR Publishing, Inc., 1310 Eastside Centre Ct, Suite 6, Mountain Home, AR 72653
800-980-OGRR (6477)
www.ogaugerr.com

×
×
×
×
Link copied to your clipboard.
×
×