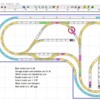
Good Evening, I'm new to O Gauge and hope someone can help. My husband discovered a Fastrack layout he wanted to try (see OGAUGE Track Plans and Layout Design Mar. 3, 2014 posted by ChrisJ and attached below. I would like to surprise him by buying the additional track necessary to complete the layout, (he's been slammed at the hospital due to the virus) but I can't find a legend to decipher the various types of Fastrack I'll need to buy. Is there something out there I can use? Thank you in advance, Lee
Replies sorted oldest to newest
If no one else responds, I’ll enter the design into SCARM tomorrow and get you a Parts List.
Lee,
The print out of this plan actually looks like it shows the Lionel track numbers for most pieces of track. Just check a Lionel Catalog.
However, please note that this plan has two places that track doesn't connect. Without access to the drawing software (apparently RRT), you will not know for sure whether or not this plan can actually work as designed. Why buy track for something that might not work?
Chuck
It is an RRT design, but I checked the original thread and no one posted the file. I saw the disconnects, but believe there’s enough play in FasTrack for it all to connect.
I've done a number of layouts using Fastrack, and I would have to disagree that some of those mismatches will work out without extra pieces. You may be able to put them together, but you'll have out of alignment pieces somewhere.
This one looks really out of whack, I can't imagine Fastrack staying together if you try to muscle that into place!

I'm pretty sure this will be trouble as well.

I think it could be made to fit, but I wouldn't publish a track list based on this version of the design.
Attachments
@PRR1950 posted:Lee,
The print out of this plan actually looks like it shows the Lionel track numbers for most pieces of track. Just check a Lionel Catalog.
Those 4 digit numbers appear to be MTH Realtrax part numbers.
If you do a goggle search. Putting a 40- **** will give you the exact dimension of each piece.
You'll probably have to make some adjustments as some of the MTH track pieces are not offered in fastrack. I.e. o-42 curves.
I'd have to agree with John, at least for a few of them. I saw 4 spots with a gap (red boxes below).
These are just some thoughts, I did not go playing with RRT to figure out if my suggestions will make this close cleanly with absolutely perfect geometry . ![]()

The topmost one I'd guess maybe there could be an improvement with some of the smallest fitter sections used equivalently in the 2 areas where I put the purple stars. No other part of the track would be affected by pushing that a little to the left to help the alignment at the switch. Even if you allow for that spur to move a bit and become non-parallel to the main loop, it's not a lot of pieces to allow for fudging it.... not really much play there (if I counted right only 2 straights (one being shorter than a 10" piece) and the switch in between the 2 opposite sides of the loop).
The furthest left one (purple arrow) might be able to just force it with little issue. Since there are no other switches until all the way around the loop near the bottom right, there is probably enough play there to fake it.
The bottom most disconnect looks like maybe it could be helped with a short fitter piece added in the area near the green arrow. Or at least make it closer so it might be less stress if you do force it.
The one with the orange arrow looks tight, even though it's only a small offset. With only 2 straights and one curve between the 2 switches, it might be rough. I'm not sure where to try to add a fitter to help that without affecting a lot of other alignment. Maybe a small piece in the area near the light blue arrow if it may actually also help with the lower right misalignment (though it looks like moving in that direction could make the disconnect at the switch worse instead of better). Might have to shorten those two spurs near the curve also, even if it does help.
{edit: good catch by RickO on the track type. I don't think that conceptually changes my thoughts above, with the possible exception that I don't know if RealTrax has the same small fitters available that FasTrack does}
-Dave
Attachments
Sorry, I read the original thread where it mentioned RealTrax and should have said I’d convert it to FasTrack. When Chuck commented about the disconnects, I was busy and responded too quickly to his concern.
I think if you want to create a similar plan, you need to actually start with the desired track family and create the plan from scratch.
I thought that was rather obvious 😉, but it’s nice to have an idea of what her husband is looking for as a start. I’m pretty sure I worked on a FasTrack plan just like this a long time ago. Unfortunately, I no longer have it in my files, so I’ll have to start over.
@DoubleDAZ posted:I thought that was rather obvious 😉
Probably, just thought it needed to be said. ![]()
@gunrunnerjohn posted:Probably, just thought it needed to be said.
Better safe than sorry, right? 🤣
Lee, here's what I came up with. The Legend is kind of self-explanatory, but I'll go through it anyway.
-- Blue tracks are O-48.
-- Orange tracks and switches are O-36. I used manual switches, but remote switches can be substituted.
-- White tracks are labeled by size.
-- Purple tracks are 1 3/4" straights.
-- Green tracks are 1 3/8" straights.
-- Black tracks are Bumpers.
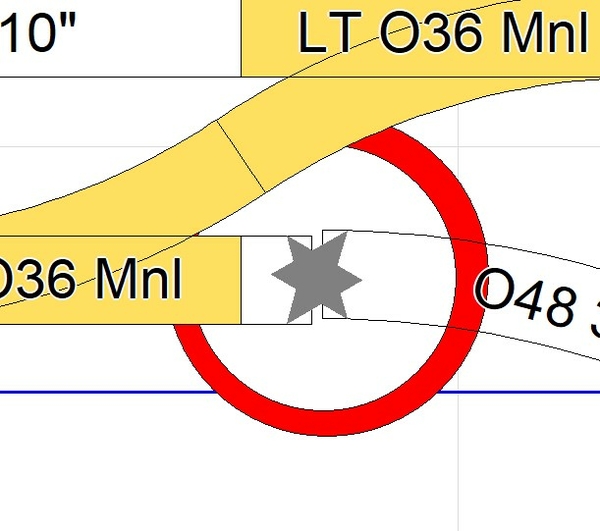
NOTE: There is a .06" gap (see photo) circled in Red that I "think" will connect when assembled. However, I don't use FasTrack, so I could be wrong and will defer to GRJ or anyone else with more experience.
I deviated from the original design in some places. I had to use O-36 curves in the "L" because O-48 curves dropped the lower loop too far and it didn't fit in the space. If the lower leg of the "L" can be increased in size by 6" or so, O-48 curves can be substituted, but there will be another gap (see photo) that may or may not connect when assembled.
I moved both crossovers together.
The design only had 1 reversing loop and that meant that once a train was turned, there was no way to turn it back. So, I added the Wye to solve that problem.
I attached the SCARM file in case someone else has some ideas to make it better. If your husband wants to pursue this and has questions, please don't hesitate to ask.
Lastly, I added a Part List. Again, if you have any questions, just ask.

Attachments
Here's a Fastrack version with minimal fit errors (according to RR-Track). I thought this would be a quick drawing effort but getting the best fit is tedious. Inner track is 31" curves except for 48" reverse curve. Outer curves are 36" except for a couple of 60" curves entering curve on the L.H. side. I found the reversing loop fit better using 36" switches instead of 31" switches. If I was building this, I would get extra 10" straights and cut custom lengths, or have extra 1-3/8" pieces available. I don't know the precision of RR-Track's Fastrack dimensions.
Item list for Fastrack_L.rrt
NUMBER DESCRIPTION PRICE EA
(5) 12042 FasTrack 30 in straight 15.99
(23) 12014 FasTrack 10 in straight 5.49
(11) 37103 FasTrack O31 45° curve 5.49
(2) 16825 FasTrack O36 TMCC switch right 129.99
(3) 81254 FasTrack O31 TMCC LH switch 109.99
(4) 81662X FasTrack 031 fitter curve 0.00
(1) 81253 FasTrack O31 TMCC RH switch 109.99
(10) 12015 FasTrack O36 45° curve 5.49
(2) 12056 FasTrack O60 22.5° curve 7.49
(2) 12022 FasTrack O36 22.5° curve 4.99
(7) 12025 FasTrack 4.5 in straight 4.59
(4) 12026 FasTrack 1.75 in straight 4.59
(2) 12043 FasTrack O48 30° curve 5.99
(1) 16830 FasTrack O48 TMCC LH switch 129.99
(2) 12024 FasTrack 5 in straight 4.59
(7) 12073 FasTrack 1.375in straight 4.59
(3) 12023 FasTrack O36 11.25° curve 4.59
(4) 16824 FasTrack O36 TMCC switch left 129.99
(3) 12059 FasTrack bumper 11.99
Attachments
Thank you all for taking the time to provide guidance and advice. It is very much appreciated. - Lee
I also wanted to add that while I have always enjoyed riding excursion trains and have appreciated my husband's interest in collecting and running post-war Lionel I've become a huge fan of modeling. I attribute this to the this forum. A group of generous and thoughtful enthusiast who inspired me to give it a go! Thank you!
Lee.
In keeping with the original RealTrax layout I've kept the minimum curve at O31. I used SCARM because I don't have the FT library for RRTrack. This layout fits in the same space as the original. The are no open joints per SCARM.
The short track sections have been color-coded. The parts list has been included along with the SCARM file.
- 1 3/8"
- 1 3/4"
- 4 1/2"
- 5"
- 1/3 O31 Curve
All straights are 10"; all switches are O31; all interior curves are O31; and all outside curves are O36.
A free (limited piece count) version of SCARM is available at https://www.scarm.info/index.php
Jan


